React.js: build an isomorphic / universal application from scratch. Part 1: build the stack

My wife's face when she read this article
I decided to write a series of articles that I myself would have been happy to find about six months ago. It will be interesting first of all to those who would like to start developing cool applications on React.js , but do not know how to approach the zoo of various technologies and tools that you need to know for a full-fledged front-end development these days.
I want to implement from scratch, perhaps, the most demanded scenario: we have a server part that provides the REST API . Some of its methods require that the user of the web application be authorized.
Table of contents
1) We assemble the base stack of an isomorphic application
2) We make a simple application with routing and bootstrap
3) We implement interaction with API and authorization
Behind the brackets will be issues such as internationalization, writing tests, deploy and options for working with CSS , since these questions are much more variable and each of them draws on a separate block of articles. Perhaps I will come back to them later if there is a demand.
Note: github has a lot of great boilerplate or already collected stacks that can be used as a foundation for your application, but it seems to me much better to build your own stack yourself, understanding what each packet and every line of your code does. Having learned to do it once, the next time it takes hardly more than 5 minutes to collect the stack.
Note 2: I assume that different readers have different levels of preparation, so I’ll hide the long description of the tools under the article so that the article doesn’t seem infinitely long.
So let's go!
1. We will develop an isomorphic web application.
Isomorphic or universal application means that the JavaScript code of the application can be executed both on the server and on the client. This mechanism is one of the strengths of React and allows the user to access content substantially faster. Below I will use the term "isomorphic", as it is still more common, but it is important to understand that "isomorphic" and "universal" are one and the same.
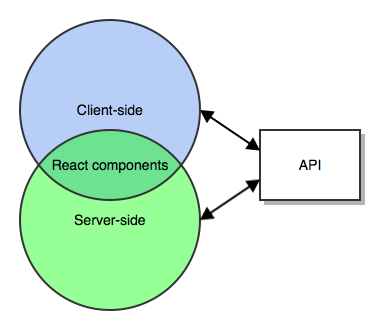
From the user's point of view, interaction with the web application is as follows.
1) The browser makes a request to our web application.
2) The server side of Node.js executes javascript . If necessary, the process also performs requests to the API . The result is a finished HTML page that is sent to the client.
3) The user receives the page content almost instantly. At this time, client-side JavaScript is downloaded and initialized in the background, and the application comes to life. The most important thing is that the user has access to the content almost immediately, and not after two seconds or more, as is the case with traditional client-side JavaScript applications.
4a) If JavaScript did not have time to load or was executed on the client with an error, then when clicking on the link, the usual request to the server will be executed, and we will return to the first step of the process.
4b) If everything is in order, then the link will be intercepted by our application. If necessary, a request to the API will be executed and client-side JavaScript * will generate and render the requested page. This approach reduces traffic and makes the application more productive.
Why is this cool?
1) The user receives the content faster by two seconds or more. This is especially true if you do not have a very good mobile Internet or you are in conditional China. The win is due to the fact that you don’t have to wait for client javascript to download, which is 200kb and more taking into account minification and compression. Also, JavaScript initialization may take some time. If we add the need to make client API requests after initialization and recall that on the mobile Internet one can often encounter very noticeable delays, it becomes obvious that an isomorphic approach makes your application much more pleasant for the user.
2) If your client-side JavaScript application fails due to an error, then your site is likely to become useless to the user. In the isomorphic case, there is a good chance that the user can still do what he wants.
In terms of implementation
We have two entry points: server.js and client.js .
Server.js will be used by the node server. In it, we will launch express or another web server, and in it we will place request processing and other server-specific business logic.
Client.js - entry point for the browser. Here we put the business logic specific to the client.
The React application will be common for both the client and the server. It makes up more than 90-95% of the source code of the entire application - this is the whole essence of the isomorphic / universal approach. In the process of implementation, we will see how this works in practice.
Create a new project
At first glance, the versioning of the node may seem a bit strange. In order not to get confused, it is enough to know that v4.x is the LTS branch, v5.x is experimental, and v6.x is the future LTS starting from October 1, 2016. I recommend installing the latest LTS version, that is, on the day of publication of the article - this is the 4th, since it will save from an unlikely but extremely unpleasant collision with the bugs of the platform itself. For our purposes, there is still little difference between them.
Following the link https://nodejs.org/en/download/ you can download and install node.js and the npm package manager for your platform.
mkdir habr-app && cd habr-app npm init For all npm questions, you can safely press the enter button to select defaults. As a result, the file package.json will appear in the root directory of the project.
2. Development process
JavaScript in recent years has been developing in leaps and bounds, which cannot be said about users. Unfortunately, we cannot support only the latest versions of browsers, since very few customers are willing to sacrifice a significant part of the audience in favor of "cool technical features." Fortunately, tools have been invented that allow the programmer to use the most modern language constructs and write as he likes, and the result will be code that will work correctly even in very ancient browsers.
Babel
Babel is a compiler that translates any JavaScript dialect, including CoffeeScript , TypeScript, and other add-ons over the language into ES5 JavaScript , which is supported by almost all browsers, including IE8 , if you add babel-polyfill . The power of Babel is in its modularity and extensibility through plugins For example, you can now use the latest JavaScript features, without worrying that they will not work in older browsers.
For the translation of the components of the reactor, we will use the preset babel-preset-react . I really like JavaScript decorators, so we also need the babel-plugin-transform-decorators-legacy package. In order for our code to work correctly in older browsers, we install the babel-polyfill package , and we need babel-preset-es2015 and babel-preset-stage-0 to write in ES6 / ES7 dialects, respectively.
npm i --save babel-core babel-plugin-transform-decorators-legacy babel-polyfill babel-preset-es2015 babel-preset-react babel-preset-stage-0 These dependencies should be installed as project dependencies, since the server part of the application also needs a babel .
Now install the packages that are needed to build client-side JavaScript. We will set them as development dependencies, since they are not needed in production.
.babelrc
When launched, babel will access the .babelrc file in the project root, which stores the configuration and the list of presets and plugins used.
Create this file
{ "presets": [ "es2015", "react", "stage-0" ], "plugins": [ "transform-decorators-legacy" ] } 3. Build
We installed Babel with the plugins we need, but who should launch it and when? It is time to move on to this issue.
Note: projects of web applications these days seem to differ little from projects of desktop or mobile applications: they will contain external libraries, files that most likely correspond to the MVC paradigm, resources, style files and much more. Such a presentation will be very convenient for the programmer, but not for the user. If you take all the source code of the JavaScript project, as well as the used libraries, throw out all unnecessary, merge into one large file and apply minification, then one output file may take 10 or more times less than the original set. You also need only one, not hundreds, browser request to download all the logic of our application. Both are very important for performance. By the way, the same logic applies to CSS resources, including different dialects ( LESS , SASS , etc.).
This useful work will be done by the webpack .
Note: for the same purpose, collectors can be used: grunt, gulp, bower, browserify, and others, but historically, webpack is most often used for React.
webpack
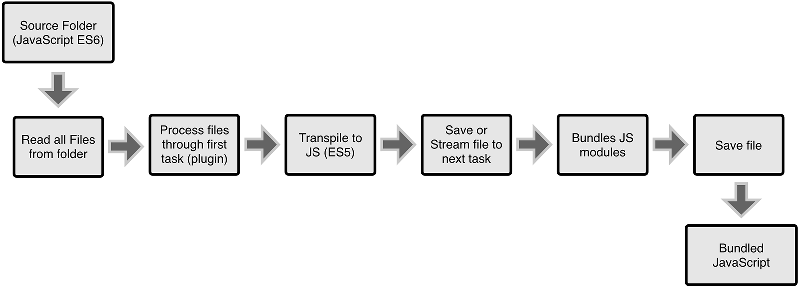
Webpack work algorithm
The easiest way to imagine webpack work as a pipeline. Webpack will take the provided entry points and consistently bypass all dependencies that it encounters on its way. All code written in JavaScript or its dialects will be passed through the babel and blinded into one large JavaScript ES5 file. Here it is worthwhile to elaborate on how it works. Each require or import in your code and the code used by node_modules will be allocated by the webpack into its own separate small module in the final assembly. If your code or the code of libraries that you use depends on the same function, then it will get into the final assembly only once as a Webpack module, and all pieces of code that depend on it will refer to the same module in the final assembly. Another cool feature of the webpack build process is that if you use a huge library, for example lodash , but clearly indicate that you only need a specific function, for example
import assign from 'lodash/assign'; then only the used part of the library will be included in the final assembly, and not all of it, which can significantly reduce the size of the assembled file.
Note: this will work only if the library used supports modularity. For this reason, the author refused to use Moment.js, XRegExp and several others in their projects.
For different types of files of our project in the webpack configuration , we will define our own loader or chain of loaders that will process it.
webpack-dev-server
Rebuilding the entire project each time can be very costly: for a medium-sized project, the assembly can easily reach 30 seconds or more. To solve this problem, during development it is very convenient to use webpack-dev-server . This is a third-party server application that, when launched, will produce a complete assembly of resources and, when accessing them, will deliver the latest version of them from RAM. During development, if individual webpack-dev-server files are modified, it will recompile only the file that has changed on the fly and replace the old module with a new one in the final assembly. Since rebuilding does not require the entire project, but only one file, it rarely takes more than a second.
We will install Webpack and webpack-dev-server as development dependencies, since we, of course, will not be engaged in assembly on production.
npm i --save-dev webpack@1.13.2 webpack-dev-server Note : at the time of writing and publishing the article, the version of webpack 1 was relevant. Since September 22, 2016, the default webpack 2 beta is set.
Well, now we need to write a configuration file for the assembly. Create a file in the project root
webpack.config.js
global.Promise = require('bluebird'); var webpack = require('webpack'); var path = require('path'); var ExtractTextPlugin = require('extract-text-webpack-plugin'); var CleanWebpackPlugin = require('clean-webpack-plugin'); var publicPath = 'http://localhost:8050/public/assets'; var cssName = process.env.NODE_ENV === 'production' ? 'styles-[hash].css' : 'styles.css'; var jsName = process.env.NODE_ENV === 'production' ? 'bundle-[hash].js' : 'bundle.js'; var plugins = [ new webpack.DefinePlugin({ 'process.env': { BROWSER: JSON.stringify(true), NODE_ENV: JSON.stringify(process.env.NODE_ENV || 'development') } }), new ExtractTextPlugin(cssName) ]; if (process.env.NODE_ENV === 'production') { plugins.push( new CleanWebpackPlugin([ 'public/assets/' ], { root: __dirname, verbose: true, dry: false }) ); plugins.push(new webpack.optimize.DedupePlugin()); plugins.push(new webpack.optimize.OccurenceOrderPlugin()); } module.exports = { entry: ['babel-polyfill', './src/client.js'], debug: process.env.NODE_ENV !== 'production', resolve: { root: path.join(__dirname, 'src'), modulesDirectories: ['node_modules'], extensions: ['', '.js', '.jsx'] }, plugins, output: { path: `${__dirname}/public/assets/`, filename: jsName, publicPath }, module: { loaders: [ { test: /\.css$/, loader: ExtractTextPlugin.extract('style-loader', 'css-loader!postcss-loader') }, { test: /\.less$/, loader: ExtractTextPlugin.extract('style-loader', 'css-loader!postcss-loader!less-loader') }, { test: /\.gif$/, loader: 'url-loader?limit=10000&mimetype=image/gif' }, { test: /\.jpg$/, loader: 'url-loader?limit=10000&mimetype=image/jpg' }, { test: /\.png$/, loader: 'url-loader?limit=10000&mimetype=image/png' }, { test: /\.svg/, loader: 'url-loader?limit=26000&mimetype=image/svg+xml' }, { test: /\.(woff|woff2|ttf|eot)/, loader: 'url-loader?limit=1' }, { test: /\.jsx?$/, loader: 'babel', exclude: [/node_modules/, /public/] }, { test: /\.json$/, loader: 'json-loader' }, ] }, devtool: process.env.NODE_ENV !== 'production' ? 'source-map' : null, devServer: { headers: { 'Access-Control-Allow-Origin': '*' } } }; Note: this is an example of a config for a productive project, so it looks a bit more complicated than it could.
So,
1) We announce that we will use the implementation of promises from the bluebird project. De facto standard.
2) For production, we want each file to have an assembly hash in order to effectively manage the caching of resources. So that the old versions of the collected resources do not interfere with us, we will use the clean-webpack-plugin , which will clear the corresponding directories before the next build.
3) during the build process, the extract-text-webpack-plugin will search for all css / less / sass / whatever dependencies and at the end will issue them as one CSS file.
4) We use DefinePlugin to set global assembly variables, DedupePlugin and OccurenceOrderPlugin - optimization plugins. More details on these plugins can be found in the documentation.
5) As an entry point, we specify babel-polyfill and client.js . The first will allow our JavaScript code to run in older browsers, the second is our entry point for the client web application, we will write it later.
6) resolve means that when we write in the code of our application
import SomeClass from './SomeClass'; The webpack will look for SomeClass in SomeClass.js or SomeClass.jsx files before reporting that it cannot find the specified file.
7) Next, we transfer the list of plugins and specify the output directory where the webpack will put the files after the build.
8) The most interesting is the list of loaders . Here we define the pipelines mentioned above. They will be applied to files with the appropriate extensions. For more information on the loader definition format and their parameters, it is better to familiarize yourself with the documentation, since this issue draws on a separate article. In order not to be completely unfounded, I’ll focus on the loader design.
test: /\.less$/, loader: ExtractTextPlugin.extract('style-loader', 'css-loader!postcss-loader!less-loader') Here we say that if a file with the less extension is encountered, it needs to be transferred to ExtractTextPlugin , which will use the css-loader chain ! Postcss-loader! Less-loader . It is necessary to read from right to left, that is, first the less-loader will process the .less file, the result will pass to the postcss-loader , which in turn will transfer the processed contents of the css-loader .
9) I also recommend reading devtool in the webpack documentation.
10) At the end, we will additionally specify the webpack-dev-server parameters. In this case, it is important for us to specify Access-Control-Allow-Origin, since the webpack-dev-server and our application will work on different ports, which means that we need to solve the CORS problem.
Libraries to which we refer in the configuration will not install themselves. Depending on the project, we will only have bluebird , everything else is needed exclusively for assembly.
npm i --save bluebird npm i --save-dev babel-loader clean-webpack-plugin css-loader extract-text-webpack-plugin file-loader html-loader json-loader less less-loader postcss-loader style-loader url-loader It is also time to add a few new package.json scripts: to launch the build and the webpack-dev-server.
"scripts": { "build": "NODE_ENV='production' webpack -p", "webpack-devserver": "webpack-dev-server --debug --hot --devtool eval-source-map --output-pathinfo --watch --colors --inline --content-base public --port 8050 --host 0.0.0.0" } Update: users of wrewolf and Nerop in a personal and comments respectively reported that in Windows scripts should look different.
"scripts": { "build": "set NODE_ENV='production' && webpack -p", "webpack-devserver": "webpack-dev-server --debug --hot --devtool eval-source-map --output-pathinfo --watch --colors --inline --content-base public --port 8050 --host 0.0.0.0" } Create a src folder in the project root and an empty client.js file in it.
Let's test our scripts: enter npm run build in the console, and npm run webpack-devserver in another console window. If there are no errors - move on.
4. ESLint
This is an optional item, but I find it very useful. ESLint is a set of rules that apply to the source code. If one or more of these rules are violated by the programmer in the process of writing code, we will see errors during the webpack build. Thus, the entire code of the web application will be written in a single style, including naming variables, indents, prohibiting the use of certain constructs, and so on.
I will put the list of rules in the .eslintrc file in the project root. More details about ESLint and the rules can be found on the project website.
{ "parser": "babel-eslint", "plugins": [ "react" ], "env": { "browser": true, "node": true, "mocha": true, "es6": true }, "ecmaFeatures": { "arrowFunctions": true, "blockBindings": true, "classes": true, "defaultParams": true, "destructuring": true, "forOf": true, "generators": false, "modules": true, "objectLiteralComputedProperties": true, "objectLiteralDuplicateProperties": false, "objectLiteralShorthandMethods": true, "objectLiteralShorthandProperties": true, "restParams": true, "spread": true, "superInFunctions": true, "templateStrings": true, "jsx": true }, "rules":{ // Possible errors "comma-dangle": [2, "never"], "no-cond-assign": [2, "always"], "no-constant-condition": 2, "no-control-regex": 2, "no-dupe-args": 2, "no-dupe-keys": 2, "no-duplicate-case": 2, "no-empty-character-class": 2, "no-empty": 2, "no-extra-boolean-cast": 0, "no-extra-parens": [2, "functions"], "no-extra-semi": 2, "no-func-assign": 2, "no-inner-declarations": 2, "no-invalid-regexp": 2, "no-irregular-whitespace": 2, "no-negated-in-lhs": 2, "no-obj-calls": 2, "no-regex-spaces": 2, "no-sparse-arrays": 2, "no-unreachable": 2, "use-isnan": 2, "valid-typeof": 2, "no-unexpected-multiline": 0, // Best Practices "block-scoped-var": 2, "complexity": [2, 40], "curly": [2, "multi-line"], "default-case": 2, "dot-notation": [2, { "allowKeywords": true }], "eqeqeq": 2, "guard-for-in": 2, "no-alert": 1, "no-caller": 2, "no-case-declarations": 2, "no-div-regex": 0, "no-else-return": 2, "no-eq-null": 2, "no-eval": 2, "no-extend-native": 2, "no-extra-bind": 2, "no-fallthrough": 2, "no-floating-decimal": 2, "no-implied-eval": 2, "no-iterator": 2, "no-labels": 2, "no-lone-blocks": 2, "no-loop-func": 2, "no-multi-str": 2, "no-native-reassign": 2, "no-new": 2, "no-new-func": 2, "no-new-wrappers": 2, "no-octal": 2, "no-octal-escape": 2, "no-param-reassign": [2, { "props": true }], "no-proto": 2, "no-redeclare": 2, "no-script-url": 2, "no-self-compare": 2, "no-sequences": 2, "no-unused-expressions": 2, "no-useless-call": 2, "no-with": 2, "radix": 2, "wrap-iife": [2, "outside"], "yoda": 2, // ES2015 "arrow-parens": 0, "arrow-spacing": [2, { "before": true, "after": true }], "constructor-super": 2, "no-class-assign": 2, "no-const-assign": 2, "no-this-before-super": 0, "no-var": 2, "object-shorthand": [2, "always"], "prefer-arrow-callback": 2, "prefer-const": 2, "prefer-spread": 2, "prefer-template": 2, // Strict Mode "strict": [2, "never"], // Variables "no-catch-shadow": 2, "no-delete-var": 2, "no-label-var": 2, "no-shadow-restricted-names": 2, "no-shadow": 2, "no-undef-init": 2, "no-undef": 2, "no-unused-vars": 2, // Node.js "callback-return": 2, "no-mixed-requires": 2, "no-path-concat": 2, "no-sync": 2, "handle-callback-err": 1, "no-new-require": 2, // Stylistic "array-bracket-spacing": [2, "never", { "singleValue": true, "objectsInArrays": true, "arraysInArrays": true }], "newline-after-var": [1, "always"], "brace-style": [2, "1tbs"], "camelcase": [2, { "properties": "always" }], "comma-spacing": [2, { "before": false, "after": true }], "comma-style": [2, "last"], "computed-property-spacing": [2, "never"], "eol-last": 2, "func-names": 1, "func-style": [2, "declaration"], "indent": [2, 2, { "SwitchCase": 1 }], "jsx-quotes": [2, "prefer-single"], "linebreak-style": [2, "unix"], "max-len": [2, 128, 4, { "ignoreUrls": true, "ignoreComments": false, "ignorePattern": "^\\s*(const|let|var)\\s+\\w+\\s+\\=\\s+\\/.*\\/(|i|g|m|ig|im|gm|igm);?$" }], "max-nested-callbacks": [2, 4], "new-parens": 2, "no-array-constructor": 2, "no-lonely-if": 2, "no-mixed-spaces-and-tabs": 2, "no-multiple-empty-lines": [2, { "max": 2, "maxEOF": 1 }], "no-nested-ternary": 2, "no-new-object": 2, "no-spaced-func": 2, "no-trailing-spaces": 2, "no-unneeded-ternary": 2, "object-curly-spacing": [2, "always"], "one-var": [2, "never"], "padded-blocks": [2, "never"], "quotes": [1, "single", "avoid-escape"], "semi-spacing": [2, { "before": false, "after": true }], "semi": [2, "always"], "keyword-spacing": 2, "space-before-blocks": 2, "space-before-function-paren": [2, { "anonymous": "always", "named": "never" }], "space-in-parens": [2, "never"], "space-infix-ops": 2, "space-unary-ops": [2, { "words": true, "nonwords": false }], "spaced-comment": [2, "always", { "exceptions": ["-", "+"], "markers": ["=", "!"] }], // React "react/jsx-boolean-value": 2, "react/jsx-closing-bracket-location": 2, "react/jsx-curly-spacing": [2, "never"], "react/jsx-handler-names": 2, "react/jsx-indent-props": [2, 2], "react/jsx-indent": [2, 2], "react/jsx-key": 2, "react/jsx-max-props-per-line": [2, {maximum: 3}], "react/jsx-no-bind": [2, { "ignoreRefs": true, "allowBind": true, "allowArrowFunctions": true }], "react/jsx-no-duplicate-props": 2, "react/jsx-no-undef": 2, "react/jsx-pascal-case": 2, "react/jsx-uses-react": 2, "react/jsx-uses-vars": 2, "react/no-danger": 2, "react/no-deprecated": 2, "react/no-did-mount-set-state": 0, "react/no-did-update-set-state": 0, "react/no-direct-mutation-state": 2, "react/no-is-mounted": 2, "react/no-multi-comp": 2, "react/no-string-refs": 2, "react/no-unknown-property": 2, "react/prefer-es6-class": 2, "react/prop-types": 2, "react/react-in-jsx-scope": 2, "react/self-closing-comp": 2, "react/sort-comp": [2, { "order": [ "lifecycle", "/^handle.+$/", "/^(get|set)(?!(InitialState$|DefaultProps$|ChildContext$)).+$/", "everything-else", "/^render.+$/", "render" ] }], "react/jsx-wrap-multilines": 2, // Legacy "max-depth": [0, 4], "max-params": [2, 4], "no-bitwise": 2 }, "globals":{ "$": true, "ga": true } } Note: Windows rule
"linebreak-style": [2, "unix"], need to be replaced by
"linebreak-style": [2, "windows"], npm i --save-dev babel-eslint eslint eslint-loader eslint-plugin-react We will add an eslint-loader to the webpack configuration, so before babel translates our code to ES5 , all our code will be checked for compliance with the specified rules.
webpack.config.js
In module.exports.module.loaders:
--- { test: /\.jsx?$/, loader: 'babel', exclude: [/node_modules/, /public/] }, +++ { test: /\.jsx?$/, loader: 'babel!eslint-loader', exclude: [/node_modules/, /public/] }, In module.exports:
+++ eslint: { configFile: '.eslintrc' }, 5. Express and Server.js
By now, we have set up the project build, code translation in JS ES5 , described and implemented the check for lice source code. It's time to start writing the application itself, or rather, its server part.
Note: I use Express, and it completely suits me, but, of course, there are many other similar packages (the same Node.js).
Install express
npm i --save express Create a root server.js file with the following contents
server.js
require('babel-core/register'); ['.css', '.less', '.sass', '.ttf', '.woff', '.woff2'].forEach((ext) => require.extensions[ext] = () => {}); require('babel-polyfill'); require('server.js'); Here we indicate that we need babel to support ES6 / ES7 , and also that if the node meets constructions like
import 'awesome.css'; then you just need to ignore this line, since it is not JavaScript or one of its dialects.
The server-side code itself will be in the src / server.js file , in which we can now freely use the ES6 / ES7 syntax.
src / server.js
import express from 'express'; const app = express(); app.use((req, res) => { res.end('<p>Hello World!</p>'); }); const PORT = process.env.PORT || 3001; app.listen(PORT, () => { console.log(`Server listening on: ${PORT}`); }); Everything is quite simple here: we import the express web server, run it on the port that was passed in the PORT or 3001 environment variable. The server itself will respond to any request: "Hello World"
We will install the nodemon package according to the development to run the server-side JavaScript code. It is convenient in that it outputs any errors with detailed Stack Traces immediately to the console as they occur.
npm i --save-dev nodemon Add another script to package.json
+++ "nodemon": "NODE_PATH=./src nodemon server.js", For Windows:
+++ "nodemon": "set NODE_PATH=./src; && nodemon server.js", And run in the console
npm run nodemon Open the browser and try to open the http: // localhost: 3001 page. If all is well, then we will see Hello World .
6. React and ReactDOM
Congratulations! Almost all preparations have been completed, and we can finally move on to the reactor.
Install the appropriate libraries:
npm i --save react react-dom Also install the react-hot-loader : when changing the source code of components during the development process, the browser will reload the page automatically. This is a very convenient feature, especially if you have several monitors.
npm i --save-dev react-hot-loader@1.3.0 Note: during the stay of the article in the sandbox in npm , the version of the react-hot-loader package changed from 1.3.x to 3.xx-beta. At the moment, the third version is poorly documented, so we will use the first one hereinafter.
webpack.config.js
--- { test: /\.jsx?$/, loader: 'babel!eslint-loader', exclude: [/node_modules/, /public/] }, +++ { test: /\.jsx?$/, loader: process.env.NODE_ENV !== 'production' ? 'react-hot!babel!eslint-loader' : 'babel', exclude: [/node_modules/, /public/] }, We now turn to writing the code of our first component App.jsx , the entry point to the isomorphic part of our web application.
src / components / App.jsx
import React, { PropTypes, Component } from 'react'; import './App.css'; const propTypes = { initialName: PropTypes.string }; const defaultProps = { initialName: '' }; class App extends Component { constructor(props) { super(props); this.handleNameChange = this.handleNameChange.bind(this); this.renderGreetingWidget = this.renderGreetingWidget.bind(this); this.state = { name: this.props.initialName, touched: false, greetingWidget: () => null }; } handleNameChange(val) { const name = val.target.value; this.setState({ touched: true }); if (name.length === 0) { this.setState({ name: this.props.initialName }); } else { this.setState({ name }); } } renderGreetingWidget() { if (!this.state.touched) { return null; } return ( <div> <hr /> <p>, {this.state.name}!</p> </div> ); } render() { return ( <div className='App'> <h1>Hello World!</h1> <div> <p> :</p> <div><input onChange={this.handleNameChange} /></div> {this.renderGreetingWidget()} </div> </div> ); } } App.propTypes = propTypes; App.defaultProps = defaultProps; export default App; src / components / App.css
.App { padding: 20px; } .App h1 { font-size: 26px; } .App input { padding: 10px; } .App hr { margin-top: 20px; } Everything is quite simple here: ask the user to enter his name and greet him.
In order for our application to display this component, we will make the following changes to the server and client code.
src / client.js
import React from 'react'; import ReactDOM from 'react-dom'; import App from 'components/App'; ReactDOM.render(<App />, document.getElementById('react-view')); After initialization of JavaScript, the reactor will find the main container of the react-view application and “animate” it.
src / server.js
import express from 'express'; import React from 'react'; import ReactDom from 'react-dom/server'; import App from 'components/App'; const app = express(); app.use((req, res) => { const componentHTML = ReactDom.renderToString(<App />); return res.end(renderHTML(componentHTML)); }); const assetUrl = process.env.NODE_ENV !== 'production' ? 'http://localhost:8050' : '/'; function renderHTML(componentHTML) { return ` <!DOCTYPE html> <html> <head> <meta charset="utf-8"> <meta name="viewport" content="width=device-width, initial-scale=1.0"> <title>Hello React</title> <link rel="stylesheet" href="${assetUrl}/public/assets/styles.css"> </head> <body> <div id="react-view">${componentHTML}</div> <script type="application/javascript" src="${assetUrl}/public/assets/bundle.js"></script> </body> </html> `; } const PORT = process.env.PORT || 3001; app.listen(PORT, () => { console.log(`Server listening on: ${PORT}`); }); : JavaScript RenderDom.renderToString(<App />) HTML-, , renderHTML . assetUrl : , webpack-dev-server .
, :
npm run nodemon npm run webpack-devserver : http://localhost:3001 … - !
, .
1) server-side rendering . webpack-dev-server . , , .
2) client-side rendering . src/server.js , , .
--- <div id="react-view">${componentHTML}</div> +++ <div id="react-view"></div> . , . !
: , , npm run webpack-devserver, .
Github
: https://github.com/yury-dymov/habr-app
https://github.com/yury-dymov/habr-app/tree/v1 — v1
https://github.com/yury-dymov/habr-app/tree/v2 — v2
v3 [To be done]
What's next?
Hello World ? , , !
react-bootstrap , , , , flux redux .
7.
- JavaScript ES2015 — https://learn.javascript.ru/es-modern
- webpack — http://webpack.imtqy.com/docs/
- webpack — https://learn.javascript.ru/screencast/webpack
- Babel — https://babeljs.io/
- ESLint — http://eslint.org/
- Express — https://expressjs.com/
- Express — http://jsman.ru/express/
- React — https://facebook.imtqy.com/react/
Ps , , . Thank you in advance!
')
Source: https://habr.com/ru/post/309958/
All Articles