Google Tango: control the robot in augmented reality mode
Thanks to Habrahabr and Google, the dev-kit tablet of the Google Tango project came to the robot laboratory of Skoltech for a week. We not only tested this device, but also wrote a small demo on managing a mobile robot in augmented reality mode. But more about that later, first a little about the device and our impressions of it.
I think many of you have already heard about this project and have a good idea of what it represents. In short, this is a computer vision and localization platform aimed at application in mobile devices. Using data from two cameras (wide-angle and conventional), a depth sensor (essentially Kinect in miniature), accelerometers, gyroscopes, and a barometer, the Google Tango project device is able to perceive the surrounding three-dimensional space and track its position in it. The great merit of the ATAP (Advanced Technology and Projects) engineers group lies not only in the fact that they could fit all this equipment in a mobile device, but also in the fact that they went out to develop a developer-friendly high-level SDK that does the main hard work. processing data from sensors and carrying out the necessary transformations, allowing the developer to work with convenient abstractions. Also, in the best traditions of Google, we have access to high-quality documentation , which allows us to quickly become familiar with the device even to developers with no experience in developing Android applications.
Principle of operation

')
The device essentially has two main localization modes: with and without Area Learning. In the first mode, we pre-scan the room and build its map (unfortunately this is done offline, that is, first processing the accumulated data, then using the result as an ADF file - Area Description File), after which we can quite accurately localize in the studied room , to compensate for the drift and cope with the problem of temporary loss of tracking. (for example, when closing the sensors with a hand or another object too close by)
The second mode allows us to localize in space and track the movement of the device without any preliminary preparation. It works on the basis of combining data from all sensors: the IMU (Inertial Measurment Unit), visual odometry at specific points of the image of a wide-angle camera, depth sensor, etc. But since we do not know the points for which we could catch on, in this mode, the coordinates of the device will be subject to drift due to constantly accumulating errors. (see illustration) In addition, there is a risk of loss of tracking, the correct recovery from which in this mode is generally impossible.
Using localization data (that is, in fact, knowing with some accuracy the coordinates and orientation of the device relative to the room) and having a three-dimensional cloud of points from the depth sensor, we have the ability to create applications of augmented reality previously impossible in principle on mobile devices. A logical continuation would be the installation of Tango on augmented reality glasses (the next iteration of Google Glass like Hololens?), But for now we can use a substitute in the form of Google Cardboard .
Of course, one of the first questions to the device is its accuracy. The documentation, of course, deals with this issue, but we could not deny ourselves the desire to check the statements for accuracy of a few centimeters in optimal conditions.
Since we were very limited in time, we decided to just make a handicraft estimate from above using as a tool a table with known dimensions. (two by three meters) By moving the device from one corner of the table to another along a curved trajectory with a deviation from the table up to two meters, we recorded global coordinates (with and without Area Learning) at each of the points, after which we calculated the distance between these points and compared with what should have happened. The results are as follows:
For obvious reasons, accuracy is highly dependent on the room in which measurements are taken. In a room with good lighting (the device is poorly related to direct sunlight) and a large number of special points it is quite possible to achieve an accuracy of a couple of centimeters. But in poor conditions, the device quickly loses tracking, IMU of course helps out for the time being, but its capabilities are very limited. Therefore, we abandoned the idea of putting tango on an industrial robo-arm and measuring accuracy in this way, because a room with a robot is a bad example of a “normal” room.
Now about the accuracy of the depth sensor. We decided to check its accuracy by removing the clouds of points for flat objects (floors, walls, tables) and analyzing how well the points fall on the plane. At the optimal distance of 0.5–4 m, the accuracy was usually about 0.5 cm, but on some surfaces the accuracy dropped by a factor of 2–3, for example, in the field of our laboratory, covered with a black-and-white carpet and speckled. It looks like the texture played a cruel joke with depth determination algorithms based on structured IR radiation.
In short, Google is on top. I think as soon as the Tango devices get into a wide sale, there will be no release from the developers not only because of the unique capabilities of the device, but also because of the simplicity of programming applications for it. The phrase in the introduction, that even a developer without Android programming experience can get used to the device, an experimentally confirmed fact, since The main developer for Tango, our robot management demo, Marco Simik (foreign master of our laboratory), had almost no experience in developing for Android, but nevertheless he was able to study tools and API in a sufficient amount for writing simple applications in a couple of days.
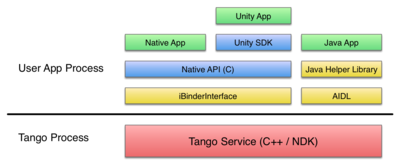
But enough praise. Tango Service is a service running as a separate process. The overall structure of the software stack is shown in the illustration.
The SDK provides the ability to work with C ++, Java and Unity. The order roughly corresponds to their “high level”. Of course, game developers are likely to appreciate the ability to use Unity and will mostly choose this option. If you want to work directly with AIDL (Android Interface Definition Language) or other Java applications, then the Java API is for you. Developers who want to develop applications with Android NDK and have more control will choose the C API .
In all three options, the API is almost identical and provides tools for capturing data from the device, controlling it, and carrying out the necessary transformations from different coordinate systems. (of which there are already 6 pieces)
I think retelling the documentation makes little sense, it is better to just read it .
However, the situation with DevKit was far from ideal. At times, Tango Service fell and either refused to work or gave out noise at the output. In such cases, only a reboot helped. In general, some dampness of the device was felt, let's hope that this property of the dev-whale and in commercially available devices these children's sores will be corrected.
In addition, it is worth noting that the device heats up quite noticeably, especially in applications with 3D gafi. Here, unfortunately, it is unlikely to change the situation fundamentally, because heavy calculations must be made anyway. So I don’t have to rely on Tango devices for a long time with active use. To assess, you can take your phone or tablet and run a 3D game on it, I think the approximate lifetime of the device will be plus or minus.
In addition, do not expect miracles from building maps. Approximate quality can be seen for example in this video.
Plus, it should be remembered that the device is not a magic wand and it has its own limitations, which are very likely to serve as a deterrent when it is used for consumer use, because the average user is unaware of the features of the localization algorithms used, so when playing on the Tango device, he may encounter very unpleasant lags, jumps and other manifestations of non-ideal work. For example, we could not play the games that came with the device so that we could confidently say that they are ready for ordinary users, most likely they will describe the current games simply as “buggy and incomprehensible”. But maybe this is just a symptom of the dampness of the device.
Video with the end result of a weekly acquaintance with Google Tango:
The source code of scripts for Unity is published on Gitkhab .
It is no secret that virtual reality is an increasing trend. But usually it is considered from the point of view of adding the virtual to the real, we wanted, if I may say so, to add the real to the virtual. In our opinion, for real virtual reality, it is not enough to add a virtual overlay; feedback from virtual to real is necessary. Approximately in the same vein, work from MIT to add virtual interfaces for physical objects followed.
In our case, we decided to make a virtual interface for a very real mobile robot. Since we were very limited in time, we decided to limit ourselves only to controlling the robot by setting points where to go to the robot in real space. Of course, this idea can be continued in many directions: add additional interfaces for the robot (for example, a “hologram” of a person over the robot, visualize data exchange between robots), create feedback (for example, showing the planned trajectory of the robot), make games that combine real and virtual , collect virtual objects real machine) and the like.
But even a simple execution of the control of the robot through the task of target points can be very useful features, especially in industries where there are more and more robots .
Not to mention the potential for developing ideas for using Google Tango to monitor physical objects.
To implement this idea, we decided to use the Unity API, as the most simple and easy to build a demo application in view of its high level. To improve the reliability of determining the coordinates, we used localization using Area Learning. (In practice, most likely, robots will be used in well-known premises, which are not difficult to measure). Of course, one could do without him, but accuracy and reliability will suffer greatly from this.
Of course, in order for the application to work, it is desirable that the robot has its own means of navigation in space, otherwise we will constantly have to keep the robot in the field of view of the device, which you will not agree is very convenient. Our mobile robot used a two-dimensional laser scanner Hokuyo-04LX and software implementing SLAM (simultaneous localization and mapping), at the output of which we received the occupancy grid of the surrounding area, using which we can already plan the trajectory of the robot. (software for the robot was mostly self-written, but all the same can be done using ready-made modules in ROS).
Now we just have to compare the global coordinates of the device and the robot, and the first coordinates are already aligned horizontally through the use of an accelerometer, so we basically need to localize the robot and its orientation in the global two-dimensional device space, after which we will be able to convert the coordinates of target points from the system tablet into the robot system.
In order to implement this idea, the application needed to include three features: motion tracking, Area Learning and getting a depth map. (Or in other words, a three-dimensional point cloud) Using the application follows the following path:
And it is worth noting that, noting the position of the robot, we only know its coordinate, but not the direction, here we went to tricks and simplified the task by creating the rule that you should always choose the robot standing strictly behind it. Of course, in the general case, a robot can be detected by special labels (say, displayed on the screen or pasted on the body) or using TensorFlow- based neural networks in general . But again, time constraints affected.
The sources in the repository (link above) contain only three scripts: select the ADF file, splash-screen initialization (relocalization) after selecting the ADF, the main control script and the UI. To use these scripts, it is enough to add them to the AreaLearning example.
Unity scripts are executed in a certain way, there are 3 main callbacks that we use in our demo:
As a result, we have the following structure:
The control code of the robot, we think, is beyond the scope of this article, therefore it is not published at the moment.
As a result of our acquaintance, I can say with confidence: Google Tango is an extremely promising device that is capable of making a coup in the coming years in what we consider mobile devices. In general, it is highly unlikely that this project will end up as Glass and Wave. Of course, at the moment, the devices are not devoid of children's sores, and like any technology, they have their limits and features, but the first will be fixed, and I think the users and developers will gradually get used to the second.
Thus, we believe that the virtual reality boom long overdue will apparently soon open up to its full potential, and Google Tango clearly intends to lead it through its ease of programming, friendliness to developers, the established Android ecosystem, and Google's active promotion.
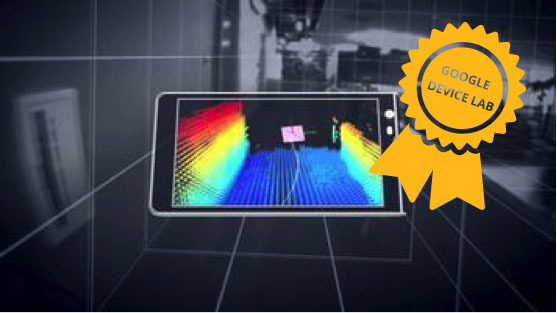
Article author Dmitry Senashenko, in the framework of the competition "Device Lab from Google . "
I think many of you have already heard about this project and have a good idea of what it represents. In short, this is a computer vision and localization platform aimed at application in mobile devices. Using data from two cameras (wide-angle and conventional), a depth sensor (essentially Kinect in miniature), accelerometers, gyroscopes, and a barometer, the Google Tango project device is able to perceive the surrounding three-dimensional space and track its position in it. The great merit of the ATAP (Advanced Technology and Projects) engineers group lies not only in the fact that they could fit all this equipment in a mobile device, but also in the fact that they went out to develop a developer-friendly high-level SDK that does the main hard work. processing data from sensors and carrying out the necessary transformations, allowing the developer to work with convenient abstractions. Also, in the best traditions of Google, we have access to high-quality documentation , which allows us to quickly become familiar with the device even to developers with no experience in developing Android applications.
About the device
Principle of operation
')
The device essentially has two main localization modes: with and without Area Learning. In the first mode, we pre-scan the room and build its map (unfortunately this is done offline, that is, first processing the accumulated data, then using the result as an ADF file - Area Description File), after which we can quite accurately localize in the studied room , to compensate for the drift and cope with the problem of temporary loss of tracking. (for example, when closing the sensors with a hand or another object too close by)
The second mode allows us to localize in space and track the movement of the device without any preliminary preparation. It works on the basis of combining data from all sensors: the IMU (Inertial Measurment Unit), visual odometry at specific points of the image of a wide-angle camera, depth sensor, etc. But since we do not know the points for which we could catch on, in this mode, the coordinates of the device will be subject to drift due to constantly accumulating errors. (see illustration) In addition, there is a risk of loss of tracking, the correct recovery from which in this mode is generally impossible.
Using localization data (that is, in fact, knowing with some accuracy the coordinates and orientation of the device relative to the room) and having a three-dimensional cloud of points from the depth sensor, we have the ability to create applications of augmented reality previously impossible in principle on mobile devices. A logical continuation would be the installation of Tango on augmented reality glasses (the next iteration of Google Glass like Hololens?), But for now we can use a substitute in the form of Google Cardboard .
Little about accuracy
Of course, one of the first questions to the device is its accuracy. The documentation, of course, deals with this issue, but we could not deny ourselves the desire to check the statements for accuracy of a few centimeters in optimal conditions.
Since we were very limited in time, we decided to just make a handicraft estimate from above using as a tool a table with known dimensions. (two by three meters) By moving the device from one corner of the table to another along a curved trajectory with a deviation from the table up to two meters, we recorded global coordinates (with and without Area Learning) at each of the points, after which we calculated the distance between these points and compared with what should have happened. The results are as follows:
- The average deviation was 2-3 cm, in the worst cases, up to 5-6 cm
- Accuracy with and without Area Learning on trajectories of 15–20 meters is not fundamentally different, which indicates a sufficiently high quality of localization by visual odometry and IMU
- The orientation of the device affects the coordinates with an error of up to 5 cm (including using Area Learning), i.e. if you return the device to the starting point, but rotated, its coordinates will be somewhat different
For obvious reasons, accuracy is highly dependent on the room in which measurements are taken. In a room with good lighting (the device is poorly related to direct sunlight) and a large number of special points it is quite possible to achieve an accuracy of a couple of centimeters. But in poor conditions, the device quickly loses tracking, IMU of course helps out for the time being, but its capabilities are very limited. Therefore, we abandoned the idea of putting tango on an industrial robo-arm and measuring accuracy in this way, because a room with a robot is a bad example of a “normal” room.
Now about the accuracy of the depth sensor. We decided to check its accuracy by removing the clouds of points for flat objects (floors, walls, tables) and analyzing how well the points fall on the plane. At the optimal distance of 0.5–4 m, the accuracy was usually about 0.5 cm, but on some surfaces the accuracy dropped by a factor of 2–3, for example, in the field of our laboratory, covered with a black-and-white carpet and speckled. It looks like the texture played a cruel joke with depth determination algorithms based on structured IR radiation.
About SDK and API
In short, Google is on top. I think as soon as the Tango devices get into a wide sale, there will be no release from the developers not only because of the unique capabilities of the device, but also because of the simplicity of programming applications for it. The phrase in the introduction, that even a developer without Android programming experience can get used to the device, an experimentally confirmed fact, since The main developer for Tango, our robot management demo, Marco Simik (foreign master of our laboratory), had almost no experience in developing for Android, but nevertheless he was able to study tools and API in a sufficient amount for writing simple applications in a couple of days.
But enough praise. Tango Service is a service running as a separate process. The overall structure of the software stack is shown in the illustration.
The SDK provides the ability to work with C ++, Java and Unity. The order roughly corresponds to their “high level”. Of course, game developers are likely to appreciate the ability to use Unity and will mostly choose this option. If you want to work directly with AIDL (Android Interface Definition Language) or other Java applications, then the Java API is for you. Developers who want to develop applications with Android NDK and have more control will choose the C API .
In all three options, the API is almost identical and provides tools for capturing data from the device, controlling it, and carrying out the necessary transformations from different coordinate systems. (of which there are already 6 pieces)
I think retelling the documentation makes little sense, it is better to just read it .
A spoon of tar
However, the situation with DevKit was far from ideal. At times, Tango Service fell and either refused to work or gave out noise at the output. In such cases, only a reboot helped. In general, some dampness of the device was felt, let's hope that this property of the dev-whale and in commercially available devices these children's sores will be corrected.
In addition, it is worth noting that the device heats up quite noticeably, especially in applications with 3D gafi. Here, unfortunately, it is unlikely to change the situation fundamentally, because heavy calculations must be made anyway. So I don’t have to rely on Tango devices for a long time with active use. To assess, you can take your phone or tablet and run a 3D game on it, I think the approximate lifetime of the device will be plus or minus.
In addition, do not expect miracles from building maps. Approximate quality can be seen for example in this video.
Plus, it should be remembered that the device is not a magic wand and it has its own limitations, which are very likely to serve as a deterrent when it is used for consumer use, because the average user is unaware of the features of the localization algorithms used, so when playing on the Tango device, he may encounter very unpleasant lags, jumps and other manifestations of non-ideal work. For example, we could not play the games that came with the device so that we could confidently say that they are ready for ordinary users, most likely they will describe the current games simply as “buggy and incomprehensible”. But maybe this is just a symptom of the dampness of the device.
Demo: control the robot
Video with the end result of a weekly acquaintance with Google Tango:
The source code of scripts for Unity is published on Gitkhab .
Idea
It is no secret that virtual reality is an increasing trend. But usually it is considered from the point of view of adding the virtual to the real, we wanted, if I may say so, to add the real to the virtual. In our opinion, for real virtual reality, it is not enough to add a virtual overlay; feedback from virtual to real is necessary. Approximately in the same vein, work from MIT to add virtual interfaces for physical objects followed.
In our case, we decided to make a virtual interface for a very real mobile robot. Since we were very limited in time, we decided to limit ourselves only to controlling the robot by setting points where to go to the robot in real space. Of course, this idea can be continued in many directions: add additional interfaces for the robot (for example, a “hologram” of a person over the robot, visualize data exchange between robots), create feedback (for example, showing the planned trajectory of the robot), make games that combine real and virtual , collect virtual objects real machine) and the like.
But even a simple execution of the control of the robot through the task of target points can be very useful features, especially in industries where there are more and more robots .
Not to mention the potential for developing ideas for using Google Tango to monitor physical objects.
Execution
To implement this idea, we decided to use the Unity API, as the most simple and easy to build a demo application in view of its high level. To improve the reliability of determining the coordinates, we used localization using Area Learning. (In practice, most likely, robots will be used in well-known premises, which are not difficult to measure). Of course, one could do without him, but accuracy and reliability will suffer greatly from this.
Of course, in order for the application to work, it is desirable that the robot has its own means of navigation in space, otherwise we will constantly have to keep the robot in the field of view of the device, which you will not agree is very convenient. Our mobile robot used a two-dimensional laser scanner Hokuyo-04LX and software implementing SLAM (simultaneous localization and mapping), at the output of which we received the occupancy grid of the surrounding area, using which we can already plan the trajectory of the robot. (software for the robot was mostly self-written, but all the same can be done using ready-made modules in ROS).
Now we just have to compare the global coordinates of the device and the robot, and the first coordinates are already aligned horizontally through the use of an accelerometer, so we basically need to localize the robot and its orientation in the global two-dimensional device space, after which we will be able to convert the coordinates of target points from the system tablet into the robot system.
In order to implement this idea, the application needed to include three features: motion tracking, Area Learning and getting a depth map. (Or in other words, a three-dimensional point cloud) Using the application follows the following path:
- Write the Area Description File (ADF), i.e. conduct Area Learning premises in which the program will be used
- Download the received ADF, move the device a little so that the device recognizes special points and makes its own localization
- Mark the position of the robot
- Mark the target point and press the command execution button
And it is worth noting that, noting the position of the robot, we only know its coordinate, but not the direction, here we went to tricks and simplified the task by creating the rule that you should always choose the robot standing strictly behind it. Of course, in the general case, a robot can be detected by special labels (say, displayed on the screen or pasted on the body) or using TensorFlow- based neural networks in general . But again, time constraints affected.
Code
The sources in the repository (link above) contain only three scripts: select the ADF file, splash-screen initialization (relocalization) after selecting the ADF, the main control script and the UI. To use these scripts, it is enough to add them to the AreaLearning example.
Unity scripts are executed in a certain way, there are 3 main callbacks that we use in our demo:
- Start () starts when the application starts
- Update () runs every frame update.
- OnGUI () runs several times per frame.
As a result, we have the following structure:
- Start () assigns callbacks to relevant events.
- Update () handles the touch of the screen and, if necessary, starts the coruntine to find the global coordinates corresponding to the taped coordinates of the screen, plus draws a red marker when the point is successfully selected
- OnTangoDepthAvailable, OnTangoPoseAvailable callbacks awaiting events from Tango and setting the appropriate flags on startup
- _WaitForTouch Cortinas awaiting tapas on the screen after pressing one of the buttons, then calling Corutin to calculate global coordinates corresponding to the tap location
- _WaitForDepth waits for a depth map (three-dimensional point cloud) and finds the coordinates of a point in the global reference system for a given coordinate on the screen
- _WaitForRequest handles the sending of the command to the robot, in our case it was a simple GET request
The control code of the robot, we think, is beyond the scope of this article, therefore it is not published at the moment.
Conclusion
As a result of our acquaintance, I can say with confidence: Google Tango is an extremely promising device that is capable of making a coup in the coming years in what we consider mobile devices. In general, it is highly unlikely that this project will end up as Glass and Wave. Of course, at the moment, the devices are not devoid of children's sores, and like any technology, they have their limits and features, but the first will be fixed, and I think the users and developers will gradually get used to the second.
Thus, we believe that the virtual reality boom long overdue will apparently soon open up to its full potential, and Google Tango clearly intends to lead it through its ease of programming, friendliness to developers, the established Android ecosystem, and Google's active promotion.
Source: https://habr.com/ru/post/309870/
All Articles