Using blocks in iOS. Part 2
In the first part of our tutorial, we used Storyboard to customize the view. In the second and final part, we finally got to the blocks themselves. We’ll talk about what blocks represent by themselves, what their syntax is, how to use them, and touch on a bunch of examples. It will show how to use blocks with NSArray, UIView animations, Grand Central Dispatch, and much more.
Blocks were first introduced in iOS 4.0 and Mac OSX 10.6 to simplify the code. They can help reduce it, reduce dependence on delegates, and write clean, readable code. But, despite the obvious advantages, many developers do not use blocks because of an incomplete understanding of the principle of their operation.
Let's look at all the “what, where, when, and why” blocks.
On the inside, a block is a piece of code that may be called at some point in the future. A block is a first-class function , so it can be said that blocks are ordinary Objective-C objects. And objects can be passed as parameters, returned from functions and methods, and assigned to variables. Blocks are often called closures in languages such as Python, Ruby and Lisp, because after the declaration they encapsulate their state. The block creates a constant copy of any local variable to which it refers.
When you need to call the execution of some code that would later return something to you, you would probably use delegates or NSNotificationCenter, not blocks. And it would have worked perfectly, but pieces of code would be scattered everywhere - the task starts from one point, and the result is processed in another.
')
Blocks are better because they keep the task in one place, which we'll see soon.
For you! But seriously, blocks are for everyone and everyone uses blocks. Blocks are the future, so you can explore them right now. Many methods of embedded frameworks are rewritten or supplemented with blocks based on existing functionality.
This picture, from the iOS Developer Library, well explains the syntax for blocks.

The format of the block description is:
If you have already programmed in any other C language, this construction is quite familiar to you except for this symbol ^. ^ and means block. If you understand that ^ means “I am a block” - congratulations - you have just understood the most difficult thing about blocks. ;]
Note that the names for the parameters are not currently required, but you can turn them on if you wish.
Below is a sample ad block.
Further, the block description.
Actually, this is how a block is created. Notice that the block description is different from its declaration. It starts with a ^ and is followed by parameters that can be named and that must match the type and order of the parameters in the block declaration. Next comes the code itself.
In the block definition, the return type is optional, it can be identified from the code. If there are multiple return values, they must be of the same type.
Sample block description:
If you combine the description and block declaration, you get the following code:
You can also use blocks in this way:
Now let's look at a couple of examples of using blocks as opposed to the same code without blocks.
Let's see how the blocks change the principle of performing some operations on an array. For starters, here is the usual code for a loop:
You may not give the value of the "stop" variable. But everything will become clear after you see the implementation of this method using a block. The block method contains the “stop” variable, which allows you to stop the loop at any time, and therefore we simply duplicate this feature here for code similarity.
Now let's take a look at the same code using fast-enumeration.
And now with the block:
In the code above, you may be wondering what the “stop” variable is. It is simply a variable to which YES can be assigned inside the block to stop the process. This parameter is defined as part of the block that will be used in the enumerateObjectsUsingBlock method.
The above code is trivial, and it’s quite difficult to see the advantages of the blocks in it. But there are two things that I would like to point out:
Let's take a look at a simple animation that operates on a single UIView. It changes the alpha parameter to 0 and moves the view down and to the right by 50 points, then removes the UIView from the superview. Simple, isn't it? Code without blocks:
Block method:
If you look closely at these two methods, you can see three advantages of the block method:
I think the best advice is to use blocks where they are needed. You may want to continue using old methods to maintain backward compatibility, or simply because you are more familiar with them. But every time you approach a decision point like this, consider whether blocks can make your code easier for you, and whether you should use methods with a block approach.
Of course, over time, you may notice that you have become increasingly in need of blocks simply because most frameworks are written and rewritten using blocks. So start using blocks now to meet them fully in the future.
We continue from the same place where we stopped in the first part . If you have not read the first part, or just want to refresh everything in memory, you can download the project here .
Open a project in Xcode and switch to Project Navigator . Right-click the iOSDiner folder and select New Group . Let's call it "Models".
Now right-click on the created Models folder and select the New File → Objective-C class (or Cocoa Touch Class). Let's call it “IODItem” and choose NSObject as the parent class.
Repeat the above steps to create an IODOrder class.
Now we have all the necessary classes. It's code time.
Open IODItem.h . First of all, you need to add the NSCopying protocol to the class . Protocols
are a kind of "agreement" about the methods that the class will implement. If a protocol is declared in a class, then in the same class it is necessary to define mandatory, or optional methods that are described in the protocol. The protocol declaration is as follows:
Next, add properties for the object. Each object will have a name, a price, and a name for the image file. IODItem.h will look like this:
Now let's switch to IODItem.m . Here we see a warning.

This warning refers to the NSCopying protocol that we added earlier. Remember that protocols can describe required methods? So NSCopying needs to determine
That's all, the warning has disappeared. This code creates a new IODItem object, copies the properties of an already existing object, and returns this new instance.
Additionally, an initialization method is required. It allows you to easily and quickly set the default values of properties when an object is initialized. Write in IODItem.m :
Return to IODItem.h and add the prototype of the method before the end of the file (@end):
Next, let's work on another class - IODOrder . This class will be an order and operations associated with it - adding an object, deleting, calculating the total order value and displaying the contents of the order on the screen.
Open IODOrder.h and add an import header file in front of the interface :
And under the interface, write the property:
This is a dictionary in which objects selected by the user will be stored.
Switch to ViewController.m , add properties:
The currentItemIndex property will remember the index of the object being viewed in inventory. The meaning of inventory is easy to explain - this is an array of IODItem-elements that we get from a web service. order is an object of class IODOrder , which stores objects selected by the user.
Further, in the viewDidLoad method, you need to reset currentItemIndex and order .
Now the beginning of ViewController.m looks like this:
Build the project. There should be no warnings.
The class method retrieveInventoryItems , which we will now add, will load and process the inventory loaded from the web service.
Note Class methods begin with “+”, and class instance methods begin with “-”.
In IODItem.m, immediately after the #import directives, add the following:
Note Change the address if you hosted the web service yourself.
Next, add the retrieveInventoryItems method.
And here is our first unit. Let's take a closer look at the code.
Now open IODItem.h and add the prototype of the method:
Another thing you need to know is the dispatch queue . Switch to ViewController.m and add a property.
At the end of the ViewDidLoad method, write the line:
The first parameter to the dispatch_queue_create method is the name of the queue. Call it what you will, but this name must be unique. Therefore, Apple recommends a reverse DNS style for this name.
Now let's use this queue. Let's write in viewDidAppear :
Run the project. Something is wrong, right? We use the retrieveInventoryItems method, which is defined in IODItem to call the web service, return the inventory objects and put them into an array.
Remember the five-second delay in the PHP script from the last part ? But when we run the program, we do not see “Loading inventory ...”, then we wait five seconds, and we see “Inventory Loaded”.
The problem is this: a web service call blocks and “freezes” the main queue, and does not allow it to change the label's text. If only we had a separate queue that could be used for such operations, without referring to the main line ... Stop! We already have it. This is where the Grand Central Dispatch and blocks can help us quite easily. With Grand Central Dispatch, we can put data processing in a different queue without blocking the main one. Replace the last two lines in viewDidAppear with the following:
Notice that here we use two different blocks that do not return anything and have no parameters.
Run the project again. Now it works as it should.
You did not wonder why we call dispatch_async to assign the text to the label? When you put the text in the label, you update the UI element, and everything that relates to the UI should be processed in the main queue. Therefore, we call dispatch_async again, but only take the main queue and execute the block in it.
This method is quite common when the operation takes a lot of time and the UI elements need to be updated.
Grand Central Dispatch is a rather complex system, the role of which cannot be understood in this simple lesson. If you are interested, read Multithreading and Grand Central Dispatch on iOS for Beginners .
We use a web service to load and store inventory. Now we need three helper methods that will display the stored inventory to the user.
The first method, findKeyForOrderItem:, we will add to IODOrder.m . It will be useful to access the object from the dictionary.
Let's see what this method does. But before doing this, I must explain why it is needed at all. The IODOrder object contains an orderItems dictionary (key-value pairs). The key is an IODItem , and the value is an NSNumber , which indicates how many such IODItem has been ordered.
In theory, everything is fine, but a peculiar quirk of the NSDictionary class is that when you want to assign an object as a key, it does not assign this object, but creates its copy and uses it as a key. This means that the object that you use as a key must comply with the NSCopying protocol (this is why we in IODItem declared the NSCopying protocol).
The key in the orderItems dictionary and IODItem in the inventory array are not the same object (although they have the same properties), so we cannot do a simple search by key. Instead, we will have to compare the name and price of each object to determine their coincidence. The above method does this: compares the properties of the keys to find the one you need.
This is what the code does:
Do not forget to add a prototype method in IODOrder.h.
Navigate to ViewController.m and add the following method:
Using currentItemIndex and the inventory array, this method displays the name and image for each inventory item.
We register one more method:
This method is the longest of the three helper methods, but rather simple. It checks the program status and determines whether to make one or another button active.
For example, if currentItemIndex is zero, ibPreviousItemButton should not be active, because there are no items before the first one. If there are no elements in orderItems , then the ibTotalOrderButton button should not be active, because there is no order for which to calculate the amount.
So, with these three methods you can now create magic. Let's go back to viewDidAppear in ViewController.m and add at the very beginning:
Then replace the block with this one:
Build and run.
Oh, and here is the hamburger. But we want to see the rest of the food, so let's make the buttons work.
The ibaLoadNextItem: and ibaLoadPreviousItem methods: we already have ViewController.m . Add some code.
Thanks to those helper methods, switching between objects with changing currentItemIndex and updating the UI has become very easy. Compile and run. Now you can see all the menus.
We have a menu, but there is no waiter to take an order. In other words, the add and remove buttons do not work. Well, the time has come.
We need another helper method in the IODOrder class. In I ODOrder.m we write the following:
This is a simple getter method for the orderItems property. If there is already something in orderItems , the method will return an object. And if not, it will create a new dictionary and assign it to orderItems , and then return it.
Next, let's work on the orderDescription method. This method will give us lines for output to the chalk board. In IODOrder.m we write:
A bit of explanation:
IODOrder.h .
, , ViewController.m .
. , «No Items. Please order something!». , orderDescription IODOrder .
. viewDidAppear :
, , , .
. IODOrder.m .
:
removeItemFromOrder: , addItemToOrder: . IODOrder.m :
, - , . , , 1, , 0.
IODOrder.h :
ViewController.m :
, — , addItemToOrder: removeItemFromOrder: , UI.
. , .
. ibaRemoveItem: ibaAddItemMethod:
, . UILabel . — , . UIView- , .
. .
, IODOrder.m — .
:
IODOrder.h .
, — . totalOrder , Total . ibaCalculateTotal :
.
That's all! .
, , .
.
— Objective-C, . , ( , ).
, , typedef .
. , , Xcode , .
, :
enumerateObjectsUsingBlock — Enter . Enter . :
code , , — , .
. git, . , , .
— . , .
:
Introduction
Blocks were first introduced in iOS 4.0 and Mac OSX 10.6 to simplify the code. They can help reduce it, reduce dependence on delegates, and write clean, readable code. But, despite the obvious advantages, many developers do not use blocks because of an incomplete understanding of the principle of their operation.
Let's look at all the “what, where, when, and why” blocks.
What are these "Blocks" and why are they so important?
On the inside, a block is a piece of code that may be called at some point in the future. A block is a first-class function , so it can be said that blocks are ordinary Objective-C objects. And objects can be passed as parameters, returned from functions and methods, and assigned to variables. Blocks are often called closures in languages such as Python, Ruby and Lisp, because after the declaration they encapsulate their state. The block creates a constant copy of any local variable to which it refers.
When you need to call the execution of some code that would later return something to you, you would probably use delegates or NSNotificationCenter, not blocks. And it would have worked perfectly, but pieces of code would be scattered everywhere - the task starts from one point, and the result is processed in another.
')
Blocks are better because they keep the task in one place, which we'll see soon.
Who are the blocks for?
For you! But seriously, blocks are for everyone and everyone uses blocks. Blocks are the future, so you can explore them right now. Many methods of embedded frameworks are rewritten or supplemented with blocks based on existing functionality.
How to use blocks?
This picture, from the iOS Developer Library, well explains the syntax for blocks.
The format of the block description is:
return_type (^block_name)(param_type, param_type, ...) If you have already programmed in any other C language, this construction is quite familiar to you except for this symbol ^. ^ and means block. If you understand that ^ means “I am a block” - congratulations - you have just understood the most difficult thing about blocks. ;]
Note that the names for the parameters are not currently required, but you can turn them on if you wish.
Below is a sample ad block.
int (^add)(int,int) Further, the block description.
^return_type(param_type param_name, param_type param_name, ...) { ... return return_type; } Actually, this is how a block is created. Notice that the block description is different from its declaration. It starts with a ^ and is followed by parameters that can be named and that must match the type and order of the parameters in the block declaration. Next comes the code itself.
In the block definition, the return type is optional, it can be identified from the code. If there are multiple return values, they must be of the same type.
Sample block description:
^(int number1, int number2){ return number1+number2 } If you combine the description and block declaration, you get the following code:
int (^add)(int,int) = ^(int number1, int number2){ return number1+number2; } You can also use blocks in this way:
int resultFromBlock = add(2,2); Now let's look at a couple of examples of using blocks as opposed to the same code without blocks.
Example: NSArray
Let's see how the blocks change the principle of performing some operations on an array. For starters, here is the usual code for a loop:
BOOL stop; for (int i = 0 ; i < [theArray count] ; i++) { NSLog(@"The object at index %d is %@",i,[theArray objectAtIndex:i]); if (stop) break; } You may not give the value of the "stop" variable. But everything will become clear after you see the implementation of this method using a block. The block method contains the “stop” variable, which allows you to stop the loop at any time, and therefore we simply duplicate this feature here for code similarity.
Now let's take a look at the same code using fast-enumeration.
BOOL stop; int idx = 0; for (id obj in theArray) { NSLog(@"The object at index %d is %@",idx,obj); if (stop) break; idx++; } And now with the block:
[theArray enumerateObjectsUsingBlock:^(id obj, NSUInteger idx, BOOL *stop){ NSLog(@"The object at index %d is %@",idx,obj); }]; In the code above, you may be wondering what the “stop” variable is. It is simply a variable to which YES can be assigned inside the block to stop the process. This parameter is defined as part of the block that will be used in the enumerateObjectsUsingBlock method.
The above code is trivial, and it’s quite difficult to see the advantages of the blocks in it. But there are two things that I would like to point out:
- Simplicity Using blocks, we can access the object, the index of the object in the array and the stop variable without writing code. This leads to a decrease in the code, which in turn reduces the number of errors.
- Speed The block method has a slight speed advantage over the fast listing method. In our case, this advantage may be too small to mention, but in more complex cases it becomes significant.
Example: UIView animations
Let's take a look at a simple animation that operates on a single UIView. It changes the alpha parameter to 0 and moves the view down and to the right by 50 points, then removes the UIView from the superview. Simple, isn't it? Code without blocks:
- (void)removeAnimationView:(id)sender { [animatingView removeFromSuperview]; } - (void)viewDidAppear:(BOOL)animated { [super viewDidAppear:animated]; [UIView beginAnimations:@"Example" context:nil]; [UIView setAnimationDuration:5.0]; [UIView setAnimationDidStopSelector:@selector(removeAnimationView)]; [animatingView setAlpha:0]; [animatingView setCenter:CGPointMake(animatingView.center.x+50.0, animatingView.center.y+50.0)]; [UIView commitAnimations]; } Block method:
- (void)viewDidAppear:(BOOL)animated { [super viewDidAppear:animated]; [UIView animateWithDuration:5.0 animations:^{ [animatingView setAlpha:0]; [animatingView setCenter:CGPointMake(animatingView.center.x+50.0, animatingView.center.y+50.0)]; } completion:^(BOOL finished) { [animatingView removeFromSuperview]; }]; } If you look closely at these two methods, you can see three advantages of the block method:
- Simplifies the code . With a block, we do not need to define an absolutely separate method to complete the callback, or to begin beginAnimations / commitAnimations .
- All code lies in one place . Using a block, you do not need to start the animation in one place, and the callback method in another. All the code associated with the animation is in one place, which makes it easier to write and read.
- So says Apple . Apple rewrote existing functionality that did not use blocks, so Apple officially recommends switching to block-based methods, if possible.
When to use blocks?
I think the best advice is to use blocks where they are needed. You may want to continue using old methods to maintain backward compatibility, or simply because you are more familiar with them. But every time you approach a decision point like this, consider whether blocks can make your code easier for you, and whether you should use methods with a block approach.
Of course, over time, you may notice that you have become increasingly in need of blocks simply because most frameworks are written and rewritten using blocks. So start using blocks now to meet them fully in the future.
Returning to iOS Diner: setting up model classes
We continue from the same place where we stopped in the first part . If you have not read the first part, or just want to refresh everything in memory, you can download the project here .
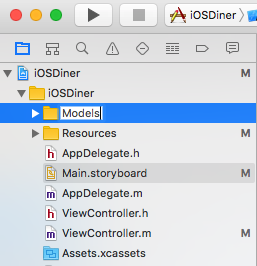
Open a project in Xcode and switch to Project Navigator . Right-click the iOSDiner folder and select New Group . Let's call it "Models".
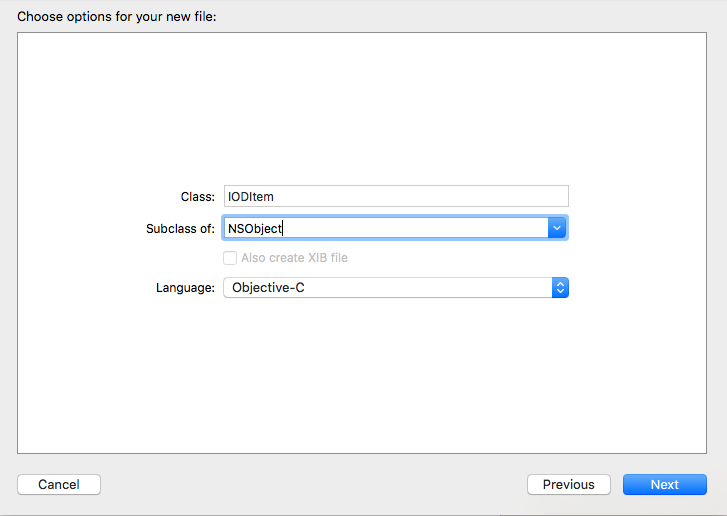
Now right-click on the created Models folder and select the New File → Objective-C class (or Cocoa Touch Class). Let's call it “IODItem” and choose NSObject as the parent class.
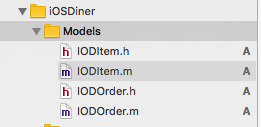
Repeat the above steps to create an IODOrder class.
Now we have all the necessary classes. It's code time.
IODItem setting
Open IODItem.h . First of all, you need to add the NSCopying protocol to the class . Protocols
are a kind of "agreement" about the methods that the class will implement. If a protocol is declared in a class, then in the same class it is necessary to define mandatory, or optional methods that are described in the protocol. The protocol declaration is as follows:
@interface IODItem : NSObject <NSCopying> Next, add properties for the object. Each object will have a name, a price, and a name for the image file. IODItem.h will look like this:
#import <Foundation/Foundation.h> @interface IODItem : NSObject <NSCopying> @property (nonatomic,strong) NSString* name; @property (nonatomic,strong) float price; @property (nonatomic,strong) NSString* pictureFile; @end Now let's switch to IODItem.m . Here we see a warning.
This warning refers to the NSCopying protocol that we added earlier. Remember that protocols can describe required methods? So NSCopying needs to determine
— (id)copyWithZone:(NSZone *)zone . Until this method is added, the class will be considered incomplete. Add the following to IODItem.m before @end : - (id)copyWithZone:(NSZone *)zone { IODItem *newItem = [[IODItem alloc] init]; newItem.name = _name; newItem.price = _price; newItem.pictureFile = _pictureFile; return newItem; } That's all, the warning has disappeared. This code creates a new IODItem object, copies the properties of an already existing object, and returns this new instance.
Additionally, an initialization method is required. It allows you to easily and quickly set the default values of properties when an object is initialized. Write in IODItem.m :
- (id)initWithName:(NSString *)name andPrice:(NSNumber *)price andPictureFile:(NSString *)pictureFile { if(self = [self init]) { _name = name; _price = price; _pictureFile = pictureFile; } return self; } Return to IODItem.h and add the prototype of the method before the end of the file (@end):
- (id)initWithName:(NSString*)inName andPrice:(float)inPrice andPictureFile:(NSString*)inPictureFile; Configure IODOrder
Next, let's work on another class - IODOrder . This class will be an order and operations associated with it - adding an object, deleting, calculating the total order value and displaying the contents of the order on the screen.
Open IODOrder.h and add an import header file in front of the interface :
#import "IODItem.h" And under the interface, write the property:
@property (nonatomic,strong) NSMutableDictionary* orderItems; This is a dictionary in which objects selected by the user will be stored.
ViewController setup
Switch to ViewController.m , add properties:
#import "ViewController.h" #import "IODOrder.h" @interface ViewController () @property (assign, nonatomic) NSInteger currentItemIndex; @property (strong, nonatomic) NSMutableArray *inventory; @property (strong, nonatomic) IODOrder *order; The currentItemIndex property will remember the index of the object being viewed in inventory. The meaning of inventory is easy to explain - this is an array of IODItem-elements that we get from a web service. order is an object of class IODOrder , which stores objects selected by the user.
Further, in the viewDidLoad method, you need to reset currentItemIndex and order .
- (void)viewDidLoad { [super viewDidLoad]; self.currentItemIndex = 0; self.order = [[IODOrder alloc] init]; } Now the beginning of ViewController.m looks like this:
#import "ViewController.h" #import "IODOrder.h" @interface ViewController () @property (assign, nonatomic) NSInteger currentItemIndex; @property (strong, nonatomic) NSMutableArray *inventory; @property (strong, nonatomic) IODOrder *order; @end @implementation ViewController - (void)viewDidLoad { [super viewDidLoad]; self.currentItemIndex = 0; self.order = [[IODOrder alloc] init]; } Build the project. There should be no warnings.
We load inventory
The class method retrieveInventoryItems , which we will now add, will load and process the inventory loaded from the web service.
Note Class methods begin with “+”, and class instance methods begin with “-”.
In IODItem.m, immediately after the #import directives, add the following:
#define INVENTORY_ADDRESS @"http://adamburkepile.com/inventory/" Note Change the address if you hosted the web service yourself.
Next, add the retrieveInventoryItems method.
+ (NSArray *)retrieveInventoryItems { // 1 — NSMutableArray *inventory = [[NSMutableArray alloc] init]; NSError *error = nil; // 2 — NSArray *jsonInventory = [NSJSONSerialization JSONObjectWithData:[NSData dataWithContentsOfURL:[NSURL URLWithString:INVENTORY_ADDRESS]] options:kNilOptions error:&error]; // 3 — [jsonInventory enumerateObjectsUsingBlock:^(id _Nonnull obj, NSUInteger idx, BOOL * _Nonnull stop) { NSDictionary *item = obj; [inventory addObject:[[IODItem alloc] initWithName:item[@"Name"] andPrice:item[@"Price"] andPictureFile:item[@"Image"]]]; }]; // 4 — return [inventory copy]; } And here is our first unit. Let's take a closer look at the code.
- First, we declared an array in which we will store the objects to return, and a pointer to a possible error.
- We use an NSData object to load data from a web server, and then pass this NSData object to a JSON service to decode the source data in Objective-C types (NSArray, NSDictionary, NSString, NSNumber, etc.).
- Next, we need the enumerateObjectsUsingBlock: method, which we discussed earlier, to "convert" objects from an NSDictionary to an IODItem . We call this method for the jsonInventory array, and iterate through it using a block that passes the array element as an NSDictionary to the initialization method of the IODItem object. It then adds this new object to the returned array.
- Finally, an array of inventory is returned. Notice that we are returning a copy of the array, not the array itself, because we do not want to return its variable version. The copy method creates an immutable copy.
Now open IODItem.h and add the prototype of the method:
+ (NSArray*)retrieveInventoryItems; Dispatch Queue and Grand Central Dispatch
Another thing you need to know is the dispatch queue . Switch to ViewController.m and add a property.
@property (strong, nonatomic) dispatch_queue_t queue; At the end of the ViewDidLoad method, write the line:
self.queue = dispatch_queue_create("com.adamburkepile.queue",nil); The first parameter to the dispatch_queue_create method is the name of the queue. Call it what you will, but this name must be unique. Therefore, Apple recommends a reverse DNS style for this name.
Now let's use this queue. Let's write in viewDidAppear :
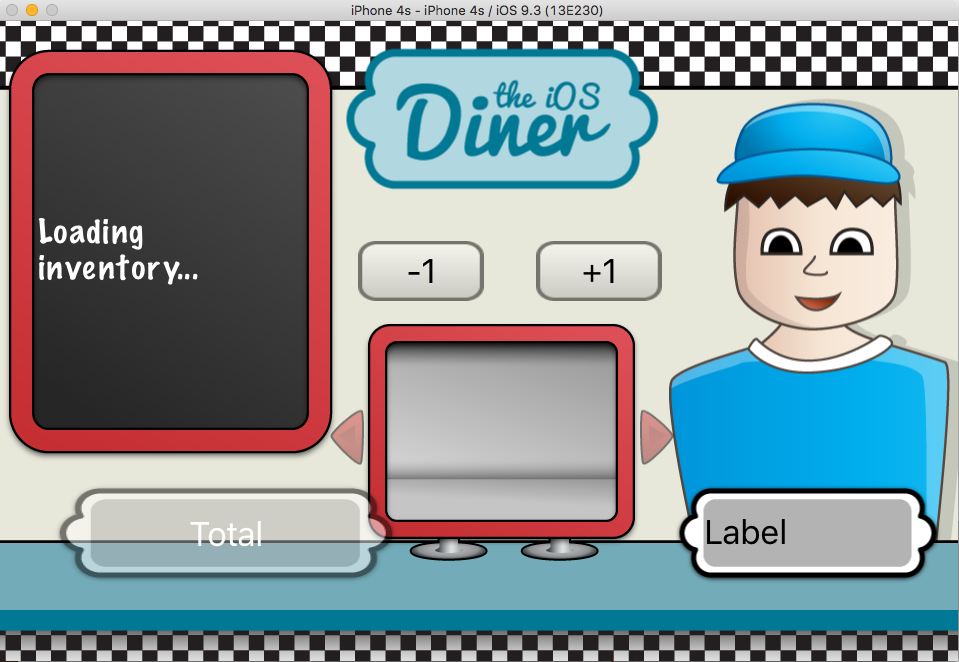
self.ibChalkboardLabel.text = @"Loading inventory..."; self.inventory = [[IODItem retrieveInventoryItems] mutableCopy]; self.ibChalkboardLabel.text = @"Inventory Loaded\n\nHow can I help you?"; Run the project. Something is wrong, right? We use the retrieveInventoryItems method, which is defined in IODItem to call the web service, return the inventory objects and put them into an array.
Remember the five-second delay in the PHP script from the last part ? But when we run the program, we do not see “Loading inventory ...”, then we wait five seconds, and we see “Inventory Loaded”.
The problem is this: a web service call blocks and “freezes” the main queue, and does not allow it to change the label's text. If only we had a separate queue that could be used for such operations, without referring to the main line ... Stop! We already have it. This is where the Grand Central Dispatch and blocks can help us quite easily. With Grand Central Dispatch, we can put data processing in a different queue without blocking the main one. Replace the last two lines in viewDidAppear with the following:
dispatch_async(self.queue, ^{ self.inventory = [[IODItem retrieveInventoryItems] mutableCopy]; dispatch_async(dispatch_get_main_queue(), ^{ self.ibChalkboardLabel.text = @"Inventory Loaded\n\nHow can I help you?"; }); }); Notice that here we use two different blocks that do not return anything and have no parameters.
Run the project again. Now it works as it should.
You did not wonder why we call dispatch_async to assign the text to the label? When you put the text in the label, you update the UI element, and everything that relates to the UI should be processed in the main queue. Therefore, we call dispatch_async again, but only take the main queue and execute the block in it.
This method is quite common when the operation takes a lot of time and the UI elements need to be updated.
Grand Central Dispatch is a rather complex system, the role of which cannot be understood in this simple lesson. If you are interested, read Multithreading and Grand Central Dispatch on iOS for Beginners .
Additional methods
We use a web service to load and store inventory. Now we need three helper methods that will display the stored inventory to the user.
The first method, findKeyForOrderItem:, we will add to IODOrder.m . It will be useful to access the object from the dictionary.
- (IODItem *)findKeyForOrderItem:(IODItem *)searchItem { //1 - NSIndexSet *indexes = [[self.orderItems allKeys] indexesOfObjectsPassingTest:^BOOL(id _Nonnull obj, NSUInteger idx, BOOL * _Nonnull stop) { IODItem *key = obj; return ([searchItem.name isEqualToString:key.name] && searchItem.price == key.price); }]; //2 - if([indexes count] >=1) { IODItem *key = [self.orderItems allKeys][[indexes firstIndex]]; return key; } //3 - return nil; } Let's see what this method does. But before doing this, I must explain why it is needed at all. The IODOrder object contains an orderItems dictionary (key-value pairs). The key is an IODItem , and the value is an NSNumber , which indicates how many such IODItem has been ordered.
In theory, everything is fine, but a peculiar quirk of the NSDictionary class is that when you want to assign an object as a key, it does not assign this object, but creates its copy and uses it as a key. This means that the object that you use as a key must comply with the NSCopying protocol (this is why we in IODItem declared the NSCopying protocol).
The key in the orderItems dictionary and IODItem in the inventory array are not the same object (although they have the same properties), so we cannot do a simple search by key. Instead, we will have to compare the name and price of each object to determine their coincidence. The above method does this: compares the properties of the keys to find the one you need.
This is what the code does:
- We iterate through the orderItems dictionary keys using the indexesOfObjectsPassingTest method : to find the name and price matches — another example of a block. Notice the bool after ^. This is the type of return value. This method processes an array, using a block to compare two objects, returns the indices of all the objects that pass the test described in the block.
- Here we take the first index from the returned
- 3. Return nil if the matching key was not found.
Do not forget to add a prototype method in IODOrder.h.
- (IODItem*)findKeyForOrderItem:(IODItem*)searchItem; Navigate to ViewController.m and add the following method:
- (void)updateCurrentInventoryItem { if (self.currentItemIndex >=0 && self.currentItemIndex < [self.inventory count]) { IODItem* currentItem = self.inventory[self.currentItemIndex]; self.ibCurrentItemLabel.text = currentItem.name; self.ibCurrentItemLabel.adjustsFontSizeToFitWidth = YES; self.ibCurrentItemImageView.image = [UIImage imageNamed:[currentItem pictureFile]]; } } Using currentItemIndex and the inventory array, this method displays the name and image for each inventory item.
We register one more method:
- (void)updateInventoryButtons { if (!self.inventory || ![self.inventory count]) { self.ibAddItemButton.enabled = NO; self.ibRemoveItemButton.enabled = NO; self.ibNextItemButton.enabled = NO; self.ibPreviousItemButton.enabled = NO; self.ibTotalOrderButton.enabled = NO; } else { if (self.currentItemIndex <= 0) { self.ibPreviousItemButton.enabled = NO; } else { self.ibPreviousItemButton.enabled = YES; } if (self.currentItemIndex >= [self.inventory count]-1) { self.ibNextItemButton.enabled = NO; } else { self.ibNextItemButton.enabled = YES; } IODItem* currentItem = self.inventory[self.currentItemIndex]; if (currentItem) { self.ibAddItemButton.enabled = YES; } else { self.ibAddItemButton.enabled = NO; } if (![self.order findKeyForOrderItem:currentItem]) { self.ibRemoveItemButton.enabled = NO; } else { self.ibRemoveItemButton.enabled = YES; } if (![self.order.orderItems count]) { self.ibTotalOrderButton.enabled = NO; } else { self.ibTotalOrderButton.enabled = YES; } } } This method is the longest of the three helper methods, but rather simple. It checks the program status and determines whether to make one or another button active.
For example, if currentItemIndex is zero, ibPreviousItemButton should not be active, because there are no items before the first one. If there are no elements in orderItems , then the ibTotalOrderButton button should not be active, because there is no order for which to calculate the amount.
So, with these three methods you can now create magic. Let's go back to viewDidAppear in ViewController.m and add at the very beginning:
[self updateInventoryButtons]; Then replace the block with this one:
dispatch_async(queue, ^{ self.inventory = [[IODItem retrieveInventoryItems] mutableCopy]; dispatch_async(dispatch_get_main_queue(), ^{ [self updateInventoryButtons]; [self updateCurrentInventoryItem]; self.ibChalkboardLabel.text = @"Inventory Loaded\n\nHow can I help you?"; }); }); Build and run.
Oh, and here is the hamburger. But we want to see the rest of the food, so let's make the buttons work.
The ibaLoadNextItem: and ibaLoadPreviousItem methods: we already have ViewController.m . Add some code.
- (IBAction)ibaLoadPreviousItem:(UIButton *)sender { self.currentItemIndex--; [self updateCurrentInventoryItem]; [self updateInventoryButtons]; } - (IBAction)ibaLoadNextItem:(UIButton *)sender { self.currentItemIndex++; [self updateCurrentInventoryItem]; [self updateInventoryButtons]; } Thanks to those helper methods, switching between objects with changing currentItemIndex and updating the UI has become very easy. Compile and run. Now you can see all the menus.
We delete and add an object.
We have a menu, but there is no waiter to take an order. In other words, the add and remove buttons do not work. Well, the time has come.
We need another helper method in the IODOrder class. In I ODOrder.m we write the following:
- (NSMutableDictionary *)orderItems{ if (!_orderItems) { _orderItems = [[NSMutableDictionary alloc] init]; } return _orderItems; } This is a simple getter method for the orderItems property. If there is already something in orderItems , the method will return an object. And if not, it will create a new dictionary and assign it to orderItems , and then return it.
Next, let's work on the orderDescription method. This method will give us lines for output to the chalk board. In IODOrder.m we write:
- (NSString*)orderDescription { // 1 - NSMutableString* orderDescription = [[NSMutableString alloc] init]; // 2 - NSArray* keys = [[self.orderItems allKeys] sortedArrayUsingComparator:^NSComparisonResult(id obj1, id obj2) { IODItem* item1 = (IODItem*)obj1; IODItem* item2 = (IODItem*)obj2; return [item1.name compare:item2.name]; }]; // 3 - [keys enumerateObjectsUsingBlock:^(id obj, NSUInteger idx, BOOL *stop) { IODItem* item = (IODItem*)obj; NSNumber* quantity = (NSNumber*)[self.orderItems objectForKey:item]; [orderDescription appendFormat:@"%@ x%@\n", item.name, quantity]; }]; // 4 - return [orderDescription copy]; } A bit of explanation:
- . .
- orderItems sortedArrayUsingComparator: .
- enumerateObjectsUsingBlock: . IODItem , (), orderDescription .
- , orderDescription , .
IODOrder.h .
- (void)updateCurrentInventoryItem; - (void)updateInventoryButtons; , , ViewController.m .
- (void)updateOrderBoard { if (![self.order.orderItems count]) { self.ibChalkboardLabel.text = @"No Items. Please order something!"; } else { self.ibChalkboardLabel.text = [self.order orderDescription]; } } . , «No Items. Please order something!». , orderDescription IODOrder .
. viewDidAppear :
dispatch_async(self.queue, ^{ self.inventory = [[IODItem retrieveInventoryItems] mutableCopy]; dispatch_async(dispatch_get_main_queue(), ^{ [self updateOrderBoard]; //<---- [self updateInventoryButtons]; [self updateCurrentInventoryItem]; self.ibChalkboardLabel.text = @"Inventory Loaded\n\nHow can I help you?"; }); }); , , , .
. IODOrder.m .
- (void)addItemToOrder:(IODItem*)inItem { // 1 - IODItem* key = [self findKeyForOrderItem:inItem]; // 2 - - if (!key) { [self.orderItems setObject:[NSNumber numberWithInt:1] forKey:inItem]; } else { // 3 - - NSNumber* quantity = self.orderItems[key]; int intQuantity = [quantity intValue]; intQuantity++; // 4 - [self.orderItems removeObjectForKey:key]; [self.orderItems setObject:[NSNumber numberWithInt:intQuantity] forKey:key]; } } :
- orderItem . , , , nil .
- , , 1.
- , 1.
- , .
removeItemFromOrder: , addItemToOrder: . IODOrder.m :
- (void)removeItemFromOrder:(IODItem*)inItem { // 1 - IODItem* key = [self findKeyForOrderItem:inItem]; // 2 - , if (key) { // 3 - , NSNumber* quantity = self.orderItems[key]; int intQuantity = [quantity intValue]; intQuantity--; // 4 - [[self orderItems] removeObjectForKey:key]; // 5 - 0 if (intQuantity) [[self orderItems] setObject:[NSNumber numberWithInt:intQuantity] forKey:key]; } } , - , . , , 1, , 0.
IODOrder.h :
- (void)addItemToOrder:(IODItem*)inItem; - (void)removeItemFromOrder:(IODItem*)inItem; ViewController.m :
- (IBAction)ibaRemoveItem:(UIButton *)sender { IODItem* currentItem = self.inventory[self.currentItemIndex]; [self.order removeItemFromOrder:currentItem]; [self updateOrderBoard]; [self updateCurrentInventoryItem]; [self updateInventoryButtons]; } - (IBAction)ibaAddItem:(UIButton *)sender { IODItem* currentItem = self.inventory[self.currentItemIndex]; [self.order addItemToOrder:currentItem]; [self updateOrderBoard]; [self updateCurrentInventoryItem]; [self updateInventoryButtons]; } , — , addItemToOrder: removeItemFromOrder: , UI.
. , .
UIAnimation
. ibaRemoveItem: ibaAddItemMethod:
- (IBAction)ibaRemoveItem:(UIButton *)sender { IODItem* currentItem = [self.inventory objectAtIndex:self.currentItemIndex]; [self.order removeItemFromOrder:currentItem]; [self updateOrderBoard]; [self updateCurrentInventoryItem]; [self updateInventoryButtons]; UILabel* removeItemDisplay = [[UILabel alloc] initWithFrame:self.ibCurrentItemImageView.frame]; removeItemDisplay.center = self.ibChalkboardLabel.center; removeItemDisplay.text = @"-1"; removeItemDisplay.textAlignment = NSTextAlignmentCenter; removeItemDisplay.textColor = [UIColor redColor]; removeItemDisplay.backgroundColor = [UIColor clearColor]; removeItemDisplay.font = [UIFont boldSystemFontOfSize:32.0]; [[self view] addSubview:removeItemDisplay]; [UIView animateWithDuration:1.0 animations:^{ removeItemDisplay.center = [self.ibCurrentItemImageView center]; removeItemDisplay.alpha = 0.0; } completion:^(BOOL finished) { [removeItemDisplay removeFromSuperview]; }]; } - (IBAction)ibaAddItem:(UIButton *)sender { IODItem* currentItem = [self.inventory objectAtIndex:self.currentItemIndex]; [self.order addItemToOrder:currentItem]; [self updateOrderBoard]; [self updateCurrentInventoryItem]; [self updateInventoryButtons]; UILabel* addItemDisplay = [[UILabel alloc] initWithFrame:self.ibCurrentItemImageView.frame]; addItemDisplay.text = @"+1"; addItemDisplay.textColor = [UIColor whiteColor]; addItemDisplay.backgroundColor = [UIColor clearColor]; addItemDisplay.textAlignment = NSTextAlignmentCenter; addItemDisplay.font = [UIFont boldSystemFontOfSize:32.0]; [[self view] addSubview:addItemDisplay]; [UIView animateWithDuration:1.0 animations:^{ [addItemDisplay setCenter:self.ibChalkboardLabel.center]; [addItemDisplay setAlpha:0.0]; } completion:^(BOOL finished) { [addItemDisplay removeFromSuperview]; }]; } , . UILabel . — , . UIView- , .
. .
(Total)
, IODOrder.m — .
- (float)totalOrder { // 1 - __block float total = 0.0; // 2 - float (^itemTotal)(float,int) = ^float(float price, int quantity) { return price * quantity; }; // 3 - [self.orderItems enumerateKeysAndObjectsUsingBlock:^(id key, id obj, BOOL *stop) { IODItem* item = (IODItem*)key; NSNumber* quantity = (NSNumber*)obj; int intQuantity = [quantity intValue]; total += itemTotal([item.price floatValue], intQuantity); }]; // 4 - return total; } :
- , . __block . . __block , , , . , . .
- , , .
- enumerateKeysAndObjectsUsingBlock: orderItems , ( __block — ).
- .
IODOrder.h .
- (float)totalOrder; , — . totalOrder , Total . ibaCalculateTotal :
- (IBAction)ibaCalculateTotal:(UIButton *)sender { float total = [self.order totalOrder]; UIAlertController *alert = [UIAlertController alertControllerWithTitle:@"Total" message:[NSString stringWithFormat:@"$%0.2f",total] preferredStyle:UIAlertControllerStyleAlert]; UIAlertAction *cancelButton = [UIAlertAction actionWithTitle:@"Close" style:UIAlertActionStyleDefault handler:^(UIAlertAction * action) { [alert dismissViewControllerAnimated:YES completion:nil]; }]; [alert addAction:cancelButton]; [self presentViewController:alert animated:YES completion:nil]; } .
That's all! .
, , .
NSArray
- enumerateObjectsUsingBlock — , .
- enumerateObjectsAtIndexes:usingBlock: — , enumerateObjectsUsingBlock , .
- indexesOfObjectsPassingTest: — , , . .
NSDictionary
UIView
- animateWithDuration:animations: — UIAnimation, .
- animateWithDuration:completion: — UIAnimation. .
Grand Central Dispatch
- dispatch_async — GCD .
.
// , - (void)doMathWithBlock:(int (^)(int, int))mathBlock { self.label.text = [NSString stringWithFormat:@"%d", mathBlock(3, 5)]; } // - (IBAction)buttonTapped:(id)sender { [self doMathWithBlock:^(int a, int b) { return a + b; }]; } — Objective-C, . , ( , ).
// @property (strong) int (^mathBlock)(int, int); // - (void)doMathWithBlock:(int (^)(int, int))mathBlock { self.mathBlock = mathBlock; } // - (IBAction)buttonTapped:(id)sender { [self doMathWithBlock:^(int a, int b) { return a + b; }]; } // ... - (IBAction)button2Tapped:(id)sender { self.label.text = [NSString stringWithFormat:@"%d", self.mathBlock(3, 5)]; } } , , typedef .
//typedef typedef int (^MathBlock)(int, int); // , typedef @property (strong) MathBlock mathBlock; // - (void)doMathWithBlock:(MathBlock) mathBlock { self.mathBlock = mathBlock; } // - (IBAction)buttonTapped:(id)sender { [self doMathWithBlock:^(int a, int b) { return a + b; }]; } // ... - (IBAction)button2Tapped:(id)sender { self.label.text = [NSString stringWithFormat:@"%d", self.mathBlock(3, 5)]; } . , , Xcode , .
, :
NSArray * array; [array enum enumerateObjectsUsingBlock — Enter . Enter . :
[array enumerateObjectsUsingBlock:^(id obj, NSUInteger idx, BOOL *stop) { code } code , , — , .
[array enumerateObjectsUsingBlock:^(id obj, NSUInteger idx, BOOL *stop) { // Do something }]; ?
. git, . , , .
— . , .
:
Source: https://habr.com/ru/post/309846/
All Articles