Using blocks in iOS. Part 1
In the process of learning Objective-C and iOS-development could not understand the principles of operation of the blocks. I was confused that they can be passed as parameters to methods. I stumbled upon an article that seemed extremely interesting to me, since not only the blocks were considered, but also the application development process. The post is adapted for xCode 7.3.1.
Blocks are an incredibly powerful addition to C / Objective-C that allows you to "wrap" pieces of code into separate units and operate on them as objects. More and more APIs require the use of blocks in iOS, so it is very important to understand them. However, their syntax and some subtle aspects are often confusing for beginners. But you should not be afraid - this lesson will be very useful.
In two parts of this lesson we will create a small iOS project “iOS Diner”. The application itself is simple: the user selects a dish from the menu to create an order, as if about to dine. Caution: in the process of creating the feeling of hunger escalates!
In the first part, we will develop the UI of our application, at the same time examining the Storyboard (literally - storyboard - Approx. Ln.), Including a small note on creating and using web services to load the menu in JSON format.
')
Note If you're already pretty good with Storyboard and Interface Builder , you can skip the first part and go straight to the second part , where we will start using blocks. This section only focuses on Storyboard and Interface Builder .
The second part will show the comprehensive use of blocks for programming application logic, asynchronous data processing, background tasks, using as an alternative to many standard APIs, and much more.
Open Xcode and create a new project.
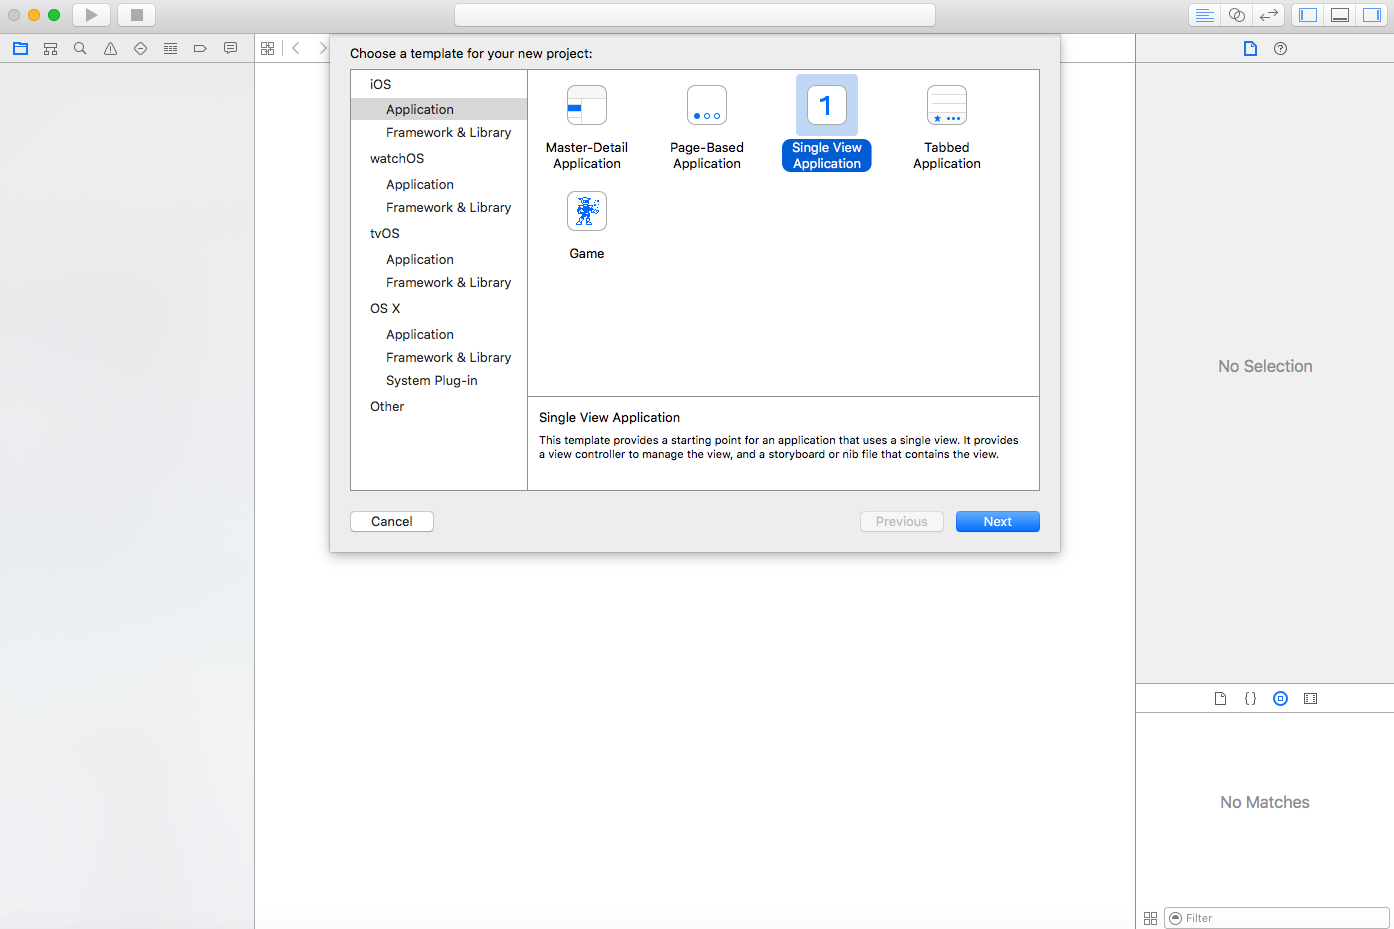
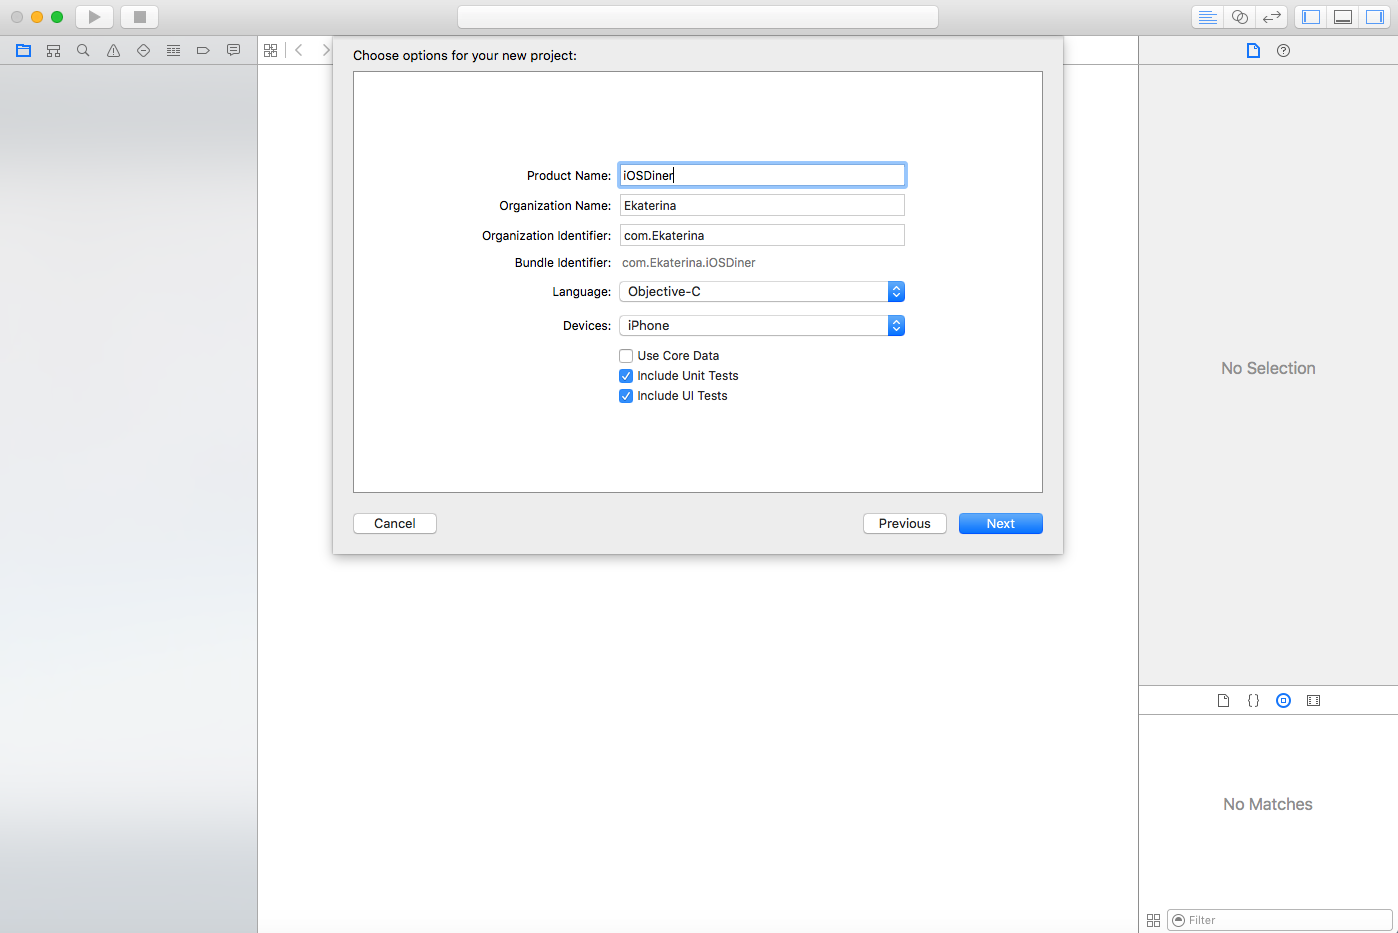
In the name of the project, specify "iOSDiner".
Run the project. Of course, it’s still empty, and the simulator will have a blank white screen.

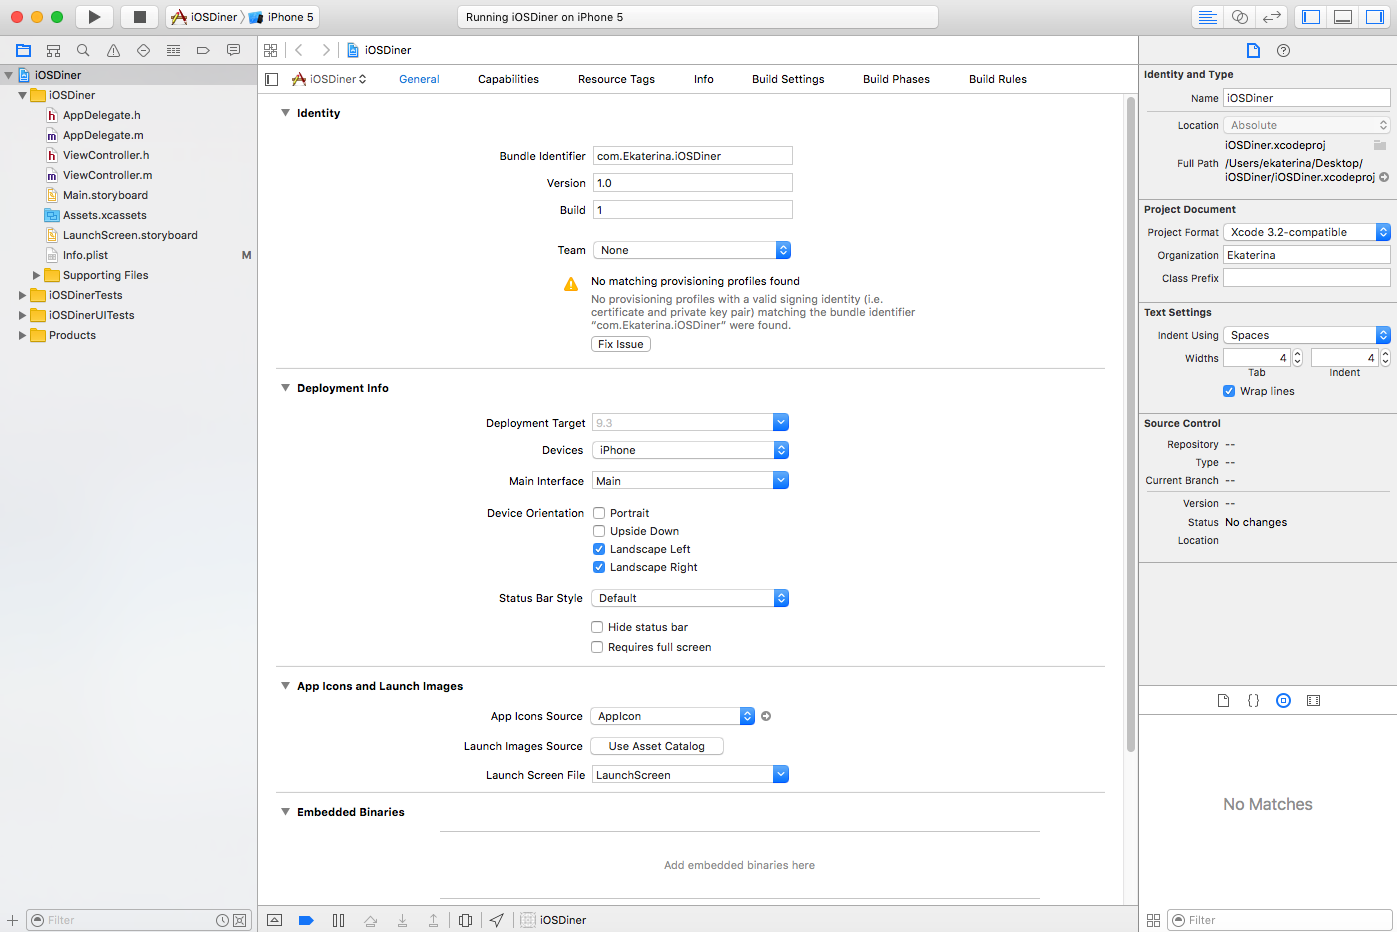
In the project settings in Deployment Info we remove the tick Portrait .
The first thing we do is set up the presentation. This will require some graphics. You can download from here . This will need to be added to project resources.
To be honest, I never liked how xCode handles file matching in a project and the file system, so usually I add resources manually in the file system. In the Finder, open the project folder and create the “Resources” folder in it. In it, create a folder «Images».
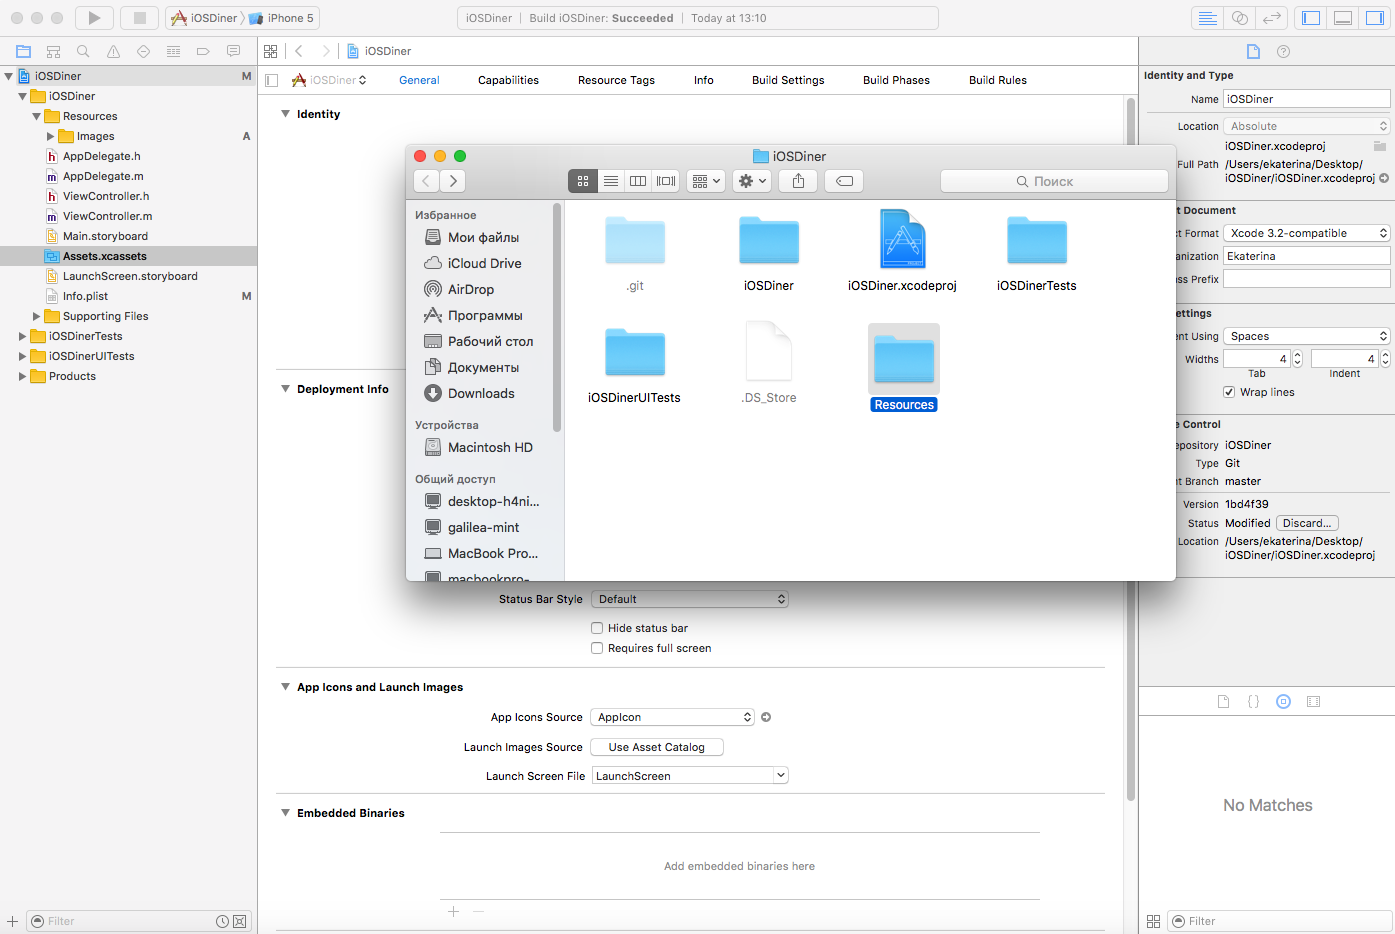
Copy the graphic from the downloaded zip file to the Images folder, then drag the Resources folder to the IOSDiner folder in Xcode, as shown in the screenshot below.
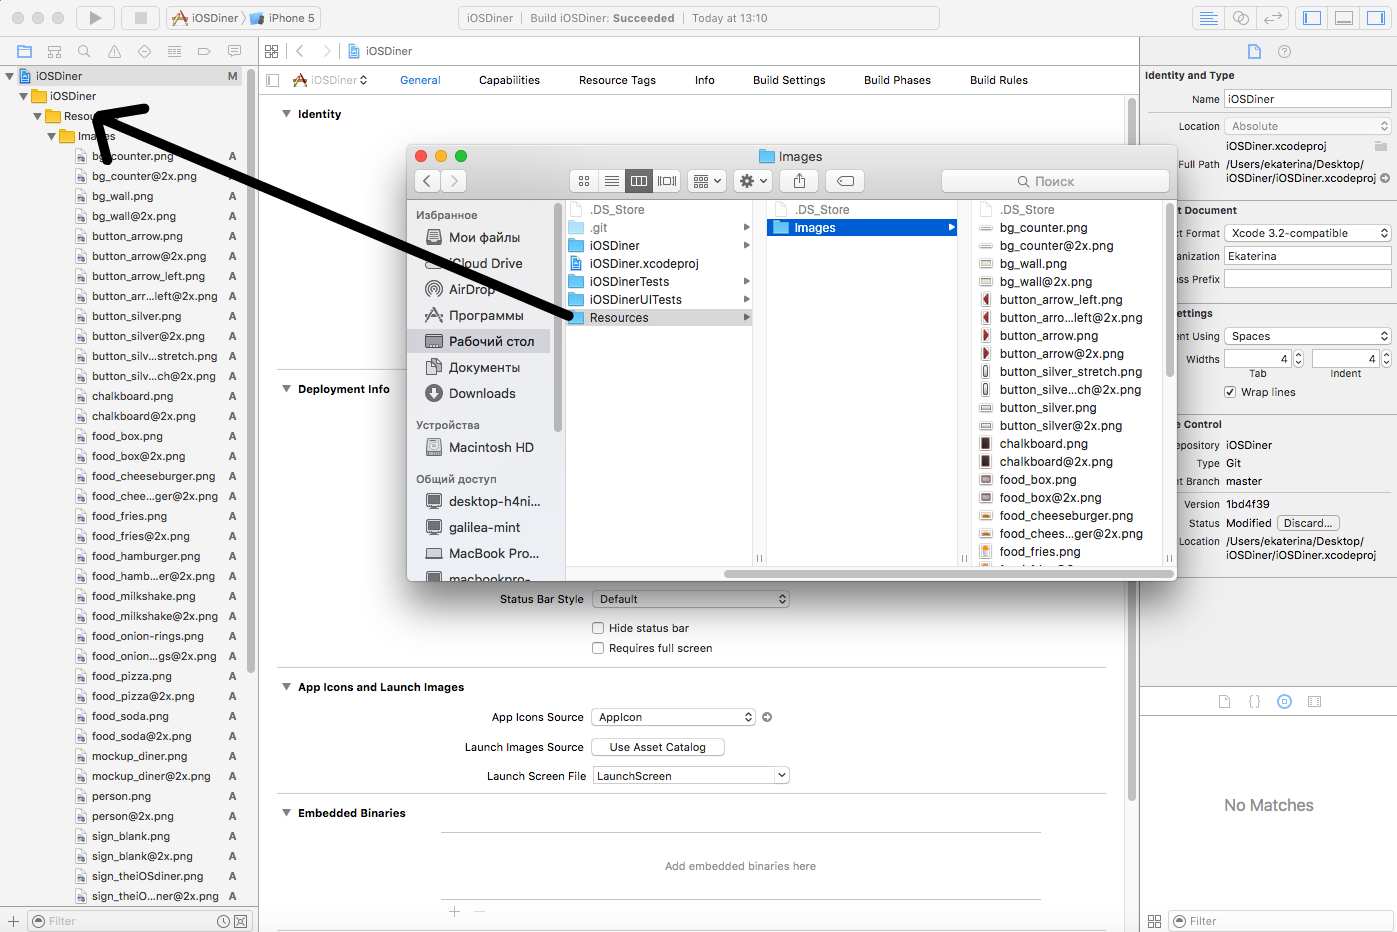
Now you can see the Resources folder in Xcode, which has a subfolder of Images with downloaded images, just like in the file system.
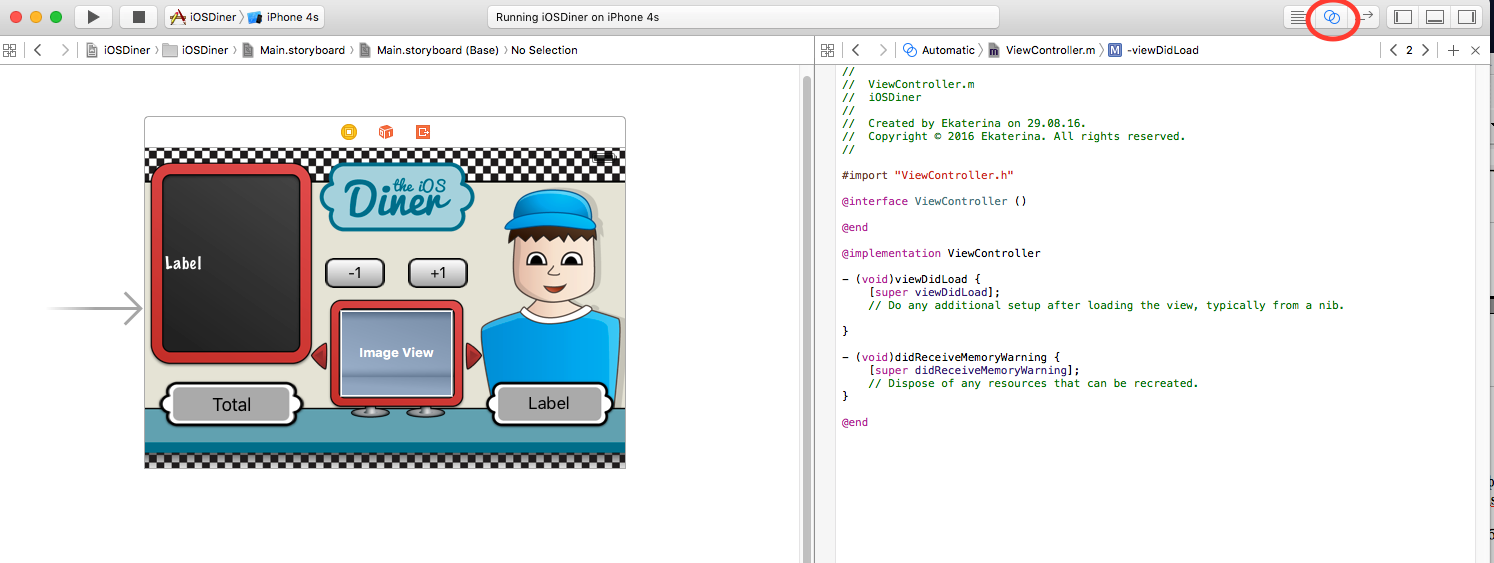
Open Main.storyboard .
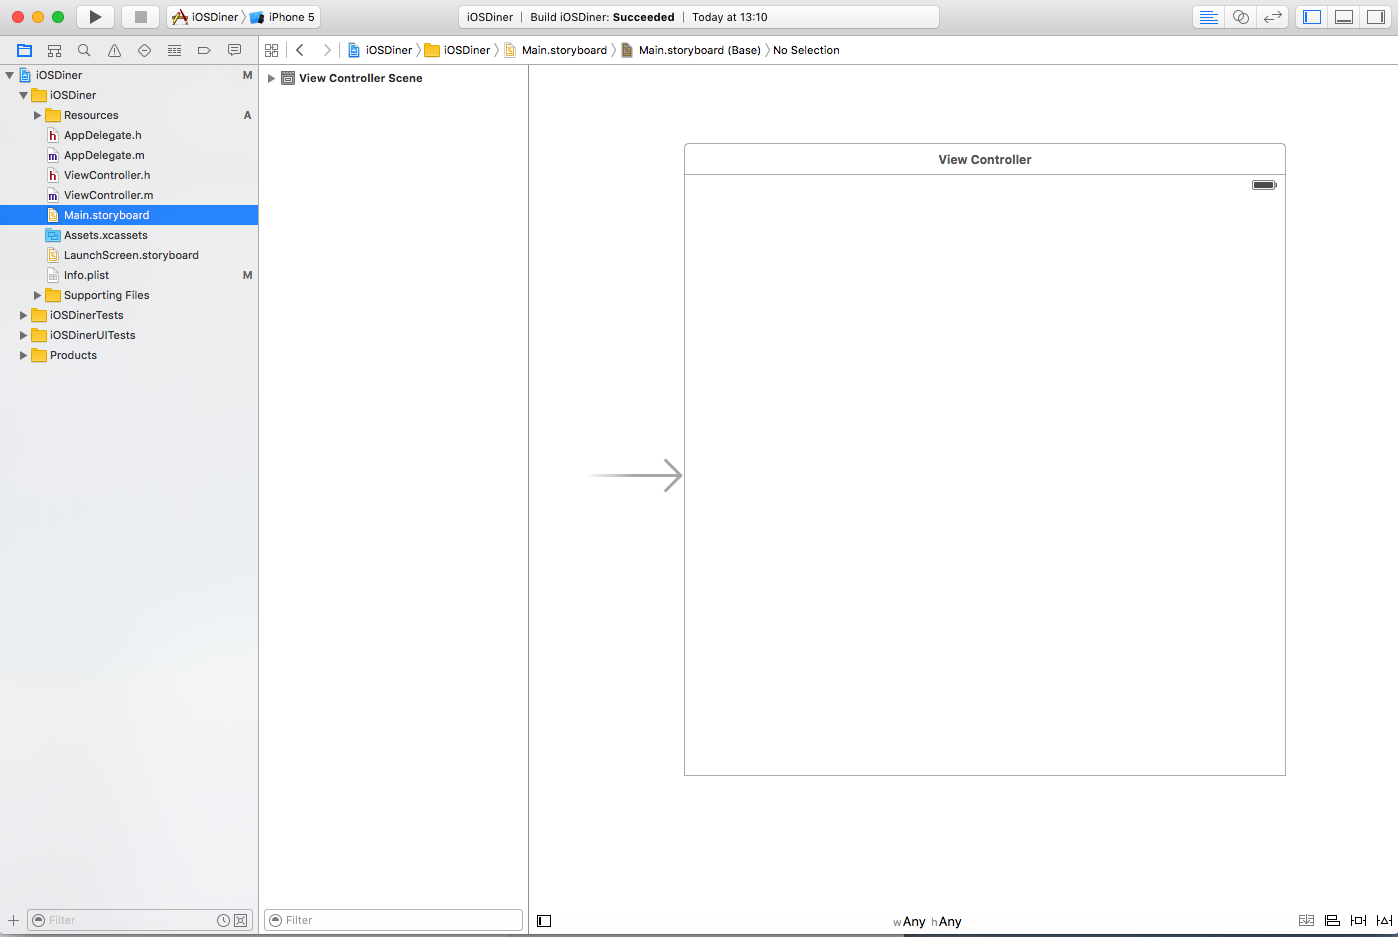
If you do not see the second column called “ View Controller Scene ”, at the bottom click on the Expand button.
So, we are going to add images to the Storyboard as UIImageViews and UIButtons . To make it easier, open the Utilities sidebar and select the Media Library .
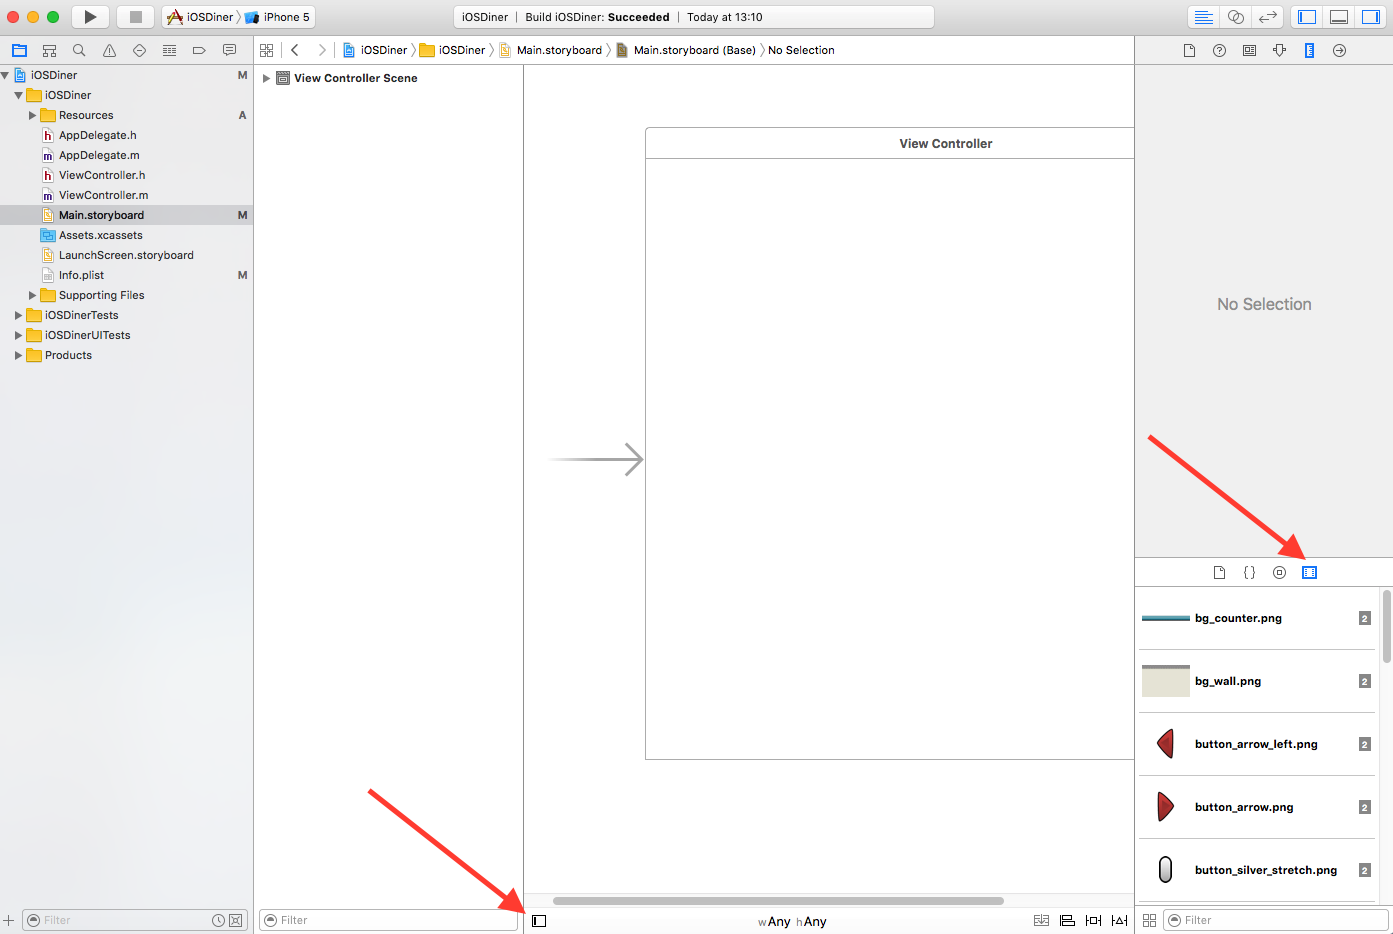
Here we see all the images previously added to the project. Surely, you have noticed that each image has its own copy with "@ 2x" at the end of the title. It is used for retina version.
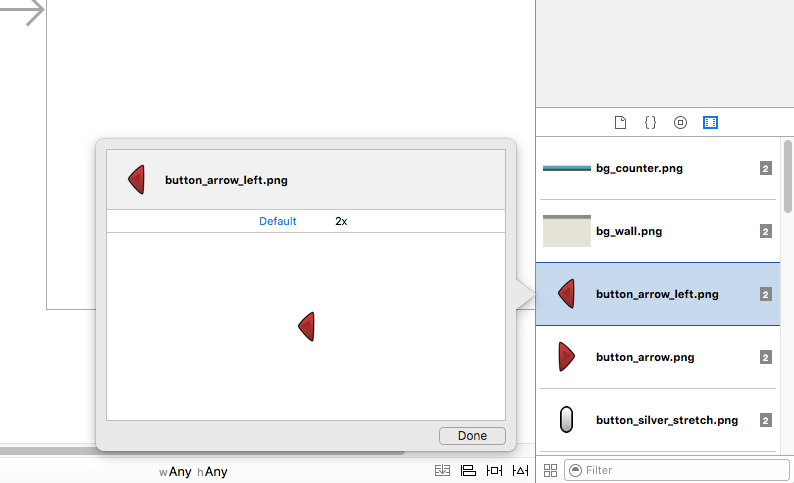
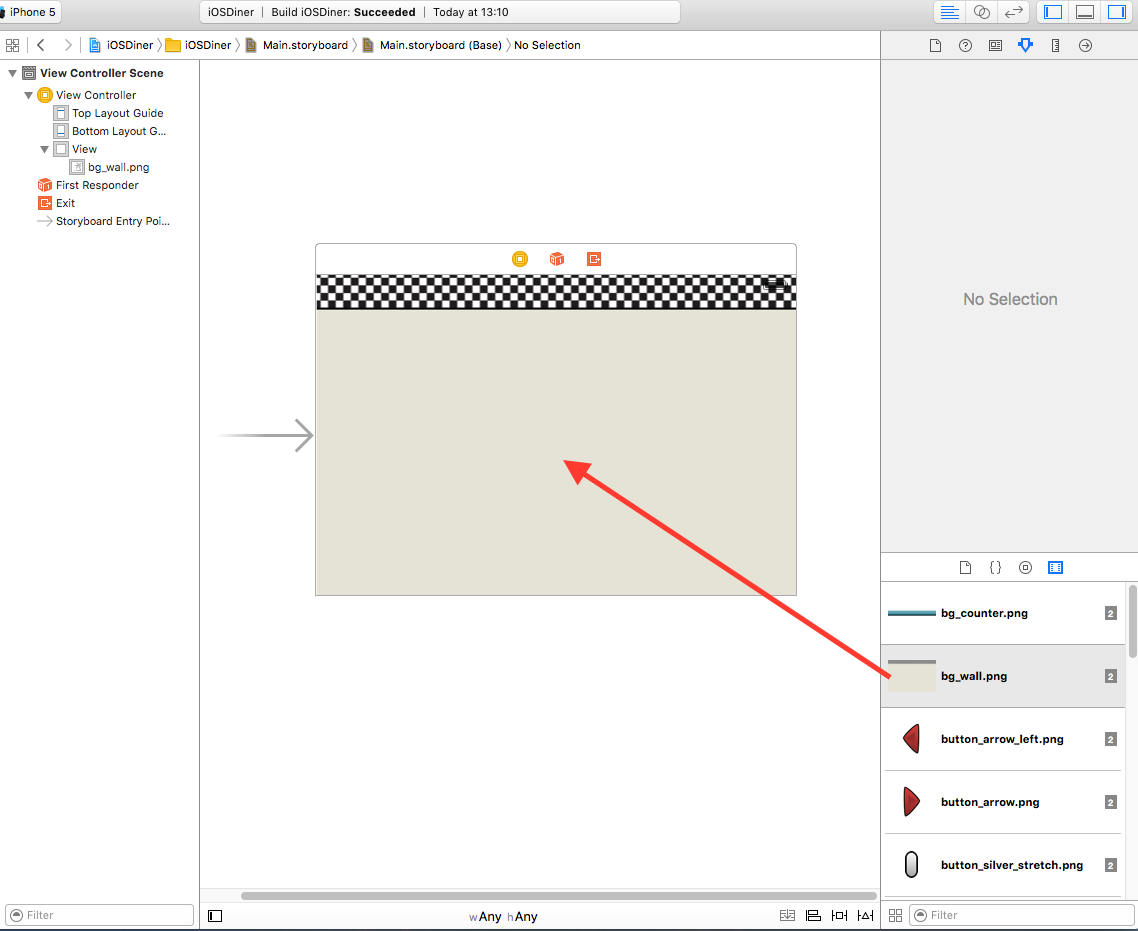
We are only interested in the usual picture. You can check which version of the image it is by clicking and pressing the spacebar. Drag “bg_wall.png” to the root view as shown below. If you are not sure that the image is set correctly, you can switch to the Size Inspector to change its X and Y coordinates.
Now do the same with the following images:
Note. You can make the Image View correspond to the exact size of the image by simultaneously pressing Cmd and the = key. Putting all the pictures into place, run the project.
Wow Almost like an app! Next, add parts of the user interface. In the Utilities panel, switch to the Object Library .
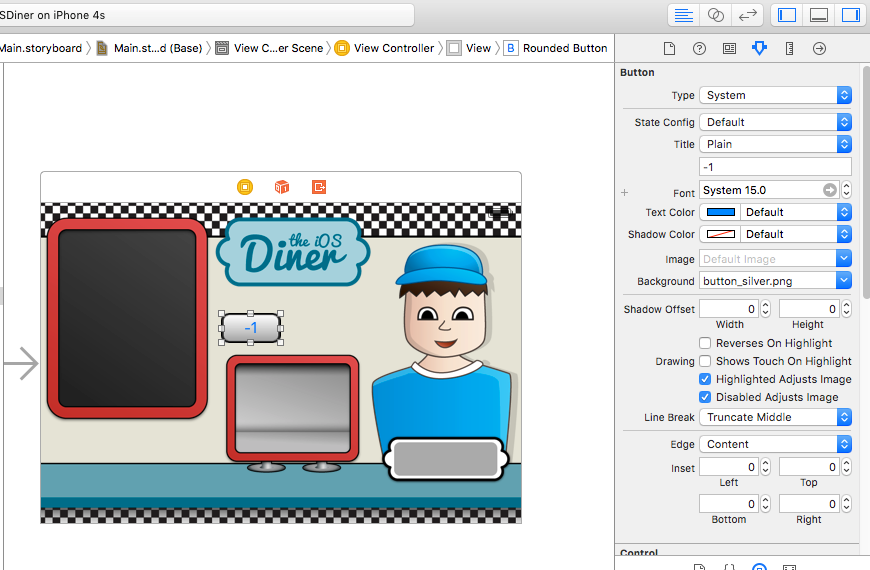
Drag a Button to the center of our view, above the monitor. Double click on the newly added button and write "-1".

Make sure the button is highlighted. In Attributes Inspector, set the Background attribute to “button_silver.png”. Press and hold the Alt key and drag the -1 button to the right. This will create a copy of the object. Change its text to +1.
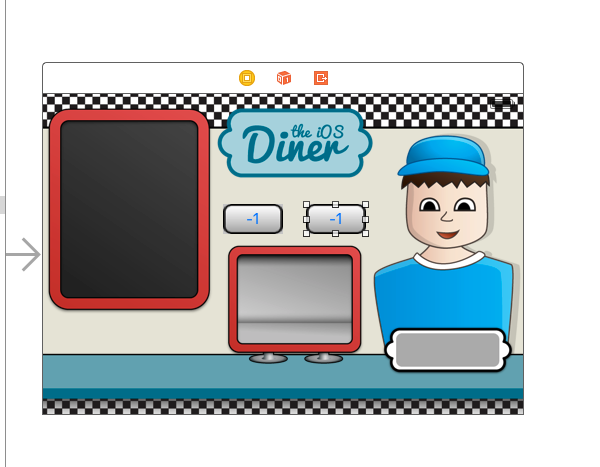
Drag another button to the left edge of the monitor. Set Button Type to Custom , remove the button title and from the Media Library drag to the button_arrow_left.png button.
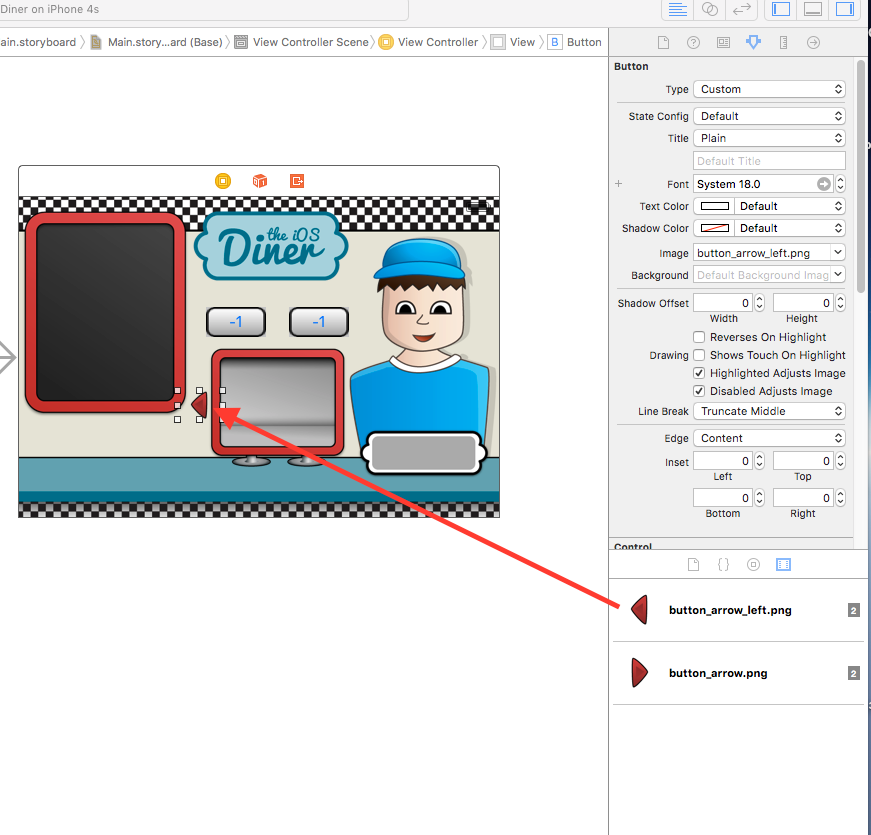
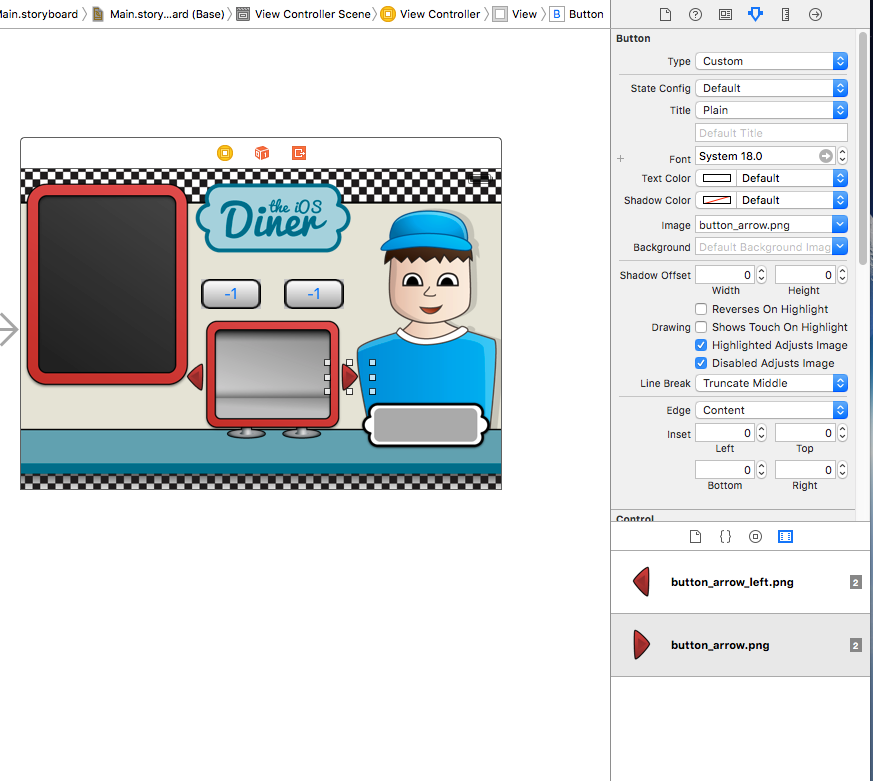
Copy this button and change the background image to "button_arrow.png"
And the last button remains. Place it under the board and set the total_field.png background image. Run the project.
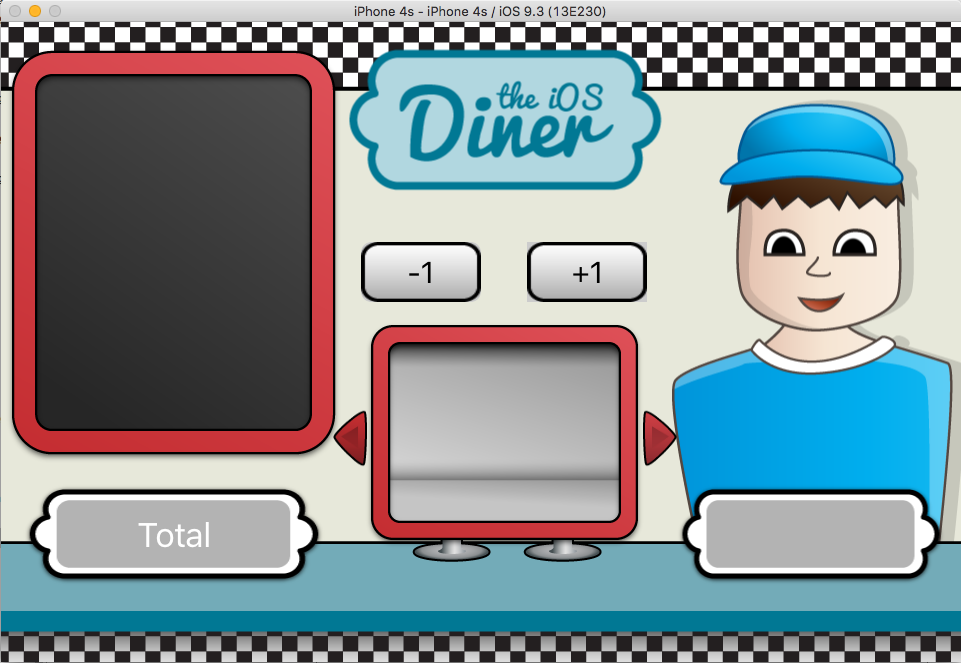
Looks quite nice. The next thing we add is labels and a preview window.
Go to the Object Library again. Drag the UILabel onto the board and stretch it to the size of the board.
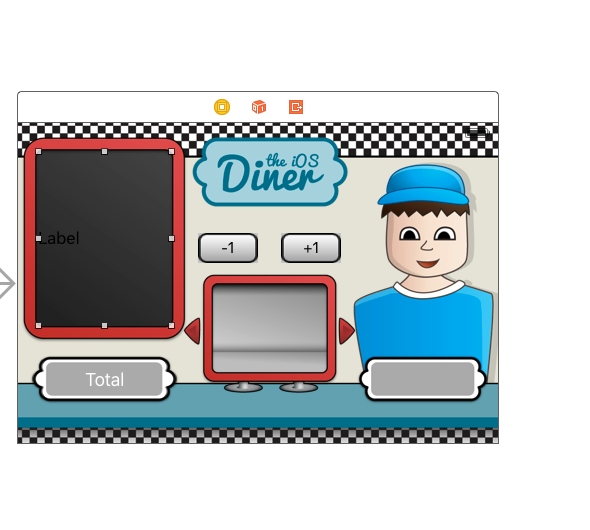
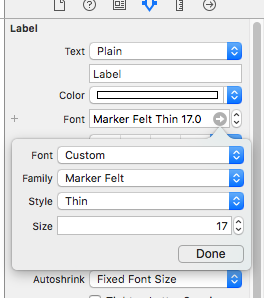
In Atrributes Inspector, set Lines to 0 (this will make the label multi-line), change the Text Color to white, and Font to Marker Felt 17.0. I usually consider using Marker Felt a crime, but in our case it’s quite suitable.
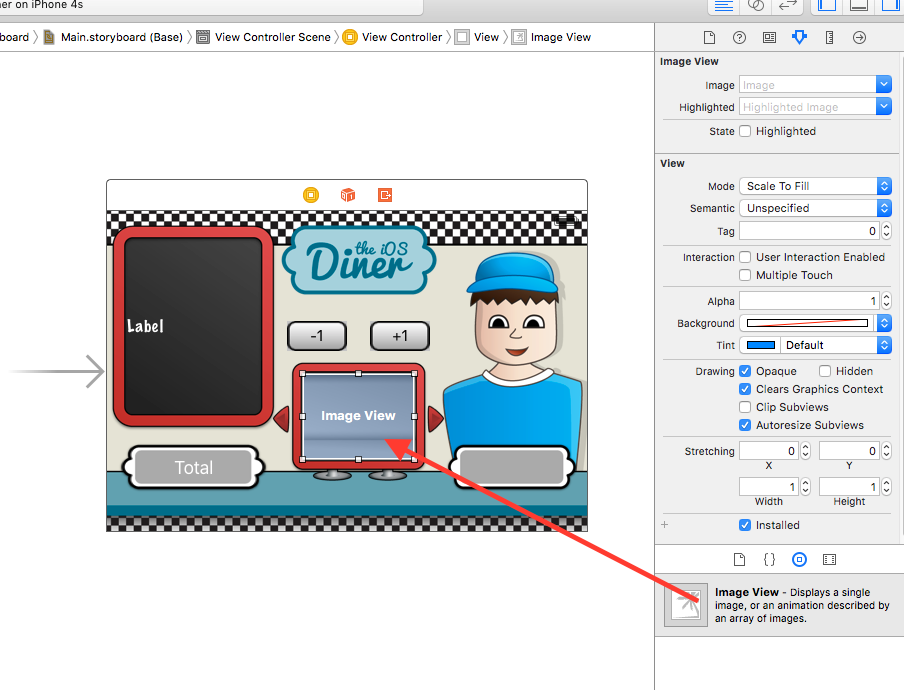
Drag the UIImageView onto the monitor and drag it to its size.
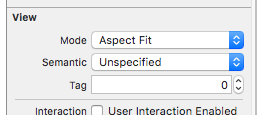
In Attributes Inspector, change Mode to Aspect Fit.
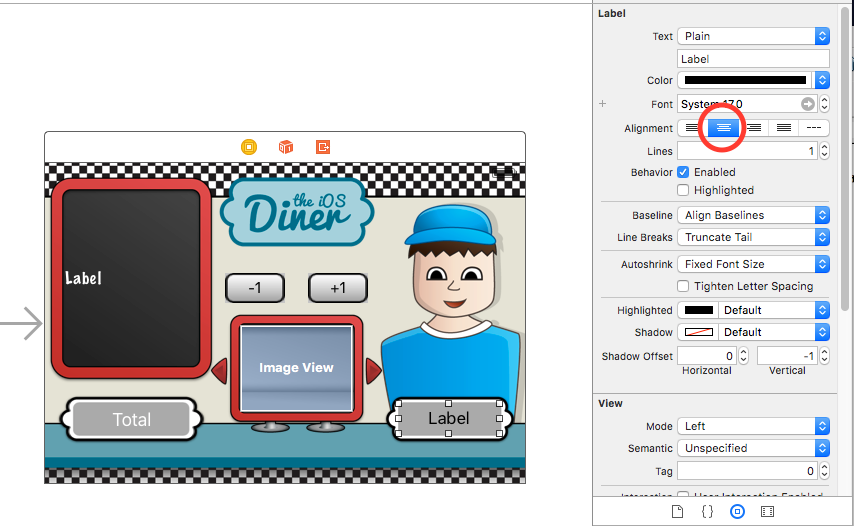
Drag another UILabel onto the table in the lower right corner. Make it the size of the gray area of the plate and set the Alignment in Center.
Next, you need to establish links between the user interface that we just created and the code. IBOutlets and IBActions are needed for this. IB stands for Interface Builder , which is used to create UI in xCode.
So let's write some code for connecting UI elements via IBOutlets and IBActions .
Close the Utilities tab and open the Assistant editor . Depending on how it is configured, the screen may not look like in the screenshot. If you want to change the display of the Assistant editor , take a look at its menu.
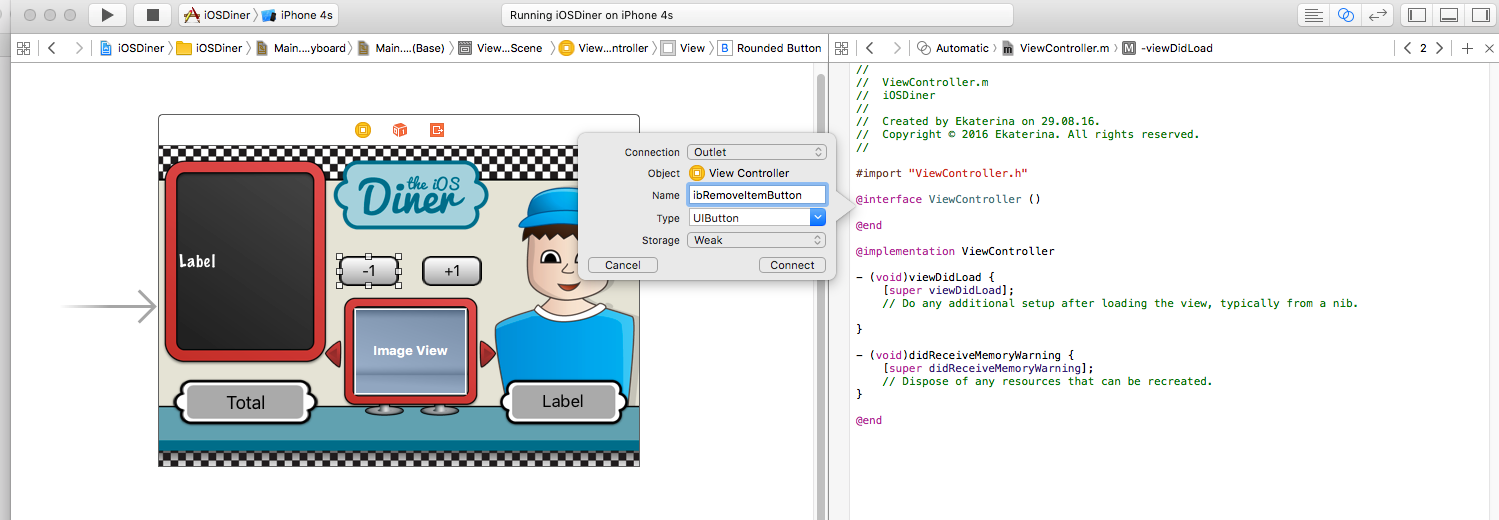
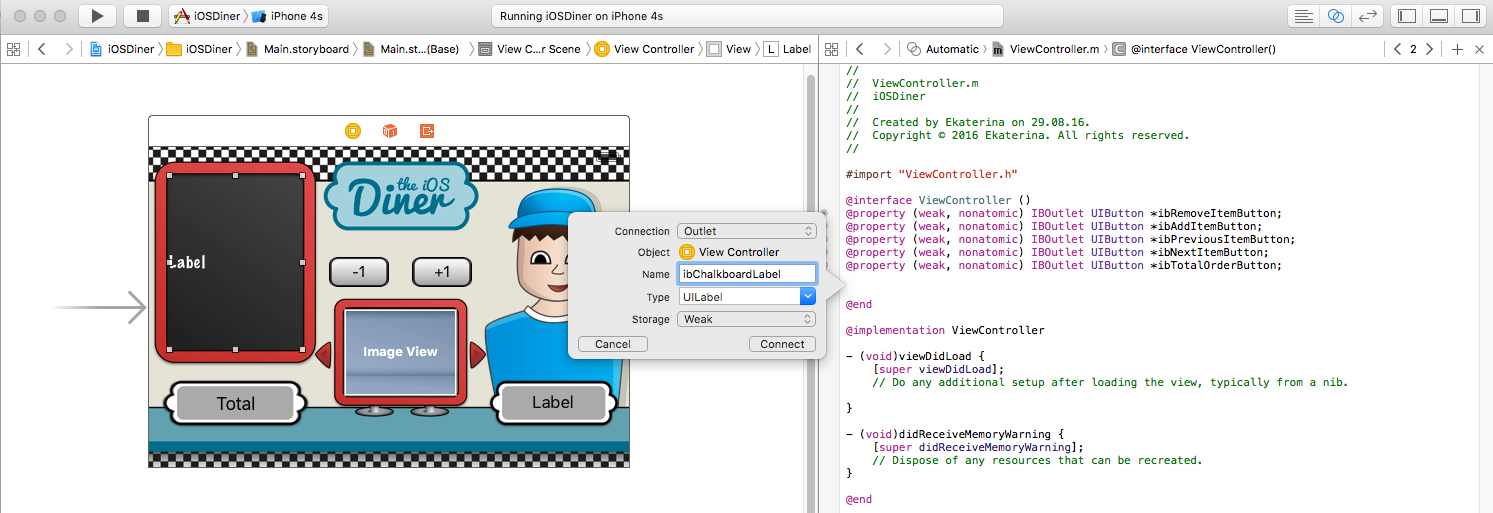
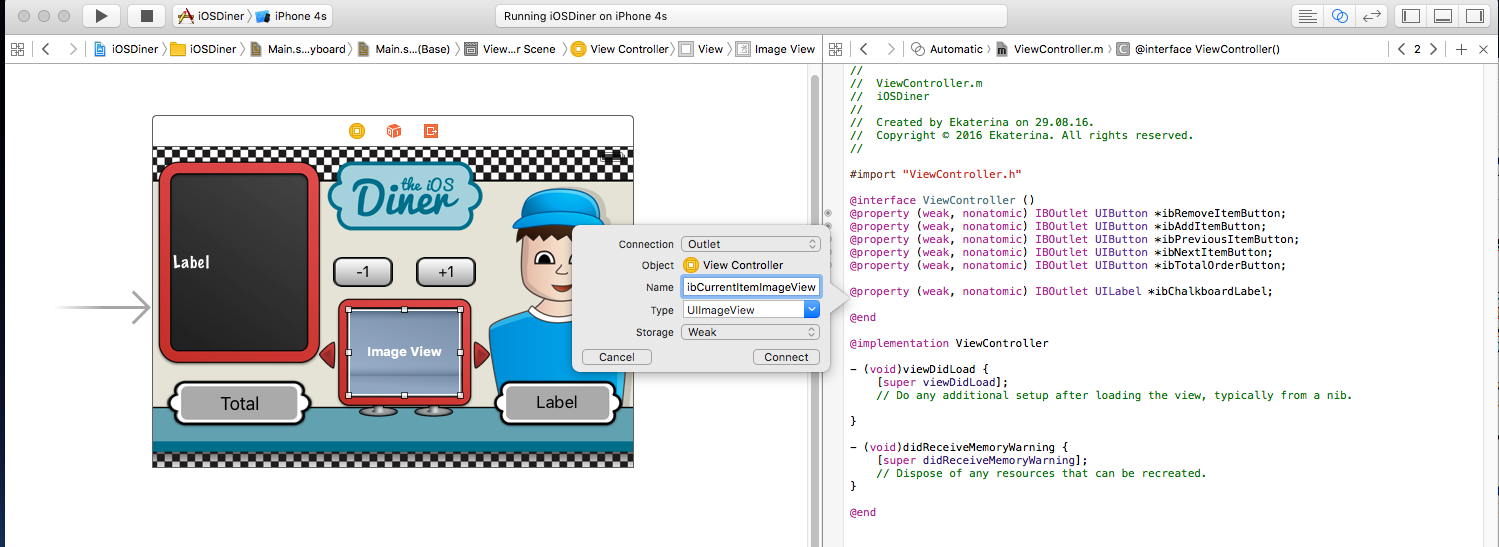
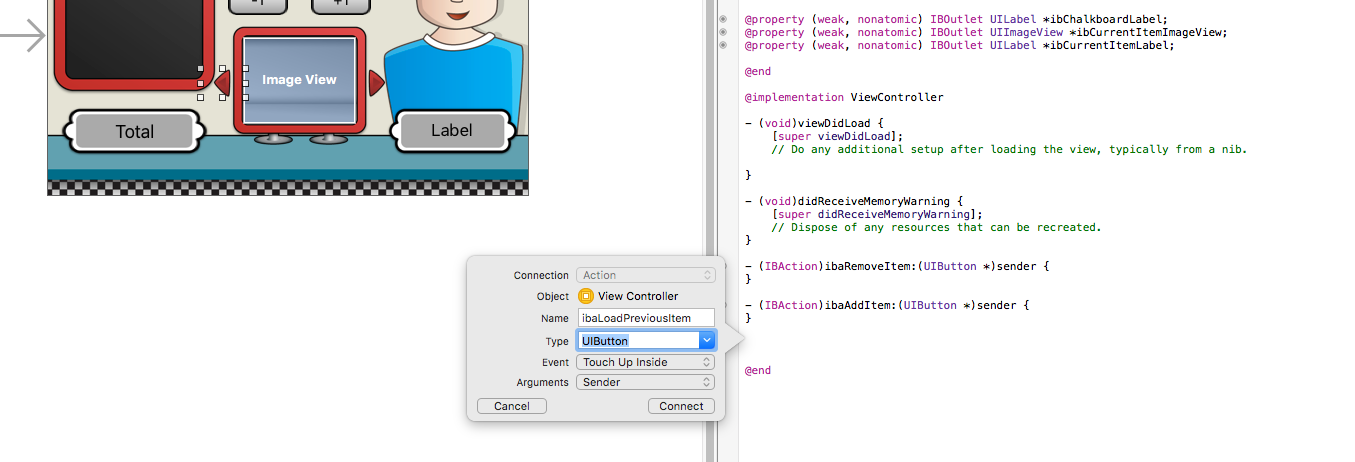
Let's start with the buttons. Select the "-1" button, hold down the Ctrl key and drag it into the code. This automates the creation of an IBOutlet for a button.
For this object, all that is needed is to name it. I like the “ib” prefixes, since in xCode it becomes easy to find all the elements by autocomplete. Name this object “ibRemoveItemButton” and click Connect .
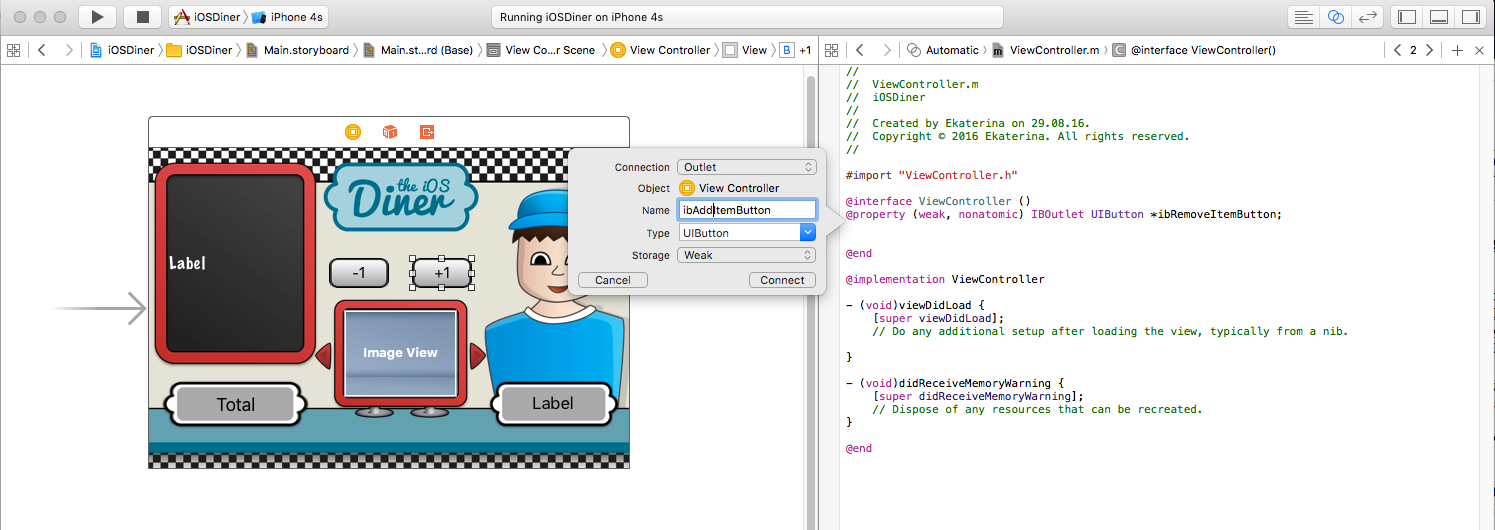
Similarly, we do with the other buttons.

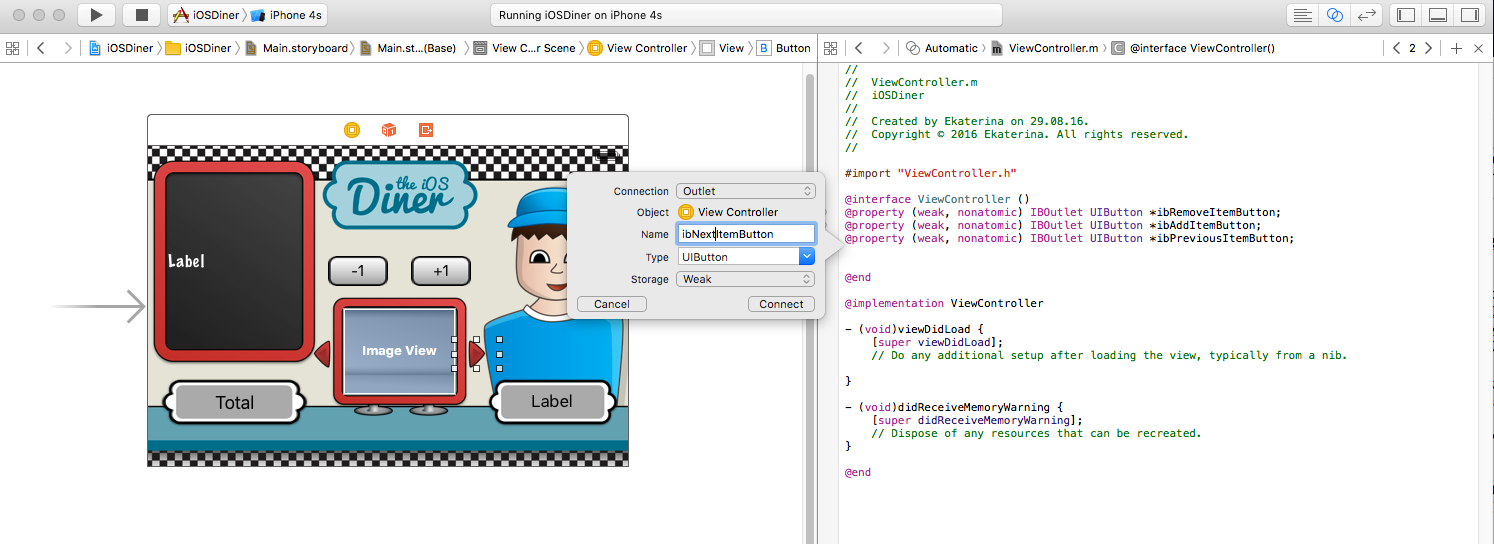

Similarly, we install labels.
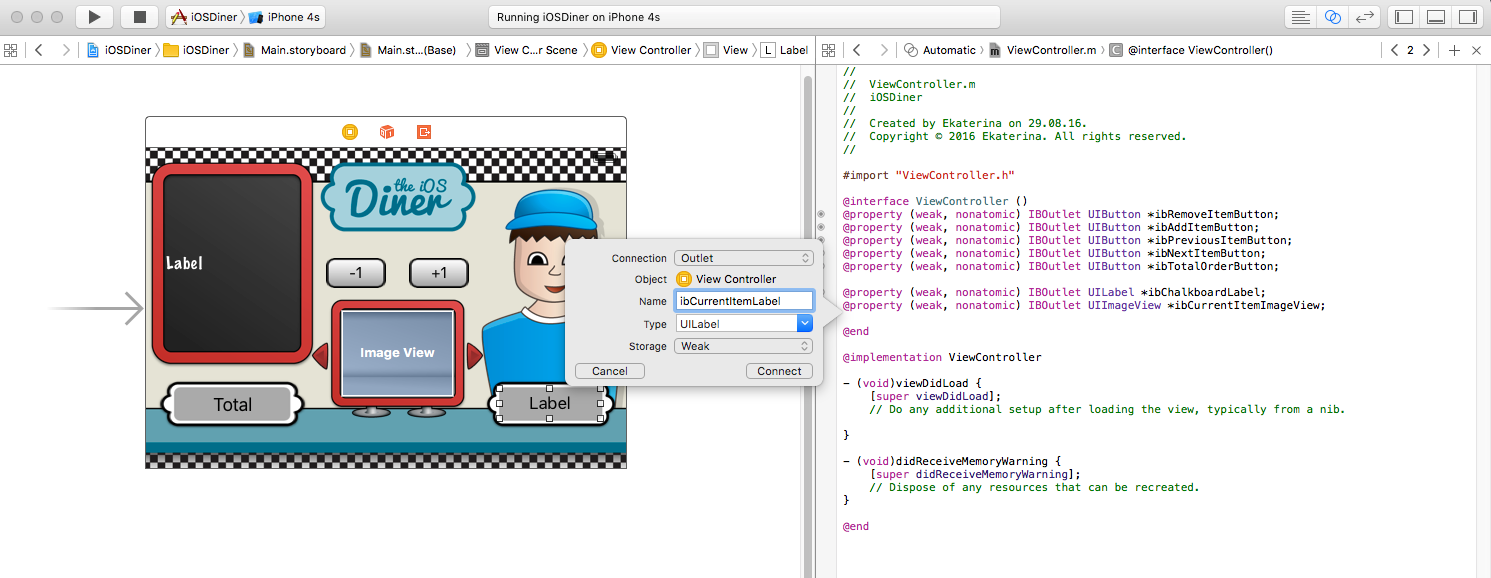
Now ViewController.m should look like this:
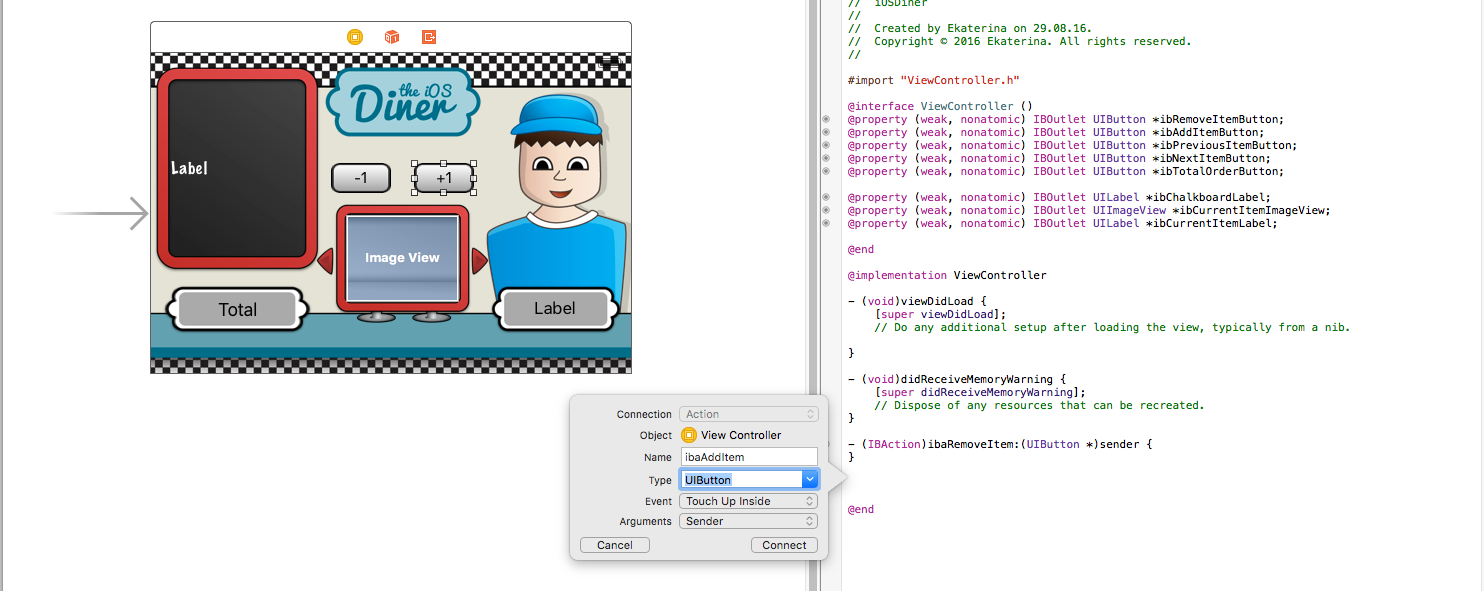
Now we need to add IBActions for UIButtons . These are methods that are called in response to certain events (Touch Up Inside, Touch Up Outside, Touch Cancel, etc.). Touch Up Inside is most commonly used for buttons.
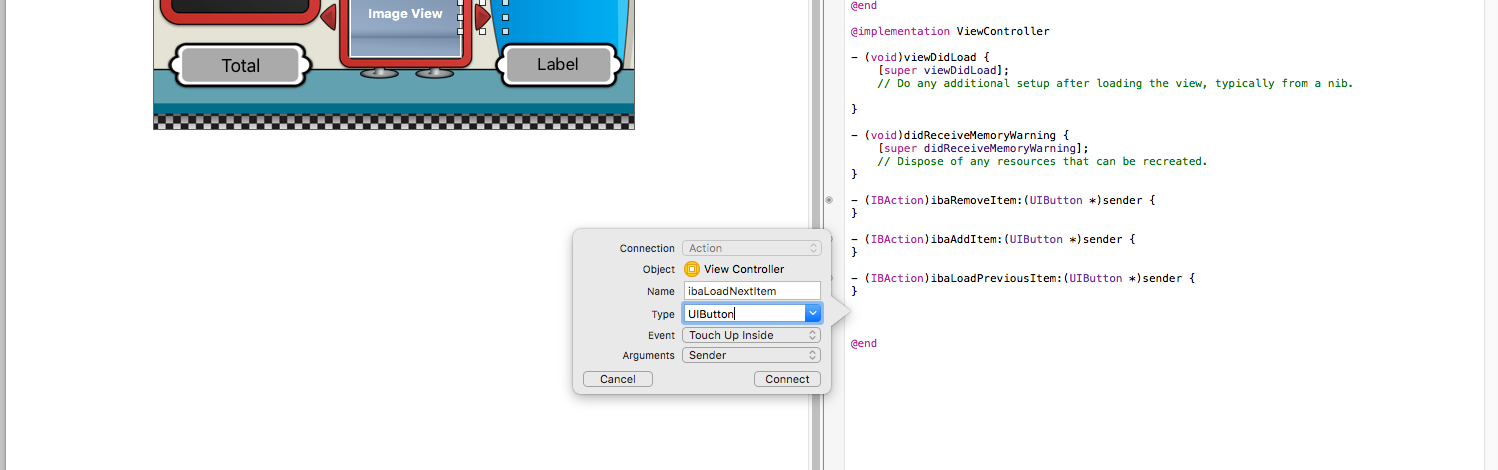
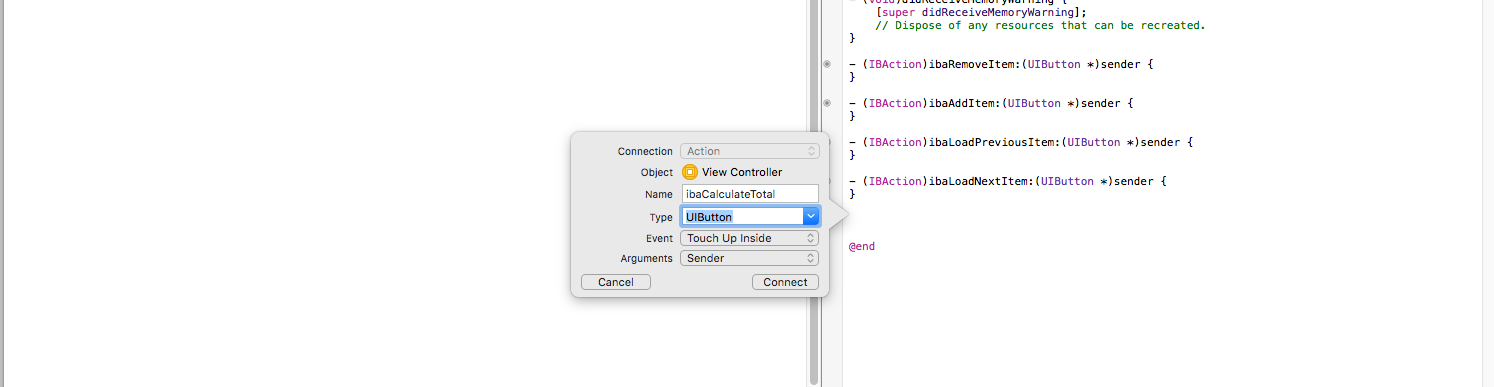
Choose the "-1" button. Again, using the Ctrl key, drag it to ViewController.m . Since this is an IBAction , we use the iba prefix. Repeat for all buttons.

Before proceeding with the code, set up a web service. I’m not going to explain everything in the smallest detail, since there are already several lessons for this purpose ( How To Write A App ?).
The code below shows what the PHP code for the web service will look like.
This web service is a completely simple PHP script that returns a JSON array. The array contains the so-called associative array (PHP), or dictionary (Objective-C), which contains the name, price, and image name for the item. The only thing that should be noted in the above code is the line
I use it to simulate a slow web service to better show how blocks can help with asynchronous operations.
You can copy this code to a file with the .php extension and place it on a hosting, or just use mine .
The draft of this part of the lesson can be downloaded here . Well, there were a lot of all sorts of things not related to the blocks. But now, by setting the view and web service , we can go to coding, where we will use blocks to make our application fully functional.
Foreword
Blocks are an incredibly powerful addition to C / Objective-C that allows you to "wrap" pieces of code into separate units and operate on them as objects. More and more APIs require the use of blocks in iOS, so it is very important to understand them. However, their syntax and some subtle aspects are often confusing for beginners. But you should not be afraid - this lesson will be very useful.
In two parts of this lesson we will create a small iOS project “iOS Diner”. The application itself is simple: the user selects a dish from the menu to create an order, as if about to dine. Caution: in the process of creating the feeling of hunger escalates!
In the first part, we will develop the UI of our application, at the same time examining the Storyboard (literally - storyboard - Approx. Ln.), Including a small note on creating and using web services to load the menu in JSON format.
')
Note If you're already pretty good with Storyboard and Interface Builder , you can skip the first part and go straight to the second part , where we will start using blocks. This section only focuses on Storyboard and Interface Builder .
The second part will show the comprehensive use of blocks for programming application logic, asynchronous data processing, background tasks, using as an alternative to many standard APIs, and much more.
Getting started
Open Xcode and create a new project.
In the name of the project, specify "iOSDiner".
Run the project. Of course, it’s still empty, and the simulator will have a blank white screen.
In the project settings in Deployment Info we remove the tick Portrait .
The first thing we do is set up the presentation. This will require some graphics. You can download from here . This will need to be added to project resources.
To be honest, I never liked how xCode handles file matching in a project and the file system, so usually I add resources manually in the file system. In the Finder, open the project folder and create the “Resources” folder in it. In it, create a folder «Images».
Copy the graphic from the downloaded zip file to the Images folder, then drag the Resources folder to the IOSDiner folder in Xcode, as shown in the screenshot below.
Now you can see the Resources folder in Xcode, which has a subfolder of Images with downloaded images, just like in the file system.
Adding Images
Open Main.storyboard .
If you do not see the second column called “ View Controller Scene ”, at the bottom click on the Expand button.
So, we are going to add images to the Storyboard as UIImageViews and UIButtons . To make it easier, open the Utilities sidebar and select the Media Library .
Here we see all the images previously added to the project. Surely, you have noticed that each image has its own copy with "@ 2x" at the end of the title. It is used for retina version.
We are only interested in the usual picture. You can check which version of the image it is by clicking and pressing the spacebar. Drag “bg_wall.png” to the root view as shown below. If you are not sure that the image is set correctly, you can switch to the Size Inspector to change its X and Y coordinates.
Now do the same with the following images:
- person.png
- sign_theiOSdiner.png
- chalkboard.png
- bg_counter.png
- total_field.png
- food_box.png
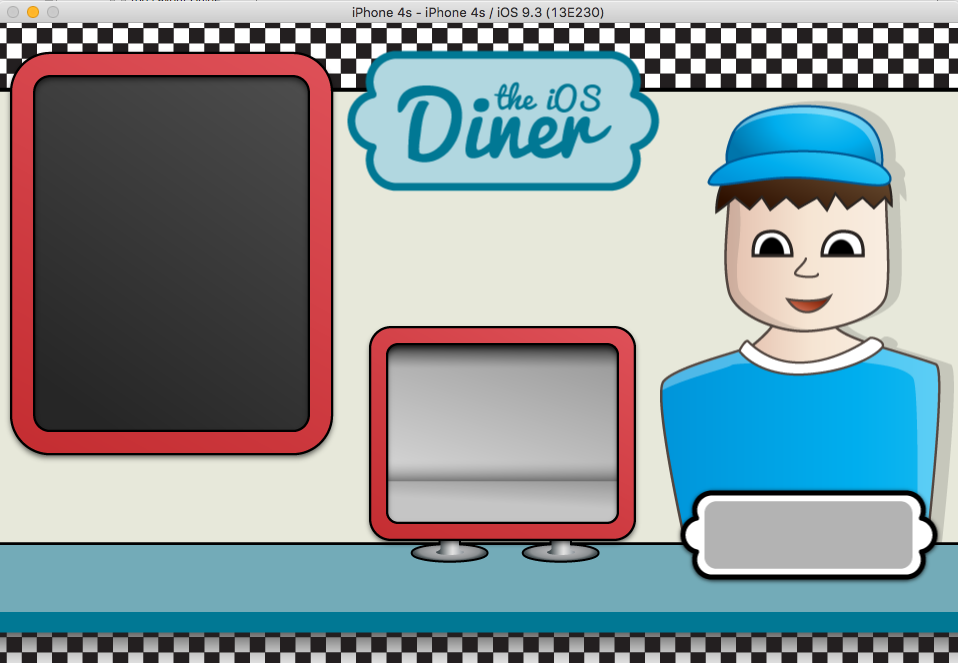
Note. You can make the Image View correspond to the exact size of the image by simultaneously pressing Cmd and the = key. Putting all the pictures into place, run the project.
Wow Almost like an app! Next, add parts of the user interface. In the Utilities panel, switch to the Object Library .
Drag a Button to the center of our view, above the monitor. Double click on the newly added button and write "-1".
Round Rect Button
The original used Round Rect Button , which are missing in xCode 7.3.1. Stack Overflow has a solution for how to use them.
Make sure the button is highlighted. In Attributes Inspector, set the Background attribute to “button_silver.png”. Press and hold the Alt key and drag the -1 button to the right. This will create a copy of the object. Change its text to +1.
Drag another button to the left edge of the monitor. Set Button Type to Custom , remove the button title and from the Media Library drag to the button_arrow_left.png button.
Copy this button and change the background image to "button_arrow.png"
And the last button remains. Place it under the board and set the total_field.png background image. Run the project.
Looks quite nice. The next thing we add is labels and a preview window.
Go to the Object Library again. Drag the UILabel onto the board and stretch it to the size of the board.
In Atrributes Inspector, set Lines to 0 (this will make the label multi-line), change the Text Color to white, and Font to Marker Felt 17.0. I usually consider using Marker Felt a crime, but in our case it’s quite suitable.
Drag the UIImageView onto the monitor and drag it to its size.
In Attributes Inspector, change Mode to Aspect Fit.
Drag another UILabel onto the table in the lower right corner. Make it the size of the gray area of the plate and set the Alignment in Center.
Install IBOutlets and IBActions
Next, you need to establish links between the user interface that we just created and the code. IBOutlets and IBActions are needed for this. IB stands for Interface Builder , which is used to create UI in xCode.
- An IBOutlet is basically a link to the UI element (button or label) with its link in code.
- IBAction is an action (or method, as it is more convenient) in the code that can be connected to some event (button click, for example) in the developed interface.
So let's write some code for connecting UI elements via IBOutlets and IBActions .
Close the Utilities tab and open the Assistant editor . Depending on how it is configured, the screen may not look like in the screenshot. If you want to change the display of the Assistant editor , take a look at its menu.
Let's start with the buttons. Select the "-1" button, hold down the Ctrl key and drag it into the code. This automates the creation of an IBOutlet for a button.
For this object, all that is needed is to name it. I like the “ib” prefixes, since in xCode it becomes easy to find all the elements by autocomplete. Name this object “ibRemoveItemButton” and click Connect .
Similarly, we do with the other buttons.
Similarly, we install labels.
Now ViewController.m should look like this:
#import "ViewController.h" @interface ViewController () @property (weak, nonatomic) IBOutlet UIButton *ibRemoveItemButton; @property (weak, nonatomic) IBOutlet UIButton *ibAddItemButton; @property (weak, nonatomic) IBOutlet UIButton *ibPreviousItemButton; @property (weak, nonatomic) IBOutlet UIButton *ibNextItemButton; @property (weak, nonatomic) IBOutlet UIButton *ibTotalOrderButton; @property (weak, nonatomic) IBOutlet UILabel *ibChalkboardLabel; @property (weak, nonatomic) IBOutlet UIImageView *ibCurrentItemImageView; @property (weak, nonatomic) IBOutlet UILabel *ibCurrentItemLabel; @end @implementation ViewController - (void)viewDidLoad { [super viewDidLoad]; // Do any additional setup after loading the view, typically from a nib. } - (void)didReceiveMemoryWarning { [super didReceiveMemoryWarning]; // Dispose of any resources that can be recreated. } @end Now we need to add IBActions for UIButtons . These are methods that are called in response to certain events (Touch Up Inside, Touch Up Outside, Touch Cancel, etc.). Touch Up Inside is most commonly used for buttons.
Choose the "-1" button. Again, using the Ctrl key, drag it to ViewController.m . Since this is an IBAction , we use the iba prefix. Repeat for all buttons.
Install the web service
Before proceeding with the code, set up a web service. I’m not going to explain everything in the smallest detail, since there are already several lessons for this purpose ( How To Write A App ?).
The code below shows what the PHP code for the web service will look like.
<?php function getStatusCodeMessage($status) { $codes = Array( 100 => 'Continue', 101 => 'Switching Protocols', 200 => 'OK', 201 => 'Created', 202 => 'Accepted', 203 => 'Non-Authoritative Information', 204 => 'No Content', 205 => 'Reset Content', 206 => 'Partial Content', 300 => 'Multiple Choices', 301 => 'Moved Permanently', 302 => 'Found', 303 => 'See Other', 304 => 'Not Modified', 305 => 'Use Proxy', 306 => '(Unused)', 307 => 'Temporary Redirect', 400 => 'Bad Request', 401 => 'Unauthorized', 402 => 'Payment Required', 403 => 'Forbidden', 404 => 'Not Found', 405 => 'Method Not Allowed', 406 => 'Not Acceptable', 407 => 'Proxy Authentication Required', 408 => 'Request Timeout', 409 => 'Conflict', 410 => 'Gone', 411 => 'Length Required', 412 => 'Precondition Failed', 413 => 'Request Entity Too Large', 414 => 'Request-URI Too Long', 415 => 'Unsupported Media Type', 416 => 'Requested Range Not Satisfiable', 417 => 'Expectation Failed', 500 => 'Internal Server Error', 501 => 'Not Implemented', 502 => 'Bad Gateway', 503 => 'Service Unavailable', 504 => 'Gateway Timeout', 505 => 'HTTP Version Not Supported' ); return (isset($codes[$status])) ? $codes[$status] : ''; } // Helper method to send a HTTP response code/message function sendResponse($status = 200, $body = '', $content_type = 'text/html') { $status_header = 'HTTP/1.1 ' . $status . ' ' . getStatusCodeMessage($status); header($status_header); header('Content-type: ' . $content_type); echo $body; } class InventoryAPI { function getInventory() { $inventory = array( array("Name"=>"Hamburger","Price"=>0.99,"Image"=>"food_hamburger.png"), array("Name"=>"Cheeseburger","Price"=>1.20,"Image"=>"food_cheeseburger.png"), array("Name"=>"Fries","Price"=>0.69,"Image"=>"food_fries.png"), array("Name"=>"Onion Rings","Price"=>0.69,"Image"=>"food_onion-rings.png"), array("Name"=>"Soda","Price"=>0.75,"Image"=>"food_soda.png"), array("Name"=>"Shake","Price"=>1.20,"Image"=>"food_milkshake.png") ); sendResponse(200, json_encode($inventory)); } } sleep(5); $api = new InventoryAPI; $api->getInventory(); ?> This web service is a completely simple PHP script that returns a JSON array. The array contains the so-called associative array (PHP), or dictionary (Objective-C), which contains the name, price, and image name for the item. The only thing that should be noted in the above code is the line
sleep(5); .I use it to simulate a slow web service to better show how blocks can help with asynchronous operations.
You can copy this code to a file with the .php extension and place it on a hosting, or just use mine .
What to do next
The draft of this part of the lesson can be downloaded here . Well, there were a lot of all sorts of things not related to the blocks. But now, by setting the view and web service , we can go to coding, where we will use blocks to make our application fully functional.
Source: https://habr.com/ru/post/309780/
All Articles