The work of NSFetchRequest and NSFetchedResultsController, as well as why there is a grocery market
Hello! This article is aimed at developers who have a minimal skill of working with the Core Data Framework . Let me remind you that Core Data is a framework for storing data on the device and interacting with them. On this subject there is a bunch of Russian-language articles on Habré and the network, so I do not see the need to repeat their content.
Often beginners especially stack overflow developers are afraid to use the Core Data Framework , because it seems difficult for them, or use only a small part of its capabilities. In reality, knowledge of the basic functions of the classes of this framework allows the developer to work with the model with convenience.
In the article I want to focus on the following points:
- We will look at the
NSFetchRequestclass, which is used to create requests to extract data from a model. We will study its basic properties and cases with their application; - we will
NSFetchedResultsControllerin detail the functions and operation ofNSFetchedResultsControllerby effectively presenting the extracted data usingNSFetchRequestusing the example ofUITableView.

Description of the demo project
The demo project, on which we will “experiment”, is very primitive. It includes the Model and ViewController , in which the UITableView is located.
For specifics, we will use a banal list of products with the name and price.
Model
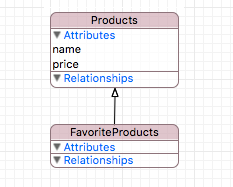
The model will contain two entities: Products with the attributes name and price and FavoriteProducts , which inherits these attributes.
For example, let's fill our database with a number of products with random price (up to 1000 ) and the name of a product from the list: ””, “”, “”, “”, “ «»”, “ «»”, “”, “” .
Controller
In the controller, with the help of the code, we initialize and place the table in full screen.
- (UITableView *)tableView { if (_tableView != nil) return _tableView; _tableView = [[UITableView alloc] initWithFrame:CGRectZero style:UITableViewStyleGrouped]; _tableView.backgroundColor = [UIColor whiteColor]; _tableView.dataSource = self; return _tableView; } - (void)loadView { [super loadView]; [self.view addSubview:self.tableView]; } - (void)viewDidLayoutSubviews { [super viewDidLayoutSubviews]; _tableView.frame = self.view.frame; } var tableView: UITableView = { let tableView = UITableView(frame: CGRectZero, style: .Grouped) tableView.backgroundColor = UIColor.whiteColor() return tableView }() override func loadView() { super.loadView() self.view.addSubview(tableView) } override func viewDidLoad() { super.viewDidLoad() tableView.dataSource = self } override func viewDidLayoutSubviews() { super.viewDidLayoutSubviews() tableView.frame = self.view.frame } Data retrieval
Extraction of data from the model is performed by the NSManagedObjectContext method executeFetchRequest(_:) . The method argument is the sampling request. NSFetchRequest is the main character of this article.
NSManagedObjectContext *context = [[CoreDataManager instance] managedObjectContext]; NSEntityDescription *entityDescription = [NSEntityDescription entityForName:@"Products" inManagedObjectContext:context]; NSFetchRequest *request = [[NSFetchRequest alloc] init]; request.entity = entityDescription; NSError *error = nil; NSArray* objects = [context executeFetchRequest:request error:&error]; let context = CoreDataManager.instance.managedObjectContext let entityDescription = NSEntityDescription.entityForName("Products", inManagedObjectContext: context) let request = NSFetchRequest() request.entity = entityDescription do { let objects = try context.executeFetchRequest(request) } catch { fatalError("Failed to fetch employees: \(error)") } The return type of the executeFetchRequest(_:) method is an array of objects of the NSManagedObject class by default. For clarity, print the elements extracted from our model, converting the output.
NAME: , PRICE: 156 NAME: , PRICE: 425 NAME: , PRICE: 85 NAME: «», PRICE: 400 NAME: , PRICE: 920 NAME: «», PRICE: 861 NAME: , PRICE: 76 NAME: , PRICE: 633 NAME: , PRICE: 635 NAME: «», PRICE: 718 NAME: , PRICE: 701 NAME: , PRICE: 176 NAME: , PRICE: 731 NAME: «», PRICE: 746 NAME: , PRICE: 456 NAME: , PRICE: 519 NAME: «», PRICE: 221 NAME: , PRICE: 560 NAME: «», PRICE: 646 NAME: , PRICE: 492 NAME: , PRICE: 185 NAME: , PRICE: 539 NAME: «», PRICE: 872 NAME: , PRICE: 972 NAME: , PRICE: 821 NAME: , PRICE: 409 NAME: , PRICE: 334 NAME: , PRICE: 734 NAME: , PRICE: 448 NAME: «», PRICE: 345 Basic methods and properties of the NSFetchRequest class
As I said above, the NSFetchRequest class NSFetchRequest used as a request to fetch data from a model. This tool allows you to set the rules for filtering and sorting objects at the stage of retrieving them from the database. This operation becomes many times more efficient and more productive than if we first performed the extraction of all objects (and if there are 10,000 or more of them?), And then manually sorted or filtered the data of interest to us.
Knowing the basic properties of this class, you can easily handle queries and get a specific sample without developing additional algorithms and crutches - everything is already implemented in Core Data . Let's get started
sortDescriptors
@property (nonatomic, strong) NSArray <NSSortDescriptor *> *sortDescriptors var sortDescriptors: [NSSortDescriptor]? I want to start a review of class properties with sortDesctriptors , which is an array of objects of the NSSortDescriptor class. It is through them that the sorting mechanism is implemented. Instructions on using sorting descriptors can be found on the Apple portal. This property accepts an array of sort descriptors, which allows us to use several sorting rules. The priorities for this use are equivalent to the First In-First Out (FIFO) rules: the smaller the index by which the object is located in the array, the higher the sorting priority.
Usage example
The output of all the objects that we reviewed earlier is chaotic and not very readable. For convenience, we sort this list first by product name, specify the name of the name attribute with a sort key, and then sort by price. We want to sort the names in alphabetical order, and the price in ascending order. To do this, we set the ascending value of both predicates to boolean true (the boolean false used for descending sorting).
NSSortDescriptor *nameSortDescriptor = [[NSSortDescriptor alloc] initWithKey:@"name" ascending:YES]; NSSortDescriptor *priceSortDescriptor = [[NSSortDescriptor alloc] initWithKey:@"price" ascending:YES]; fetchRequest.sortDescriptors = @[nameSortDescriptor, priceSortDescriptor]; let nameSortDescriptor = NSSortDescriptor(key: "name", ascending: true) let priceSortDescriptor = NSSortDescriptor(key: "price", ascending: true) fetchRequest.sortDescriptors = [nameSortDescriptor, priceSortDescriptor] NAME: , PRICE: 185 NAME: , PRICE: 334 NAME: , PRICE: 731 NAME: , PRICE: 972 NAME: , PRICE: 156 NAME: , PRICE: 492 NAME: , PRICE: 701 NAME: , PRICE: 821 NAME: , PRICE: 76 NAME: , PRICE: 85 NAME: , PRICE: 176 NAME: , PRICE: 425 NAME: , PRICE: 448 NAME: , PRICE: 539 NAME: , PRICE: 635 NAME: «», PRICE: 345 NAME: «», PRICE: 646 NAME: «», PRICE: 718 NAME: «», PRICE: 746 NAME: «», PRICE: 861 NAME: «», PRICE: 872 NAME: «», PRICE: 221 NAME: «», PRICE: 400 NAME: , PRICE: 409 NAME: , PRICE: 633 NAME: , PRICE: 734 NAME: , PRICE: 456 NAME: , PRICE: 519 NAME: , PRICE: 560 NAME: , PRICE: 920 predicate
@property (nonatomic, strong) NSPredicate *predicate var predicate: NSPredicate? The next property under consideration is the NSPredicate class NSPredicate , which is a powerful and fast data filtering tool. There is an excellent Apple Guide ( Translation ) for using a predicate. Filtering data in the request is due to the special string syntax of the predicate, which is described in the above guide.
Usage example
Let's start with a simple example: we are passionate lovers of milk sausage and want to find out the prices for it, presented in the list of products. To do this, we indicate in the predicate that we want to get objects whose name attribute name is equal to the string " «»" .
NSPredicate *predicate = [NSPredicate predicateWithFormat:@"name == %@", @" «»"]; fetchRequest.predicate = predicate; let predicate = NSPredicate(format: "name == %@", " «»") fetchRequest.predicate = predicate NAME: «», PRICE: 400 NAME: «», PRICE: 221 Note that in order to correctly compile a predicate using the equality operator == it is necessary to accurately specify the string value, taking into account the register.
And if we want to see the prices of not only dairy, but all kinds of sausages? To do this, we turn to the CONTAINS operator (the left expression right expression) and add the keywords [cd] , which indicate case insensitivity to accented characters. We can also use several conditions in which the AND operator will help us. We limit the results by cost - up to 500 monetary units.
NSPredicate *predicate = [NSPredicate predicateWithFormat:@"name CONTAINS[cd] %@ AND price < %d", @"", 500]; fetchRequest.predicate = predicate; let predicate = NSPredicate(format: "name CONTAINS[cd] %@ AND price < %d", "", 500) fetchRequest.predicate = predicate NAME: «», PRICE: 400 NAME: «», PRICE: 221 NAME: «», PRICE: 345 fetchLimit
@property (nonatomic) NSUInteger fetchLimit var fetchLimit: Int The fetchLimit property allows fetchLimit to limit the number of objects to be extracted.
Usage example
For the demonstration, we get 12 of the cheapest products from the list of products. To do this, add a sort by price and the limit on the number of extracted objects - 12 .
// NSSortDescriptor *priceSortDescriptor = [[NSSortDescriptor alloc] initWithKey:@"price" ascending:YES]; fetchRequest.sortDescriptors = @[priceSortDescriptor]; // = 12 fetchRequest.fetchLimit = 12; // let priceSortDescriptor = NSSortDescriptor(key: "price", ascending: true) fetchRequest.sortDescriptors = [priceSortDescriptor] // = 12 fetchRequest.fetchLimit = 12 NAME: , PRICE: 76 NAME: , PRICE: 85 NAME: , PRICE: 156 NAME: , PRICE: 176 NAME: , PRICE: 185 NAME: «», PRICE: 221 NAME: , PRICE: 334 NAME: «», PRICE: 345 NAME: «», PRICE: 400 NAME: , PRICE: 409 NAME: , PRICE: 425 NAME: , PRICE: 448 fetchOffset
@property (nonatomic) NSUInteger fetchOffset var fetchOffset: Int With this property you can shift the results of the sample to a specified number of objects.
Usage example
To show the operation of this property, we use the previous query and add an offset to two objects to it. As a result, we get 12 objects, where the first two are missing, and the following are added to the end, as if we had shifted the table with the results by two cells.
fetchRequest.fetchOffset = 2; fetchRequest.fetchOffset = 2 For clarity, I have limited the extracted objects to a dotted line.
: : NAME: , PRICE: 76 NAME: , PRICE: 85 --------------------------------------------------------------------------------- NAME: , PRICE: 76 NAME: , PRICE: 156 NAME: , PRICE: 85 NAME: , PRICE: 176 NAME: , PRICE: 156 NAME: , PRICE: 185 NAME: , PRICE: 176 NAME: «», PRICE: 221 NAME: , PRICE: 185 NAME: , PRICE: 334 NAME: «», PRICE: 221 NAME: «», PRICE: 345 NAME: , PRICE: 334 NAME: «», PRICE: 400 NAME: «», PRICE: 345 NAME: , PRICE: 409 NAME: «», PRICE: 400 NAME: , PRICE: 425 NAME: , PRICE: 409 NAME: , PRICE: 448 NAME: , PRICE: 425 NAME: , PRICE: 456 NAME: , PRICE: 448 NAME: , PRICE: 492 --------------------------------------------------------------------------------- NAME: , PRICE: 456 ... NAME: , PRICE: 492 ... fetchBatchSize
@property (nonatomic) NSUInteger fetchBatchSize var fetchBatchSize: Int With the help of fetchBatchSize regulated how many objects at a time will be retrieved from the database ( Persistent Store ) with which the Core Data Framework works ( SQLite , XML , etc.). Correctly established value for specific cases can both speed up work with the base and, conversely, slow down.
Suppose we work with a UITableView . There are more than 10,000 objects in our model. It will take some time to extract all these items at once. But the table we have holds 20 cells per screen, and for display we will need only 20 objects. In such a case, it is advisable to use fetchBatchSize equal to 20. First, Core Data will query the database for 20 objects, which we will display in the table, and when scrolling, the next pack of 20 elements will be requested. This approach greatly optimizes the interaction with persistent storage.
But do not use too small a pack size, for example, equal to 1 - this will only load the database with constant requests for one element.
fetchRequest.fetchBatchSize = 20; fetchRequest.fetchBatchZize = 20 resultType
@property (nonatomic) NSFetchRequestResultType resultType var resultType: NSFetchRequestResultType When retrieving data, the executeFetchRequest(_:) method by default returns an array of NSManagedObject objects and its heirs.
Changing the resultType property allows resultType to select the type of objects you extracted. Consider them (Objective-C with the prefix NS alternates with Swift through a slash):
NSManagedObjectResultType/ManagedObjectResultType- objects of theNSManagedObjectclass and its successors (by default).NSManagedObjectIDResultType/ManagedObjectIDResultType-NSManagedObjectobject identifier.NSDictionaryResultType/DictionaryResultTypeis a dictionary where the keys are the attribute names of the entity.NSCountResultType/CountResultType- returns one array element with the value of the number of elements.
propertiesToFetch
@property (nonatomic, copy) NSArray *propertiesToFetch var propertiesToFetch: [AnyObject]? This property allows you to extract from the entity only the necessary attributes. But the prerequisite is that resultType must be a dictionary ( NSDictionaryResultType / DictionaryResultType ).
Usage example
As an example, we extract only the values of the name attribute and, for output, we print out all the values for all existing dictionary keys in the format (key: value) .
fetchRequest.resultType = NSDictionaryResultType; fetchRequest.propertiesToFetch = @[@"name"]; fetchRequest.resultType = .DictionaryResultType fetchRequest.propertiesToFetch = ["name"] name: name: name: name: «» name: name: «» name: name: name: name: «» name: name: name: name: «» name: name: name: name: name: «» name: name: name: name: «» name: name: name: name: name: name: name: «» includesSubentities
@property (nonatomic) BOOL includesSubentities var includesSubentities: Bool To demonstrate this property, you need to add an object to the FavoriteProducts entity, which is a successor of Products . Give this object the name "" and price 999 .
Referring to the request for the Products entity, with which we sorted by name and price.
NAME: , PRICE: 185 NAME: , PRICE: 334 NAME: , PRICE: 731 NAME: , PRICE: 972 NAME: , PRICE: 156 NAME: , PRICE: 492 NAME: , PRICE: 701 NAME: , PRICE: 821 NAME: , PRICE: 76 NAME: , PRICE: 85 NAME: , PRICE: 176 NAME: , PRICE: 425 NAME: , PRICE: 448 NAME: , PRICE: 539 NAME: , PRICE: 635 NAME: «», PRICE: 345 NAME: «», PRICE: 646 NAME: «», PRICE: 718 NAME: «», PRICE: 746 NAME: «», PRICE: 861 NAME: «», PRICE: 872 NAME: «», PRICE: 221 NAME: «», PRICE: 400 NAME: , PRICE: 409 NAME: , PRICE: 633 NAME: , PRICE: 734 NAME: , PRICE: 456 NAME: , PRICE: 519 NAME: , PRICE: 560 NAME: , PRICE: 920 NAME: , PRICE: 999 At the end of the list, notice the object we just added for the FavoriteProducts entity. What is he doing here? The point is that the default value of the includesSubentities property is equal to the boolean true by default, which means retrieving objects not only of the current entity, but also of successor entities.
To avoid this, change it to boolean false .
fetchRequest.includesSubentities = NO; fetchRequest.includesSubentities = false NAME: , PRICE: 185 NAME: , PRICE: 334 NAME: , PRICE: 731 NAME: , PRICE: 972 NAME: , PRICE: 156 NAME: , PRICE: 492 NAME: , PRICE: 701 NAME: , PRICE: 821 NAME: , PRICE: 76 NAME: , PRICE: 85 NAME: , PRICE: 176 NAME: , PRICE: 425 NAME: , PRICE: 448 NAME: , PRICE: 539 NAME: , PRICE: 635 NAME: «», PRICE: 345 NAME: «», PRICE: 646 NAME: «», PRICE: 718 NAME: «», PRICE: 746 NAME: «», PRICE: 861 NAME: «», PRICE: 872 NAME: «», PRICE: 221 NAME: «», PRICE: 400 NAME: , PRICE: 409 NAME: , PRICE: 633 NAME: , PRICE: 734 NAME: , PRICE: 456 NAME: , PRICE: 519 NAME: , PRICE: 560 NAME: , PRICE: 920 Fetched Results Controller (FRC)
The NSFetchedResultsController class NSFetchedResultsController can be conditionally positioned between Core Data and ViewController , in which we need to display data from the database. The methods and properties of this controller allow you to conveniently interact, present and manage objects from Core Data in conjunction with the UITableView tables for which it is most adapted.
This controller can convert extracted objects into table elements - sections and objects of these sections. FRC has the NSFetchedResultsControllerDelegate protocol, which, when delegated, allows you to detect changes that occur with objects of a given NSFetchRequest request at the time of controller initialization.
FRC Initialization
- (instancetype)initWithFetchRequest:(NSFetchRequest *)fetchRequest managedObjectContext: (NSManagedObjectContext *)context sectionNameKeyPath:(nullable NSString *)sectionNameKeyPath cacheName:(nullable NSString *)name; public init(fetchRequest: NSFetchRequest, managedObjectContext context: NSManagedObjectContext, sectionNameKeyPath: String?, cacheName name: String?) Let's sort the initialization parameters:
fetchRequest- request to retrieveNSFetchRequestobjects. Important: for theFRCto work, the request must have at least one sort descriptor and itsresultTypemust beNSManagedObjectResultType / ManagedObjectResultType.context- theNSManagedObjectContextcontext in which we work.sectionNameKeyPathis an optional parameter. If you specify it in the format of a string key (entity attribute name), objects are grouped with the same values of this attribute in a table section. It is important that this key matches the sort descriptor, which has the highest priority. If you do not specify this parameter, a table with one section will be created.cacheNameis an optional parameter, specifying which the controller starts caching query results. Consider it later in more detail.
The next step is to call the controller's performFetch method in order to extract the sample from the database.
NSError *error = nil; if (![self.fetchedResultsController performFetch:&error]) { NSLog(@"Unresolved error %@, %@", error, [error userInfo]); abort(); } do { try fetchedResultsController.performFetch() } catch { print(error) } The method returns a boolean value. If the extraction is successful, the boolean true will return, otherwise false . After extraction, the objects are in the controller's fetchedObjects .
Interaction with UITableView
Consider working with the table. Although the extracted objects are in the fetchedObject property, to work with them, you should refer to the sections property property. This is an array of objects that subscribe to the NSFetchedResultsSectionInfo protocol, which describes the following properties:
name- the section name.indexTitle- section header.numbersOfObjects- the number of objects in the section.objects- the array of objects themselves, located in the section.
Implementation
To make it convenient for us, we will add a method to configure the cell of the configureCell table.
#pragma mark - Table View - (void)configureCell:(UITableViewCell *)cell withObject:(Products *)object { cell.textLabel.text = object.name; cell.detailTextLabel.text = [NSString stringWithFormat:@"%d", object.price.intValue]; } #pragma mark UITableViewDataSource - (NSInteger)numberOfSectionsInTableView:(UITableView *)tableView { return [[self.fetchedResultsController sections] count]; } - (NSString *)tableView:(UITableView *)tableView titleForHeaderInSection:(NSInteger)section { id <NSFetchedResultsSectionInfo> sectionInfo = [self.fetchedResultsController sections][section]; return sectionInfo.indexTitle; } - (NSInteger)tableView:(UITableView *)tableView numberOfRowsInSection:(NSInteger)section { id <NSFetchedResultsSectionInfo> sectionInfo = [self.fetchedResultsController sections][section]; return [sectionInfo numberOfObjects]; } - (UITableViewCell *)tableView:(UITableView *)tableView cellForRowAtIndexPath:(NSIndexPath *)indexPath { static NSString *identifier = @"Cell"; UITableViewCell *cell = [tableView dequeueReusableCellWithIdentifier:identifier]; if (!cell) { cell = [[UITableViewCell alloc] initWithStyle:UITableViewCellStyleValue1 reuseIdentifier:identifier]; } Products *object = [[self fetchedResultsController] objectAtIndexPath:indexPath]; [self configureCell:cell withObject:(Products *)object]; return cell; } // MARK: - Table View extension ViewController { func configureCell(cell: UITableViewCell, withObject product: Products) { cell.textLabel?.text = product.name ?? "" cell.detailTextLabel?.text = String(product.price ?? 0) } } // MARK: UITableViewDataSource extension ViewController: UITableViewDataSource { func numberOfSectionsInTableView(tableView: UITableView) -> Int { guard let sections = fetchedResultsController.sections else { return 0 } return sections.count } func tableView(tableView: UITableView, titleForHeaderInSection section: Int) -> String? { guard let sections = fetchedResultsController.sections else { return nil } return sections[section].indexTitle ?? "" } func tableView(tableView: UITableView, numberOfRowsInSection section: Int) -> Int { guard let sections = fetchedResultsController.sections else { return 0 } return sections[section].numberOfObjects } func tableView(tableView: UITableView, cellForRowAtIndexPath indexPath: NSIndexPath) -> UITableViewCell { let identifier = "Cell" let product = fetchedResultsController.objectAtIndexPath(indexPath) as! Products var cell = tableView.dequeueReusableCellWithIdentifier(identifier) if cell == nil { cell = UITableViewCell(style: .Value1, reuseIdentifier: identifier) } configureCell(cell!, withObject: product) return cell! } } NSFetchRequest sectionNameKeyPath FRC "name" , .
FRC
FRC :
(delegate = nil, cacheName = nil)— .- ,
(delegate != nil, cacheName = nil)—NSFetchedResultsControllerDelegate, . . - ,
(delegate != nil, cacheName = <#NSString/String#>)— .
NSFetchedResultsControllerDelegate
NSFetchedResultsControllerDelegate , , NSFetchRequest . UITableView , UI- , .
#pragma mark - NSFetchedResultsControllerDelegate // 1 - (NSString *)controller:(NSFetchedResultsController *)controller sectionIndexTitleForSectionName:(NSString *)sectionName { return sectionName; } // 2 - (void)controllerWillChangeContent:(NSFetchedResultsController *)controller { [self.tableView beginUpdates]; } // 3 - (void)controller:(NSFetchedResultsController *)controller didChangeSection:(id <NSFetchedResultsSectionInfo>)sectionInfo atIndex:(NSUInteger)sectionIndex forChangeType:(NSFetchedResultsChangeType)type { switch(type) { case NSFetchedResultsChangeInsert: [self.tableView insertSections:[NSIndexSet indexSetWithIndex:sectionIndex] withRowAnimation:UITableViewRowAnimationFade]; break; case NSFetchedResultsChangeDelete: [self.tableView deleteSections:[NSIndexSet indexSetWithIndex:sectionIndex] withRowAnimation:UITableViewRowAnimationFade]; break; default: return; } } // 4 - (void)controller:(NSFetchedResultsController *)controller didChangeObject:(id)anObject atIndexPath:(NSIndexPath *)indexPath forChangeType:(NSFetchedResultsChangeType)type newIndexPath:(NSIndexPath *)newIndexPath { UITableView *tableView = self.tableView; switch(type) { case NSFetchedResultsChangeInsert: [tableView insertRowsAtIndexPaths:@[newIndexPath] withRowAnimation:UITableViewRowAnimationFade]; break; case NSFetchedResultsChangeDelete: [tableView deleteRowsAtIndexPaths:@[indexPath] withRowAnimation:UITableViewRowAnimationFade]; break; case NSFetchedResultsChangeUpdate: [self configureCell:[tableView cellForRowAtIndexPath:indexPath] withObject:anObject]; break; case NSFetchedResultsChangeMove: [tableView moveRowAtIndexPath:indexPath toIndexPath:newIndexPath]; break; } } // 5 - (void)controllerDidChangeContent:(NSFetchedResultsController *)controller { [self.tableView endUpdates]; } // MARK: - NSFetchedResultsControllerDelegate extension ViewController: NSFetchedResultsControllerDelegate { // 1 func controller(controller: NSFetchedResultsController, sectionIndexTitleForSectionName sectionName: String) -> String? { return sectionName } // 2 func controllerWillChangeContent(controller: NSFetchedResultsController) { tableView.beginUpdates() } // 3 func controller(controller: NSFetchedResultsController, didChangeSection sectionInfo: NSFetchedResultsSectionInfo, atIndex sectionIndex: Int, forChangeType type: NSFetchedResultsChangeType) { switch type { case .Insert: tableView.insertSections(NSIndexSet(index: sectionIndex), withRowAnimation: .Fade) case .Delete: tableView.deleteSections(NSIndexSet(index: sectionIndex), withRowAnimation: .Fade) default: return } } // 4 func controller(controller: NSFetchedResultsController, didChangeObject anObject: AnyObject, atIndexPath indexPath: NSIndexPath?, forChangeType type: NSFetchedResultsChangeType, newIndexPath: NSIndexPath?) { switch type { case .Insert: if let indexPath = newIndexPath { tableView.insertRowsAtIndexPaths([indexPath], withRowAnimation: .Automatic) } case .Update: if let indexPath = indexPath { let product = fetchedResultsController.objectAtIndexPath(indexPath) as! Products guard let cell = tableView.cellForRowAtIndexPath(indexPath) else { break } configureCell(cell, withObject: product) } case .Move: if let indexPath = indexPath { tableView.deleteRowsAtIndexPaths([indexPath], withRowAnimation: .Automatic) } if let newIndexPath = newIndexPath { tableView.insertRowsAtIndexPaths([newIndexPath], withRowAnimation: .Automatic) } case .Delete: if let indexPath = indexPath { tableView.deleteRowsAtIndexPaths([indexPath], withRowAnimation: .Automatic) } } } // 5 func controllerDidChangeContent(controller: NSFetchedResultsController) { tableView.endUpdates() } } sectionIndexTitleForSectionName— , . , , (sectionName) . . .controllerWillChangeContent— , .UITableView—beginUpdates.didChangeSection— , , . :sectionInfo— , ,sectionIndex—typeNSFetchedResultsChangeType, (Insert, Delete, Move, Update). .didChangeObject— , ,sectionInfo,anObject, ,sectionIndex— ,indexPathnewIndexPath, .UITableView, , , , .controllerDidChangeContent— .endUpdates.
— "" "" 1 .

The Cache
. . . (deleteCacheWithName:) , . Core Data , cacheName .
?
cacheName, .- , ( , , ). — , , .
Summary
NSFetchRequest , Core Data , . Fetched Results Controller , , UITableView .
, , .
')
Source: https://habr.com/ru/post/309624/
All Articles