Integration of Intel AMT settings in the management console
The complexity of the Intel Active Management Technology (Intel AMT) configuration profiles depends on the components involved. When integrating Intel AMT into the management console, you first need to determine which components the console should support.
You can explore the various configuration options in the ACU wizard. This program is part of the downloadable Intel Setup and Configuration Software (Intel SCS) . For more information about the available options, see the Intel SCS documentation that is included with the downloadable Intel SCS package.
Most often, host-based configuration is used when integrating into the console. This method uses the host OS (Windows * 7 or later) and the script to perform the configuration.
This article shows how the ACU wizard creates a sample configuration profile. The profile provides the necessary XML code, so the console can create and encrypt settings for deployment on Intel AMT devices.
')
Note. If the console creates an .xml profile file, you should encrypt this file using the SCSEncryption.exe program before deploying to an Intel AMT device. If you do not use encryption, the file will be sent to the client in plain text, with all the passwords in the profile.xml file will be vulnerable.
To automate the configuration process, you need to create a profile.xml file and a script that performs the configuration. Here are the main steps.
Host-based configuration, as described above, has one major drawback: it is not possible to configure an Intel AMT device in administrator control mode. Slightly changing the profile settings, you can organize the access of the firmware to the server installation and configuration, to the certificate of preparation. For more information about administrator management mode and client management mode, see Installing and Configuring Intel vPro Integration .
The ACU wizard supports several methods for configuring Intel AMT devices. In this article, we need only one of the ways to get our sample XML file. To create the profile.xml file using the ACU wizard, follow these steps:
Note. For detailed instructions on using the ACU wizard, see the documentation in the Intel SCS download package .
So, we have an encrypted profile.xml file. Now you need to decrypt this file to expand the settings using the SCSEncryption.exe program, which is part of the Intel SCS download package. After decryption, you can open the file in the XML viewer and see the XML tags.
Decryption syntax:
> SCSEncryption.exe Decrypt <input file name> <password> / Output <output file name>
Note. If you need to enable additional features in your profile or explore other Intel AMT features, you can do this in step 5 above. For example, one of the most common and recommended features is setting up a wireless network.
During the setup process, the Intel AMT device will be transferred to one of two modes: client control mode or administrator control mode. The main difference is that in client control mode , user consent is required for redirection operations, and in administrator control mode it is not needed.
The user consent feature provides an additional level of security for remote users. You need to send a user consent code if you need to redirect or control a remote client. For example, access via a remote KVM switch or the execution of an IDEr command is considered a redirection operation, and obtaining a power state or rebooting is not considered such an operation.
When managing devices that support Intel AMT, configuration is one of the most important tasks. The configuration process is quite simple when using ACUconfig.exe , but the profile creation process requires more detailed consideration.
Using ACUWizard.exe, you can create a sample profile.xml file that demonstrates the ability to create dynamic console profiles, so there is no need to use any specific static profile. This enables us to manage Intel AMT devices more widely, customize user consents, wireless profiles, Active Directory access control lists, etc.
You can explore the various configuration options in the ACU wizard. This program is part of the downloadable Intel Setup and Configuration Software (Intel SCS) . For more information about the available options, see the Intel SCS documentation that is included with the downloadable Intel SCS package.
Host-based configuration integration into the console
Most often, host-based configuration is used when integrating into the console. This method uses the host OS (Windows * 7 or later) and the script to perform the configuration.
This article shows how the ACU wizard creates a sample configuration profile. The profile provides the necessary XML code, so the console can create and encrypt settings for deployment on Intel AMT devices.
')
Note. If the console creates an .xml profile file, you should encrypt this file using the SCSEncryption.exe program before deploying to an Intel AMT device. If you do not use encryption, the file will be sent to the client in plain text, with all the passwords in the profile.xml file will be vulnerable.
To automate the configuration process, you need to create a profile.xml file and a script that performs the configuration. Here are the main steps.
- Copy the Configurator folder and the profile.xml file from the SCS boot folder to a location accessible for an Intel AMT client (to a local folder, to a network folder, to a USB drive, etc.).
- Open a command prompt with administrator rights, go to the acuconfig folder and run the following command: acuconfig.exe configamt <profile.xml> / decryptionpassword <password> .
- Setup is considered successful when the program exits with code 0.
Host-based configuration, as described above, has one major drawback: it is not possible to configure an Intel AMT device in administrator control mode. Slightly changing the profile settings, you can organize the access of the firmware to the server installation and configuration, to the certificate of preparation. For more information about administrator management mode and client management mode, see Installing and Configuring Intel vPro Integration .
Using the ACU Wizard
The ACU wizard supports several methods for configuring Intel AMT devices. In this article, we need only one of the ways to get our sample XML file. To create the profile.xml file using the ACU wizard, follow these steps:
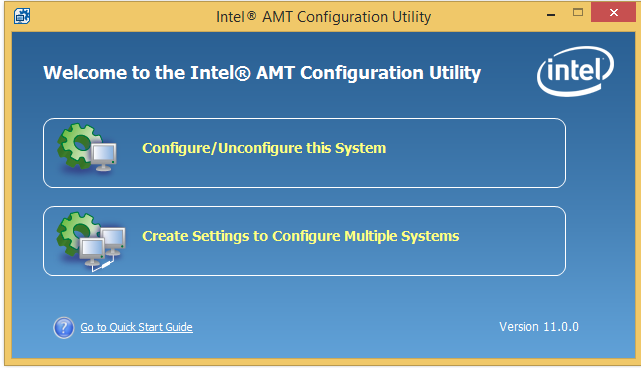
- Create a profile. To do this, open the ACU wizard and select Create Settings to configure Multiple Systems .
- The Intel AMT Configuration Utility: Profile Designer opens.
- Click the green plus.
- When the Setup Profile Wizard opens, click Next .
- When the Advanced Settings Profile Settings Wizard window opens, click Next .
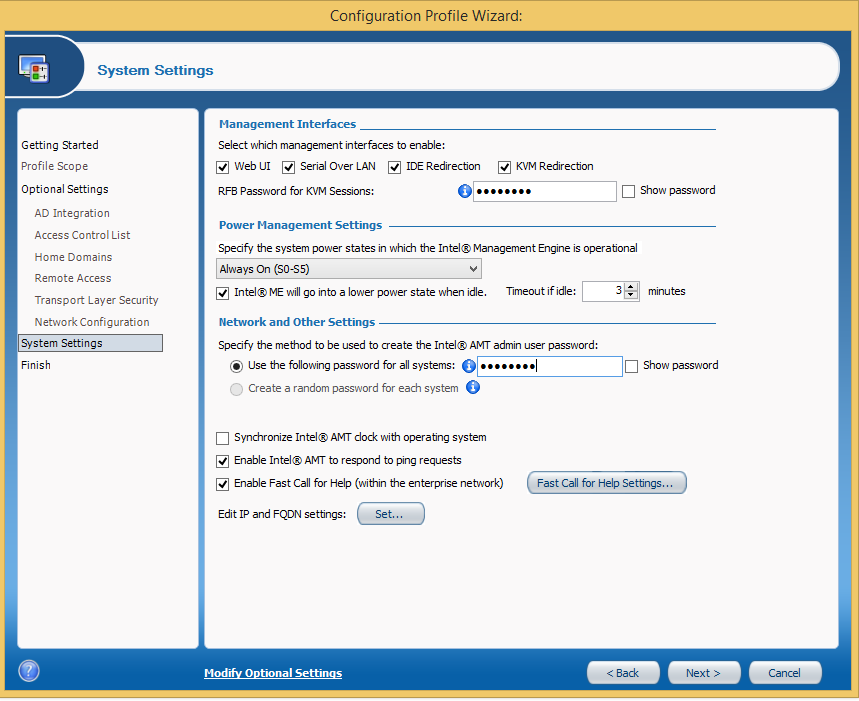
- The system settings window of the Settings Profile Wizard opens.
- Enter the RFB password if encryption is enabled (optional).
- RFB is a remote frame buffer protocol, also called RFB5900. If you enable the RFB password, you can use the standard VNC viewer that uses port 5900, instead of the Intel AMT AMT VNC viewer, which also uses port 16994 or 16995.
- RFB is a remote frame buffer protocol, also called RFB5900. If you enable the RFB password, you can use the standard VNC viewer that uses port 5900, instead of the Intel AMT AMT VNC viewer, which also uses port 16994 or 16995.
- Enter the password in the field use the following password for all systems .
- To change network settings, click the Set button ...
- If DHCP is enabled in the host OS, no changes are required. Note the changes that are needed if the OS uses a static IP address.
- Click Cancel .
- If DHCP is enabled in the host OS, no changes are required. Note the changes that are needed if the OS uses a static IP address.
- Click Next .
- Enter the RFB password if encryption is enabled (optional).
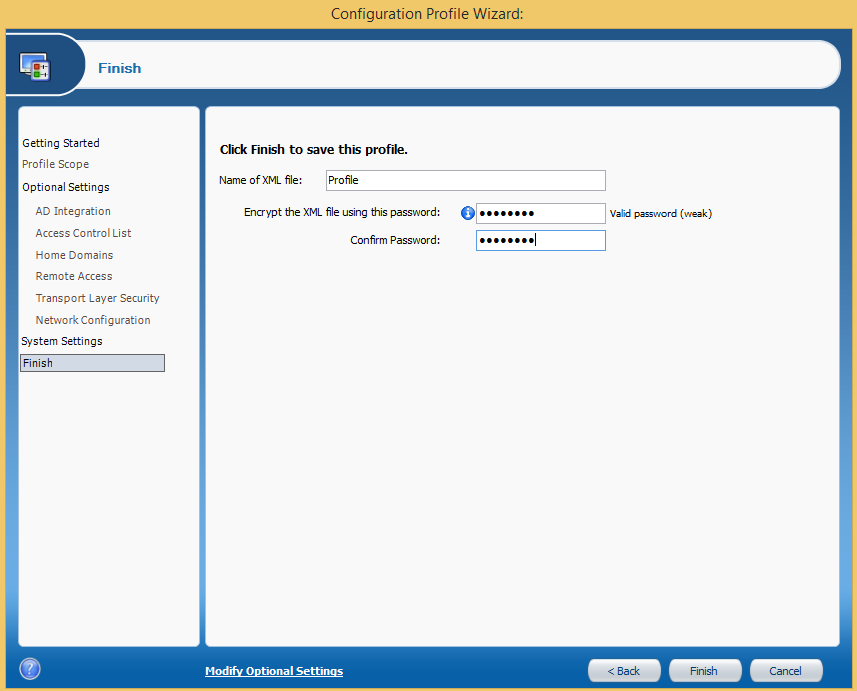
- The “Profile Settings Wizard - Done” window will open.
- Enter the desired profile name, for example “profile”.
- Encrypt the XML file by adding and confirming a password.
- Click Finish .
- The Intel AMT Configuration Utility: Profile Designer opens.
- Note the profile path shown on the screen.
- It should look something like this: <username> \ documents \ SCS_Profile.
- Close the ACU wizard.
- Note the profile path shown on the screen.
Note. For detailed instructions on using the ACU wizard, see the documentation in the Intel SCS download package .
Using the Profile.xml File
So, we have an encrypted profile.xml file. Now you need to decrypt this file to expand the settings using the SCSEncryption.exe program, which is part of the Intel SCS download package. After decryption, you can open the file in the XML viewer and see the XML tags.
Decryption syntax:
> SCSEncryption.exe Decrypt <input file name> <password> / Output <output file name>
Note. If you need to enable additional features in your profile or explore other Intel AMT features, you can do this in step 5 above. For example, one of the most common and recommended features is setting up a wireless network.
Selection of control mode
During the setup process, the Intel AMT device will be transferred to one of two modes: client control mode or administrator control mode. The main difference is that in client control mode , user consent is required for redirection operations, and in administrator control mode it is not needed.
User consent
The user consent feature provides an additional level of security for remote users. You need to send a user consent code if you need to redirect or control a remote client. For example, access via a remote KVM switch or the execution of an IDEr command is considered a redirection operation, and obtaining a power state or rebooting is not considered such an operation.
Additional resources
- Learn more about admin control mode and client control mode.
- Download Intel SCS.
- Implementation Guide and Intel AMT Reference Guide.
- Intel AMT PowerShell Module
- Download the Intel AMT SDK.
- Install and configure Intel vPro integration.
Conclusion
When managing devices that support Intel AMT, configuration is one of the most important tasks. The configuration process is quite simple when using ACUconfig.exe , but the profile creation process requires more detailed consideration.
Using ACUWizard.exe, you can create a sample profile.xml file that demonstrates the ability to create dynamic console profiles, so there is no need to use any specific static profile. This enables us to manage Intel AMT devices more widely, customize user consents, wireless profiles, Active Directory access control lists, etc.
Source: https://habr.com/ru/post/309574/
All Articles