Laravel 5.3: Preparation for development (for beginners)
Greetings to you, Habra community and newcomers to the world of Laravel!
This article is written for newbies in the field of Lara and is designed to help them in the initial stage of the development of the framework.
The article will examine, so to speak, “basic” packages, without which I personally find it difficult to work on any project.
')
So, if you are interested in the topic, please under the cat.
The Laravel 5.3 framework requires:
All this set of components is present in OpenServer under Windows.
Yes, someone will say that the framework has Homestead as a virtual machine. I will answer only to whom it is convenient. Personally, I’m comfortable with OpenServer under Windows.
Composer and NodeJS are also required.
On the “Basic” tab, we enable the server autostart and the requirement of the Administrator account. The second we need when working with the file hosts.
On this tab, we set the virtual disk settings in “Auto-Determination of Need”, then setting up the use of the Path variable in “Own Path + Win Path”.
We put the checkbox "Protect the server from external access" so that no one clings to us from the local computer.
And ... all) Go to the next tab.
For my purposes I use the following combination of modules:
The remaining items indicate "do not use".
On this tab, as unnecessary, immediately turn off the checkbox start FTP-server.
By default, all messages are stored locally in a folder, but it is more convenient for me to check, so to speak, “in combat mode”.
So, I set the method of sending via SMTP, then the server, port, email sender, username (login), password from account, encryption in “auto”.
And ... go ahead:
In order not to add a new site each time, in the “Domain management” list, select “Manual + Auto search”, and in the right part we indicate “public”, because in it we have the executable file.
In my work I use Cron , so let's set it up. I will say that for each site you need to add your own commands.
So, in all values of time we put the symbol "asterisks" (*), and in the column "execute":
Where we specify the full path to the file "artisan" in your project.
Before starting the deployment of the framework, make sure that Composer and NodeJS utilities are installed on the computer. The second is using version 6 of the branch, although it does not matter.
Before installing the framework, I recommend using the hirak / prestissimo package , which allows you to download multiple packages when installing / updating the framework at the same time. Without it, the installation / update process is linear, that is, it requests one package, waits for a response, then downloads (if the response from the server is successful), then proceeds to the next. The `hirak / prestissimo` package allows you to download all the necessary packages at the same time and after that begins to install them.
To install the package, run in the console:

So, open the command console and enter:
This should be done only once with the very first installation. When deploying subsequent applications, we skip this command.
After downloading the framework installer to the global compositor repository, we need to download the Laravel 5.3 framework itself. For this we have two teams to choose from:
They both perform the same action, the only difference is ... And so you can see the difference)
The only caveat, when first installed, the path to the executable file of the composer is automatically specified when it is installed, but the path to the “laravel” command is not. Personally, I find it convenient to use the “laravel” command, so we go to “This computer” (I use Windows 10, so I will describe all the steps for it).
Open the "Parameters" and in the search box enter "System", then "Change parameters". In the "System Properties" window, go to the "Advanced" tab and click the "Environment Variables" button.
In the window that opens, in variable environments for the user, open the change `PATH`, where we add the path to the executable file` laravel`. I have it in the `c: \ Users \ Developer \ AppData \ Roaming \ Composer \ vendor \ bin \` folder, where “Developer” is the name of the account (user).
So, we execute one of the commands:
The framework is downloaded to the blog folder. You can immediately register the address of your site. To do this, modify the command:
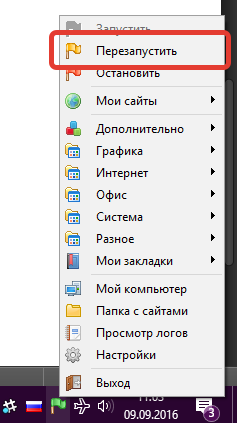
After this, you need to restart OpenServer so that it “sees” the new site.
Everything. The installation is complete and proceed to the next step.
Since many people use repositories, we immediately go to the `.gitignore` file, bringing it to the form:
That is, we include in the prohibition of downloading information from node_modules and auto-generated files from `public / build` and other" system "files.
The contents of the `vendor` and` node_modules` folders are automatically loaded.
Everything is quite simple here:
`DB_CONNECTION` is the connection name of the corresponding database from the configuration` config / databases.php >> conntections`.
In the case of PostgreSQL, we specify `pgsql`, and in the case of MySQL / MariaDB, we specify` mysql`.
Also, do not forget to specify the port used for the database. The port number can be viewed in the `OpenServer` in the tab` Server`.
Before this, using the application `PgAdmin III` from the` OpenServer`, you need to add a database and set the parameters in the file `.env`.
To work we need the following packages:
The package is needed for improved display of information about errors when developing in debug mode.
Installation is simple: in turn we execute the following commands in the console:
Next, in the file `config / app.php` we add the service provider` GrahamCampbell \ Exceptions \ ExceptionsServiceProvider :: class` to the `providers` block.
After that, in the `App \ Exceptions \ Handler.php` file in the` use` block, change the `use Illuminate \ Foundation \ Exceptions \ Handler as ExceptionHandler;` to `use GrahamCampbell \ Exceptions \ NewExceptionHandler as ExceptionHandler;`
More on graham-campbell / exceptions .
Execute the command:
Next, in the file `config / app.php` we add the service provider` Barryvdh \ Debugbar \ ServiceProvider :: class, `to the` providers` block.
Read more about the barryvdh / laravel-debugbar package .
Alternately, we execute the commands:
Next, in the file `config / app.php` we add the service provider` Barryvdh \ LaravelIdeHelper \ IdeHelperServiceProvider :: class, `to the` providers` block.
After that, the `scripts / post-update-cmd` block in the` composer.json` file from the root directory, we put it into the form:
Read more about the barryvdh / laravel-ide-helper package.
I personally find it convenient to create migrations and models using just one command: `php artisan make: migration: schema`.
For example, we need to create a `news` table with` slug`, `title`, and` content` fields.
To install a package under Laravel 5.3, run the command:
Next, in the file `config / app.php` we add the service provider` Laracasts \ Generators \ GeneratorsServiceProvider :: class, `to the` providers` block.
Read more about the laracasts / generators package.
After installing all the packages, execute in the console:
With the packages sorted out. At the turn of the Elixir .
In the console, being in the project folder, we execute the following commands in turn:
Since, since the days of Laravel 5.2, I use VueJs , which in 5.3 comes out of the box, we will connect it with all the necessary packages:
Please note: components such as `vue` and` vue-resource` did not fit in, as they are out of the box.
Further, in the file `resources / assets / js / bootstrap.js` after the line` window. $ = Window.jQuery = require ('jquery'); `you will find the connection to the Twitter framework Twitter Bootstrap (` require ('bootstrap-sass' ); `). Since in this example we use not it, but MaterializeCSS, we replace it with `require ('../ vendor / materialize-css / js / bin / materialize.min');`.
Next, we find:
window.Vue = require ('vue');
require ('vue-resource');
And we bring to the form:
window.Vue = require ('vue');
var VueResource = require ('vue-resource');
var VueAsyncData = require ('vue-async-data');
Vue.use (VueResource);
Vue.use (VueAsyncData);
It has long been transferred from the Twitter framework Twitter Bootstrap in favor of the “material” design of MaterializeCSS , since for me personally it looks more modern.
To install it, execute the command:
Next, you need to connect the font used by MaterializeCSS `Material Icon` in the template:
When developing a very convenient browser tool - the console. To organize a “quick search” of the problematic line, in the file `gulpfile.js` add the line` elixir.config.sourcemaps = true; `, which is responsible for generating the“ surse map ”.
When working with MaterializeCSS and SASS, for me it looks like:
I think it’s not necessary to thoroughly explain why each method is needed. Just leave here a link to the documentation.
Since not all components from the MaterializeCSS framework are needed for the development of a project, we add links to them in our `resources / assets / sass / app.scss` file:
So, in the course of the previous steps, executing the `gulp` command in the console, we will get 2 files at the output:` app.js` and `app.css`. Since the version control system was used (you shouldn’t talk about browser caching of resources, right?), The template `resources / views / layouts / app.blade.php` needs to be written:
It often happens that a class was renamed and the command `composer update` refuses to work right away.
With most errors that occur when running console commands, the command helps:
Yes, the command is the same and both methods are correct. Which one to choose is up to you.
Also, it will be useful to see a list of all the `artisan`-commands:
And, of course, a list of active routes:
For those who wish to place in the public repository ready project set up on this manual.
So to speak, you can see "live" as well as there.
Expand this example is simple. Clone repository:
And in turn we execute the commands:
Actually, that's all.
Enjoy using.
PS: If someone disagrees with me and there are other better solutions, please write in the comments)
We kindly request to comment on your negative, pointing out the facts and how you would do.
Just watering is not constructive. It only cracks the page with spam, no more.
UPD1: JhaoDa shared a link to the finished skeleton for a working version of Laravel 5.3.
LaravelRUS / laravel-skeleton - A skeleton application based on Laravel 5.3 from the LaravelRUS community.
This article is written for newbies in the field of Lara and is designed to help them in the initial stage of the development of the framework.
The article will examine, so to speak, “basic” packages, without which I personally find it difficult to work on any project.
')
So, if you are interested in the topic, please under the cat.
1. System Requirements
The Laravel 5.3 framework requires:
- PHP> = 5.6.4
- OpenSSL PHP Extension
- PDO PHP Extension
- Mbstring PHP Extension
- Tokenizer php extension
All this set of components is present in OpenServer under Windows.
Yes, someone will say that the framework has Homestead as a virtual machine. I will answer only to whom it is convenient. Personally, I’m comfortable with OpenServer under Windows.
Composer and NodeJS are also required.
2. Installation
2.1. OpenServer Setup
Main
On the “Basic” tab, we enable the server autostart and the requirement of the Administrator account. The second we need when working with the file hosts.
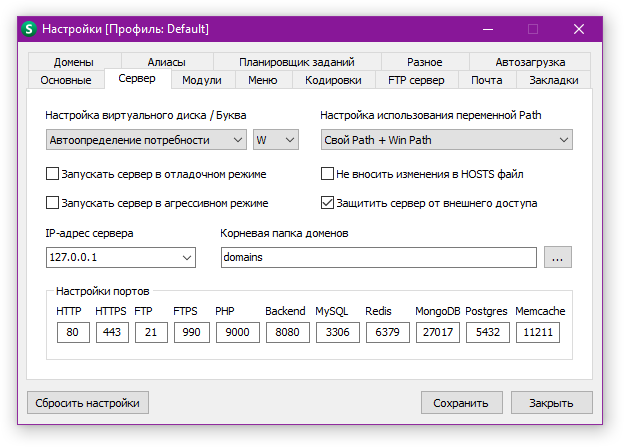
Server
On this tab, we set the virtual disk settings in “Auto-Determination of Need”, then setting up the use of the Path variable in “Own Path + Win Path”.
We put the checkbox "Protect the server from external access" so that no one clings to us from the local computer.
And ... all) Go to the next tab.
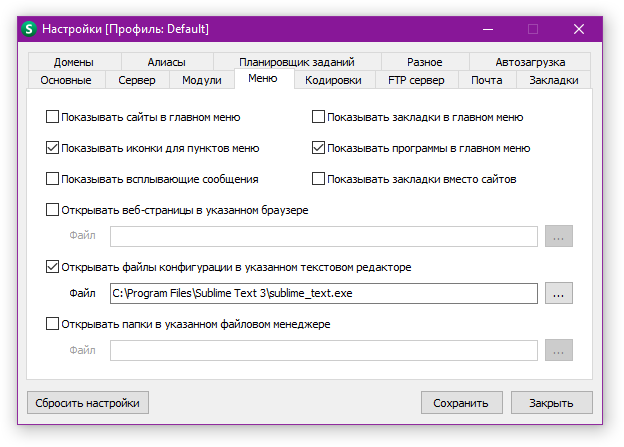
Modules
For my purposes I use the following combination of modules:
- HTTP: Apache - PHP 7 x64 - NGINX 1.10
- PHP: PHP 7 x64
- PostgreSQL 9.5 x64
- Redis 3.0
The remaining items indicate "do not use".
FTP server
On this tab, as unnecessary, immediately turn off the checkbox start FTP-server.
post office
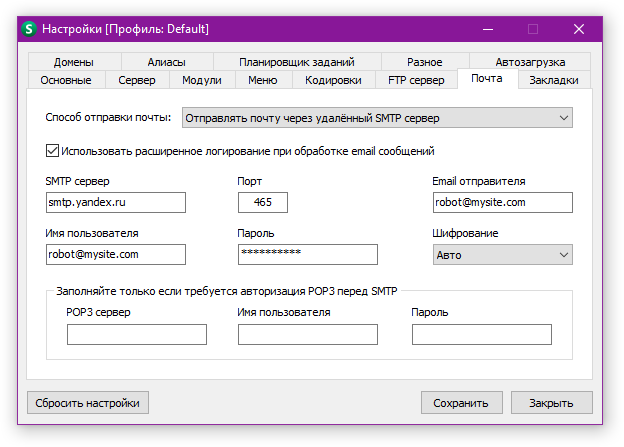
By default, all messages are stored locally in a folder, but it is more convenient for me to check, so to speak, “in combat mode”.
So, I set the method of sending via SMTP, then the server, port, email sender, username (login), password from account, encryption in “auto”.
And ... go ahead:
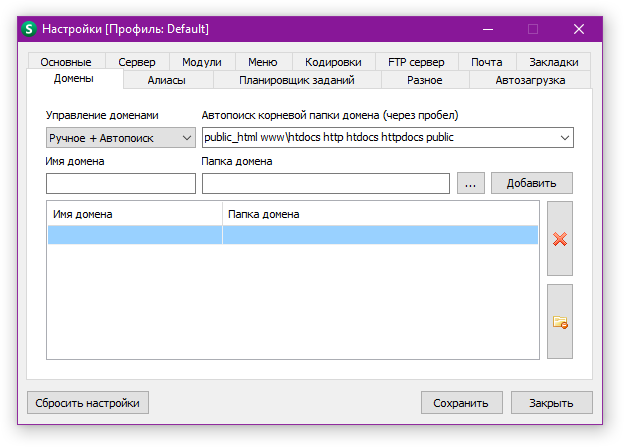
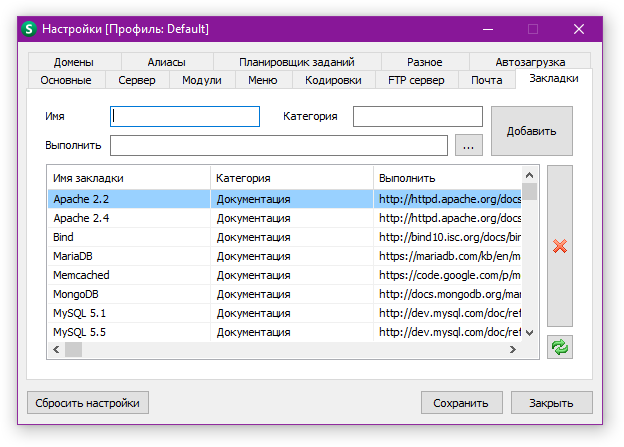
Domains
In order not to add a new site each time, in the “Domain management” list, select “Manual + Auto search”, and in the right part we indicate “public”, because in it we have the executable file.
Task Scheduler (Cron)
In my work I use Cron , so let's set it up. I will say that for each site you need to add your own commands.
So, in all values of time we put the symbol "asterisks" (*), and in the column "execute":
php "D:\OpenServer\domains\mysite.com\artisan" schedule:run Where we specify the full path to the file "artisan" in your project.
Screenshots with details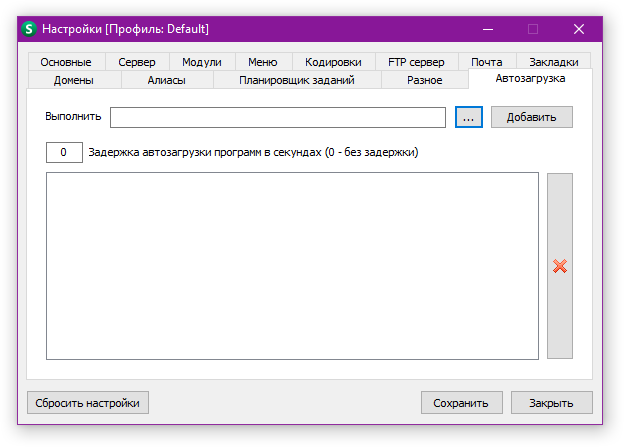


2.2. Installing Laravel 5.3
Before starting the deployment of the framework, make sure that Composer and NodeJS utilities are installed on the computer. The second is using version 6 of the branch, although it does not matter.
Before installing the framework, I recommend using the hirak / prestissimo package , which allows you to download multiple packages when installing / updating the framework at the same time. Without it, the installation / update process is linear, that is, it requests one package, waits for a response, then downloads (if the response from the server is successful), then proceeds to the next. The `hirak / prestissimo` package allows you to download all the necessary packages at the same time and after that begins to install them.
To install the package, run in the console:
composer global require "hirak/prestissimo:^0.3" So, open the command console and enter:
composer global require "laravel/installer" This should be done only once with the very first installation. When deploying subsequent applications, we skip this command.
After downloading the framework installer to the global compositor repository, we need to download the Laravel 5.3 framework itself. For this we have two teams to choose from:
laravel new blog composer create-project --prefer-dist laravel/laravel blog They both perform the same action, the only difference is ... And so you can see the difference)
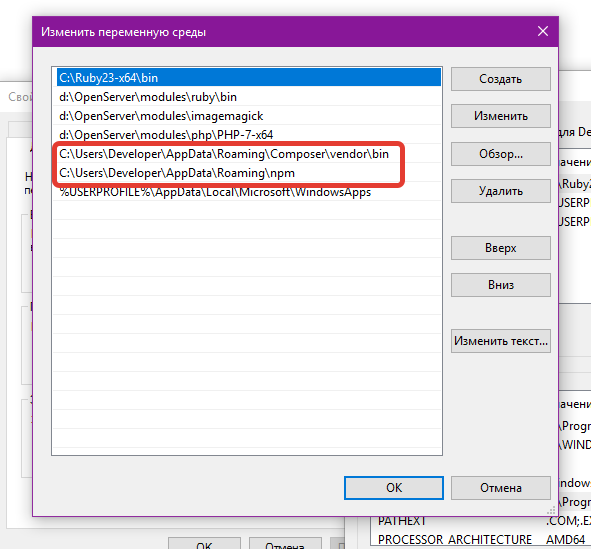
The only caveat, when first installed, the path to the executable file of the composer is automatically specified when it is installed, but the path to the “laravel” command is not. Personally, I find it convenient to use the “laravel” command, so we go to “This computer” (I use Windows 10, so I will describe all the steps for it).
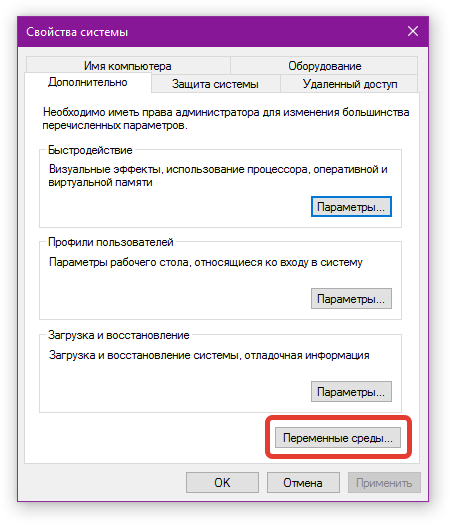
Open the "Parameters" and in the search box enter "System", then "Change parameters". In the "System Properties" window, go to the "Advanced" tab and click the "Environment Variables" button.
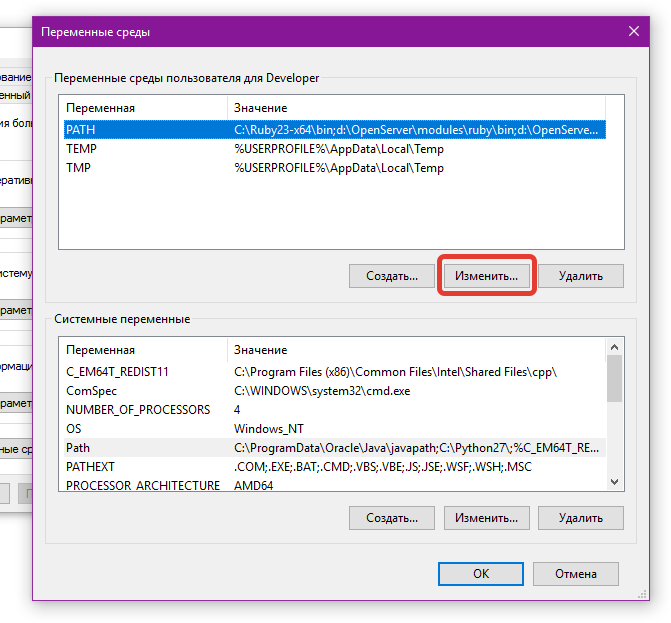
In the window that opens, in variable environments for the user, open the change `PATH`, where we add the path to the executable file` laravel`. I have it in the `c: \ Users \ Developer \ AppData \ Roaming \ Composer \ vendor \ bin \` folder, where “Developer” is the name of the account (user).
Screenshots with details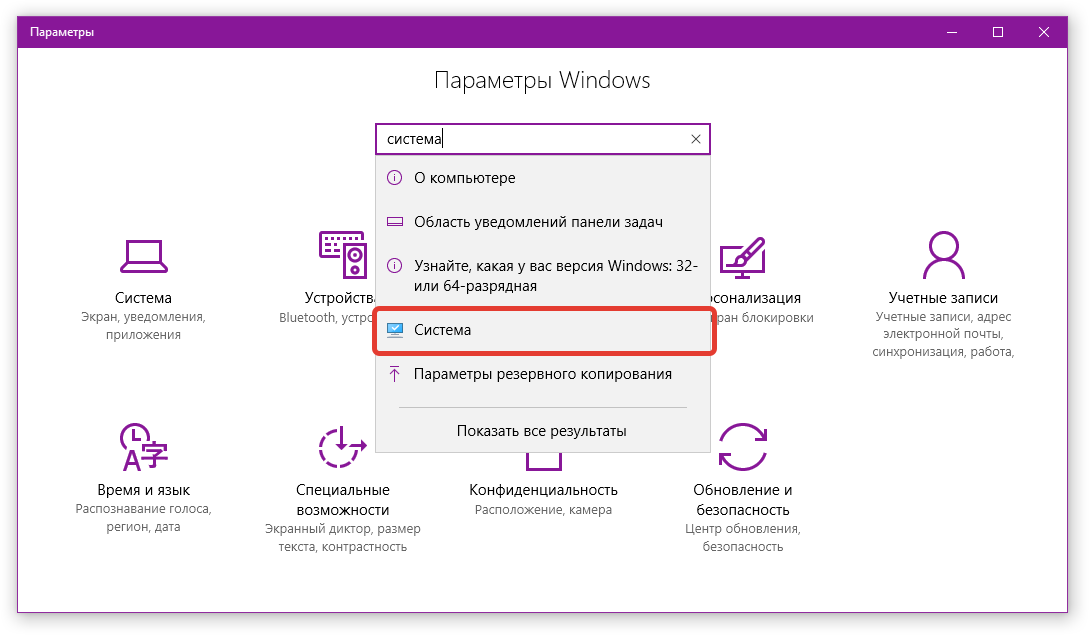

So, we execute one of the commands:
laravel new blog composer create-project --prefer-dist laravel/laravel blog The framework is downloaded to the blog folder. You can immediately register the address of your site. To do this, modify the command:
laravel new mysite.dev composer create-project --prefer-dist laravel/laravel mysite.dev After this, you need to restart OpenServer so that it “sees” the new site.
Everything. The installation is complete and proceed to the next step.
3. Configure Laravel 5.3
3.1. .gitignore
Since many people use repositories, we immediately go to the `.gitignore` file, bringing it to the form:
.env /vendor /node_modules /public/storage /.idea Homestead.yaml Homestead.json *npm-debug.log* That is, we include in the prohibition of downloading information from node_modules and auto-generated files from `public / build` and other" system "files.
The contents of the `vendor` and` node_modules` folders are automatically loaded.
3.2. Environment (.env)
Everything is quite simple here:
APP_ENV=local APP_DEBUG=true DB_CONNECTION=pgsql DB_HOST=127.0.0.1 DB_PORT=5432 DB_DATABASE=my_database DB_USERNAME=root DB_PASSWORD= `DB_CONNECTION` is the connection name of the corresponding database from the configuration` config / databases.php >> conntections`.
In the case of PostgreSQL, we specify `pgsql`, and in the case of MySQL / MariaDB, we specify` mysql`.
Also, do not forget to specify the port used for the database. The port number can be viewed in the `OpenServer` in the tab` Server`.
Before this, using the application `PgAdmin III` from the` OpenServer`, you need to add a database and set the parameters in the file `.env`.
3.3. Packages
To work we need the following packages:
- graham-campbell / exceptions
- barryvdh / laravel-debugbar
- barryvdh / laravel-ide-helper
- laracasts / generators
Laravel Exceptions
The package is needed for improved display of information about errors when developing in debug mode.
Installation is simple: in turn we execute the following commands in the console:
composer require graham-campbell/exceptions composer require filp/whoops --dev Next, in the file `config / app.php` we add the service provider` GrahamCampbell \ Exceptions \ ExceptionsServiceProvider :: class` to the `providers` block.
After that, in the `App \ Exceptions \ Handler.php` file in the` use` block, change the `use Illuminate \ Foundation \ Exceptions \ Handler as ExceptionHandler;` to `use GrahamCampbell \ Exceptions \ NewExceptionHandler as ExceptionHandler;`
More on graham-campbell / exceptions .
Screenshot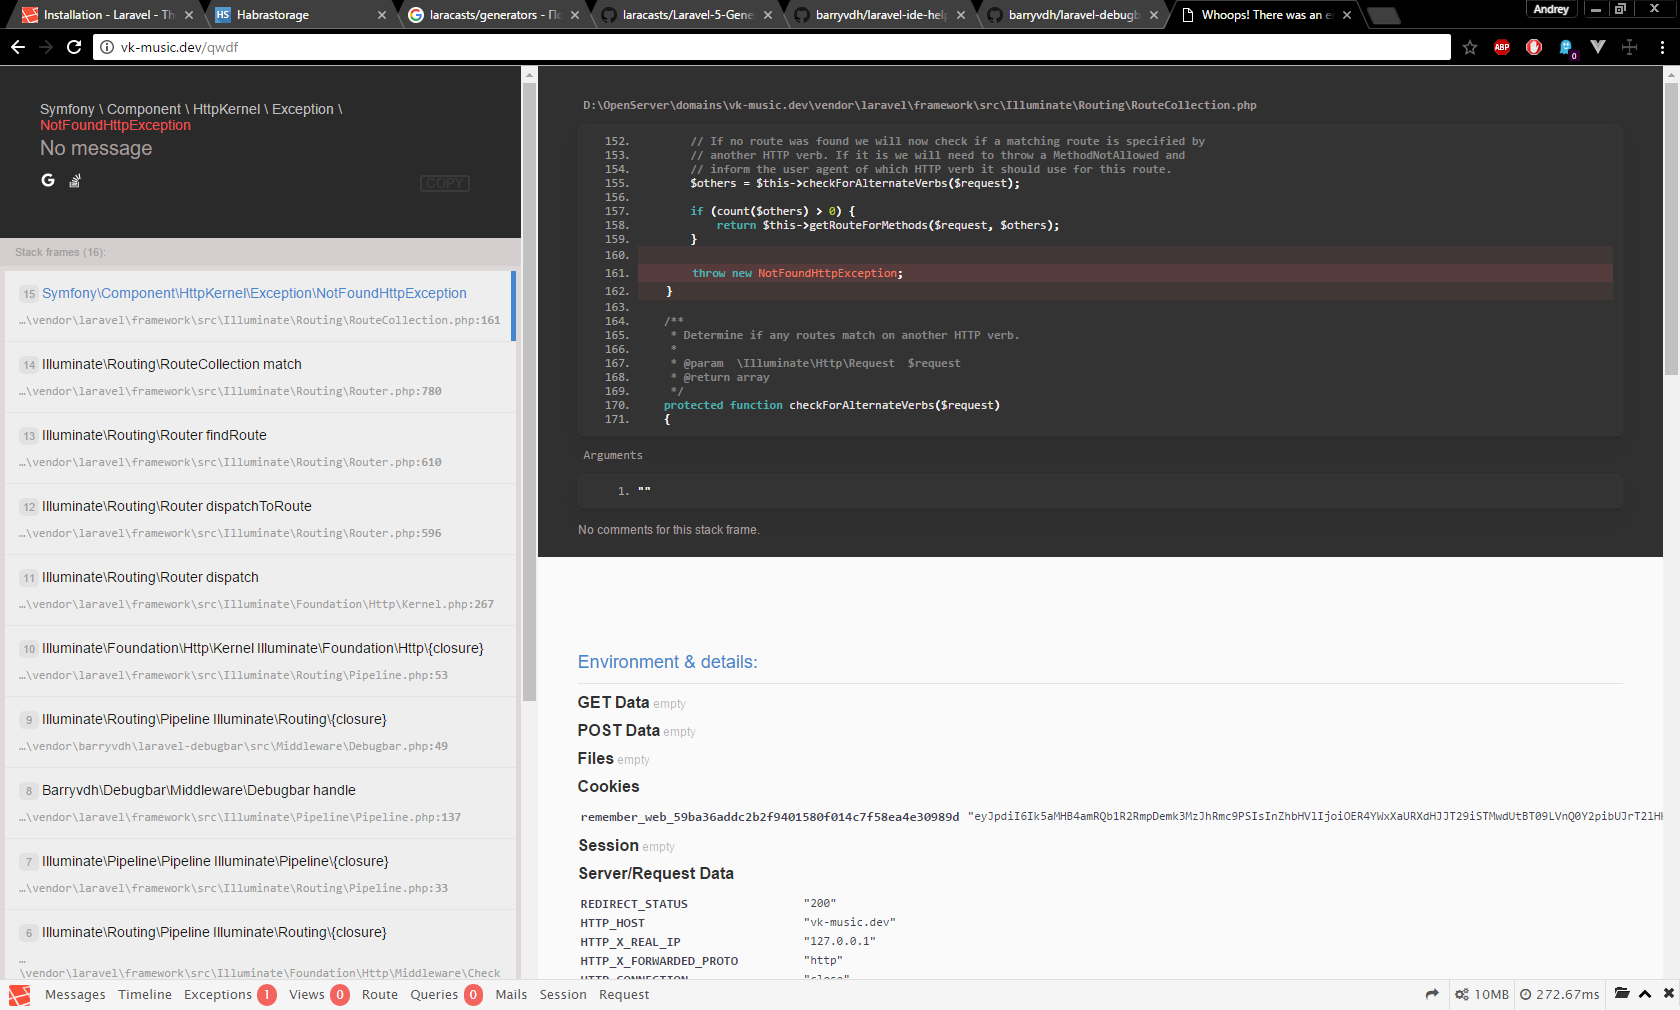
Laravel debugbar
Execute the command:
composer require barryvdh/laravel-debugbar Next, in the file `config / app.php` we add the service provider` Barryvdh \ Debugbar \ ServiceProvider :: class, `to the` providers` block.
Read more about the barryvdh / laravel-debugbar package .
Screenshot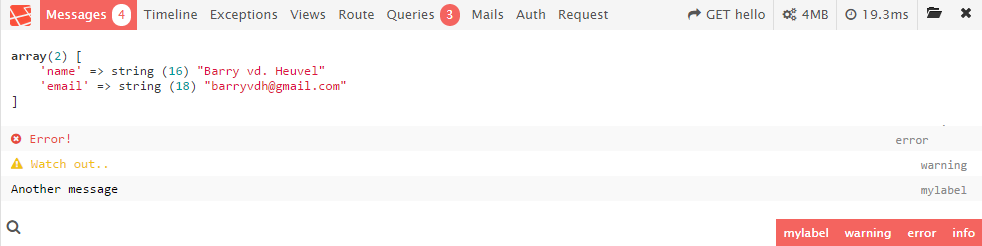
Laravel 5 IDE Helper Generator
Alternately, we execute the commands:
composer require barryvdh/laravel-ide-helper composer require doctrine/dbal Next, in the file `config / app.php` we add the service provider` Barryvdh \ LaravelIdeHelper \ IdeHelperServiceProvider :: class, `to the` providers` block.
After that, the `scripts / post-update-cmd` block in the` composer.json` file from the root directory, we put it into the form:
{ "scripts": { "post-update-cmd": [ "Illuminate\\Foundation\\ComposerScripts::postUpdate", "php artisan ide-helper:generate", "php artisan ide-helper:meta", "php artisan optimize" ] } } Read more about the barryvdh / laravel-ide-helper package.
Laravel 5 Extended Generators
I personally find it convenient to create migrations and models using just one command: `php artisan make: migration: schema`.
For example, we need to create a `news` table with` slug`, `title`, and` content` fields.
php artisan make:migration:schema create_news_table --schema="slug:string:unique, title:string:unique, content:text" To install a package under Laravel 5.3, run the command:
composer require laracasts/generators --dev Next, in the file `config / app.php` we add the service provider` Laracasts \ Generators \ GeneratorsServiceProvider :: class, `to the` providers` block.
Read more about the laracasts / generators package.
Complete package configuration
After installing all the packages, execute in the console:
php artisan vendor:publish composer update With the packages sorted out. At the turn of the Elixir .
4. Elixir
4.1 Installing Elixir
In the console, being in the project folder, we execute the following commands in turn:
npm install --global gulp-cli npm install --no-bin-links Since, since the days of Laravel 5.2, I use VueJs , which in 5.3 comes out of the box, we will connect it with all the necessary packages:
npm rebuild node-sass npm install hammerjs vue-async-data materialize-css Please note: components such as `vue` and` vue-resource` did not fit in, as they are out of the box.
Further, in the file `resources / assets / js / bootstrap.js` after the line` window. $ = Window.jQuery = require ('jquery'); `you will find the connection to the Twitter framework Twitter Bootstrap (` require ('bootstrap-sass' ); `). Since in this example we use not it, but MaterializeCSS, we replace it with `require ('../ vendor / materialize-css / js / bin / materialize.min');`.
Next, we find:
window.Vue = require ('vue');
require ('vue-resource');
And we bring to the form:
window.Vue = require ('vue');
var VueResource = require ('vue-resource');
var VueAsyncData = require ('vue-async-data');
Vue.use (VueResource);
Vue.use (VueAsyncData);
4.2 MaterializeCSS
It has long been transferred from the Twitter framework Twitter Bootstrap in favor of the “material” design of MaterializeCSS , since for me personally it looks more modern.
To install it, execute the command:
npm install materialize-css Next, you need to connect the font used by MaterializeCSS `Material Icon` in the template:
<!DOCTYPE html> <html> <head> <!--Import Google Icon Font--> <link href="http://fonts.googleapis.com/icon?family=Material+Icons" rel="stylesheet"> </head> <body> // </body> </html> 4.3 Configuring gulpfile.js
When developing a very convenient browser tool - the console. To organize a “quick search” of the problematic line, in the file `gulpfile.js` add the line` elixir.config.sourcemaps = true; `, which is responsible for generating the“ surse map ”.
When working with MaterializeCSS and SASS, for me it looks like:
Worker gulpfile.js
const elixir = require('laravel-elixir'); require('laravel-elixir-vue'); elixir.config.sourcemaps = true; /* |-------------------------------------------------------------------------- | Elixir Asset Management |-------------------------------------------------------------------------- | | Elixir provides a clean, fluent API for defining some basic Gulp tasks | for your Laravel application. By default, we are compiling the Sass | file for our application, as well as publishing vendor resources. | */ elixir(mix => { var assets = 'resources/assets/', node_modules = '../../../node_modules/'; mix .sass('app.scss', 'public/css/app.css') .copy(assets + 'images', 'public/images') .copy(node_modules + 'materialize-css/fonts', 'public/build/fonts') .webpack('app.js') /* * Version */ .version( [ 'css/app.css', 'js/app.js' ] ); } ); I think it’s not necessary to thoroughly explain why each method is needed. Just leave here a link to the documentation.
4.3 Resources: SASS
Since not all components from the MaterializeCSS framework are needed for the development of a project, we add links to them in our `resources / assets / sass / app.scss` file:
Content app.scss
@charset "UTF-8"; // Mixins // @import "../../../node_modules/materialize-css/sass/components/prefixer"; @import "../../../node_modules/materialize-css/sass/components/mixins"; @import "../../../node_modules/materialize-css/sass/components/color"; // Variables; @import "../../../node_modules/materialize-css/sass/components/variables"; // Reset @import "../../../node_modules/materialize-css/sass/components/normalize"; // components @import "../../../node_modules/materialize-css/sass/components/global"; @import "../../../node_modules/materialize-css/sass/components/icons-material-design"; @import "../../../node_modules/materialize-css/sass/components/grid"; @import "../../../node_modules/materialize-css/sass/components/navbar"; @import "../../../node_modules/materialize-css/sass/components/roboto"; @import "../../../node_modules/materialize-css/sass/components/typography"; @import "../../../node_modules/materialize-css/sass/components/cards"; @import "../../../node_modules/materialize-css/sass/components/toast"; @import "../../../node_modules/materialize-css/sass/components/tabs"; @import "../../../node_modules/materialize-css/sass/components/tooltip"; @import "../../../node_modules/materialize-css/sass/components/buttons"; @import "../../../node_modules/materialize-css/sass/components/dropdown"; @import "../../../node_modules/materialize-css/sass/components/waves"; @import "../../../node_modules/materialize-css/sass/components/modal"; @import "../../../node_modules/materialize-css/sass/components/collapsible"; @import "../../../node_modules/materialize-css/sass/components/chips"; @import "../../../node_modules/materialize-css/sass/components/materialbox"; @import "../../../node_modules/materialize-css/sass/components/forms/forms"; @import "../../../node_modules/materialize-css/sass/components/table_of_contents"; @import "../../../node_modules/materialize-css/sass/components/sideNav"; @import "../../../node_modules/materialize-css/sass/components/preloader"; @import "../../../node_modules/materialize-css/sass/components/slider"; @import "../../../node_modules/materialize-css/sass/components/carousel"; @import "../../../node_modules/materialize-css/sass/components/date_picker/default"; @import "../../../node_modules/materialize-css/sass/components/date_picker/default.date"; @import "../../../node_modules/materialize-css/sass/components/date_picker/default.time"; 4.3 Resources: View
So, in the course of the previous steps, executing the `gulp` command in the console, we will get 2 files at the output:` app.js` and `app.css`. Since the version control system was used (you shouldn’t talk about browser caching of resources, right?), The template `resources / views / layouts / app.blade.php` needs to be written:
<!DOCTYPE html> <html lang="en"> <head> <meta charset="utf-8"> <meta http-equiv="X-UA-Compatible" content="IE=edge"> <meta name="viewport" content="width=device-width, initial-scale=1"> {{--<!-- CSRF Token -->--}} <meta name="csrf-token" content="{{ csrf_token() }}"> {{--<!--Import Google Icon Font-->--}} <link href="https://fonts.googleapis.com/icon?family=Material+Icons" rel="stylesheet"> {{--<!-- Styles -->--}} <link href="{{ elixir('css/app.css') }}" rel="stylesheet"> </head> <body> // Content {{--<!-- JavaScripts -->--}} <script src="{{ elixir('js/app.js') }}"></script> </body> </html> 5. "Buns"
It often happens that a class was renamed and the command `composer update` refuses to work right away.
With most errors that occur when running console commands, the command helps:
composer dump-autoload composer dumpautolod Yes, the command is the same and both methods are correct. Which one to choose is up to you.
Also, it will be useful to see a list of all the `artisan`-commands:
php artisan list And, of course, a list of active routes:
php artisan route:list Repository
For those who wish to place in the public repository ready project set up on this manual.
So to speak, you can see "live" as well as there.
Expand this example is simple. Clone repository:
git clone https://github.com/andrey-helldar/laravel-example-to-juniors.git And in turn we execute the commands:
composer install npm install gulp Actually, that's all.
Enjoy using.
PS: If someone disagrees with me and there are other better solutions, please write in the comments)
We kindly request to comment on your negative, pointing out the facts and how you would do.
Just watering is not constructive. It only cracks the page with spam, no more.
UPD1: JhaoDa shared a link to the finished skeleton for a working version of Laravel 5.3.
LaravelRUS / laravel-skeleton - A skeleton application based on Laravel 5.3 from the LaravelRUS community.
Source: https://habr.com/ru/post/309568/
All Articles