Black box for the house: collect NAS do-it-yourself, part 1
If I were an employee of a macaroni factory, I would now have puzzled over what to do with 500 packs of pasta a pound each. Fortunately, when the authorities decide to award the sysadmin “in kind”, receiving a dry ration van as a gift does not threaten, although there are good chances to become the owner of several dozen kilograms of frank scrap. However, this time I was lucky - as a corporate gift I received a pair of brand new WD Re 2004FBYZ for 2 terabytes each, and the Thermaltake Smart DPS G 750W power supply unit. That's just what to do with the disks? To put in a home computer is too wasteful even for me, after all, Enterprise Class, and there is no special need. Much more practical on their basis to collect NAS. Of course, not some kind of file dump, but highly reliable storage - a kind of “black box” for critical data. Plus, you can combine business with pleasure - once the decision has been made to completely transfer the infrastructure to “smart” PSUs (and this is how Thermaltake is positioning the Smart DPS line), it would be nice to see how it works.
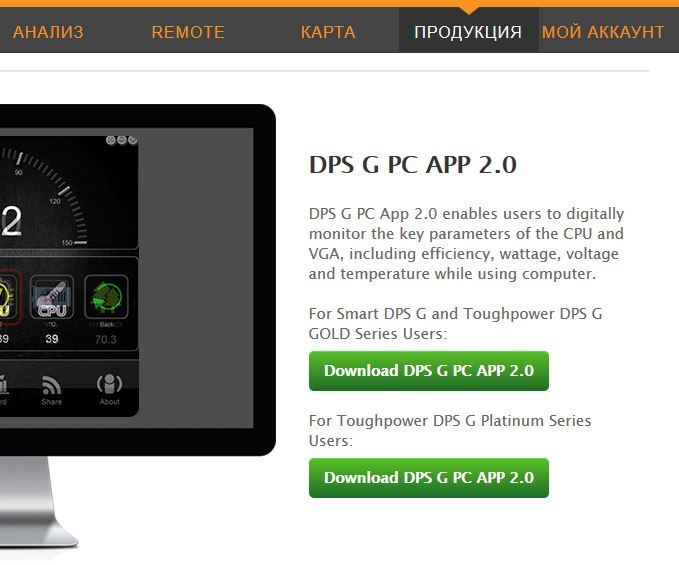
But there is one snag - at the moment a proprietary application exists only under Windows. For an enterprise data center, this operating system is good, but for home file storage is terrible and extremely unprofitable. Therefore, I decided to make two posts. In this, we will raise a NAS based on Windows Server 2008 r2 (making sure that the “windows” and “home NAS” are incompatible concepts), and see what the DPS G App 2.0 is capable of. In the second we will collect a budget NAS based on NAS4Free, creating a truly reliable system.
In order not to be filled with tomatoes, I want to warn you right away - the article is intended primarily for non-professionals. Although it will be interesting to even experienced administrators and enthusiasts to read about Smart Power Management from Thermaltake, the main material is aimed at people who do not want to overpay for a big name, buying ready-made solutions, and at the same time are far from system administration (programmers, designers, web developers, etc.). .d.) If your hand is hard enough to assemble a computer from components, but you don’t want to deal with server software for a long time, and the console has only been seen in dreadful dreams - this stuff is for you. If you want to look at SPM Cloud to decide how this system can be useful for you, turn the post to the subtitle “How smart is the smart power supply?”. By the way, I warn you - under the cut a lot of photos and screenshots.
Immediately make a reservation - I did not seek to assemble a home NAS only on the basis of cost. Selecting components, I was guided by how well the components are suitable for the implementation of the task, while not forgetting the quality characteristics. Is it possible to build a budget NAS at lower cost? Can. But it can also be lost in performance and convenience, which I would not want. As a result, the following happened.
')
Housing The Thermaltake Core V1 took over the role of the data storage case - a cute, all-metal cube with a quiet 200 mm fan behind the front bezel.

Behind there are seats for a couple of fans at 80 mm, so that the network storage can be made really cold.

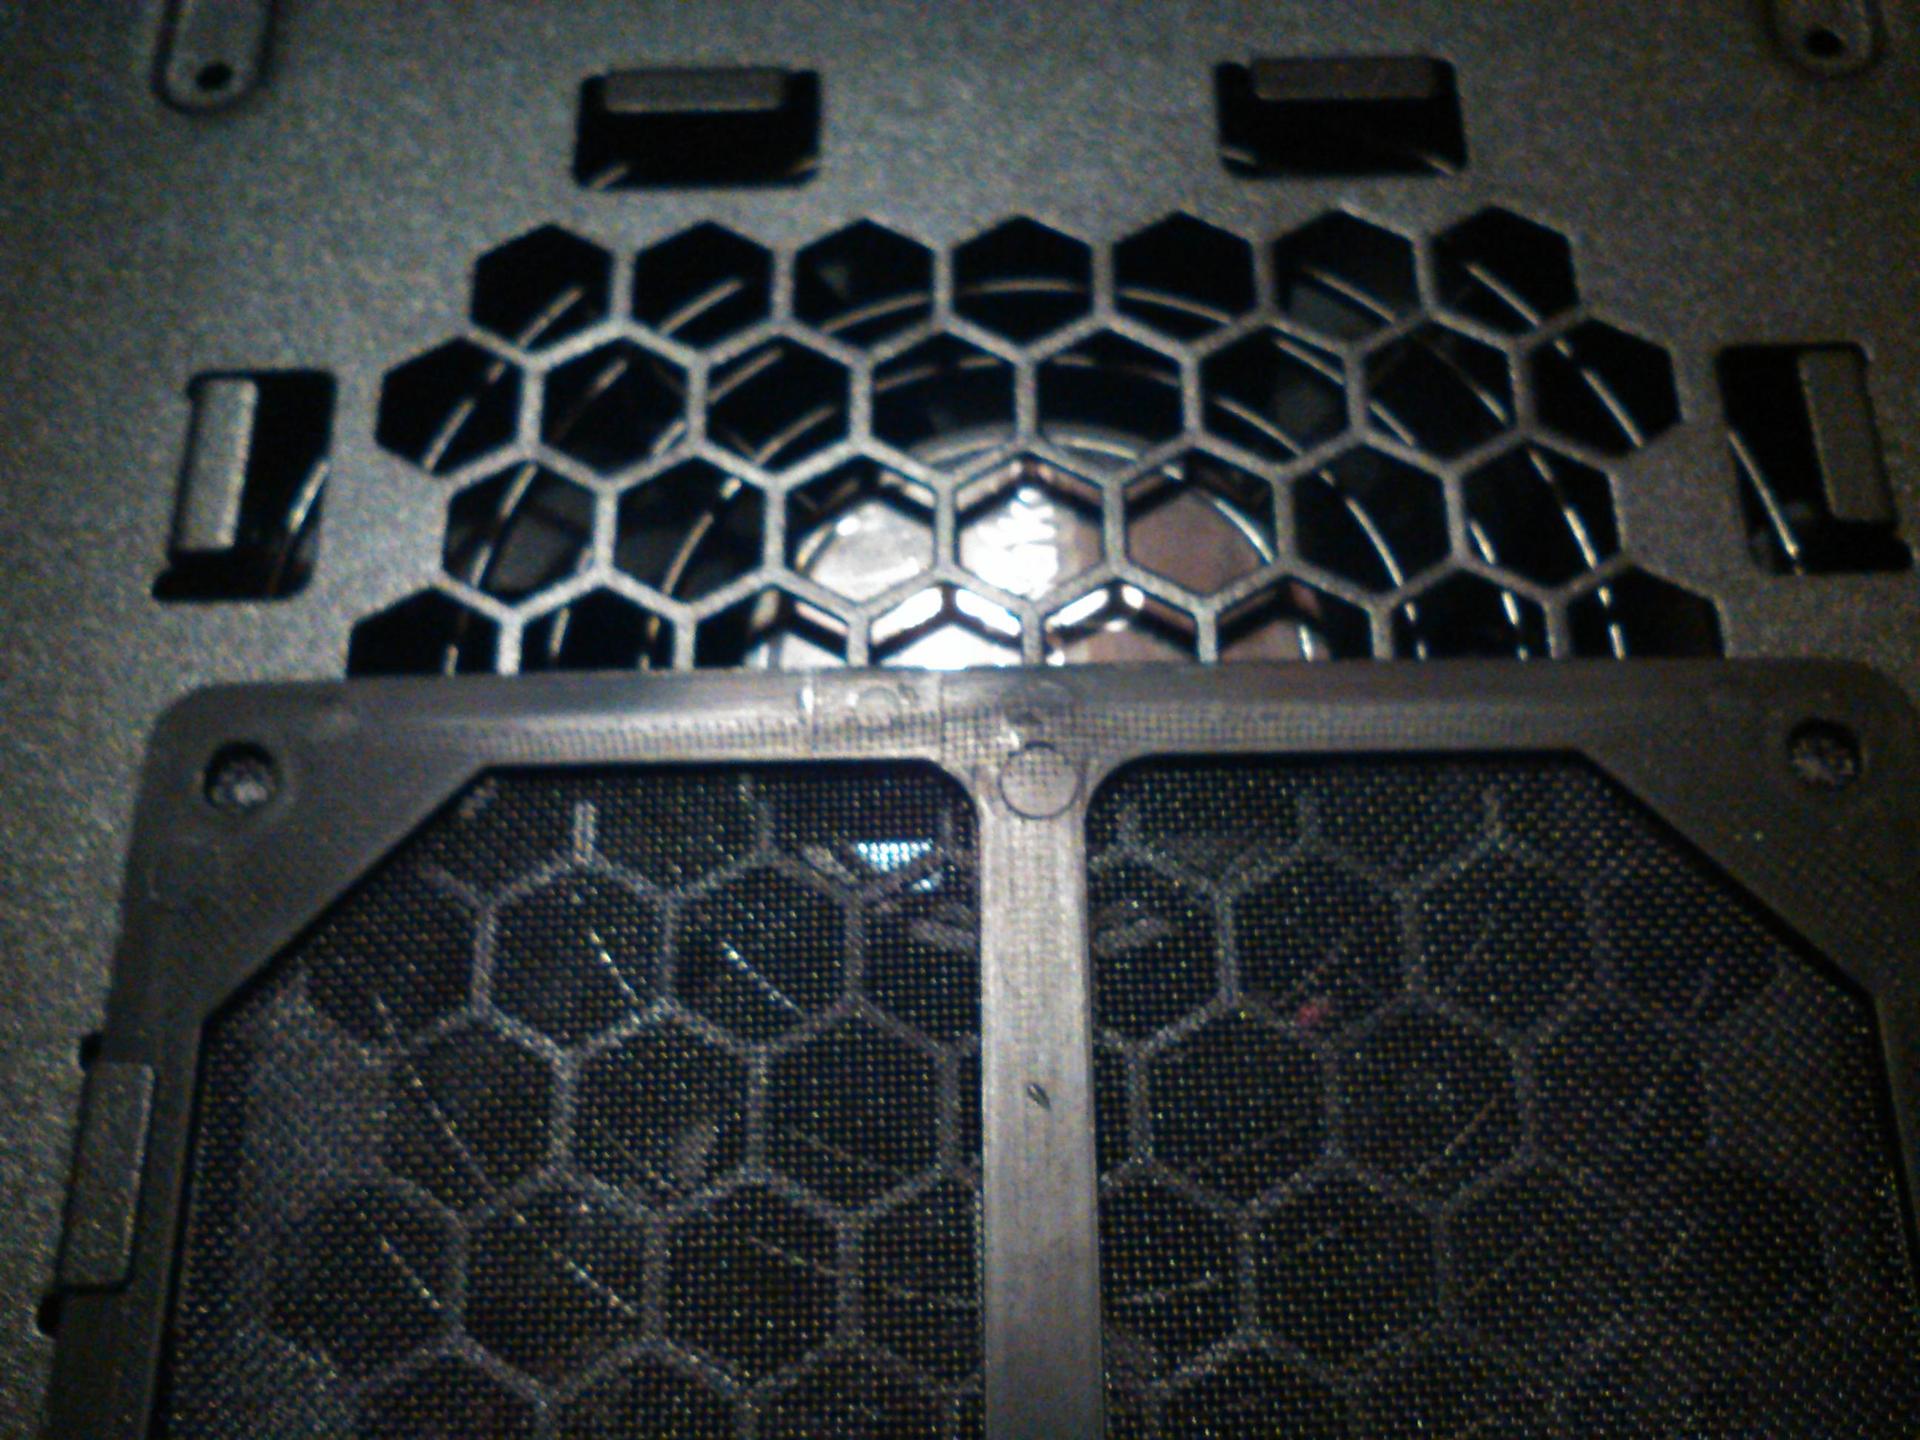
As well as in other modern models, for the power unit here the lower compartment is set aside. Dust protection provides a metal filter.
Another advantage of the Core V1 are 4 removable walls (side, roof and bottom), which greatly facilitates the assembly procedure. Each panel is fastened with a pair of screws that can be easily loosened by hand. I also quite liked the implementation of the disc baskets - each of the four fixing screws received its own rubber damper, which dampens vibration quite well:

Motherboard. Here my choice fell on the GIGABYTE GA-J1800N-D2H with integrated Intel Celeron. The dual-core processor with base 2.41 GHz for the network storage device is enough for the eyes (although Windows Server will load it 100%, but the windows are not our target platform), it is quite economical and does not require active cooling (there is no need to buy a cooler) .

Despite its cheapness, Gigabyte introduced its proprietary chips into the product: High ESD technology, providing protection against electrostatics for microchips and LAN, as well as Anti-Surge IC, which prevents the motherboard from failing due to power surges - everything you really need. reliable system. The only controversial point is the location of the internal USB connector close to the radiator: it is simply inconvenient to work with it.

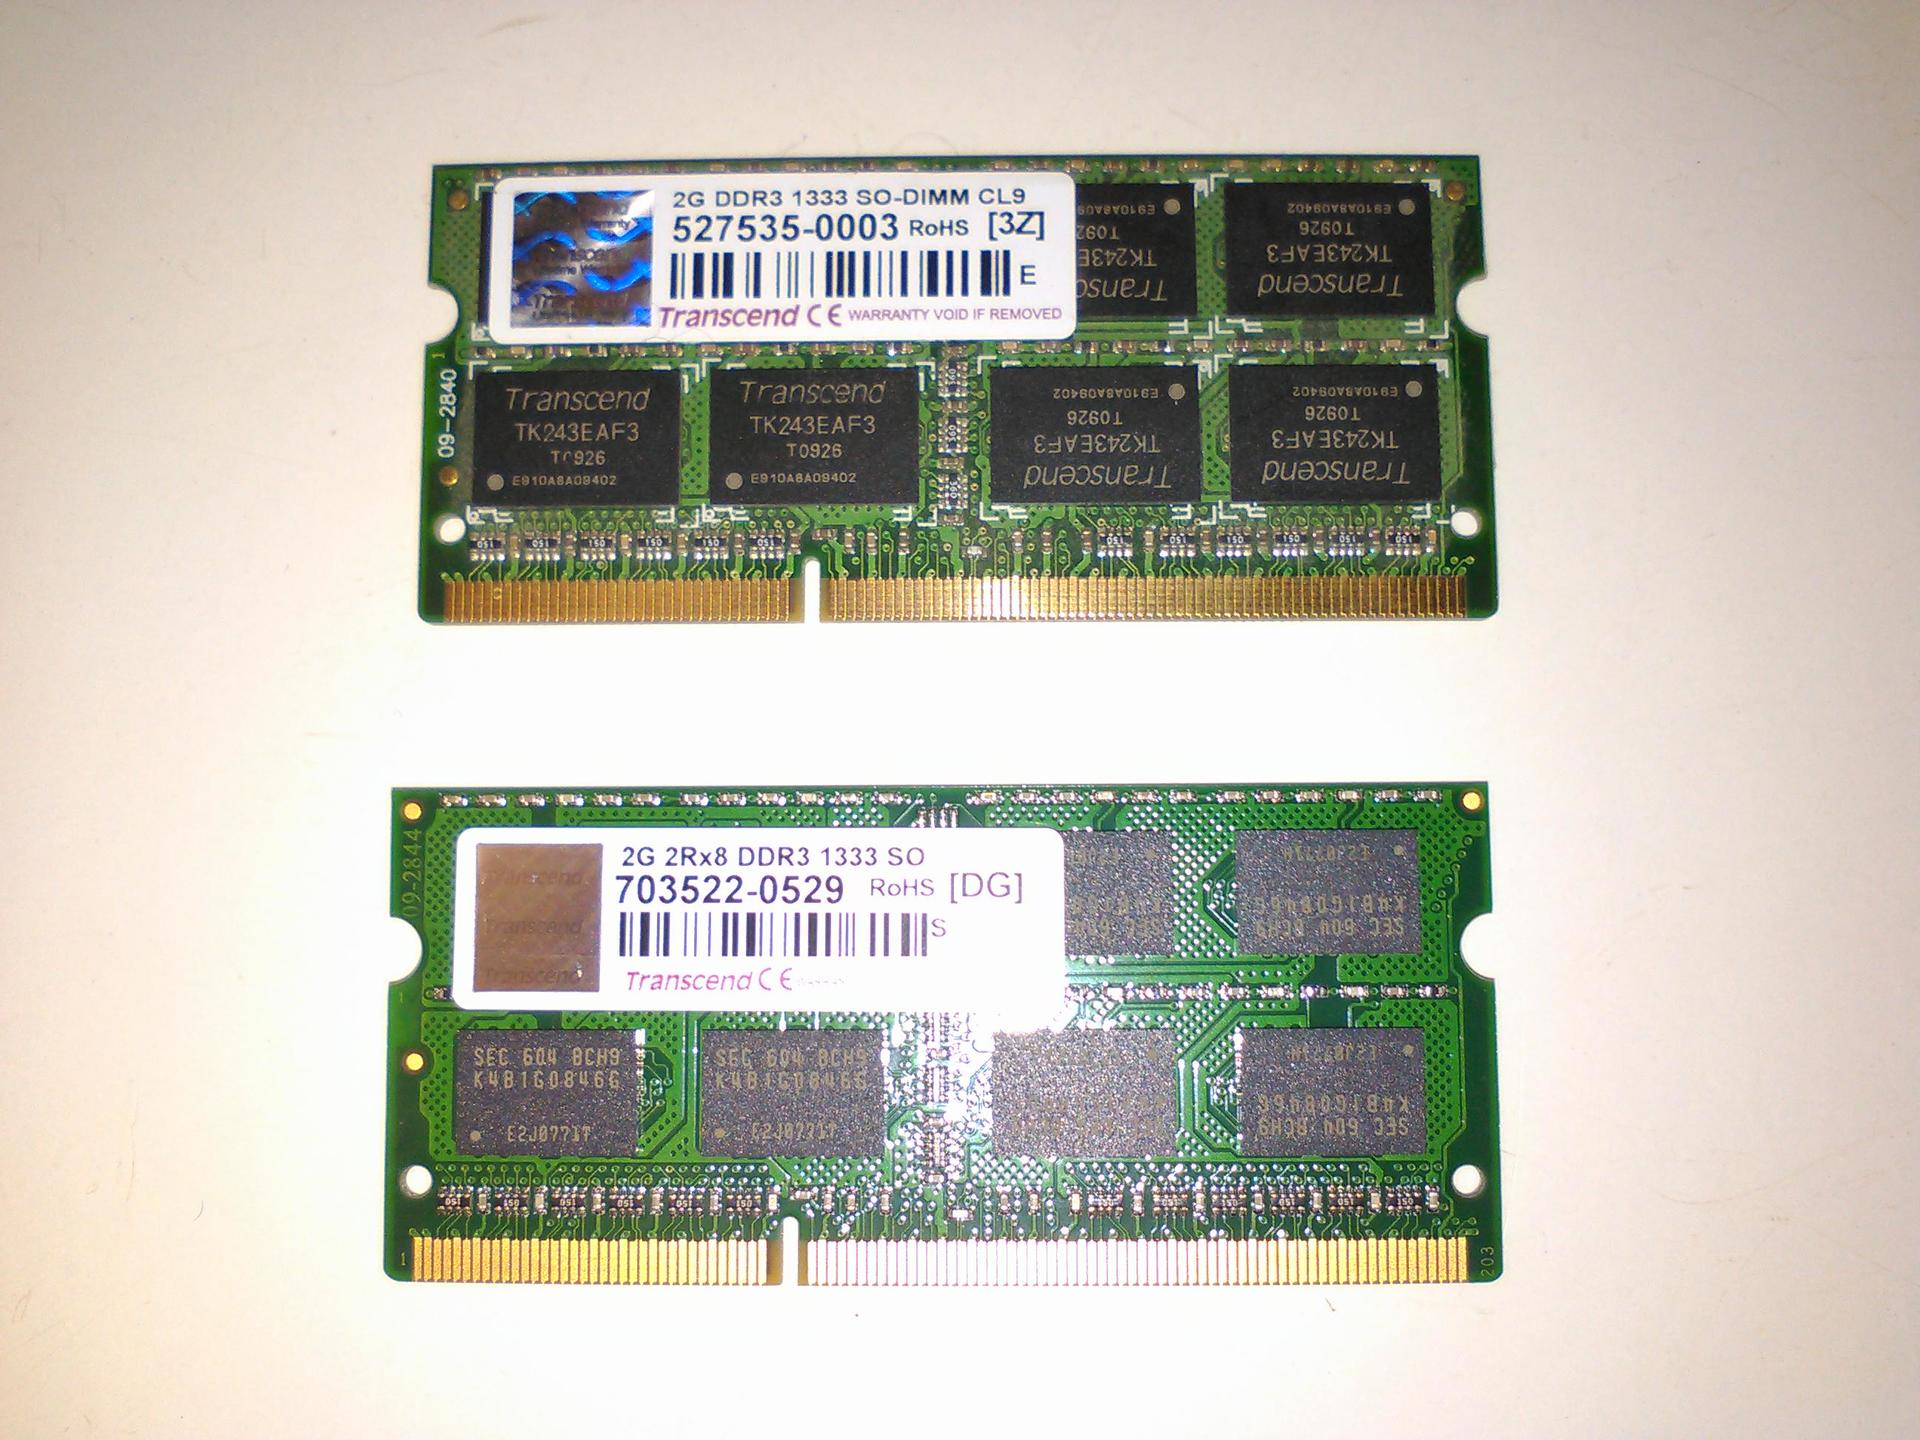
RAM. Nothing special - the usual Transcend 2Gb DDR-III 1333Mhz in the SO-DIMM form factor. If somewhere in the closet strayed an old laptop, you can remove the modules from it.
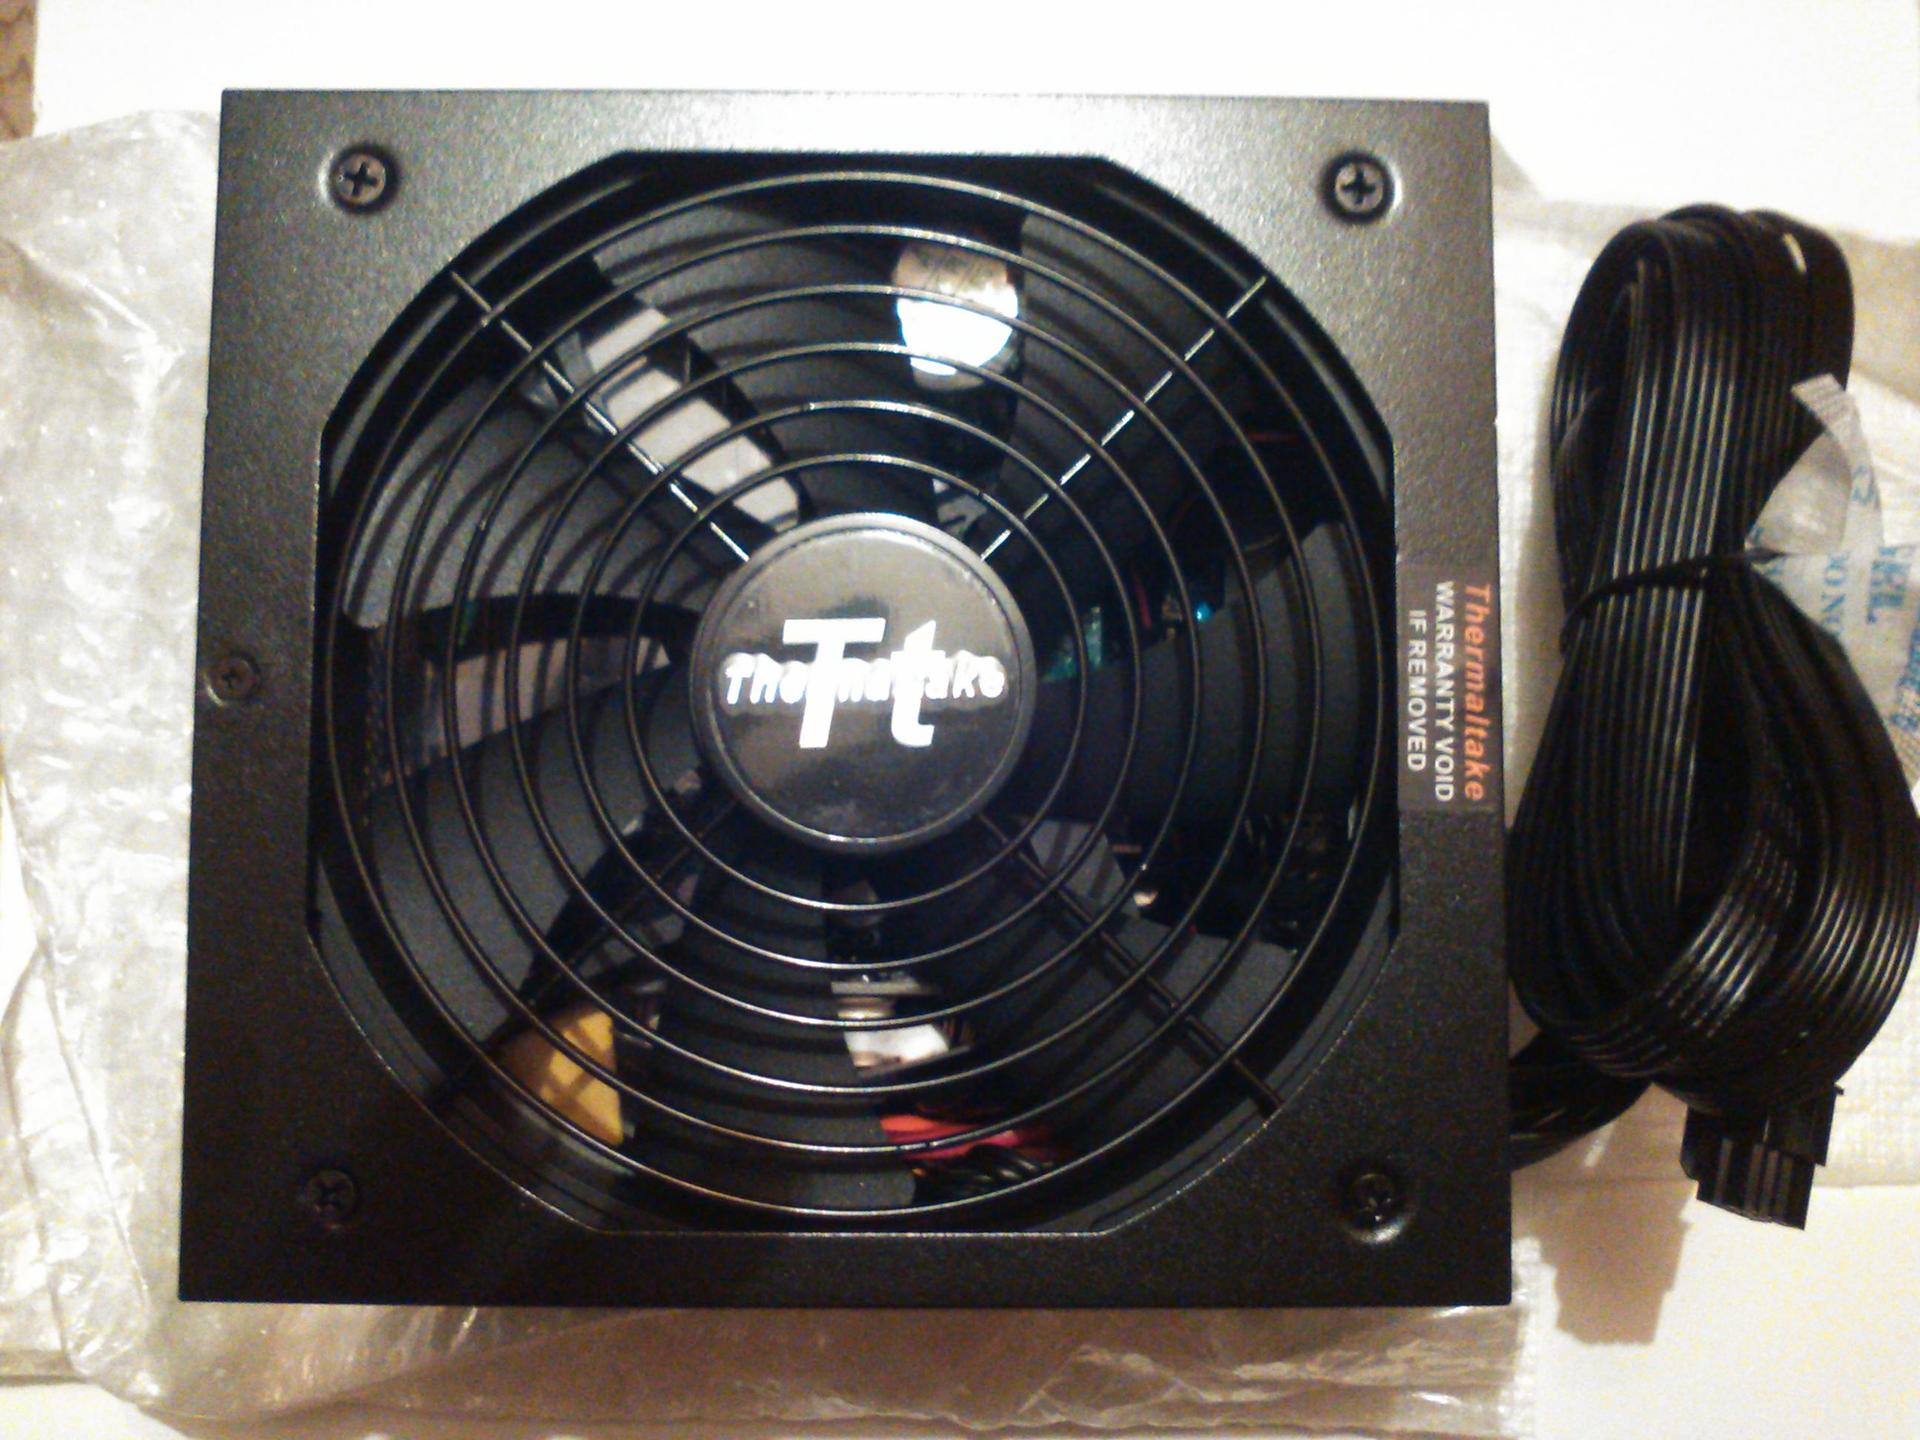
Power Supply. Solid Thermaltake Smart DPS G 750W, designed for high-performance PCs and server platforms certified to 80 PLUS Gold. For a full-fledged server or workstation - just right, for building a NAS with your own hands - too powerful, but during the experiment you can pamper yourself by installing a nitros on a small car.
Of course, a modular connection of cables is provided in the device of this class. Of the built-in - only connectors of the motherboard and processor (shared 4 + 4 pin, which had to be very handy during assembly).

Additional convenience is provided by flat cables, although even they fit in a compact Core V1 with difficulty - yet the case is not designed for this. Among them was the wire to connect the Thermaltake Smart DPS G 750W to the internal USB connector. Obviously, it provides the interaction of the onboard 32-bit microcontroller with the sensors of the motherboard, and is necessary for the full functioning of Smart Power Management. However, about how the monitoring system justifies itself and what features it provides, we will talk a bit later.
Cooling. Two quiet unregulated TITAN DC FAN. Once we want to build a quiet NAS without extra costs, this option will be optimal.

Hdd Although they don’t look a gift horse in the mouth, I consider it necessary to say a few words about the heroes of the occasion - the sweet couple WD Re 2004FBYZ. After all, whatever one may say, the safety of information depends on the quality of hard drives.

If you refer to the manufacturer's specifications, everything looks very tasty. So, hard drives are equipped with accelerometers and pressure sensors, on the basis of which Rotary Acceleration Feed Forward (RAFF) technology is implemented, which provides protection against linear and angular vibration in real time, which increases both reliability and performance. As a server solution, WD Re 2004FBYZ also has TLER (Time Limited Error Recovery), which limits the time of correction in order to prevent the disk from erroneously falling out of the RAID array. Add to this the stated time to failure in 1.2 million hours, and we get almost perfect.
However, it is difficult to judge the truthfulness of beautiful words and sophisticated abbreviations until you try the product yourself. And here I can only say that I am typing this article on a computer, within which the terabyte Caviar Black has been working for six years already. Yes, and a 2.5-inch baby in an old Dell Inspirion 1501, now given to parents, feels just as good. Actually, the transfer of the infrastructure to WD at the current place of work took place exactly at my suggestion - I had a long and very productive relationship with this brand. I have been using their disks for more than a year, they have never let me down, and today I don’t see any reason to change my preferences.
Flash drive. Any 8GB USB drive. Of course, compact “plugs”, whose case practically does not protrude above the connector, are optimally suited.
Now from this stuff you need to collect network storage - everything is quite simple. If you have at least once self-assembled computer, then cope without any difficulty. I will note only a few key points:
Perhaps, it is worth taking a small groove and counting how our budget assembly turned out. So let's get started:
Total: 13,504 rubles.
I deliberately did not take into account the HDD, in order to compare with the products of Synology. For example, DiskStation DS216 + will cost you 28,173 rubles, while under the hood we will see a very modest stuffing: Intel Celeron N3050 1.6 GHz, RAM - 1 Gb, all the same two 3.5 mm seats for disks. If WD Re 2004FBYZ hadn’t gotten to me for nothing, I would have paid another 17,660 rubles, and the final costs would be close to 31,000 - the cost of the “bare” platform of a popular brand. Yes, our assembly is less compact, but more productive and reliable, and this is almost at half price! And if there is a difference, then pay more? With this, a small lyrical digression is completed - time to move on and commission our car!
Even if you haven’t seen * nixs in your eyes, even if you are trembling at the sight of the command line, even if the “windows” seem familiar and instill a sense of security, do not try to raise your personal Windows-based file storage. Why? I'll tell you in the course of this material. But first we will deal with the installation.
We will install Windows Server 2008 r2, of course, from a flash drive. To create a bootable drive, you can refer to the following instructions , or use the Windows USB / DVD Download Tool utility, which is also recommended in the official Microsoft blog . The same can be done with the help of Rufus , which, moreover, will be able to check the memory for broken blocks (one or two passes will be enough), or install in Windows To Go mode, which will allow you to run the OS directly from the device.
However, the last option is not the best idea, given the peculiarities of the operating system and the required disk space for it, so let's make a regular bootable USB flash drive.
Now you can start the installation, and here we see the first pitfall - the size. Want to put a standart editor with a visual interface? Be so kind as to allocate 24 gigabytes. In the case of a pair of disks, it is too wasteful. Otherwise, there are no nuances: as in the version for home use, it all comes down to “Next-Next-Done”.
Logging in to the system, you will see the following argument “against” - the need to activate. I do not plan to use Windows Server as the basis for the NAS - all this is, first of all, an experiment, so I will confine myself to the trial, which Microsoft itself kindly provides. Run regedit, look for the registry key
change its value by one and reboot the machine. Now the trial period has increased from 3 to 30 days. In total, it can be extended up to six months using the slmgr.vbs script. The slmgr.vbs -dli command will help you know how much time is left until the end of the current license, and slmgr.vbs –rearm to reset the evaluation period (no more than three times). The process can be automated by creating a small XML file.
I would like to express one more “fairy” in the direction of the “Update Center”. Windows Server 2008 r2 SP1 was later released more than 300 patches of different caliber. It will take several hours to install them all, and the patches conflict with the addition of server roles. That is, it is necessary to update either before or after, the process takes a lot of time, and loads the system to the maximum:
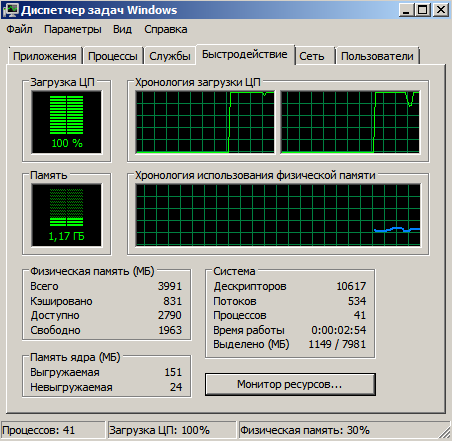
There is also a regrettable bug. After installing the updates, you may find that the space on the system disk began to disappear by itself. If you notice a leak, go to the folder C: \ Windows \ Temp. Almost certainly you will see this picture:
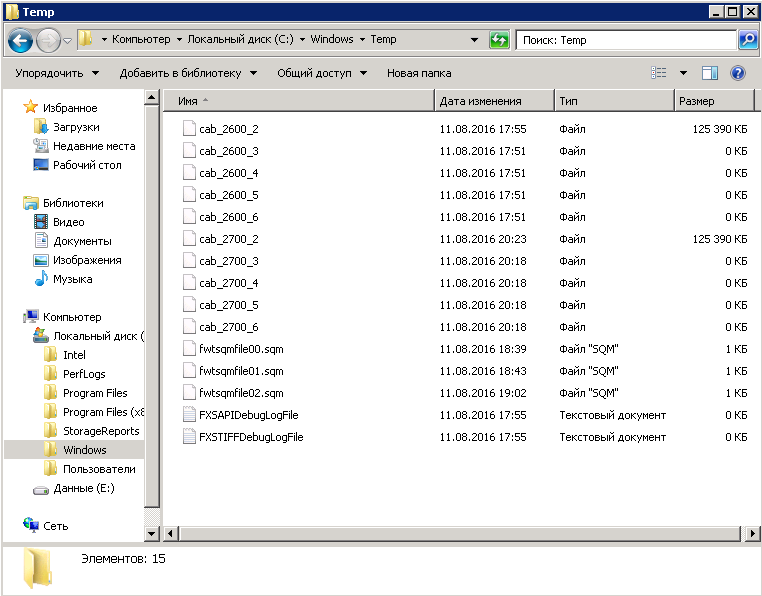
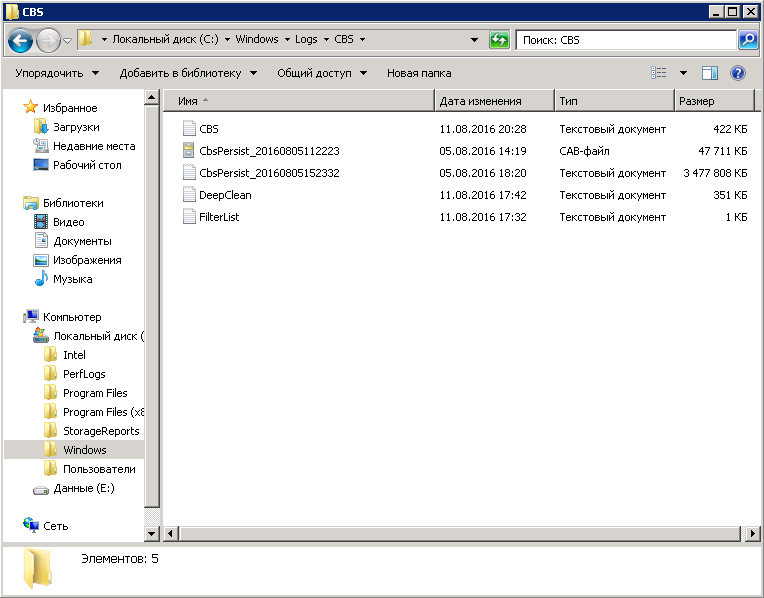
The point is in the failure to archive update logs - the system spawns damaged archives at a terrible speed, after each error, it starts the procedure again. It is treated by deleting all files from the folder C: \ Windows \ Logs \ CBS, after which you can safely clean the Temp directory.
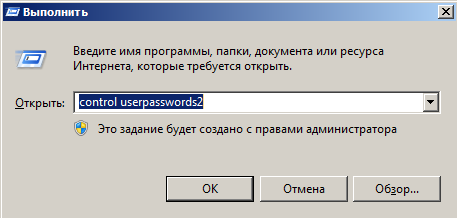
However, we move on. And the first thing that needs to be done is to configure autologin, the benefit of the NAS will still be in the home network, and every time entering a password is too tedious. Go to “Start” -> “Run” and drive the control userpasswords2 command.
Selecting the “Administrators” group, uncheck “Require user name and password entry”, save the selection.
Now we will deal with remote connection. The easiest way to use the built-in desktop manager. To activate it, go to “Start” -> “Control Panel” -> “System and Security” -> “Remote Access Settings”, select the second or third item (if you plan to display the NAS to the Internet). You should also set a simpler and laconic computer name on the tab of the same name.
LiteManager can become an alternative - a multifunctional program that is free for a private user and has many useful functions: file transfer, direct access to the console, registry editor, task manager, and several others. When installing the server side on the NAS, set the access password that will be used when logging in:
If you plan to release your home NAS to the Internet, you can further configure the IP filter:
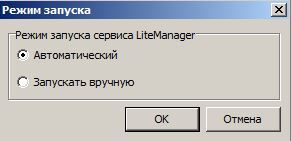
Make sure the LM Server is in automatic startup mode:
Also do not forget to set the static address for our machine in the properties of the adapter:
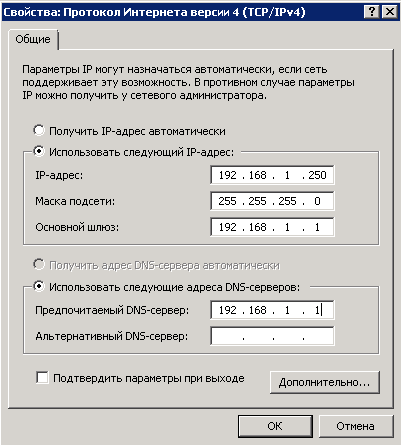
where 192.168.1.1 is the address of the router. Finally, enable network discovery and sharing of files and folders in “Control Panel” -> “Network and Internet” -> “Network and Sharing Center” -> “Change advanced sharing settings”.
After the operations described above, you can connect the NAS to your home network with a clear conscience. If further control will be exercised through the LM Viewer, install the application on your computer and add a new connection by clicking on the plus on the toolbar and filling in the required fields:
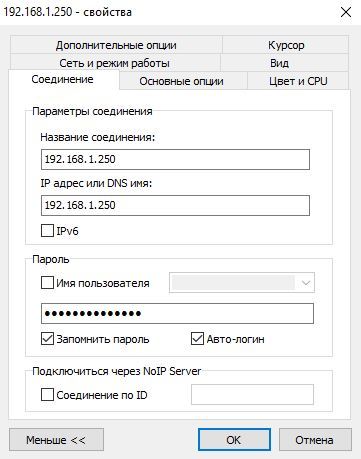
where 192.168.1.250 is the NAS IP address. Or use the built-in Windows remote desktop connection utility.
Now let's create a section for storing information. Go to “Server Manager” -> “Storage” -> “Disk Management”, right-click on unallocated space on the system disk, select “Create a simple volume” and, following the wizard’s prompts, create the main section “Data” formatted in NTFS.
You can proceed directly to raising the file server. Open in the manager “Roles” -> “Add roles”.
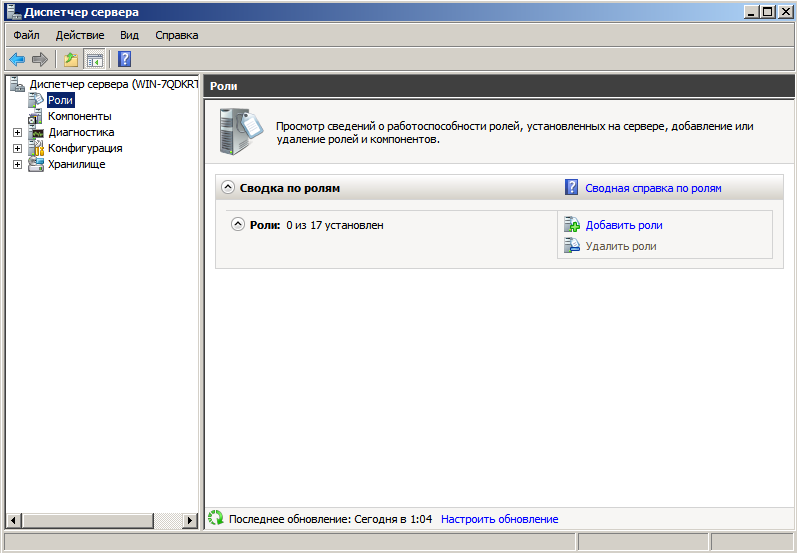
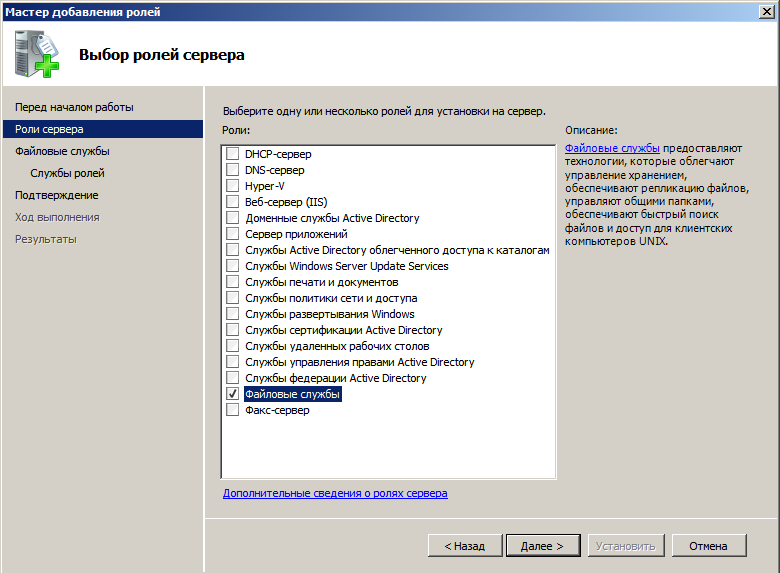
After the welcome wizard window, a list of available will appear. We are interested in “File Services”:
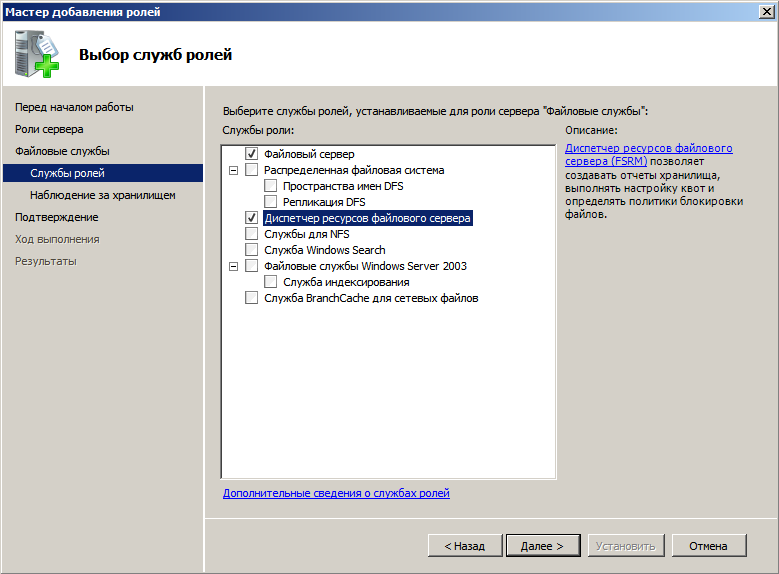
In the next window, check the box next to “File Server Services Manager”, optionally, you can enable “Windows Search Service”.
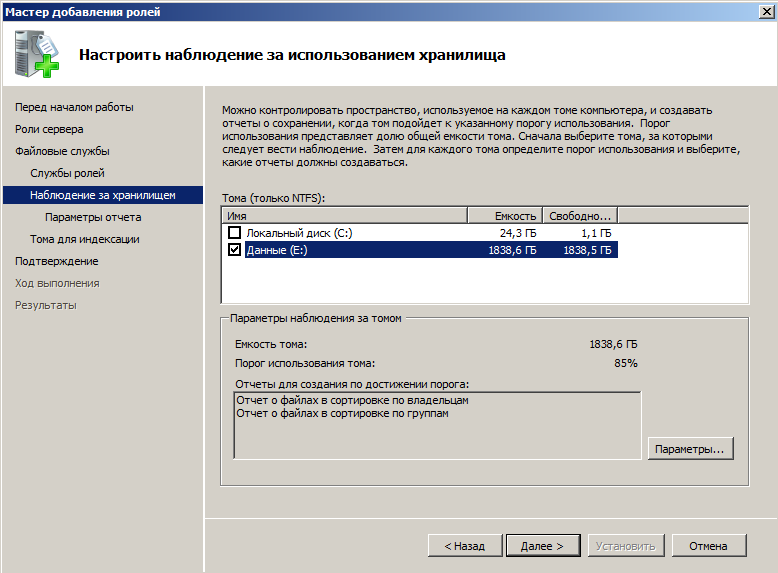
In “Monitoring the storage” we mark our section “Data”:
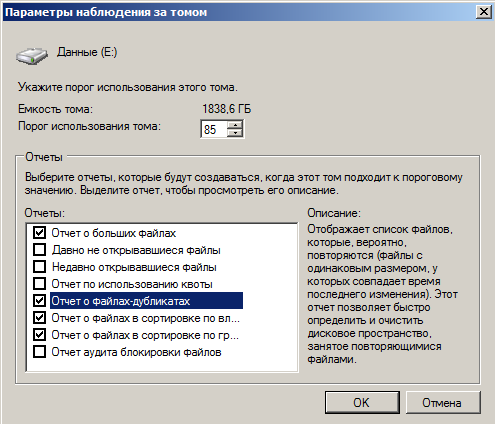
Here, by pressing the “Parameters” button, we set up the monitoring of the volume. For convenience, you can add reports about duplicates and large files.
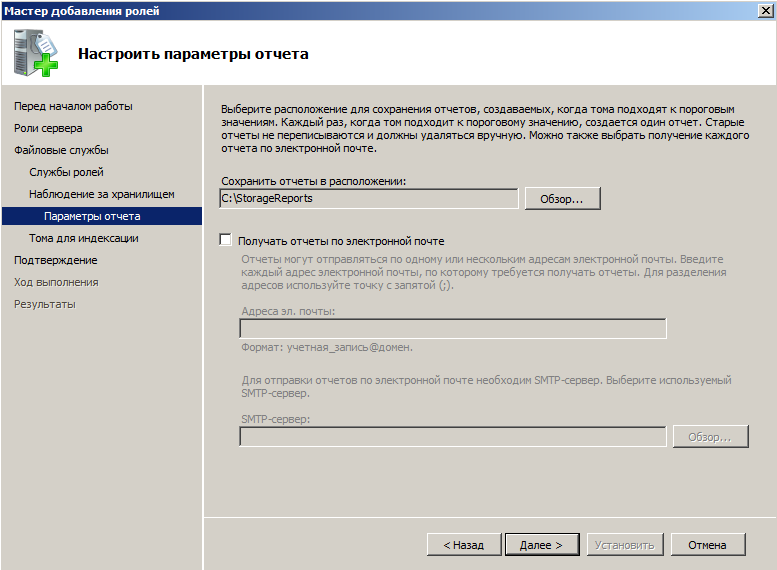
In the “Report Parameters” set the path for storing records:
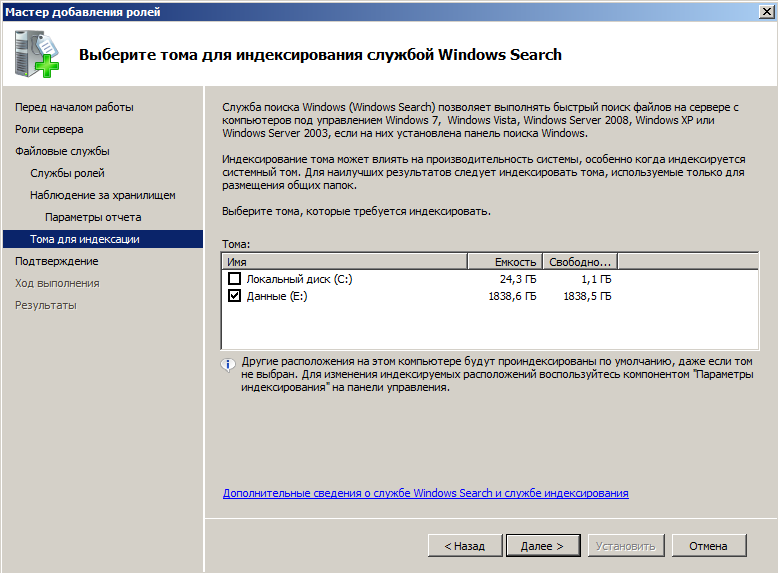
If you have connected Windows Search, select the indexing of the “Data” volume:
We confirm the choice and wait for the end of the installation. After that, the capabilities of the file manager will be available to us (located in “Start” -> “Administration”). From the whole range of tools offered, home quota management is useful for home use.
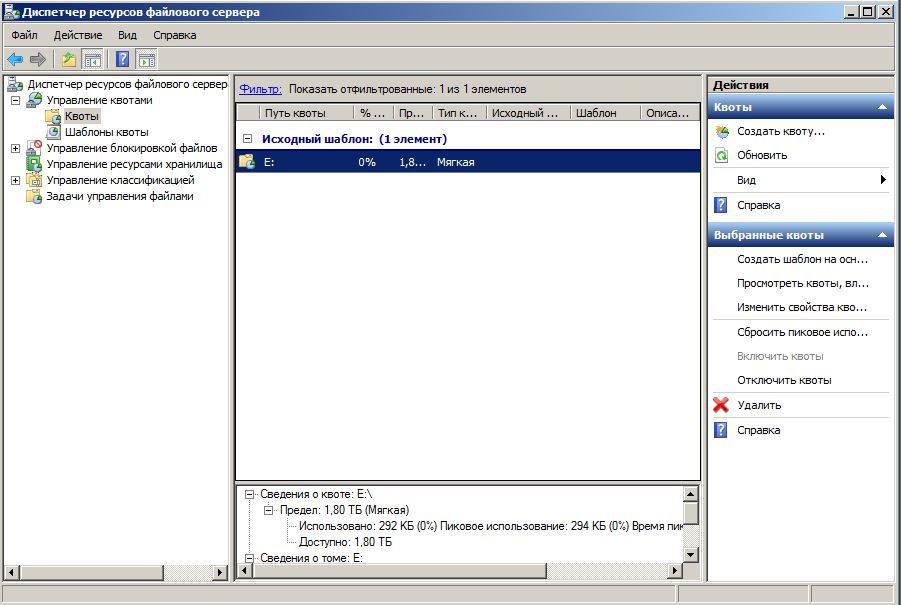
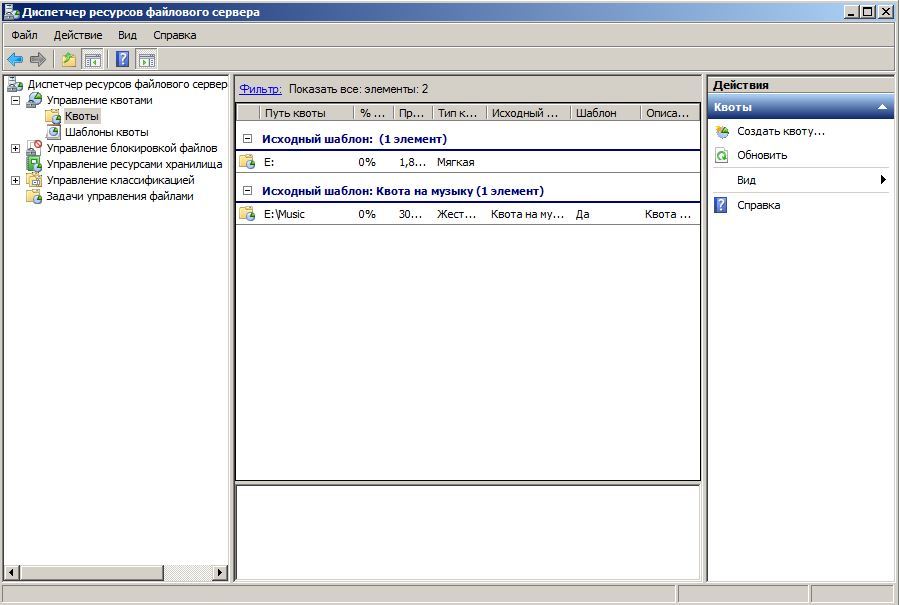
As you can see, the “Data” section has already received a “soft” quota by default. This means that if it is filled more than 85%, we will receive an alert, but the recording of files in the NAS will still be available. Quotas can be set not only for partitions, but also for individual directories. Let's create a “Music” folder on the “E” disk and set a size limit for it. Click "Create a quota" and select the path:
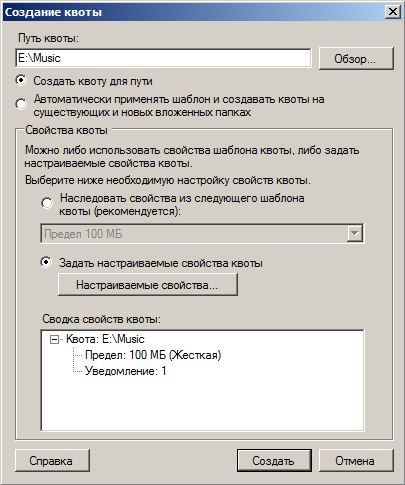
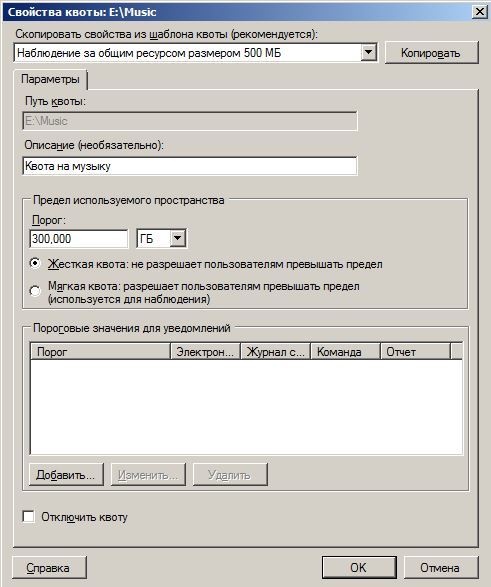
In the “Customizable Properties”, we indicate the limit of 300 GB and select the “Hard” option so that the music does not lead to a situation where there is no space for regular backups and important documents on the disk:
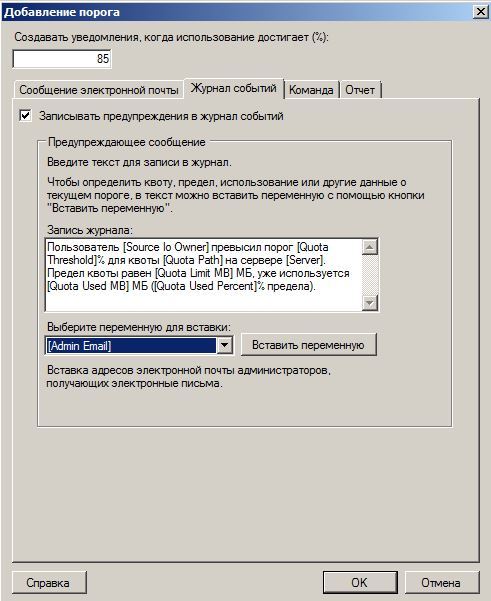
Add a threshold value of 85% and set the notification method:
As a result, we get:

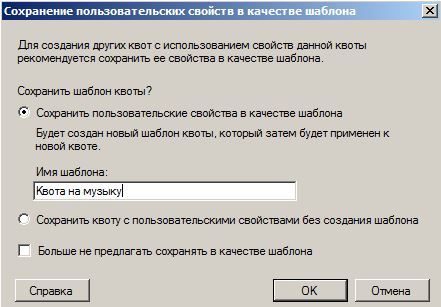
After clicking the “Create” button, the system will offer to save the settings to a template. Subsequently, this will allow us to apply similar rules to other folders in one click.
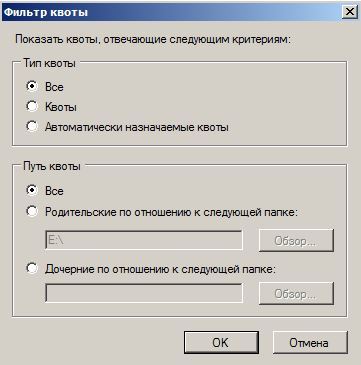
In order for a new quota to appear in the list, you must reconfigure the filter. Click on the link of the same name and select “All” values:
Now the new quota is also visible on the main screen:
Another option that may be useful if, in addition to your file storage, your wife, children, and your favorite cat use file locking control. It allows you to exclude the download of files of certain extensions in certain directories.
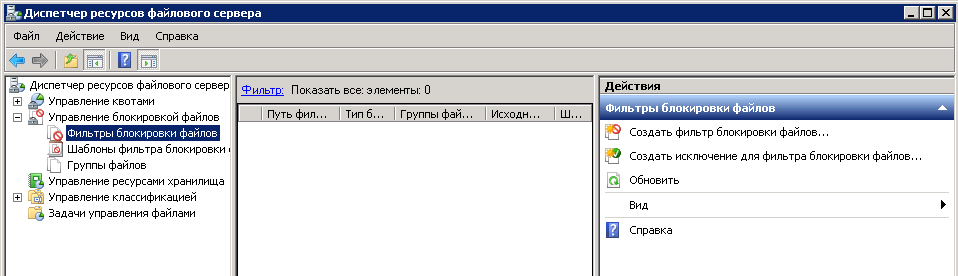
Let's create the Backup directory and prevent it from littering with music and video. To do this, simply click on “Create file block filter”, select the desired directory and, in our case, the preset “Block audio and video files” template.
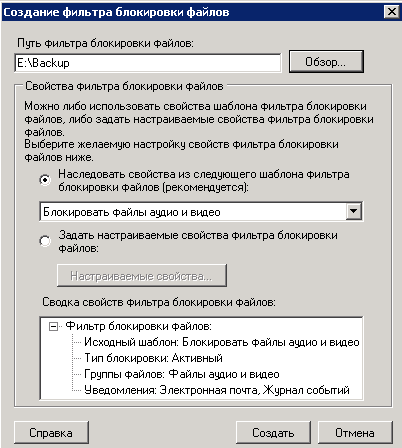
The template lists almost all the most common formats, but you can always add new ones in the appropriate section:
Clicking on “Change template properties”, we get to the setup menu.
Here, by clicking the "Edit" button, you can call the section to add new extensions and delete existing ones, as well as familiarize yourself with the pre-installed ones:
It remains to make our folder available on the network. To do this, go to “Start” -> “Administration” -> “Computer Management” -> “Shared Folders” -> “Shared Resources” and create a new one. Then just follow the prompts of the wizard. First, specify the path to the folder:
In the next step we set its parameters (you can leave it by default):
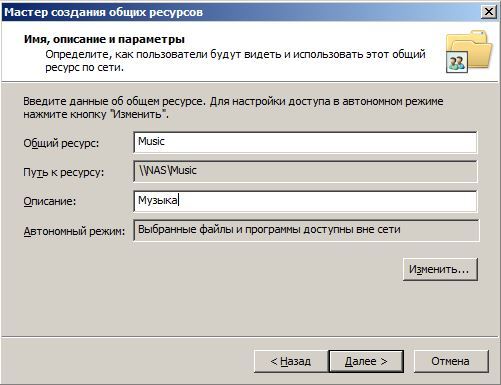
Configure access permissions. For a local network, you can open access for everyone, for the Internet - leave only to administrators:
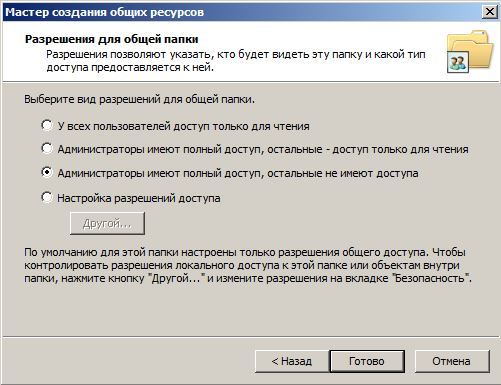
Now the “Music” folder will be available directly from any computer on your home network - just type the address \\ NAS \ Music in the explorer and log in. We will perform a similar procedure for the Backup directory, and at the same time we will check how file locking works by trying to load a movie into it.
Access is denied - everything works fine.
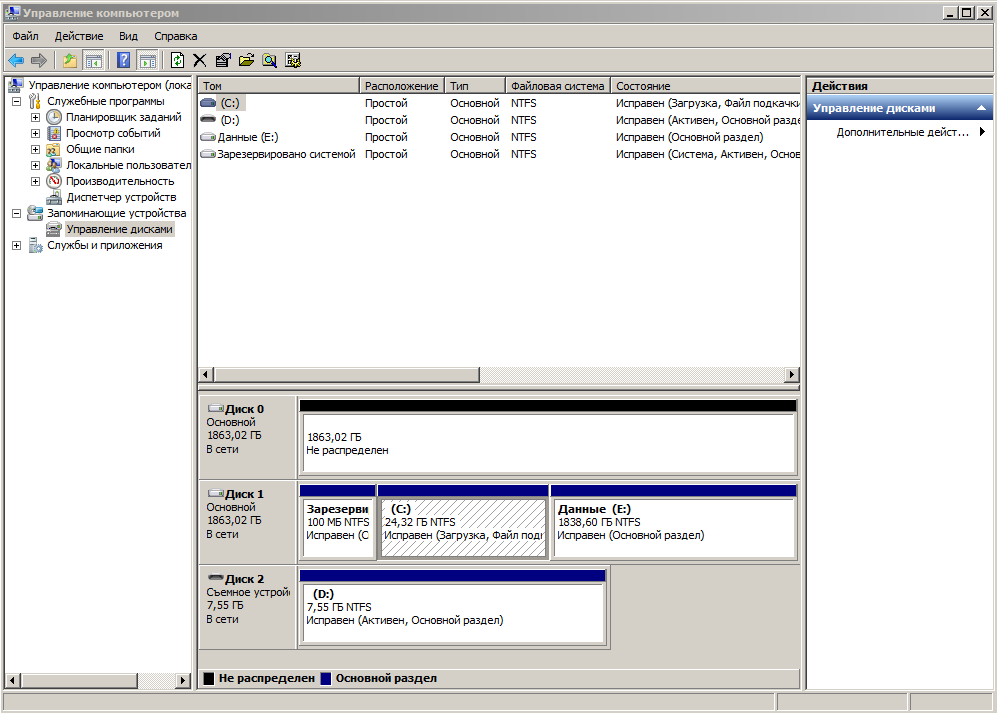
The final touch is the creation of software RAID-1. There is nothing difficult in this: go to “Server Manager” -> “Storage” -> “Disk Management”, right-click on the system disk (“Disk 1” in our example), and select “Convert to dynamic disk”.
Then alternately click on each volume, choosing in the menu “Add a mirror”. All partitions “will be reflected” on the second disk and resynchronization will begin:
And here is another argument against. The fact is that the resynchronization process for a 2 terabyte HDD will last more than 5 hours. The discs will be checked completely, no matter how much information is recorded, and their download will tend to 100%. Of course, WD Re is able to withstand such a test, only you cannot use NAS normally during this period: the write / read speed will drop significantly.
Speaking of speed: let's evaluate the speed of the array in real conditions. This is what happened when I transferred the Rammstein discography to a network folder:
Not bad at all, but NAS4Free can really make you feel better. Free and resource-less OSes are optimal for home NAS and can work with the ZFS file system, where disk mirroring is implemented much more intelligently and reliably. At the same time, the primary synchronization process is absent in principle. That is why I recommend NAS4Free for organizing home file storage. However, we'll talk about it in the next post, and now let's get down to the most interesting.
Do you like quests in reality? I remembered about them because my acquaintance with the DPS App and the Smart Power Managment started right from this mini-quest. Google helpfully prompted the page for downloading the application by clicking on the cherished button, I saw this form:
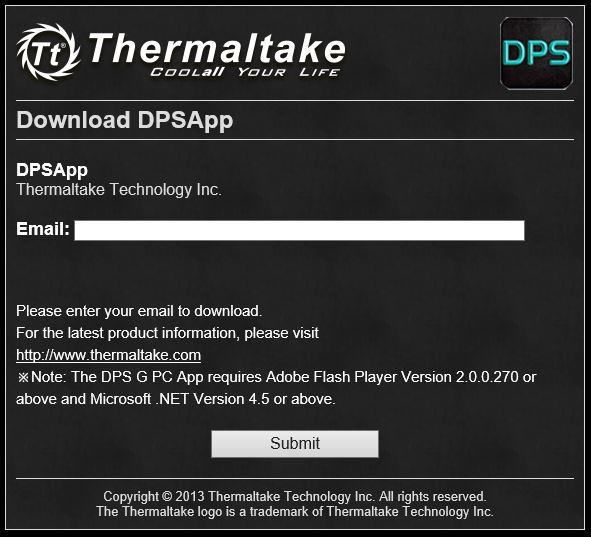
Nothing unusual - many companies ask for your E-mail for the newsletter. However, I entered my address instead of the utility:
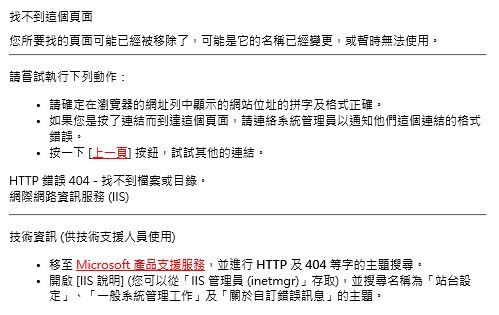
Even without a translator, it is clear that the requested page was not found. What could be wrong? It turns out that everything works a bit wrong. First you need to create an account in the system, confirm the registration, and only then you can download the utility in the “Products” section.
Another important nuance is that if you adhere to the golden rule for compiling passwords, including special characters, then you will have to abandon this practice. There will be no problems with authorization on the site, however, the DPS App simply will not accept the passphrase, displaying an error:

Therefore, it is necessary to limit the combination of Latin letters and numbers. However, we will not judge strictly: while the system is in beta testing, such bugs are quite natural.
Now let's finally download and install the application itself. Please note that Microsoft .NET 4.5, Adobe Flash Player ActiveX, as well as the current version of Java are required for its correct operation. After launching, the utility will offer to log in to synchronize with SPM, which we will do.
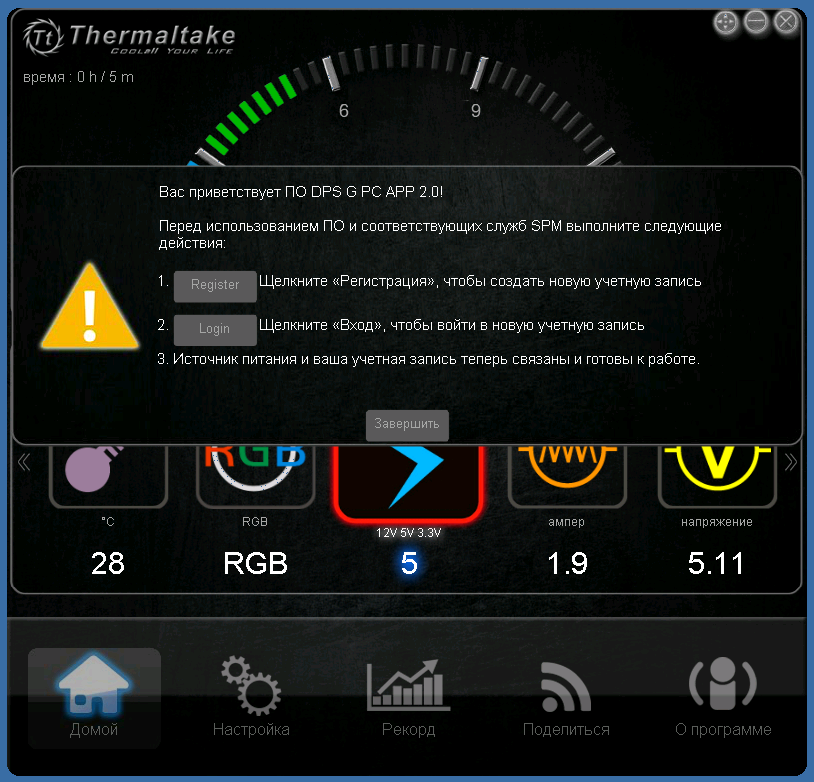
The equipment is automatically detected (in earlier versions, the serial number had to be specified manually). After successful login, this window will appear:
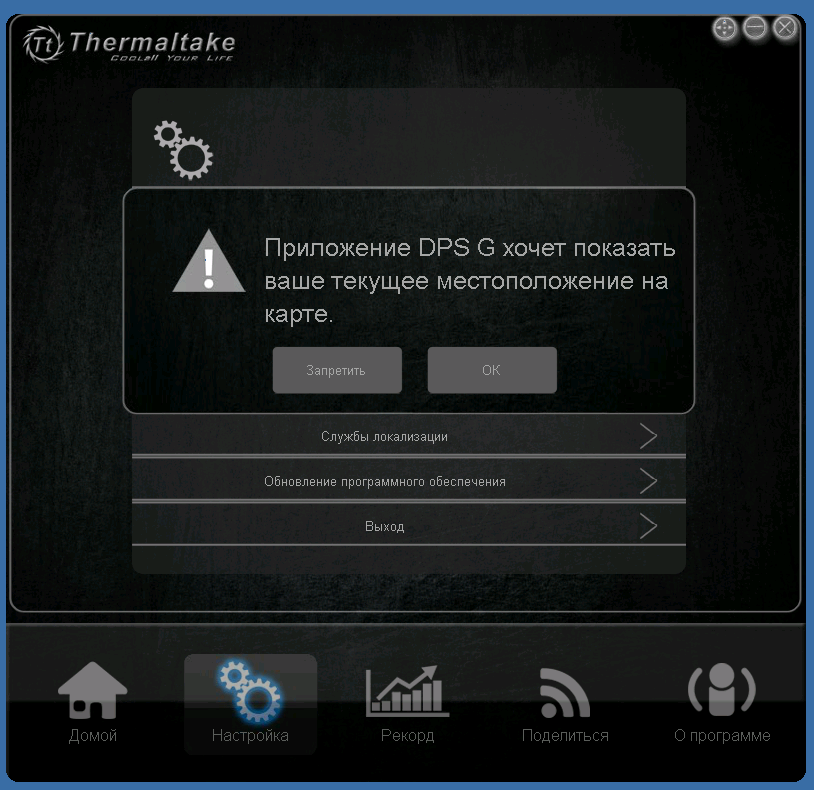
You should not be afraid - the program wants to determine your coordinates for display on an interactive map (about it later), but positioning can be turned off.
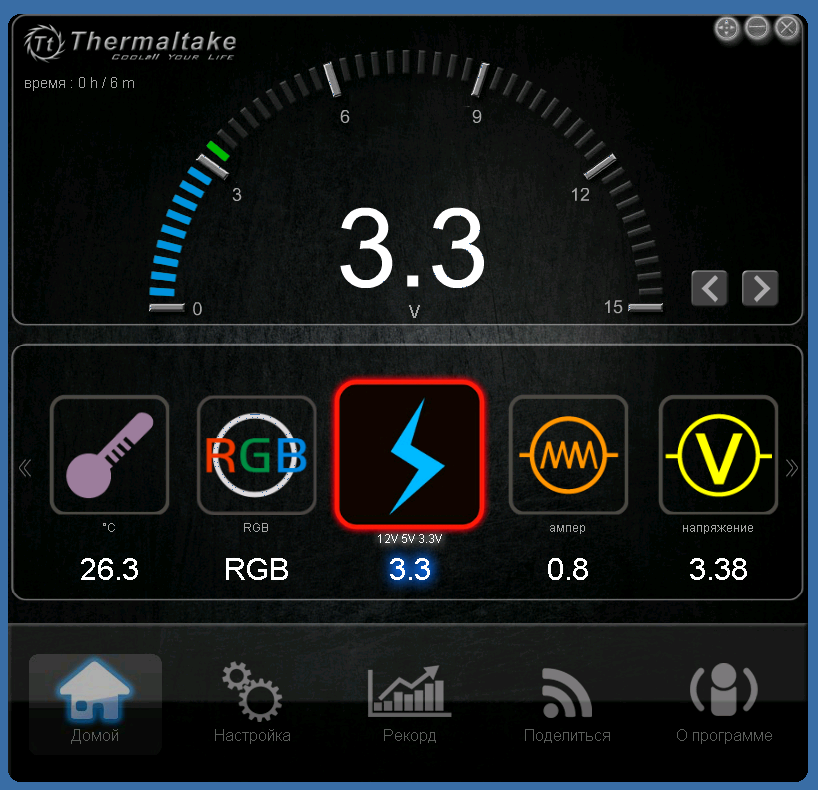
Now let's see what the application actually offers us. In the assortment - a whole set of scanners, allowing you to control the following parameters:
With the help of round arrows you can turn on the graph mode, which displays changes in real time:
There is also a temperature sensor BP, where you can select the unit of measurement to taste:
Thermaltake Smart DPS G 750W fan control is also available in the DPS App. In the “Performance” mode, the unit will select the optimal speed, almost equalizing the temperature of the power supply components with the ambient temperature. The “Zero fan” option allows you to turn off the fan altogether - although the power supply itself is extremely quiet, if your household has not become accustomed to the lulling sounds of a working server, this function will help make the NAS almost silent. Given the efficiency of our system, active cooling may not be needed at all. If the temperature exceeds the critical 80 ° C, the power supply automatically switches to an intensive mode of operation.
The item “Expenses” allows you to set the tariff for electricity and, thus, find out how much it costs you to operate the equipment. Unfortunately, at the moment only one tariff zone is supported and only one currency - the US dollar. As a result, the tool is only suitable for use for informational purposes, which the utility kindly warns.
A rather interesting feature is the ability to send data to social networks. Facebook, Twitter and its Chinese counterpart Weibo are supported. When you click on the corresponding icon on your account, a screenshot of the currently opened counter is published. Sending a picture to an e-mail is also available, but only if the email client is pre-configured on the computer.
The “Record” tab provides much more interesting features. Here you can download reports on the operation of the power supply by date in CSV format.
The readings are taken at intervals of one minute. The table records all the parameters displayed on the indicators - very convenient for assessing the effectiveness of the system.
However, let's digress from the application (we have disassembled all the available functionality, with the exception of the backlight control, which this model is not equipped with), and see what features the cloud platform SPM offers. But first, go to “My Account” -> “Settings”:
If you set the status to “Public”, the statistics will be displayed on the “All uploads” tab, however, only users added as friends will have access to the data. When you turn on the geolocation service, the location of your computer will be displayed on an interactive map.
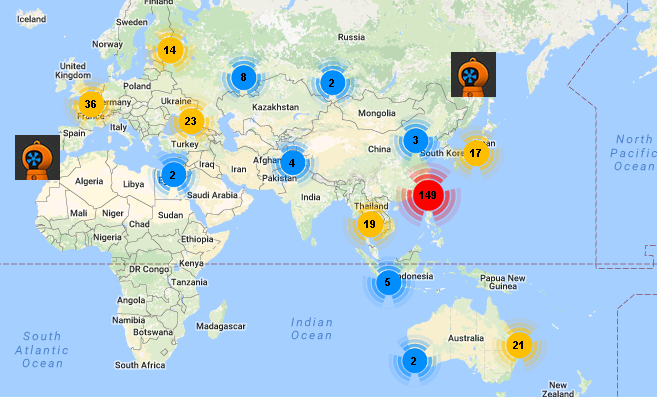
According to the developers, Smart Power Managment should be not just a cloud monitoring service, but a full-fledged social platform. Using the functions of positioning, you can make acquaintances with other users and share experiences through personal messages. Considering that the Thermaltake target products are professionals and enthusiasts, in the future such a system can serve as an excellent alternative to subject groups and forums, allowing in a couple of clicks to find colleagues and like-minded people all over the world.
Go to the tab “My uploads”. The reports generated by the application are loaded here.
Clicking on the link “Download data ...” we get into the visual interface. Here all the information stored in text reports, but already in the form of graphs. You can view statistics on the BP itself, CPU and video card:

The most interesting is the “Analysis” tab. Selecting the PSU (and the platform allows you to add an unlimited number of devices), we get to this page like this:
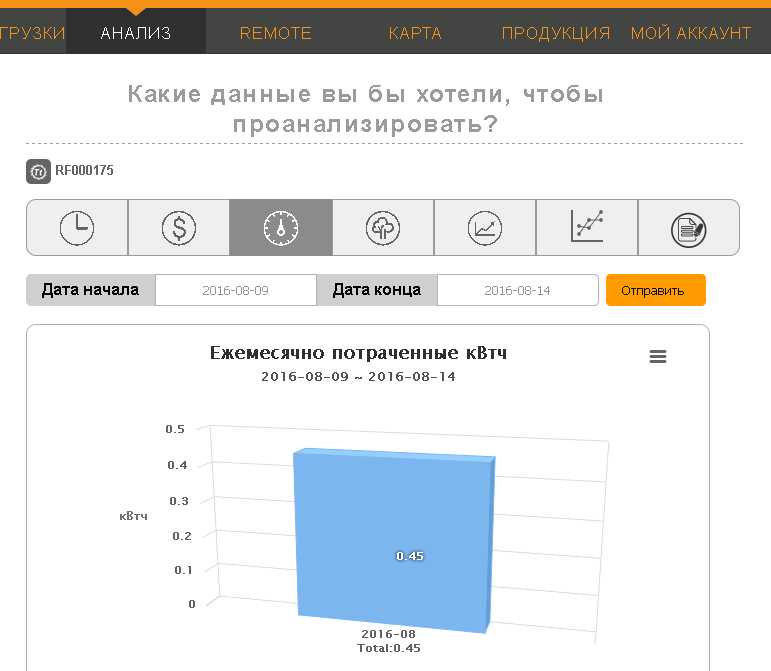
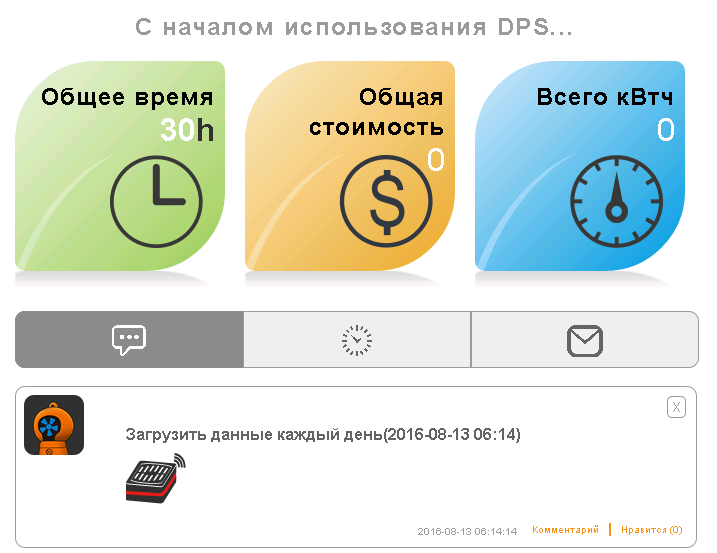
The first three tabs allow you to find out the total time of using the power supply, the cost of electricity and the amount of kWh spent, respectively. By clicking on the icon in the form of a tree, we can assess the environmental friendliness of the system:

Unfortunately, the NAS worked for nothing, so far I haven’t planted a single tree. Then you can get a summary statistics on electricity consumption and cost, as well as find out the average power for the selected period:
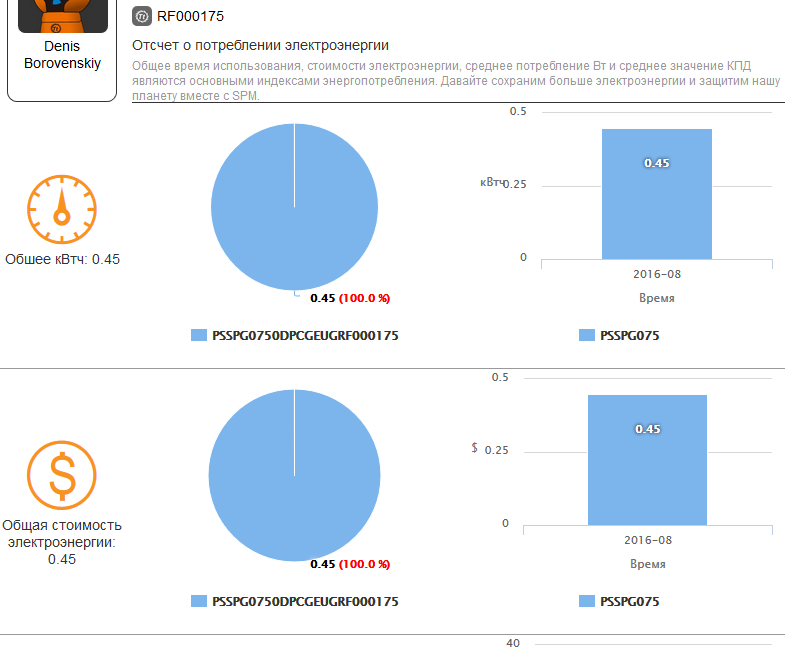
The tab “Analysis of consumed electricity” will tell you how suitable the PSU is for the file storage:
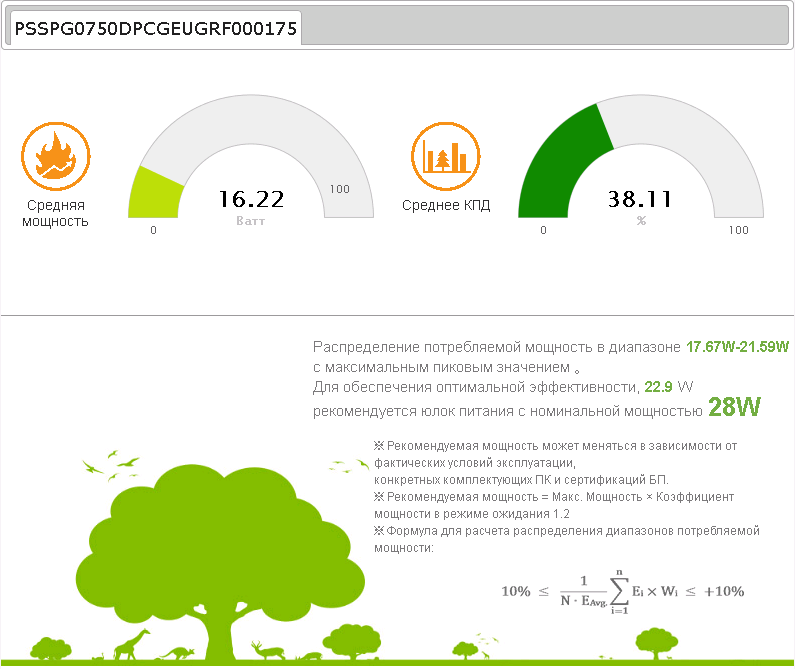
As was to be expected, we managed to assemble a home NAS, the power consumption of which is comparable to a conventional household light bulb.
The last tab allows you to create a plan for energy saving based on the selected parameters. Here you can set up alerts for the mobile version of the application:
In addition, Smart Power Managment allows you to remotely control the power of a computer or server. All the necessary tools are presented in the Remote section.
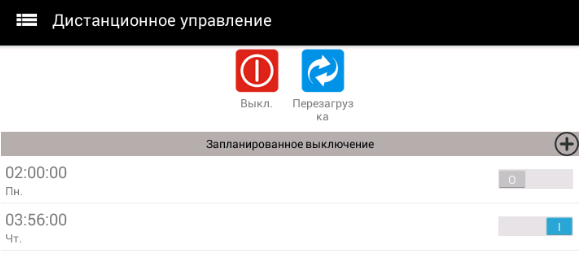
It is possible to completely de-energize or reboot the system (do not worry, the corresponding signal will be sent to the motherboard), as well as schedule outages:
The above functionality is also available in the DPS G Mobile App, released for iOS and Android (Windows Phone was naturally ignored). And if viewing the statistics on the smartphone screen is not very convenient, then the implementation of remote control of a home NAS will be most welcome. All previously made settings are fully synchronized:
The most useful function is to inform you that the fan has stopped or the unit has overheated above 60 ° C, after which you can immediately shut down the system, preventing the power supply unit of the home NAS from malfunctioning.
Summarize. We found that using Windows in a home NAS is long, expensive, and extremely inconvenient. Excessive voracity, duration of setup, updates and resynchronization, finally, bugs and the need to purchase a license - all this makes the “windows” perhaps the worst solution for file storage. Therefore, in the next post I will talk about what NAS4Free is and what it is eaten with.
As for the Smart Power Managment platform, I can say that the solution is already working perfectly, offering an ample set of tools for monitoring and power management. It can be a good help in situations where the use of professional industry solutions is unprofitable (for example, during the construction of the IT infrastructure of small offices). A smart power supply unit can also be useful for a private user: when your computer is working 24/7, the ability to track changes remotely will have to be very useful, just like the panic button for turning off the system in case of emergency. But personally, I would like to see a more advanced pricing system with support for several zones and currencies - this would allow fixing the costs of electricity with high accuracy and planning the budget without additional software.If Thermaltake releases the version of the utility for Linux and FreeBSD, it will not be priced at all. I hope the company representatives read Habr - perhaps they will like my ideas and still transfer the utility to * nix'y.
But there is one snag - at the moment a proprietary application exists only under Windows. For an enterprise data center, this operating system is good, but for home file storage is terrible and extremely unprofitable. Therefore, I decided to make two posts. In this, we will raise a NAS based on Windows Server 2008 r2 (making sure that the “windows” and “home NAS” are incompatible concepts), and see what the DPS G App 2.0 is capable of. In the second we will collect a budget NAS based on NAS4Free, creating a truly reliable system.
Foreword
In order not to be filled with tomatoes, I want to warn you right away - the article is intended primarily for non-professionals. Although it will be interesting to even experienced administrators and enthusiasts to read about Smart Power Management from Thermaltake, the main material is aimed at people who do not want to overpay for a big name, buying ready-made solutions, and at the same time are far from system administration (programmers, designers, web developers, etc.). .d.) If your hand is hard enough to assemble a computer from components, but you don’t want to deal with server software for a long time, and the console has only been seen in dreadful dreams - this stuff is for you. If you want to look at SPM Cloud to decide how this system can be useful for you, turn the post to the subtitle “How smart is the smart power supply?”. By the way, I warn you - under the cut a lot of photos and screenshots.
Simple but tasteful
Immediately make a reservation - I did not seek to assemble a home NAS only on the basis of cost. Selecting components, I was guided by how well the components are suitable for the implementation of the task, while not forgetting the quality characteristics. Is it possible to build a budget NAS at lower cost? Can. But it can also be lost in performance and convenience, which I would not want. As a result, the following happened.
')
Housing The Thermaltake Core V1 took over the role of the data storage case - a cute, all-metal cube with a quiet 200 mm fan behind the front bezel.
Behind there are seats for a couple of fans at 80 mm, so that the network storage can be made really cold.
As well as in other modern models, for the power unit here the lower compartment is set aside. Dust protection provides a metal filter.
Another advantage of the Core V1 are 4 removable walls (side, roof and bottom), which greatly facilitates the assembly procedure. Each panel is fastened with a pair of screws that can be easily loosened by hand. I also quite liked the implementation of the disc baskets - each of the four fixing screws received its own rubber damper, which dampens vibration quite well:
Motherboard. Here my choice fell on the GIGABYTE GA-J1800N-D2H with integrated Intel Celeron. The dual-core processor with base 2.41 GHz for the network storage device is enough for the eyes (although Windows Server will load it 100%, but the windows are not our target platform), it is quite economical and does not require active cooling (there is no need to buy a cooler) .
Despite its cheapness, Gigabyte introduced its proprietary chips into the product: High ESD technology, providing protection against electrostatics for microchips and LAN, as well as Anti-Surge IC, which prevents the motherboard from failing due to power surges - everything you really need. reliable system. The only controversial point is the location of the internal USB connector close to the radiator: it is simply inconvenient to work with it.
RAM. Nothing special - the usual Transcend 2Gb DDR-III 1333Mhz in the SO-DIMM form factor. If somewhere in the closet strayed an old laptop, you can remove the modules from it.
Power Supply. Solid Thermaltake Smart DPS G 750W, designed for high-performance PCs and server platforms certified to 80 PLUS Gold. For a full-fledged server or workstation - just right, for building a NAS with your own hands - too powerful, but during the experiment you can pamper yourself by installing a nitros on a small car.
Of course, a modular connection of cables is provided in the device of this class. Of the built-in - only connectors of the motherboard and processor (shared 4 + 4 pin, which had to be very handy during assembly).
Additional convenience is provided by flat cables, although even they fit in a compact Core V1 with difficulty - yet the case is not designed for this. Among them was the wire to connect the Thermaltake Smart DPS G 750W to the internal USB connector. Obviously, it provides the interaction of the onboard 32-bit microcontroller with the sensors of the motherboard, and is necessary for the full functioning of Smart Power Management. However, about how the monitoring system justifies itself and what features it provides, we will talk a bit later.
Cooling. Two quiet unregulated TITAN DC FAN. Once we want to build a quiet NAS without extra costs, this option will be optimal.
Hdd Although they don’t look a gift horse in the mouth, I consider it necessary to say a few words about the heroes of the occasion - the sweet couple WD Re 2004FBYZ. After all, whatever one may say, the safety of information depends on the quality of hard drives.
If you refer to the manufacturer's specifications, everything looks very tasty. So, hard drives are equipped with accelerometers and pressure sensors, on the basis of which Rotary Acceleration Feed Forward (RAFF) technology is implemented, which provides protection against linear and angular vibration in real time, which increases both reliability and performance. As a server solution, WD Re 2004FBYZ also has TLER (Time Limited Error Recovery), which limits the time of correction in order to prevent the disk from erroneously falling out of the RAID array. Add to this the stated time to failure in 1.2 million hours, and we get almost perfect.
However, it is difficult to judge the truthfulness of beautiful words and sophisticated abbreviations until you try the product yourself. And here I can only say that I am typing this article on a computer, within which the terabyte Caviar Black has been working for six years already. Yes, and a 2.5-inch baby in an old Dell Inspirion 1501, now given to parents, feels just as good. Actually, the transfer of the infrastructure to WD at the current place of work took place exactly at my suggestion - I had a long and very productive relationship with this brand. I have been using their disks for more than a year, they have never let me down, and today I don’t see any reason to change my preferences.
Flash drive. Any 8GB USB drive. Of course, compact “plugs”, whose case practically does not protrude above the connector, are optimally suited.
Now from this stuff you need to collect network storage - everything is quite simple. If you have at least once self-assembled computer, then cope without any difficulty. I will note only a few key points:
- Additional coolers should be put on blowing - then we will achieve flow-through air circulation from front to back and optimal cooling;
- When you install the motherboard, watch the metal jumper above the USB 3.0 hole on the rear panel - acting carelessly, it can be bent and, thus, block the connector;
- Disc baskets are fixed with a single screw, but they are installed rather rigidly and can not be fed immediately. To remove the basket, it must be pulled away from the body and slightly downwards;
- On the motherboard there is no connection for external USB 3.0, you can safely hide this wire in the lower compartment of the case.
Entertaining mathematics
Perhaps, it is worth taking a small groove and counting how our budget assembly turned out. So let's get started:
- Case: Thermaltake Core V1 - 3 764 rubles.
- Power supply: no matter how good the Thermaltake Smart DPS G 750W is, it is too luxurious for a small file storage. In the future I plan to put there Chieftec HPS-350NS - 1560 rubles.
- Motherboard: GIGABYTE GA-J1800N-D2H - 4436 rubles.
- RAM: Transcend SO-DIMM 2Gb DDR-III 1333Mhz x 2 - 3040 rubles.
- Cooling: TITAN DC FAN (80 mm, 2000 rpm) x 2 - 404 rub.
- USB-drive: 300 rubles.
Total: 13,504 rubles.
I deliberately did not take into account the HDD, in order to compare with the products of Synology. For example, DiskStation DS216 + will cost you 28,173 rubles, while under the hood we will see a very modest stuffing: Intel Celeron N3050 1.6 GHz, RAM - 1 Gb, all the same two 3.5 mm seats for disks. If WD Re 2004FBYZ hadn’t gotten to me for nothing, I would have paid another 17,660 rubles, and the final costs would be close to 31,000 - the cost of the “bare” platform of a popular brand. Yes, our assembly is less compact, but more productive and reliable, and this is almost at half price! And if there is a difference, then pay more? With this, a small lyrical digression is completed - time to move on and commission our car!
Windows Server - the worst solution for home NAS
Even if you haven’t seen * nixs in your eyes, even if you are trembling at the sight of the command line, even if the “windows” seem familiar and instill a sense of security, do not try to raise your personal Windows-based file storage. Why? I'll tell you in the course of this material. But first we will deal with the installation.
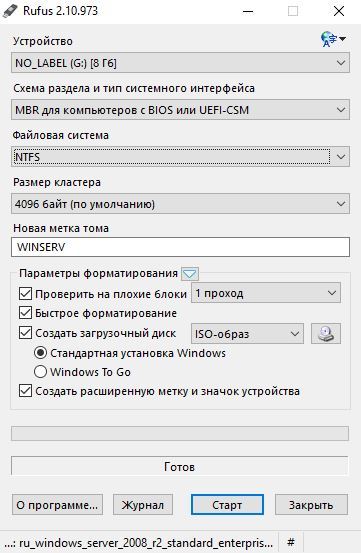
We will install Windows Server 2008 r2, of course, from a flash drive. To create a bootable drive, you can refer to the following instructions , or use the Windows USB / DVD Download Tool utility, which is also recommended in the official Microsoft blog . The same can be done with the help of Rufus , which, moreover, will be able to check the memory for broken blocks (one or two passes will be enough), or install in Windows To Go mode, which will allow you to run the OS directly from the device.
However, the last option is not the best idea, given the peculiarities of the operating system and the required disk space for it, so let's make a regular bootable USB flash drive.
Now you can start the installation, and here we see the first pitfall - the size. Want to put a standart editor with a visual interface? Be so kind as to allocate 24 gigabytes. In the case of a pair of disks, it is too wasteful. Otherwise, there are no nuances: as in the version for home use, it all comes down to “Next-Next-Done”.
Logging in to the system, you will see the following argument “against” - the need to activate. I do not plan to use Windows Server as the basis for the NAS - all this is, first of all, an experiment, so I will confine myself to the trial, which Microsoft itself kindly provides. Run regedit, look for the registry key
HKEY_LOCAL_MACHINE\SOFTWARE\Microsoft\Windows NT\CurrentVersion\SoftwareProtectionPlatform\Activation\Manual
change its value by one and reboot the machine. Now the trial period has increased from 3 to 30 days. In total, it can be extended up to six months using the slmgr.vbs script. The slmgr.vbs -dli command will help you know how much time is left until the end of the current license, and slmgr.vbs –rearm to reset the evaluation period (no more than three times). The process can be automated by creating a small XML file.
I would like to express one more “fairy” in the direction of the “Update Center”. Windows Server 2008 r2 SP1 was later released more than 300 patches of different caliber. It will take several hours to install them all, and the patches conflict with the addition of server roles. That is, it is necessary to update either before or after, the process takes a lot of time, and loads the system to the maximum:
There is also a regrettable bug. After installing the updates, you may find that the space on the system disk began to disappear by itself. If you notice a leak, go to the folder C: \ Windows \ Temp. Almost certainly you will see this picture:
The point is in the failure to archive update logs - the system spawns damaged archives at a terrible speed, after each error, it starts the procedure again. It is treated by deleting all files from the folder C: \ Windows \ Logs \ CBS, after which you can safely clean the Temp directory.
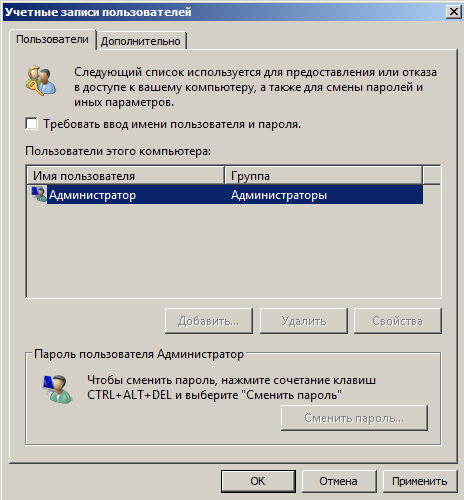
However, we move on. And the first thing that needs to be done is to configure autologin, the benefit of the NAS will still be in the home network, and every time entering a password is too tedious. Go to “Start” -> “Run” and drive the control userpasswords2 command.
Selecting the “Administrators” group, uncheck “Require user name and password entry”, save the selection.
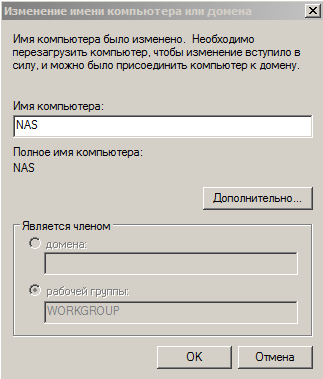
Now we will deal with remote connection. The easiest way to use the built-in desktop manager. To activate it, go to “Start” -> “Control Panel” -> “System and Security” -> “Remote Access Settings”, select the second or third item (if you plan to display the NAS to the Internet). You should also set a simpler and laconic computer name on the tab of the same name.
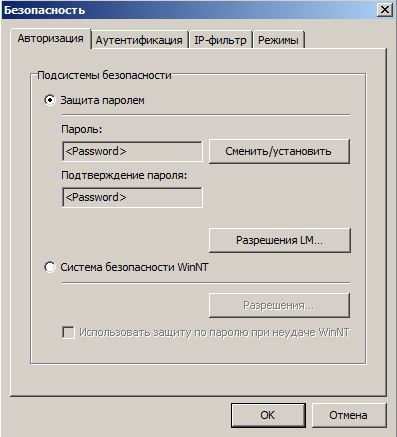
LiteManager can become an alternative - a multifunctional program that is free for a private user and has many useful functions: file transfer, direct access to the console, registry editor, task manager, and several others. When installing the server side on the NAS, set the access password that will be used when logging in:
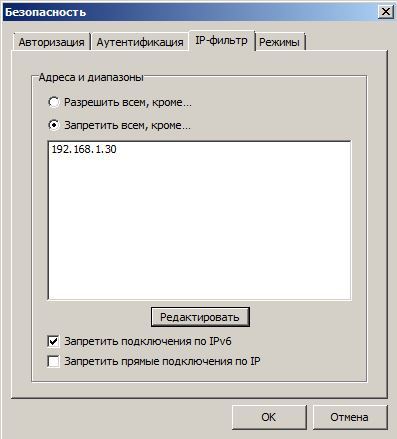
If you plan to release your home NAS to the Internet, you can further configure the IP filter:
Make sure the LM Server is in automatic startup mode:
Also do not forget to set the static address for our machine in the properties of the adapter:
where 192.168.1.1 is the address of the router. Finally, enable network discovery and sharing of files and folders in “Control Panel” -> “Network and Internet” -> “Network and Sharing Center” -> “Change advanced sharing settings”.
After the operations described above, you can connect the NAS to your home network with a clear conscience. If further control will be exercised through the LM Viewer, install the application on your computer and add a new connection by clicking on the plus on the toolbar and filling in the required fields:
where 192.168.1.250 is the NAS IP address. Or use the built-in Windows remote desktop connection utility.
Now let's create a section for storing information. Go to “Server Manager” -> “Storage” -> “Disk Management”, right-click on unallocated space on the system disk, select “Create a simple volume” and, following the wizard’s prompts, create the main section “Data” formatted in NTFS.
You can proceed directly to raising the file server. Open in the manager “Roles” -> “Add roles”.
After the welcome wizard window, a list of available will appear. We are interested in “File Services”:
In the next window, check the box next to “File Server Services Manager”, optionally, you can enable “Windows Search Service”.
In “Monitoring the storage” we mark our section “Data”:
Here, by pressing the “Parameters” button, we set up the monitoring of the volume. For convenience, you can add reports about duplicates and large files.
In the “Report Parameters” set the path for storing records:
If you have connected Windows Search, select the indexing of the “Data” volume:
We confirm the choice and wait for the end of the installation. After that, the capabilities of the file manager will be available to us (located in “Start” -> “Administration”). From the whole range of tools offered, home quota management is useful for home use.
As you can see, the “Data” section has already received a “soft” quota by default. This means that if it is filled more than 85%, we will receive an alert, but the recording of files in the NAS will still be available. Quotas can be set not only for partitions, but also for individual directories. Let's create a “Music” folder on the “E” disk and set a size limit for it. Click "Create a quota" and select the path:
In the “Customizable Properties”, we indicate the limit of 300 GB and select the “Hard” option so that the music does not lead to a situation where there is no space for regular backups and important documents on the disk:
Add a threshold value of 85% and set the notification method:
As a result, we get:
After clicking the “Create” button, the system will offer to save the settings to a template. Subsequently, this will allow us to apply similar rules to other folders in one click.
In order for a new quota to appear in the list, you must reconfigure the filter. Click on the link of the same name and select “All” values:
Now the new quota is also visible on the main screen:
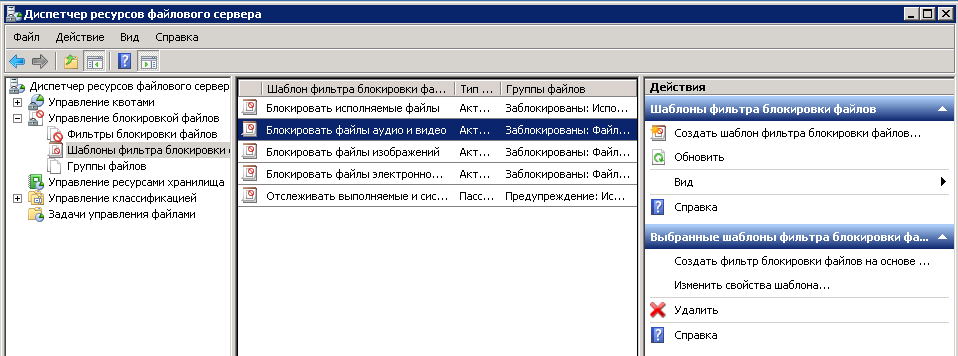
Another option that may be useful if, in addition to your file storage, your wife, children, and your favorite cat use file locking control. It allows you to exclude the download of files of certain extensions in certain directories.
Let's create the Backup directory and prevent it from littering with music and video. To do this, simply click on “Create file block filter”, select the desired directory and, in our case, the preset “Block audio and video files” template.
The template lists almost all the most common formats, but you can always add new ones in the appropriate section:
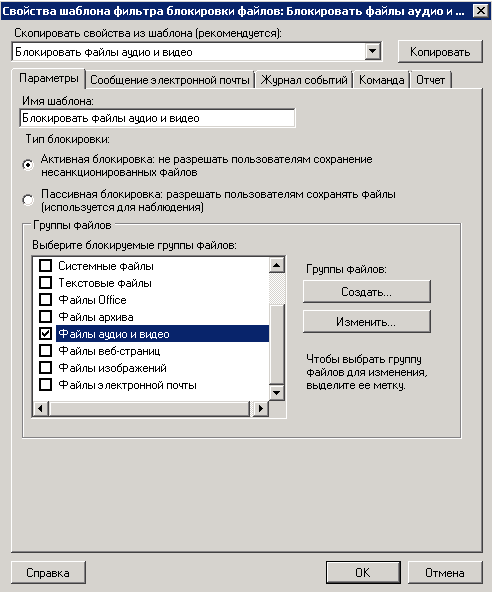
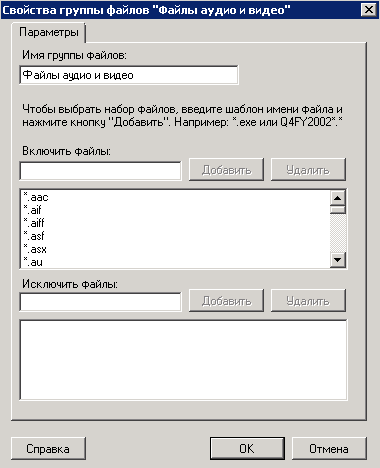
Clicking on “Change template properties”, we get to the setup menu.
Here, by clicking the "Edit" button, you can call the section to add new extensions and delete existing ones, as well as familiarize yourself with the pre-installed ones:
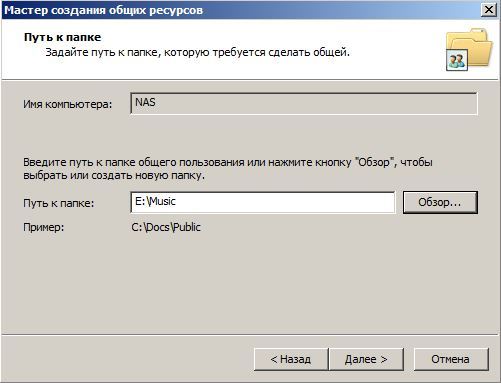
It remains to make our folder available on the network. To do this, go to “Start” -> “Administration” -> “Computer Management” -> “Shared Folders” -> “Shared Resources” and create a new one. Then just follow the prompts of the wizard. First, specify the path to the folder:
In the next step we set its parameters (you can leave it by default):
Configure access permissions. For a local network, you can open access for everyone, for the Internet - leave only to administrators:
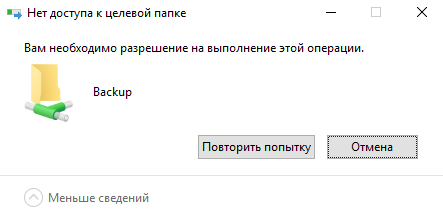
Now the “Music” folder will be available directly from any computer on your home network - just type the address \\ NAS \ Music in the explorer and log in. We will perform a similar procedure for the Backup directory, and at the same time we will check how file locking works by trying to load a movie into it.
Access is denied - everything works fine.
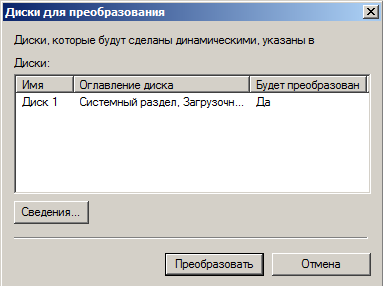
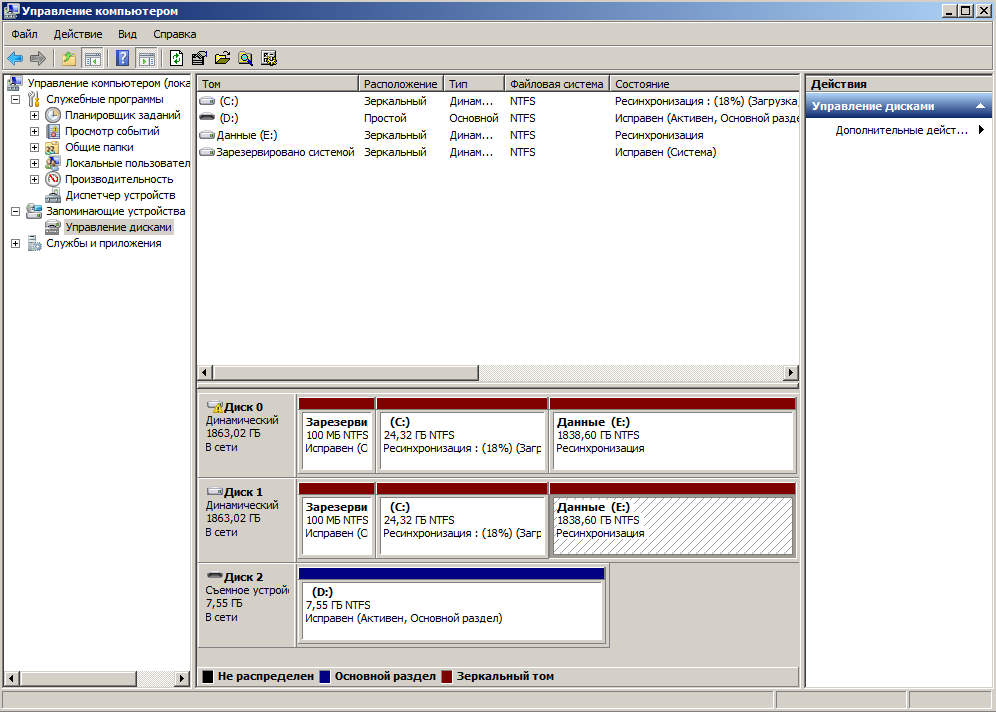
The final touch is the creation of software RAID-1. There is nothing difficult in this: go to “Server Manager” -> “Storage” -> “Disk Management”, right-click on the system disk (“Disk 1” in our example), and select “Convert to dynamic disk”.
Then alternately click on each volume, choosing in the menu “Add a mirror”. All partitions “will be reflected” on the second disk and resynchronization will begin:
And here is another argument against. The fact is that the resynchronization process for a 2 terabyte HDD will last more than 5 hours. The discs will be checked completely, no matter how much information is recorded, and their download will tend to 100%. Of course, WD Re is able to withstand such a test, only you cannot use NAS normally during this period: the write / read speed will drop significantly.
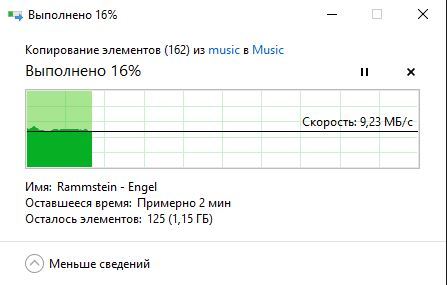
Speaking of speed: let's evaluate the speed of the array in real conditions. This is what happened when I transferred the Rammstein discography to a network folder:
Not bad at all, but NAS4Free can really make you feel better. Free and resource-less OSes are optimal for home NAS and can work with the ZFS file system, where disk mirroring is implemented much more intelligently and reliably. At the same time, the primary synchronization process is absent in principle. That is why I recommend NAS4Free for organizing home file storage. However, we'll talk about it in the next post, and now let's get down to the most interesting.
How smart is the smart power supply?
Do you like quests in reality? I remembered about them because my acquaintance with the DPS App and the Smart Power Managment started right from this mini-quest. Google helpfully prompted the page for downloading the application by clicking on the cherished button, I saw this form:
Nothing unusual - many companies ask for your E-mail for the newsletter. However, I entered my address instead of the utility:
Even without a translator, it is clear that the requested page was not found. What could be wrong? It turns out that everything works a bit wrong. First you need to create an account in the system, confirm the registration, and only then you can download the utility in the “Products” section.
Another important nuance is that if you adhere to the golden rule for compiling passwords, including special characters, then you will have to abandon this practice. There will be no problems with authorization on the site, however, the DPS App simply will not accept the passphrase, displaying an error:
Therefore, it is necessary to limit the combination of Latin letters and numbers. However, we will not judge strictly: while the system is in beta testing, such bugs are quite natural.
Now let's finally download and install the application itself. Please note that Microsoft .NET 4.5, Adobe Flash Player ActiveX, as well as the current version of Java are required for its correct operation. After launching, the utility will offer to log in to synchronize with SPM, which we will do.
The equipment is automatically detected (in earlier versions, the serial number had to be specified manually). After successful login, this window will appear:
You should not be afraid - the program wants to determine your coordinates for display on an interactive map (about it later), but positioning can be turned off.
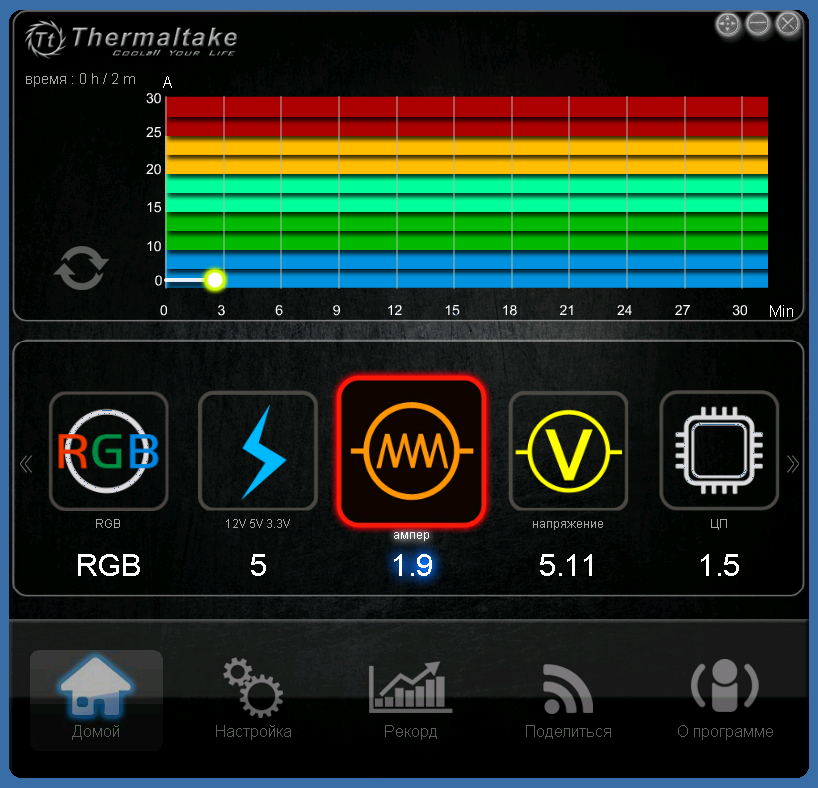
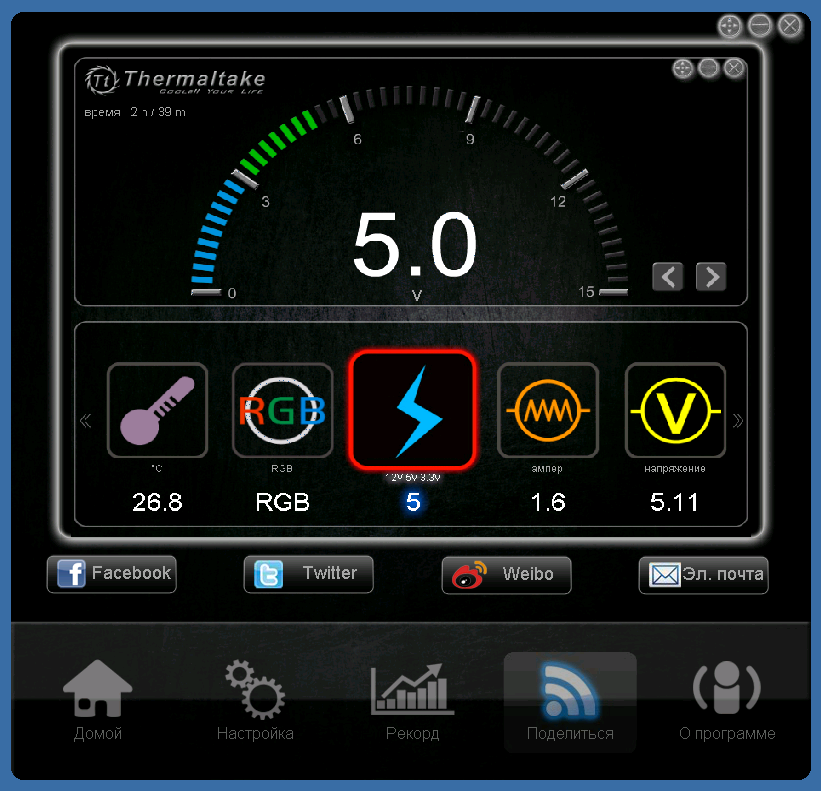
Now let's see what the application actually offers us. In the assortment - a whole set of scanners, allowing you to control the following parameters:
- Total voltage and voltage for each of the connected lines;
- Voltage on the central processor and video card;
- Current strength;
- Total power.
With the help of round arrows you can turn on the graph mode, which displays changes in real time:
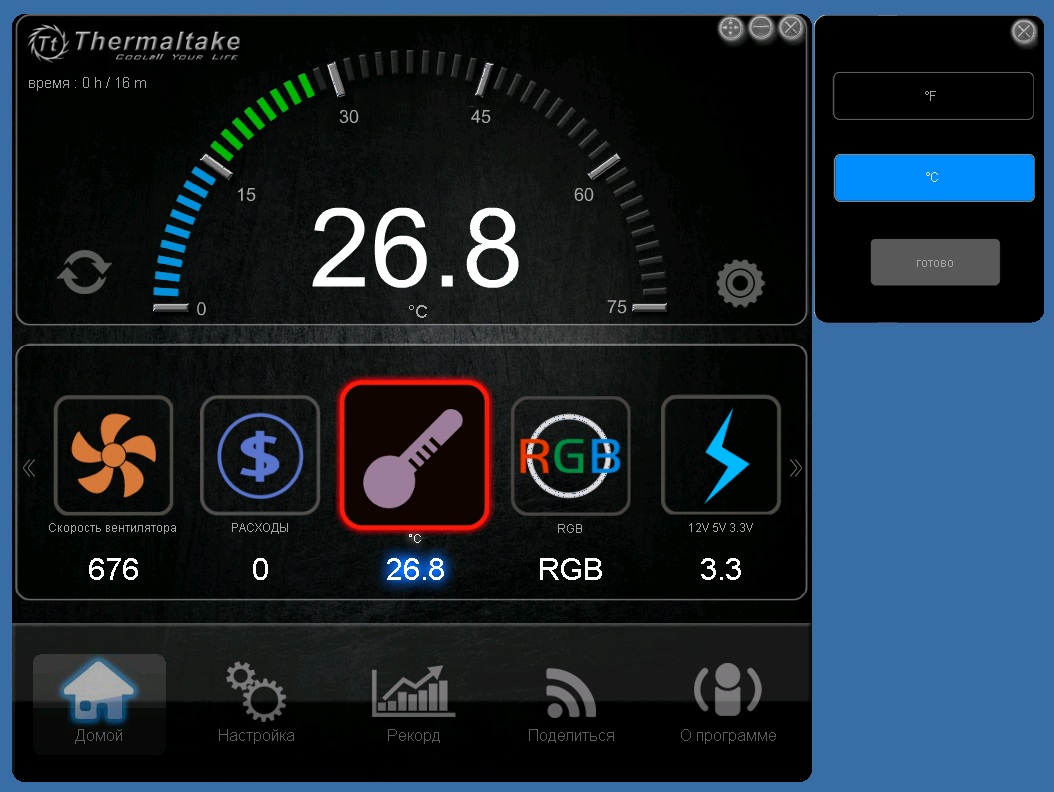
There is also a temperature sensor BP, where you can select the unit of measurement to taste:
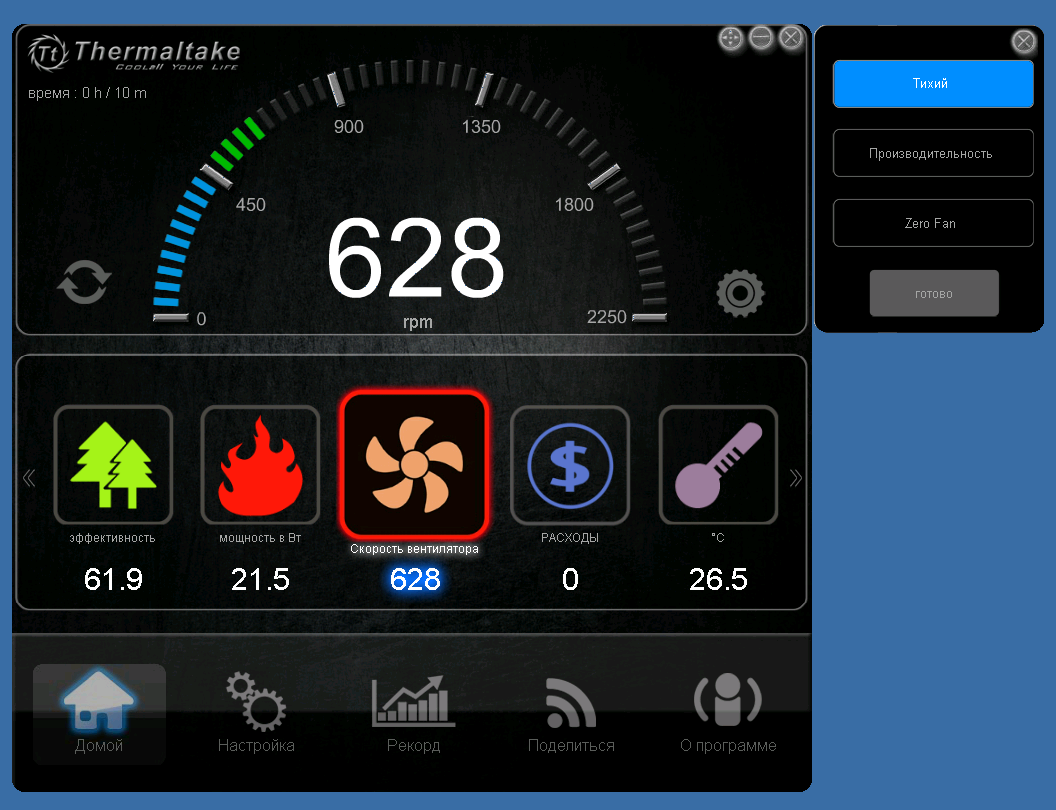
Thermaltake Smart DPS G 750W fan control is also available in the DPS App. In the “Performance” mode, the unit will select the optimal speed, almost equalizing the temperature of the power supply components with the ambient temperature. The “Zero fan” option allows you to turn off the fan altogether - although the power supply itself is extremely quiet, if your household has not become accustomed to the lulling sounds of a working server, this function will help make the NAS almost silent. Given the efficiency of our system, active cooling may not be needed at all. If the temperature exceeds the critical 80 ° C, the power supply automatically switches to an intensive mode of operation.
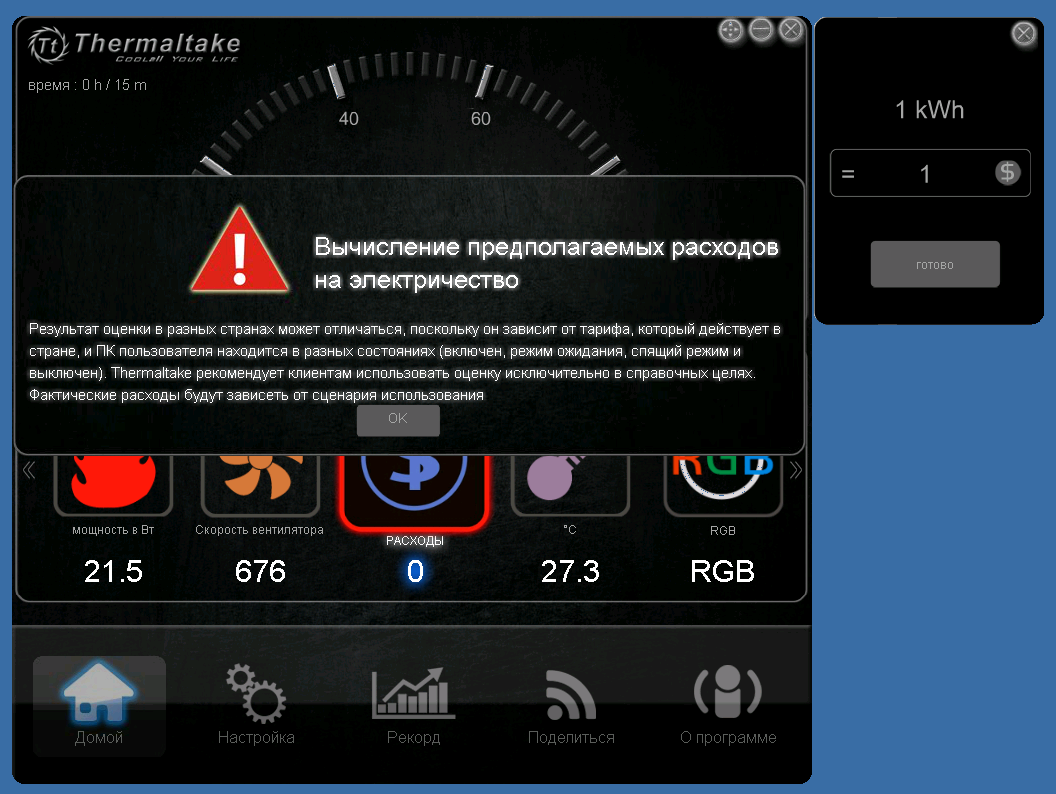
The item “Expenses” allows you to set the tariff for electricity and, thus, find out how much it costs you to operate the equipment. Unfortunately, at the moment only one tariff zone is supported and only one currency - the US dollar. As a result, the tool is only suitable for use for informational purposes, which the utility kindly warns.
A rather interesting feature is the ability to send data to social networks. Facebook, Twitter and its Chinese counterpart Weibo are supported. When you click on the corresponding icon on your account, a screenshot of the currently opened counter is published. Sending a picture to an e-mail is also available, but only if the email client is pre-configured on the computer.
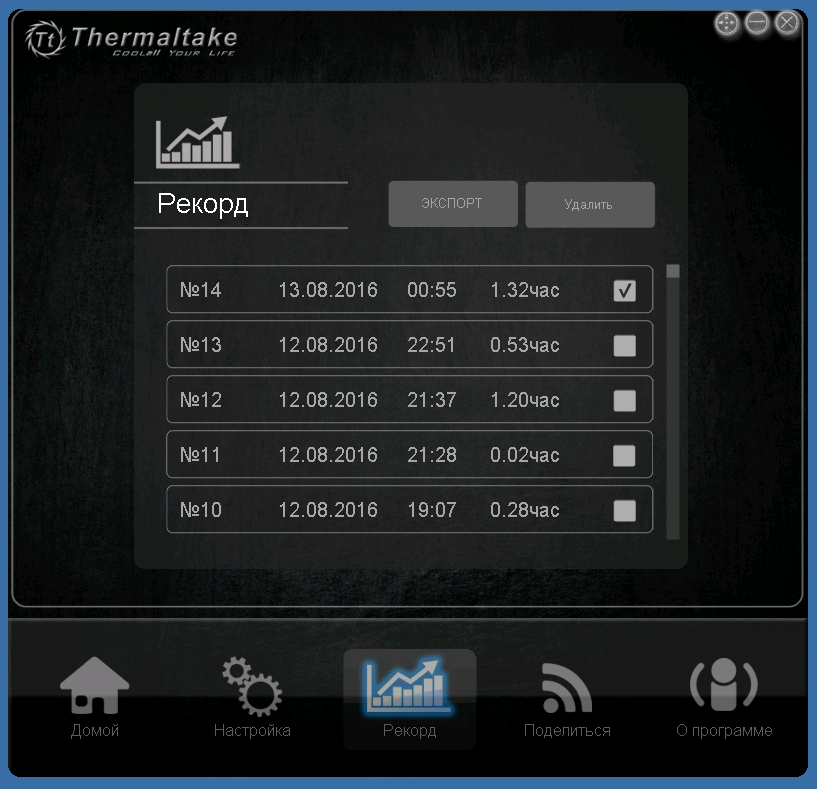
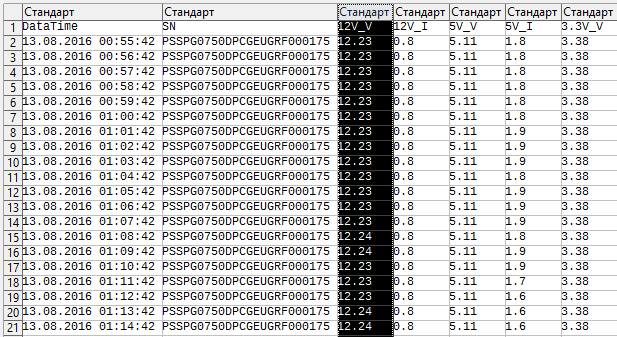
The “Record” tab provides much more interesting features. Here you can download reports on the operation of the power supply by date in CSV format.
The readings are taken at intervals of one minute. The table records all the parameters displayed on the indicators - very convenient for assessing the effectiveness of the system.
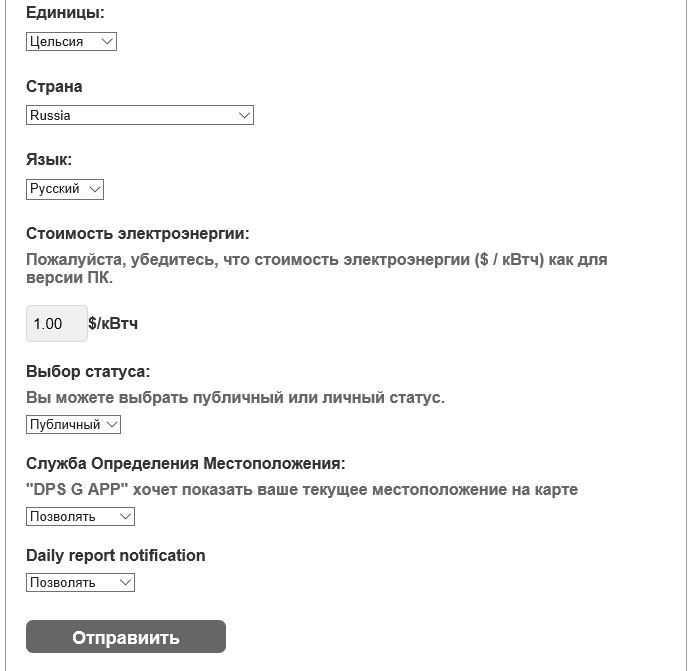
However, let's digress from the application (we have disassembled all the available functionality, with the exception of the backlight control, which this model is not equipped with), and see what features the cloud platform SPM offers. But first, go to “My Account” -> “Settings”:
If you set the status to “Public”, the statistics will be displayed on the “All uploads” tab, however, only users added as friends will have access to the data. When you turn on the geolocation service, the location of your computer will be displayed on an interactive map.
According to the developers, Smart Power Managment should be not just a cloud monitoring service, but a full-fledged social platform. Using the functions of positioning, you can make acquaintances with other users and share experiences through personal messages. Considering that the Thermaltake target products are professionals and enthusiasts, in the future such a system can serve as an excellent alternative to subject groups and forums, allowing in a couple of clicks to find colleagues and like-minded people all over the world.
Go to the tab “My uploads”. The reports generated by the application are loaded here.
Clicking on the link “Download data ...” we get into the visual interface. Here all the information stored in text reports, but already in the form of graphs. You can view statistics on the BP itself, CPU and video card:
The most interesting is the “Analysis” tab. Selecting the PSU (and the platform allows you to add an unlimited number of devices), we get to this page like this:
The first three tabs allow you to find out the total time of using the power supply, the cost of electricity and the amount of kWh spent, respectively. By clicking on the icon in the form of a tree, we can assess the environmental friendliness of the system:
Unfortunately, the NAS worked for nothing, so far I haven’t planted a single tree. Then you can get a summary statistics on electricity consumption and cost, as well as find out the average power for the selected period:
The tab “Analysis of consumed electricity” will tell you how suitable the PSU is for the file storage:
As was to be expected, we managed to assemble a home NAS, the power consumption of which is comparable to a conventional household light bulb.
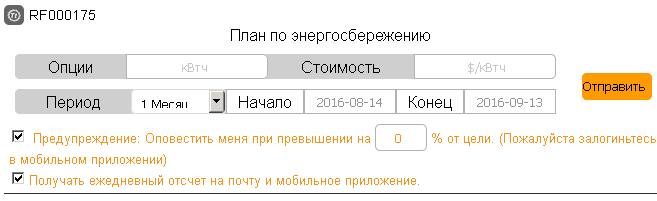
The last tab allows you to create a plan for energy saving based on the selected parameters. Here you can set up alerts for the mobile version of the application:
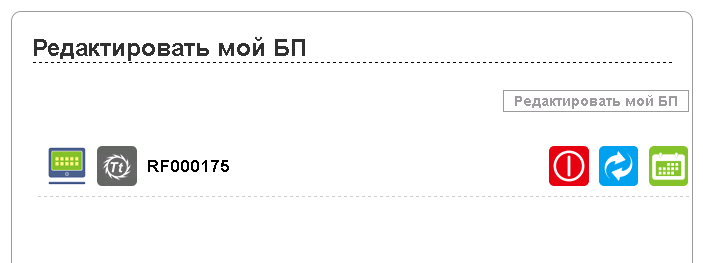
In addition, Smart Power Managment allows you to remotely control the power of a computer or server. All the necessary tools are presented in the Remote section.
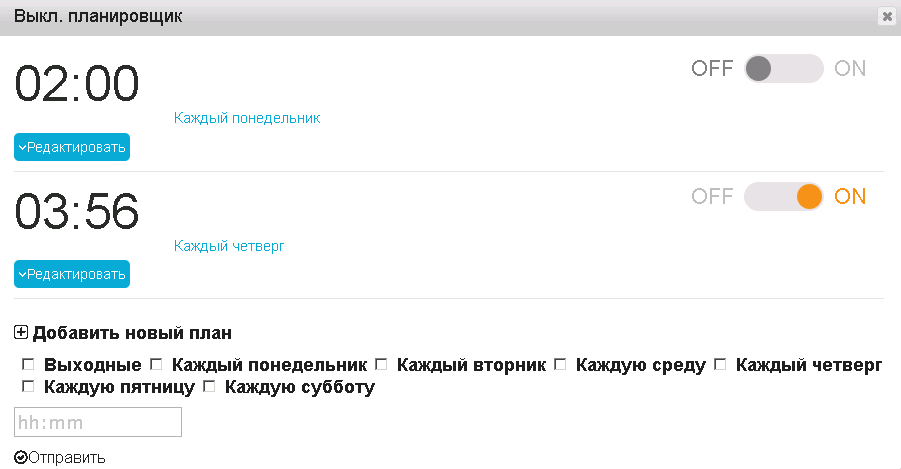
It is possible to completely de-energize or reboot the system (do not worry, the corresponding signal will be sent to the motherboard), as well as schedule outages:
The above functionality is also available in the DPS G Mobile App, released for iOS and Android (Windows Phone was naturally ignored). And if viewing the statistics on the smartphone screen is not very convenient, then the implementation of remote control of a home NAS will be most welcome. All previously made settings are fully synchronized:
The most useful function is to inform you that the fan has stopped or the unit has overheated above 60 ° C, after which you can immediately shut down the system, preventing the power supply unit of the home NAS from malfunctioning.
Instead of conclusion
Summarize. We found that using Windows in a home NAS is long, expensive, and extremely inconvenient. Excessive voracity, duration of setup, updates and resynchronization, finally, bugs and the need to purchase a license - all this makes the “windows” perhaps the worst solution for file storage. Therefore, in the next post I will talk about what NAS4Free is and what it is eaten with.
As for the Smart Power Managment platform, I can say that the solution is already working perfectly, offering an ample set of tools for monitoring and power management. It can be a good help in situations where the use of professional industry solutions is unprofitable (for example, during the construction of the IT infrastructure of small offices). A smart power supply unit can also be useful for a private user: when your computer is working 24/7, the ability to track changes remotely will have to be very useful, just like the panic button for turning off the system in case of emergency. But personally, I would like to see a more advanced pricing system with support for several zones and currencies - this would allow fixing the costs of electricity with high accuracy and planning the budget without additional software.If Thermaltake releases the version of the utility for Linux and FreeBSD, it will not be priced at all. I hope the company representatives read Habr - perhaps they will like my ideas and still transfer the utility to * nix'y.
Source: https://habr.com/ru/post/309558/
All Articles