Tower Defense on the Unity engine - Part 2
Hello! This is the second part of the tutorial for newbies on how to create a little Tower Defense genre game on the Unity engine. We stopped at creating a script for spawn creeps. If interested, please under the cat.
Part 1 ⬝ Part 2
')
This is how the code template looks like when creating a new script:
Let's declare a public variable storing a sample object for cloning.
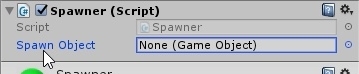
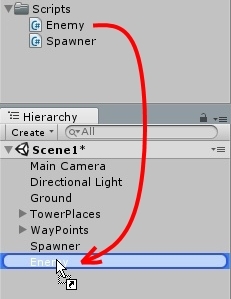
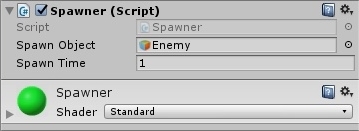
Go to the Unity editor, and drag the script to the Spawner object.

With these actions we tied the script to the object. Since the spawnObject variable has a public modifier, we can change it directly in the Unity editor through the inspector window.
Let's go back to the code. Let's declare one more public variable. She will be responsible for the time in seconds after which the creation of a new creep will occur. Also we will declare a private variable timer .
With each frame, the timer variable will decrease its value by the time delta until it reaches zero or a negative value. After that, she will take the value of the spawnTime variable and create a new creep on the scene. And everything will start on a new one.
Implement the above in the Update method:
The Instantiate function creates a copy of the object and returns a link to it. In this overload, it takes arguments: a link to the original object, a position and a rotation to insert a new object.
All Spawner script code will look like this:
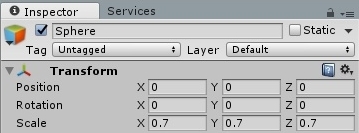
Save the project and go to the Unity editor. Create a new object sphere. This is what creeps will look like in my lesson. Zanulim position. Slightly reduce the scope of all 3 axes.
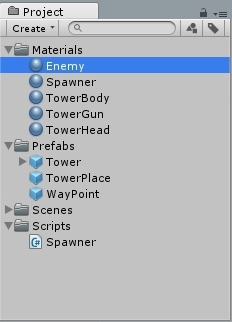
In the materials folder create a new material. Let's call him Enemy - "Opponent".
I will give him a red color. Move the material on the sphere. Now create a new script to breathe life into the creep.
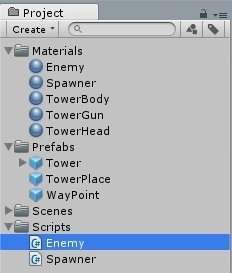
Rename the sphere to Enemy and drag the script of the same name onto it.
Go to the code. Since the structure of the project code was changed in the Unity editor, we are prompted to restart the project or choose another action.
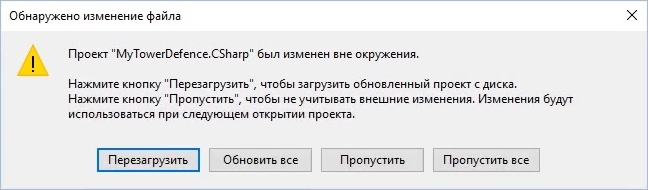
Select reboot and open the Enemy script. Let's declare private variables. The first to store an object containing the waypoints. The second is to store the transformation of the current waypoint (waypoint).
It is the current waypoint that the creep will go on until it actually comes. After that, he chooses the next point and will go to it. Let's declare one more variable.
It will store the sequence number of the current point of the path. Set the initial value to -1. Why so, find out further.
In the Start method, we will write code to search for an object on the scene named WayPoints and set the first waypoint as the current one:
Now we describe the method for selecting the next waypoint:
In the body of the method we increment the ordinal point:
Next, we check whether the index value is greater or equal from the number of waypoints. If the condition is true, then destroy the object on the scene and interrupt the execution of the method.
After the if block, the waypoint variable must be assigned a waypoint to the specified sequence number:
Add a public creep motion speed variable:
In the body of the Update method, we write the creep motion code to the current waypoint:
The first line we know the direction of movement of the creep. The second line will reset the Y-axis so that the creep cannot become a mole or a butterfly.
We declare a local variable of speed in order not to recalculate the speed several times in the method. Moving the creep should not be dependent on the frame rate.
Shift the creep position towards the waypoint, one step equal to the speed value. To do this, we multiplied the step by the local variable of speed:
Now you need to put a condition. If the vector length is less than or equal to the step length, then this is a signal to change the waypoint.
As a result, all the Enemy script code should look like this:
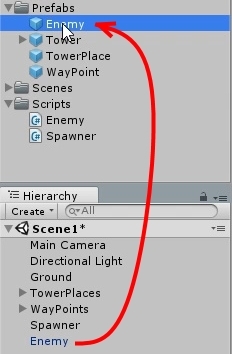
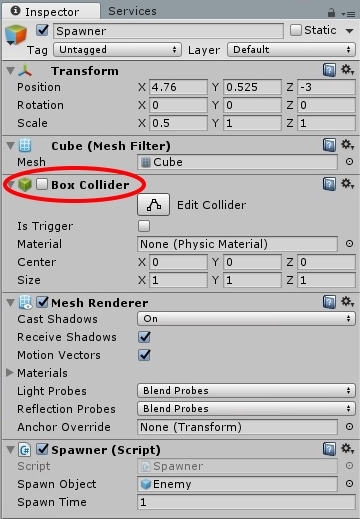
Save the code and return to the Unity editor. The Spawner script , which is tied to an object of the same name, needs to specify a sample for cloning. The sample will be the Enemy prefab, which is not there ... Let's create it by dragging the Enemy object from the Hierarchy window to the prefabs folder. Remove the original from the scene.
Now you can set a pattern by assigning a creep prefab to the spawnObject variable.
Disable the collision of the object Spawner .
We save and see what happened.
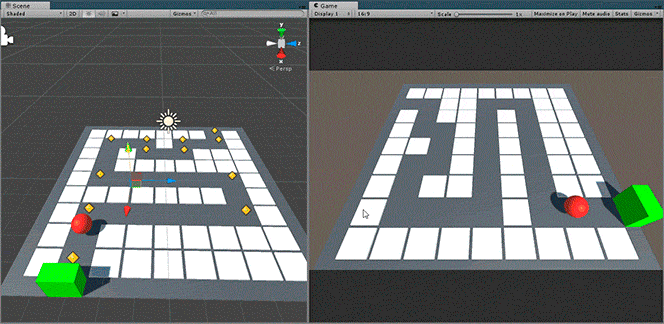
Fresh meat went on the assembly line ...
For greater clarity, you can watch the video tutorial:
PS: If you have questions or suggestions, leave your comments on YouTube under the video.
On Habré, I do not read comments.
Many have noticed that the article and video are similar to the lessons from this channel . In part, it is. But I only borrowed the waypoint allocation and level construction.
Thanks for attention! The end of the second part.
Part 1 ⬝ Part 2
')
Spawner Script
This is how the code template looks like when creating a new script:
using UnityEngine; public class Spawner : MonoBehaviour { void Start() { } void Update() { } } Let's declare a public variable storing a sample object for cloning.
public GameObject spawnObject; Go to the Unity editor, and drag the script to the Spawner object.
With these actions we tied the script to the object. Since the spawnObject variable has a public modifier, we can change it directly in the Unity editor through the inspector window.
Let's go back to the code. Let's declare one more public variable. She will be responsible for the time in seconds after which the creation of a new creep will occur. Also we will declare a private variable timer .
public float spawnTime = 1f; private float timer = 0; With each frame, the timer variable will decrease its value by the time delta until it reaches zero or a negative value. After that, she will take the value of the spawnTime variable and create a new creep on the scene. And everything will start on a new one.
Implement the above in the Update method:
timer -= Time.deltaTime; if (timer <= 0) { Instantiate(spawnObject, transform.position, transform.rotation); timer = spawnTime; } The Instantiate function creates a copy of the object and returns a link to it. In this overload, it takes arguments: a link to the original object, a position and a rotation to insert a new object.
All Spawner script code will look like this:
using UnityEngine; public class Spawner : MonoBehaviour { public GameObject spawnObject; public float spawnTime = 1f; private float timer = 0; void Start() { } void Update() { timer -= Time.deltaTime; if (timer <= 0) { Instantiate(spawnObject, transform.position, transform.rotation); timer = spawnTime; } } } Creeps (opponents)
Save the project and go to the Unity editor. Create a new object sphere. This is what creeps will look like in my lesson. Zanulim position. Slightly reduce the scope of all 3 axes.
In the materials folder create a new material. Let's call him Enemy - "Opponent".
I will give him a red color. Move the material on the sphere. Now create a new script to breathe life into the creep.
Rename the sphere to Enemy and drag the script of the same name onto it.
Any self-respecting creep should move towards the goal.
Go to the code. Since the structure of the project code was changed in the Unity editor, we are prompted to restart the project or choose another action.
Select reboot and open the Enemy script. Let's declare private variables. The first to store an object containing the waypoints. The second is to store the transformation of the current waypoint (waypoint).
private Transform waypoints; private Transform waypoint; It is the current waypoint that the creep will go on until it actually comes. After that, he chooses the next point and will go to it. Let's declare one more variable.
private int waypointIndex = -1; It will store the sequence number of the current point of the path. Set the initial value to -1. Why so, find out further.
In the Start method, we will write code to search for an object on the scene named WayPoints and set the first waypoint as the current one:
waypoints = GameObject.Find("WayPoints").transform; NextWaypoint(); Now we describe the method for selecting the next waypoint:
void NextWaypoint() { // … } In the body of the method we increment the ordinal point:
waypointIndex++; Next, we check whether the index value is greater or equal from the number of waypoints. If the condition is true, then destroy the object on the scene and interrupt the execution of the method.
if (waypointIndex >= waypoints.childCount) { Destroy(gameObject); return; } After the if block, the waypoint variable must be assigned a waypoint to the specified sequence number:
waypoint = waypoints.GetChild(waypointIndex); Add a public creep motion speed variable:
public float speed = 2f; In the body of the Update method, we write the creep motion code to the current waypoint:
Vector3 dir = waypoint.transform.position - transform.position; dir.y = 0; The first line we know the direction of movement of the creep. The second line will reset the Y-axis so that the creep cannot become a mole or a butterfly.
We declare a local variable of speed in order not to recalculate the speed several times in the method. Moving the creep should not be dependent on the frame rate.
float _speed = Time.deltaTime * speed; Shift the creep position towards the waypoint, one step equal to the speed value. To do this, we multiplied the step by the local variable of speed:
transform.Translate(dir.normalized * _speed); Now you need to put a condition. If the vector length is less than or equal to the step length, then this is a signal to change the waypoint.
if (dir.magnitude <= _speed) NextWaypoint(); As a result, all the Enemy script code should look like this:
using UnityEngine; public class Enemy : MonoBehaviour { public float speed = 2f; private Transform waypoints; private Transform waypoint; private int waypointIndex = -1; void Start() { waypoints = GameObject.Find("WayPoints").transform; NextWaypoint(); } void Update() { Vector3 dir = waypoint.transform.position - transform.position; dir.y = 0; float _speed = Time.deltaTime * speed; transform.Translate(dir.normalized * _speed); if (dir.magnitude <= _speed) NextWaypoint(); } void NextWaypoint() { waypointIndex++; if (waypointIndex >= waypoints.childCount) { Destroy(gameObject); return; } waypoint = waypoints.GetChild(waypointIndex); } } Last preparations
Save the code and return to the Unity editor. The Spawner script , which is tied to an object of the same name, needs to specify a sample for cloning. The sample will be the Enemy prefab, which is not there ... Let's create it by dragging the Enemy object from the Hierarchy window to the prefabs folder. Remove the original from the scene.
Now you can set a pattern by assigning a creep prefab to the spawnObject variable.
Disable the collision of the object Spawner .
We save and see what happened.
Fresh meat went on the assembly line ...
For greater clarity, you can watch the video tutorial:
PS: If you have questions or suggestions, leave your comments on YouTube under the video.
On Habré, I do not read comments.
Many have noticed that the article and video are similar to the lessons from this channel . In part, it is. But I only borrowed the waypoint allocation and level construction.
Thanks for attention! The end of the second part.
Source: https://habr.com/ru/post/309544/
All Articles