Webpack manual
Let's first understand why a webpack is needed, and what problems it is trying to solve, and then we will learn how to work with it. Webpack allows you to get rid of bower and gulp / grunt in the application, and replace them with one tool. Instead of using bower to install and manage client dependencies, you can use the standard Node Package Manager (npm) to install and manage all front-end dependencies. The webpack can also perform most grunt / gulp tasks.
Bower is a batch manager for the client side. It can be used to search, install, delete components in JavaScript, HTML and CSS. GruntJS is a JavaScript command-line utility that helps developers automate repetitive tasks. You can consider it a JavaScript alternative to Make or Ant. He deals with tasks like minification, compilation, unit testing, linting, etc.
Suppose we write a simple user profile page in a web application. It uses jQuery and underscore libraries. One way is to include both files in HTML:
<!DOCTYPE html> <html> <head> <meta charset="utf-8"> <title>User Profile</title> <link rel="stylesheet" href="https://cdnjs.cloudflare.com/ajax/libs/twitter-bootstrap/3.3.7/css/bootstrap.css" media="screen"> <link rel="stylesheet" href="/css/style.css" media="screen"> </head> <body> <div class="container"> <div class="page-header"> <h1 id="timeline"></h1> </div> <ul class="timeline"> </ul> </div> <script src="https://cdnjs.cloudflare.com/ajax/libs/jquery/3.1.0/jquery.min.js"></script> <script src="https://cdnjs.cloudflare.com/ajax/libs/underscore.js/1.8.3/underscore-min.js"></script> <script src="js/profile.js"></script> </body> </html> This is simple HTML with bootstrap. We hooked jQuery and underscore using the script tag.
Let's look at the profile.js file that uses the libraries we've connected. Our code lies inside an anonymous closure that stores the business logic of the application. If you do not close the code into a function, then the variables will be in the global environment, and this is bad.
(function(){ var user = { name : "Shekhar Gulati", messages : [ "hello", "bye", "good night" ] }; $("#timeline").text(user.name+ " Timeline"); _.each(user.messages, function(msg){ var html = "<li><div class='timeline-heading'><h4 class='timeline-title'>"+msg+"</h4></div></li>"; $(".timeline").append(html); }); }()); The code will be executed when the script is called. If you open the page in a browser, the profile will look like this.

This code has two tasks:
- get user information
- set the timeline.
It is known that mixing concepts is a bad practice, so you need to write separate modules that are responsible for certain tasks. In the profile.js file, we used anonymous closure to store all the code. There are ways to make modules better in JavaScript. Two popular ways are CommonJS and AMD.
- The CommonJS module is roughly a piece of reusable code that exports certain objects, and they are made available to other modules using
require. - Asynchronous Module Definition (AMD) allows you to load modules asynchronously.
If you want to learn more about the modules in JavaScript, I advise you to read the article Modules: A Beginner's Guide .
And in this article we will write modules on CommonJS. Let's write the timeline module with methods for setting the header and the timeline. In CommonJS, you can import dependencies using the require function. The timeline depends on jquery and underscore .
var $ = require('jquery'); var _ = require('underscore'); function timeline(user){ this.setHeader = function(){ $("#timeline").text(user.name+ " Timeline"); } this.setTimeline = function(){ _.each(user.messages, function(msg){ var html = "<li><div class='timeline-heading'><h4 class='timeline-title'>"+msg+"</h4></div></li>"; $(".timeline").append(html); }); } } module.exports = timeline; This code creates a new timeline module. There are two functions: setHeader and setTimeline . We use a special module object and add a link to it in module.exports . So we tell the CommonJS modular system that we want to allow other functions to use the module.
Now update profile.js , it should use the timeline module. You can create a new module that will load user information, but for now let's restrict ourselves to one module.
var timeline = require('./timeline.js'); var user = { name : "Shekhar Gulati", messages : [ "hello", "bye", "good night" ] }; var timelineModule = new timeline(user); timelineModule.setHeader(user); timelineModule.setTimeline(user); If you load index.html in the browser, then a blank page will appear. In the console (in developer tools) you can find the error:
profile.js:1 Uncaught ReferenceError: require is not defined The problem is that browsers do not understand a modular system like CommonJS. You need to give the browser the format it expects.
Module Bandlers Go To The Rescue
Web browsers do not understand these well-described modules. You need to either add all the JavaScript code to one file and import it, or you need to add all files manually to the page using the script tag. We use the module bundler to solve this problem. A module bundler combines different modules and their dependencies into one file in the correct order. It can parse code written using different modular systems and combine in one format that is understandable to the browser. Two popular module bundlers are:
- Browserify : packs npm-modules, then to use them in the browser. In the case of browserify, you have to additionally connect Grunt or Gulp for linting, running tests, etc. This means that you need to spend time working with several tools and integration.
- webpack : an assembly system that provides not only the bundling (layout) of modules, but also can perform the tasks that Gulp / Grunt do. In addition, the webpack is not limited to JavsScript files, it can work with other statics like CSS, images, html components, etc. Webpack also supports a very useful feature -
code splitting. A large application can be broken into pieces that are loaded as needed.
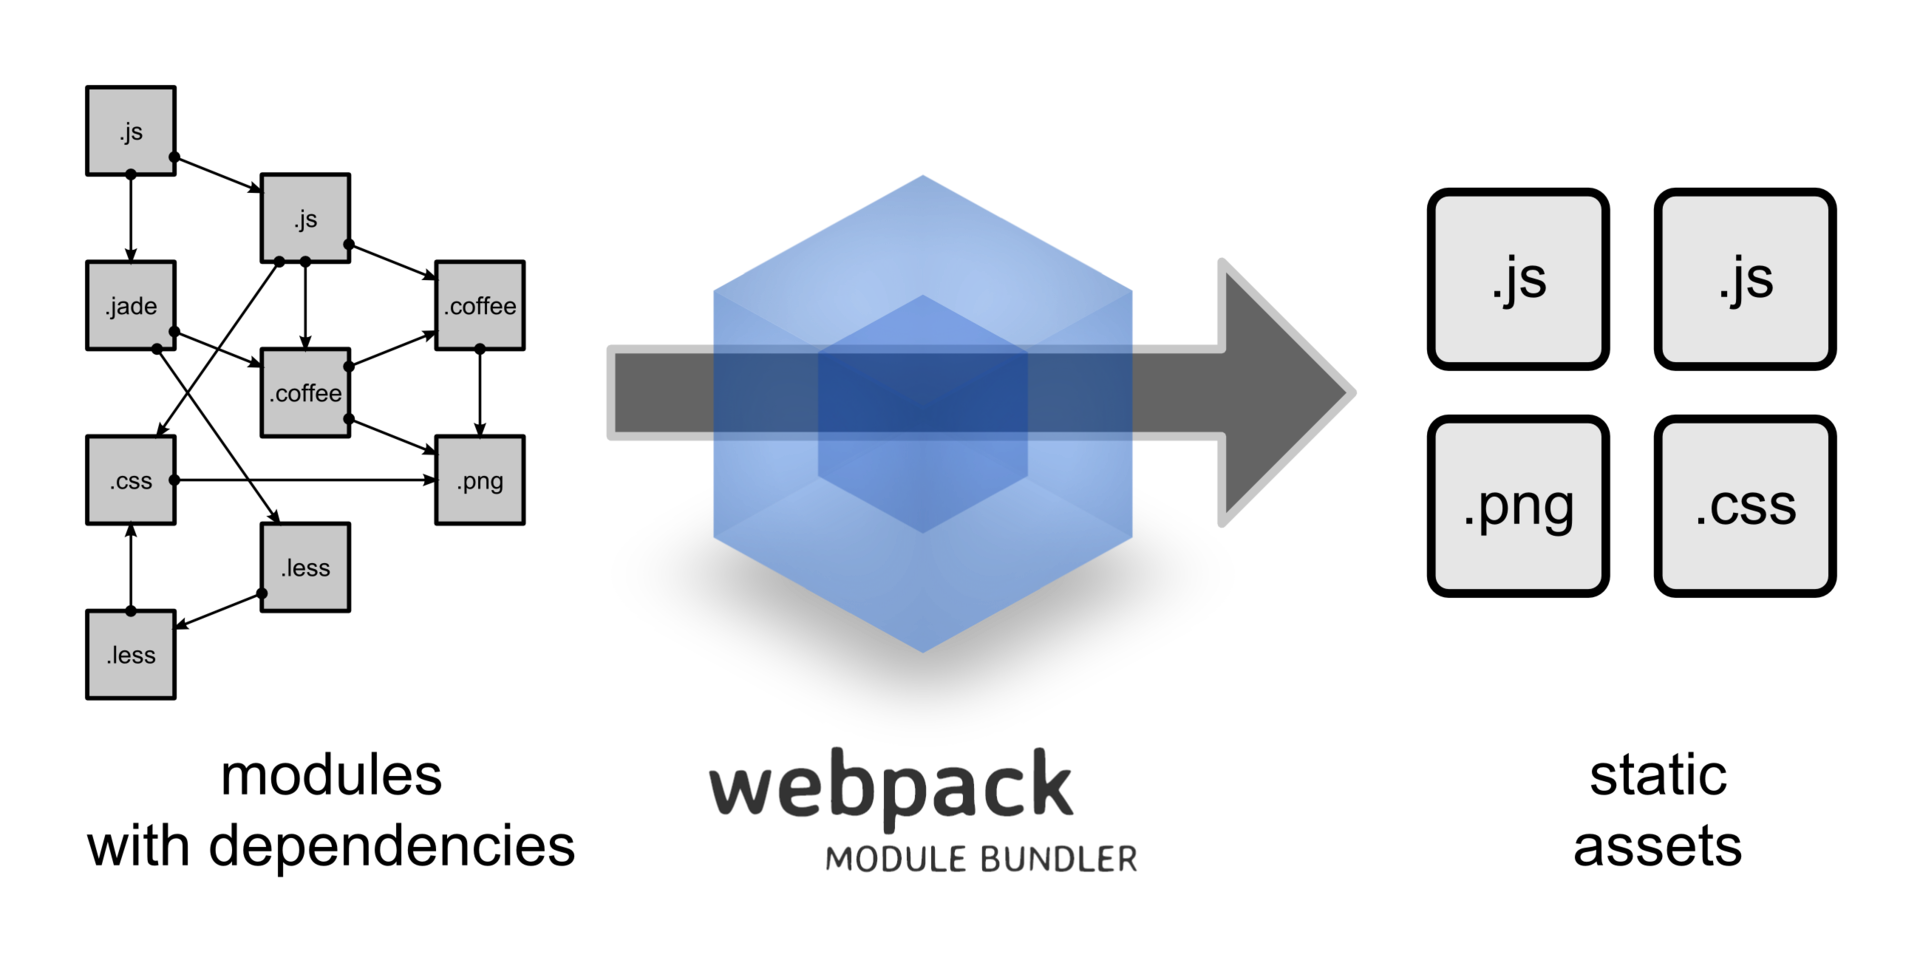
What is a webpack?
webpack takes modules with dependencies and generates static resources that these modules represent
This definition now makes sense when the problem being solved is clear. Webpack takes a set of resources and transforms them into sets (bundles).

Resource transformation is done by downloaders, which are the heart of the webpack.
Webpack in action
To install the webcam, you need a node. You can download node from the official site .
Now you can install webpack globally:
$ npm install -g webpack Create a new module with the npm init command. It will create a package.json file. Install dependencies with npm.
$ npm install -S jquery $ npm install -S underscore In addition, you need to install the webpack as a dependency.
$ npm install -S webpack Replace index.html following code. As you can see, we removed all the script tags for jquery and underscore. Also, instead of importing js/profile.js dist/bundle.js .
<!DOCTYPE html> <html> <head> <meta charset="utf-8"> <title>User Profile</title> <link rel="stylesheet" href="https://cdnjs.cloudflare.com/ajax/libs/twitter-bootstrap/3.3.7/css/bootstrap.css" media="screen"> <link rel="stylesheet" href="/css/style.css" media="screen" title="no title"> </head> <body> <div class="container"> <div class="page-header"> <h1 id="timeline"></h1> </div> <ul class="timeline"> </ul> </div> <script src="dist/bundle.js" charset="utf-8"></script> </body> </html> Let's create a bundle.
$ webpack js/profile.js dist/bundle.js Hash: 6d83c7db8ae0939be3d0 Version: webpack 1.13.2 Time: 350ms Asset Size Chunks Chunk Names bundle.js 329 kB 0 [emitted] main [0] ./js/profile.js 252 bytes {0} [built] [1] ./js/timeline.js 427 bytes {0} [built] + 2 hidden modules Now the page is working fine.
You can make the webpack monitor changes and generate a bundle automatically. To do this, run it with this flag:
$ webpack -w js/profile.js dist/bundle.js Now the webpack will not complete itself. When files are changed, a new bundle will be generated. You just need to reload the page in the browser. Let's change profile.js :
var user = { name : "Shekhar Gulati!!!", messages : [ "hello", "bye", "good night" ] }; The bundle.js file generated by the webpack contains a lot of code related to the webpack itself, and your code will be there in a modified form. It will be very inconvenient to debug an application in a browser, in developer tools, for example. To make your life easier, you can run a webcam with the devtools flag.
$ webpack -w --devtool source-map js/profile.js dist/bundle.js Webpack will generate a source map for the bundle.js file. The source map links the minimized and assembled code into a single file with the source, uncollected code. For testing, you can add a line debugger to profile.js
var timeline = require('./timeline.js'); var user = { name : "Shekhar Gulati", messages : [ "hello", "bye", "good night" ] }; debugger; var timelineModule = new timeline(user); timelineModule.setHeader(user); timelineModule.setTimeline(user); Reload the page, and the application will stop at this line.

Adding CSS
In the HTML above it is clear that we are loading /css/style.css . Webpack can work not only with JavaScript, but also with other statics, including CSS. Delete the line with /css/style.css from index.html . We will connect the styles in profile.js like this:
require('../css/style.css'); var timeline = require('./timeline.js'); var user = { name : "Shekhar Gulati", messages : [ "hello", "bye", "good night" ] }; var timelineModule = new timeline(user); timelineModule.setHeader(user); timelineModule.setTimeline(user); The webpack will reload the changes, and we will see an error message in the console:
ERROR in ./css/style.css Module parse failed: /Users/shekhargulati/dev/52-technologies-in-2016/36-webpack/code/css/style.css Unexpected token (1:0) You may need an appropriate loader to handle this file type. The problem is that the webpack does not understand CSS by default. You need to install a couple of loaders for this. Here is the command to install the required loaders:
$ npm install style-loader css-loader --save-dev Webpack uses downloaders to transform text into the desired format. Now we need to update the require :
require('style!css!../css/style.css'); Syntax style!css! means that you first need to apply the css transformation to convert text from style.css to CSS, and then apply the style to the page using the transformation style .
Launch the webpack again.
$ webpack -w --devtool source-map js/profile.js dist/bundle.js Configuration
In order not to specify all options on the command line, you can create the webpack.config.js configuration file in the application root:
module.exports = { context: __dirname, devtool: "source-map", entry: "./js/profile.js", output: { path: __dirname + "/dist", filename: "bundle.js" } } Now you can run webpack with a simple webpack -w command.
When we added style!css! in profile.js , we mixed the production code with the webpack configuration. You can transfer this option to the configuration file.
After configuration changes, you need to restart the webpack.
var webpack = require('webpack'); module.exports = { context: __dirname, devtool: "source-map", entry: "./js/profile.js", output: { path: __dirname + "/dist", filename: "bundle.js" }, module:{ loaders: [ {test : /\.css$/, loader: 'style!css!'} ] } } The most interesting section here is the declaration of the modules. Here we indicated that if the file ends in .css, then we need to apply the transformation style!css! .
Hot reboot
For hot reloading you need webpack-dev-server . Install it like this:
$ npm install -g webpack-dev-server Now you can start the server with the webpack-dev-server command.
We will start the server at http: // localhost: 8080 / webpack-dev-server / with the configuration from webpack.config.js .
The port can be changed with the --port option.
$ webpack-dev-server --port 10000 http://localhost:10000/webpack-dev-server The webpack-dev-server configuration can also be specified in the webpack.config.js file, in the devServer section.
module.exports = { context: __dirname, devtool: "source-map", entry: "./js/profile.js", output: { path: __dirname + "/dist", filename: "bundle.js" }, module:{ loaders: [ {test : /\.css$/, loader: 'style!css!'} ] }, devServer: { inline:true, port: 10000 }, } That's all for today. Learn more about the webpack from the documentation .
')
Source: https://habr.com/ru/post/309306/
All Articles