10 Webpack features
Webpack is considered the best tool for building applications on React and Redux. I suppose many of those who use Angular 2 and other frameworks today, do not overlook the Webpack. And since getting started with this tool is always difficult, I decided to devote several publications to this topic in the hope of making it easier for other developers to start and at the same time demonstrate some of the features of the Webpack.

When I first saw its configuration file, it seemed extremely strange and confusing to me. But after a while, I realized that the whole thing was in the unique syntax of the Webpack and a slightly different philosophy, which can be a little confusing at first. But, on the other hand, it is this new philosophy that makes the Webpack so popular.
')
There are 2 main principles of the Webpack philosophy:
And now let's finally move on to the features of the Webpack.
First of all, you need to understand that the Webpack has many functions, some of which are focused on development, another on production, and the third on both.
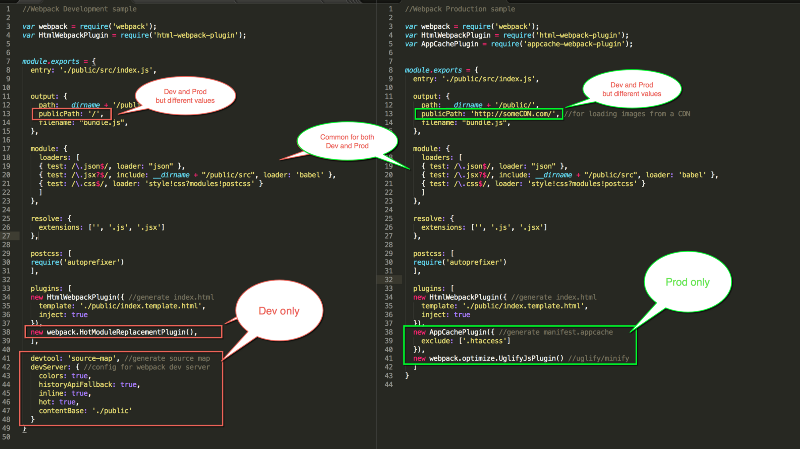
Sample Webpack files for development and production
Most projects use so many features that they usually have 2 large Webpack configuration files.
To create bundles you will most likely need to write scripts in package.json, like this:
It is important to note that Webpack, as a module builder, provides 2 interfaces:
Webpack CLI (suitable for production assemblies)
This tool takes options through the CLI tool, as well as through the configuration file (by default, webpack.config.js) and sends them to the Webpack for building.
And although you can start exploring the Webpack using the CLI tool, it is mostly useful to you only for the subsequent generation of production assemblies.
Usage example:
Webpack-dev-server (suitable for development builds)
This is the Express Node.js server that runs on port 8080 . This server calls the Webpack from the inside, which gives additional features like browser reloading (Live Reloading) and / or replacement of the just-modified module (Hot Module Replacement, or HMR) .
Usage example:
Webpack and webpack-dev-server tool options
It is worth noting that some options, such as inline and hot, are used only for the webpack-dev-server tool, while, say, hide-modules are only suitable for CLI.
CLI webpack-dev-server options and config options
It is also worth noting that there are 2 ways to transfer options to webpack-dev-server:
I found that the devServer config (hot: true and inline: true) sometimes does not work. Therefore, I prefer to pass options as CLI options inside package.json, like this:
Note: Be sure not to pass hot: true and -hot together.
Hot and inline options for webpack-dev-server
The inline option adds Live Reloading for the entire page. The hot option includes Hot Module Reloading — a hot reload of the module that only reloads the modified component (and not the entire page). If you pass both options, then when you change the source, webpack-dev-server will launch first the HMR and, only if it does not work, will reload the entire page.
Entry sends to Webpack where the root module or entry point is located. It can be a string, an array, or an object — with different types being used for different purposes.
If you have only one entry point (as in most applications), you can choose any format, and the result will be the same.

Different entry types with the same result.
entry - array
But, if you want to add several files that are independent of each other , you can use an array format.
For example, if you need googleAnalytics.js in your HTML, you can have Webpack add this file to the end of bundle.js:

entry - object
Suppose you have a real multipage application, not a SPA with a multi-view, but several HTML files (index.html and profile.html). Using Webpack, you can immediately generate multiple bundles using the entry object.
The configuration file for the example below will generate 2 JS files: indexEntry.js and profileEntry.js, which can be used in index.html and profile.html respectively.

Usage example:
Note: the file name comes from the keys of the entry object
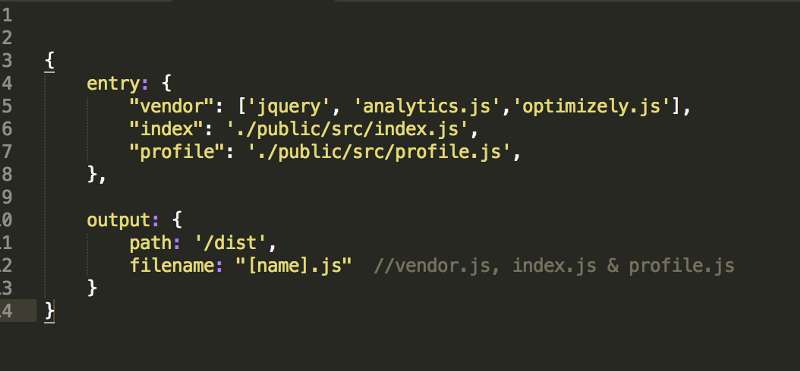
entry - combination
You can also use entry arrays inside an entry object. For example, the following configuration file will generate 3 files: index.js, profile.js and vendor.js, containing 3 vendor files.
output tells Webpack where and how to store the resulting files. Output has 2 properties, path and publicPath, at first it may be a little confusing.
The path property tells Webpack where to store the result, whereas the publicPath property is used in several Webpack plugins to update URLs inside CSS and HTML files during generation of production assemblies.
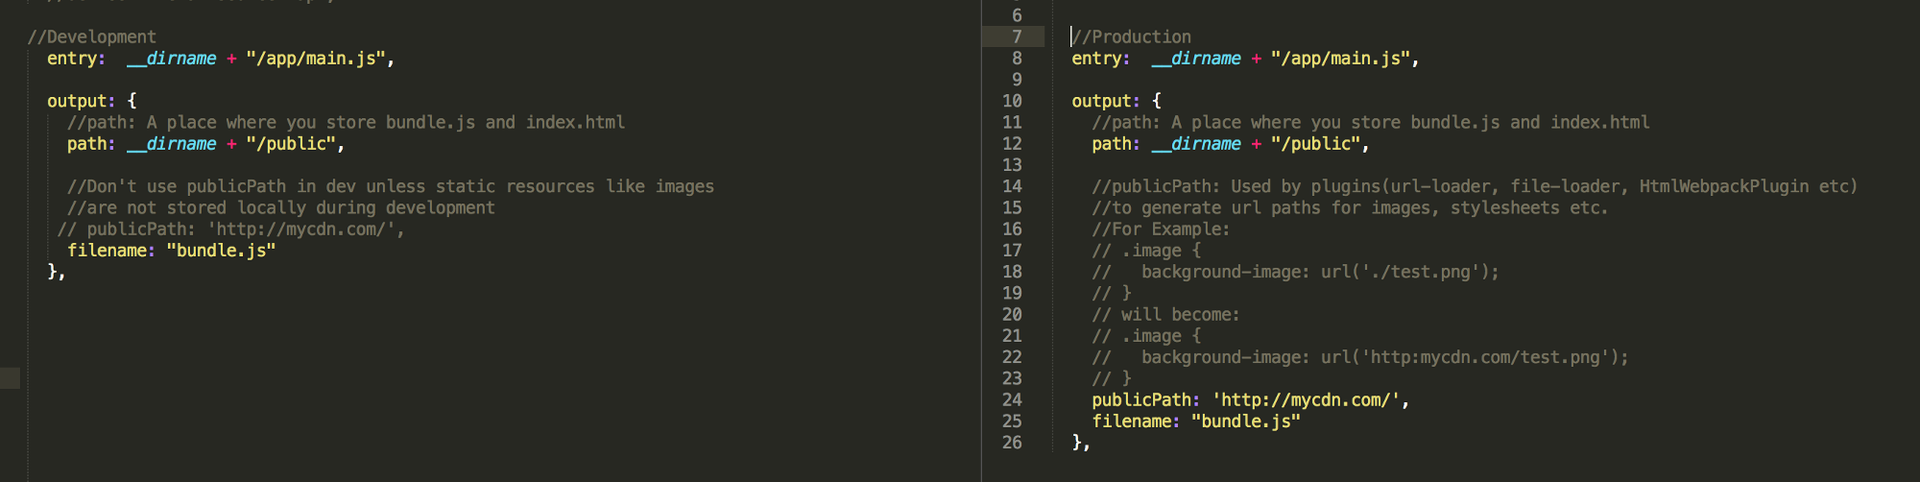
Using the publicPath property for development and production
Suppose your CSS file contains a URL for uploading ./test.png to localhost. But in production, the test.png file can be located on the CDN, whereas your Node.js server can run on Heroku . So, working on production, you will have to manually update the URL in all files so that they point to the CDN.
But instead, you can use the publicPath property, as well as a number of related plug-ins, to automatically update all URLs when generating production assemblies.

Example publicPath production
Loaders are additional node modules that help upload or import files of various types in browser-compatible formats - JS, CSS, etc. Subsequent loaders also allow you to import such files into JS using require or import in ES6.
For example, you can use the babel-loader to convert a JS file written in ES6 to an ES5 browser compatible:
Chains of loaders (working from right to left)
Multiple loaders for one file type can be chained. Chaining is carried out from right to left, and the loaders are separated by an exclamation mark: "!".
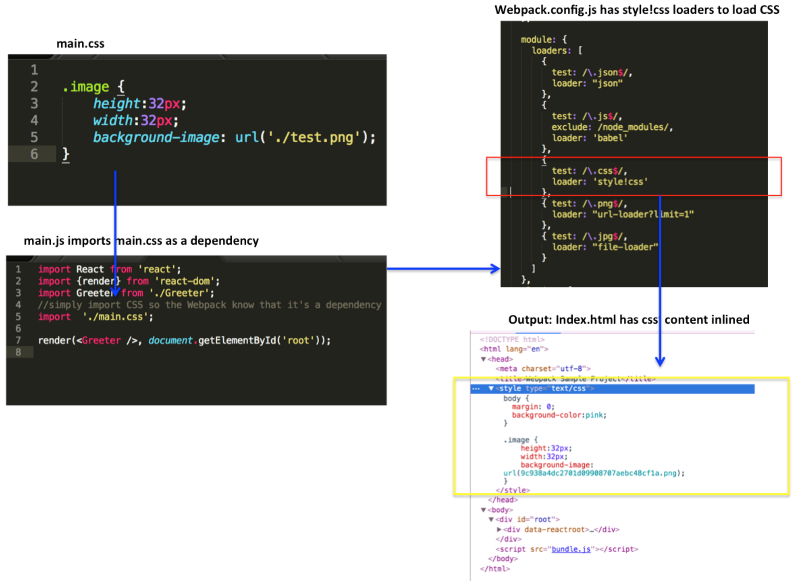
Suppose we have a CSS file myCssFile.css, and we want to upload its contents to a tag inside HTML. This can be done using 2 loaders: css-loader and style-loader.
Here's how it works:
The loaders can be configured to work differently depending on the transfer parameters.
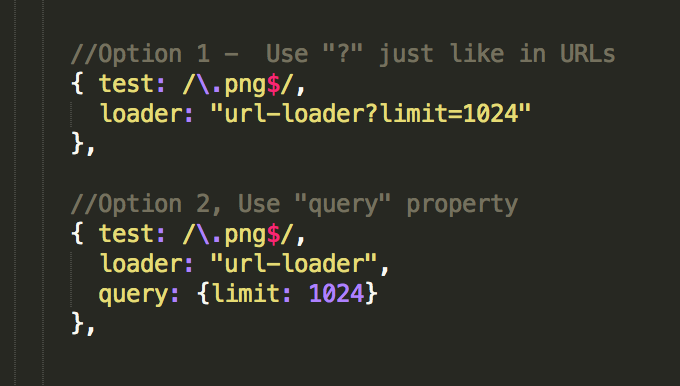
In the following example, the url-loader is configured to use a DataURL for images smaller than 1024 bytes and a URL for images larger than 1024 bytes. This can be done by passing the limit parameter in one of two ways :
babel-loader uses presets setting to convert ES6 to ES5 correctly and parse React JSX to JS. Settings can be passed through the query parameter, as shown below:
However, in many projects, the babel settings can become too large, so it’s best to keep them in the babel-loader configuration file called .babelrc. The babel-loader will automatically load the .babelrc file, if one exists.
It should look something like this:
Plugins are additional node modules that work with the resulting bundle.
For example, uglifyJSPlugin takes bundle.js, and then minimizes and obfusts its contents to reduce the file size.
Similarly, the extract-text-webpack-plugin internally uses the css-loader and style-loader to collect all the CSS files in one place. This plugin extracts the result in an external styles.css file and adds a link to this file to index.html .
Note: if you want to simply embed CSS as a style element in HTML, this can be done without the extract-text-webpack-plugin plugin , but at the expense of CSS and style loaders , as shown below:
As you have noticed, the loaders work at a separate file level during or before generating a bundle.
In turn, the plugins work at the level of a bundle or fragment after the end of the bundle generation . And some plugins like commonsChunksPlugins went even further and changed the way they created the bundles themselves.
Many Webpack configuration files have an extension property with an empty string , as shown below. An empty string is needed to facilitate importing without extensions such as require (“./ myJSFile”) or import myJSFile from ./myJSFile without file extensions.
That's all!
When I first saw its configuration file, it seemed extremely strange and confusing to me. But after a while, I realized that the whole thing was in the unique syntax of the Webpack and a slightly different philosophy, which can be a little confusing at first. But, on the other hand, it is this new philosophy that makes the Webpack so popular.
')
Webpack philosophy
There are 2 main principles of the Webpack philosophy:
- Anything can be a module. Modules can be either JS files, or CSS files, HTML files, or images. That is, you can use both require (“myJSfile.js”) and require (“myCSSfile.css”) . This way you can break any artifact into smaller manageable parts, reuse them and so on.
- Download only what you need and when you need it. Usually, module builders take all the modules and generate one large bundle.js file from them. But in many applications the size of such a file can reach 10-15 MB - and this is too much. Because Webpack is equipped with a number of functions that allow you to share code and generate multiple bundle files, as well as asynchronously load the necessary parts of the application when it is needed .
And now let's finally move on to the features of the Webpack.
1. Development and production
First of all, you need to understand that the Webpack has many functions, some of which are focused on development, another on production, and the third on both.
Sample Webpack files for development and production
Most projects use so many features that they usually have 2 large Webpack configuration files.
To create bundles you will most likely need to write scripts in package.json, like this:
“scripts”: { //npm run build to build production bundles “build”: “webpack --config webpack.config.prod.js”, //npm run dev to generate development bundles and run dev. server “dev”: “webpack-dev-server” } 2. webpack CLI and webpack-dev-server
It is important to note that Webpack, as a module builder, provides 2 interfaces:
- The webpack CLI tool is the default interface (installed as part of the Webpack itself).
- The webpack-dev-server tool is a Node.js server (needs to be installed separately).
Webpack CLI (suitable for production assemblies)
This tool takes options through the CLI tool, as well as through the configuration file (by default, webpack.config.js) and sends them to the Webpack for building.
And although you can start exploring the Webpack using the CLI tool, it is mostly useful to you only for the subsequent generation of production assemblies.
Usage example:
OPTION 1: //Install it globally npm install webpack --g //Use it at the terminal $ webpack //<--Generates bundle using webpack.config.js OPTION 2 : //Install it locally & add it to package.json npm install webpack --save //Add it to package.json's script “scripts”: { “build”: “webpack --config webpack.config.prod.js -p”, ... } //Use it by running the following: "npm run build" Webpack-dev-server (suitable for development builds)
This is the Express Node.js server that runs on port 8080 . This server calls the Webpack from the inside, which gives additional features like browser reloading (Live Reloading) and / or replacement of the just-modified module (Hot Module Replacement, or HMR) .
Usage example:
OPTION 1: //Install it globally npm install webpack-dev-server --save //Use it at the terminal $ webpack-dev-server --inline --hot OPTION 2: // Add it to package.json's script “scripts”: { “start”: “webpack-dev-server --inline --hot”, ... } // Use it by running $ npm start Open browser at: http://localhost:8080 Webpack and webpack-dev-server tool options
It is worth noting that some options, such as inline and hot, are used only for the webpack-dev-server tool, while, say, hide-modules are only suitable for CLI.
CLI webpack-dev-server options and config options
It is also worth noting that there are 2 ways to transfer options to webpack-dev-server:
- through the devServer object of the webpack.config.js file;
- via CLI options.
//Via CLI webpack-dev-server --hot --inline //Via webpack.config.js devServer: { inline: true, hot:true } I found that the devServer config (hot: true and inline: true) sometimes does not work. Therefore, I prefer to pass options as CLI options inside package.json, like this:
//package.json { scripts: {“start”: “webpack-dev-server --hot --inline”} } Note: Be sure not to pass hot: true and -hot together.
Hot and inline options for webpack-dev-server
The inline option adds Live Reloading for the entire page. The hot option includes Hot Module Reloading — a hot reload of the module that only reloads the modified component (and not the entire page). If you pass both options, then when you change the source, webpack-dev-server will launch first the HMR and, only if it does not work, will reload the entire page.
//When the source changes, all 3 options generates new bundle but, //1. doesn't reload the browser page $ webpack-dev-server //2. reloads the entire browser page $ webpack-dev-server --inline //3. reloads just the module(HMR), or the entire page if HMR fails $ webpack-dev-server --inline --hot 3. entry– line, array and object
Entry sends to Webpack where the root module or entry point is located. It can be a string, an array, or an object — with different types being used for different purposes.
If you have only one entry point (as in most applications), you can choose any format, and the result will be the same.
Different entry types with the same result.
entry - array
But, if you want to add several files that are independent of each other , you can use an array format.
For example, if you need googleAnalytics.js in your HTML, you can have Webpack add this file to the end of bundle.js:
entry - object
Suppose you have a real multipage application, not a SPA with a multi-view, but several HTML files (index.html and profile.html). Using Webpack, you can immediately generate multiple bundles using the entry object.
The configuration file for the example below will generate 2 JS files: indexEntry.js and profileEntry.js, which can be used in index.html and profile.html respectively.
Usage example:
//profile.html <script src=”dist/profileEntry.js”></script> //index.html <script src=”dist/indexEntry.js”></script> Note: the file name comes from the keys of the entry object
entry - combination
You can also use entry arrays inside an entry object. For example, the following configuration file will generate 3 files: index.js, profile.js and vendor.js, containing 3 vendor files.
4. output - path and publicPath
output tells Webpack where and how to store the resulting files. Output has 2 properties, path and publicPath, at first it may be a little confusing.
The path property tells Webpack where to store the result, whereas the publicPath property is used in several Webpack plugins to update URLs inside CSS and HTML files during generation of production assemblies.
Using the publicPath property for development and production
Suppose your CSS file contains a URL for uploading ./test.png to localhost. But in production, the test.png file can be located on the CDN, whereas your Node.js server can run on Heroku . So, working on production, you will have to manually update the URL in all files so that they point to the CDN.
But instead, you can use the publicPath property, as well as a number of related plug-ins, to automatically update all URLs when generating production assemblies.
Example publicPath production
// Development: Both Server and the image are on localhost .image { background-image: url('./test.png'); } // Production: Server is on Heroku but the image is on a CDN .image { background-image: url('https://someCDN/test.png'); } 5. Loaders and loader chains
Loaders are additional node modules that help upload or import files of various types in browser-compatible formats - JS, CSS, etc. Subsequent loaders also allow you to import such files into JS using require or import in ES6.
For example, you can use the babel-loader to convert a JS file written in ES6 to an ES5 browser compatible:
module: { loaders: [{ test: /\.js$/, ←Test for ".js" file, if it passes, use the loader exclude: /node_modules/, ←Exclude node_modules folder loader: 'babel' ←use babel (short for 'babel-loader') }] Chains of loaders (working from right to left)
Multiple loaders for one file type can be chained. Chaining is carried out from right to left, and the loaders are separated by an exclamation mark: "!".
Suppose we have a CSS file myCssFile.css, and we want to upload its contents to a tag inside HTML. This can be done using 2 loaders: css-loader and style-loader.
module: { loaders: [{ test: /\.css$/, loader: 'style!css' <--(short for style-loader!css-loader) }] Here's how it works:
- Webpack searches for interrelationships of CSS files inside modules. In other words, Webpack checks if the JS file has require (myCssFile.css) . If a relationship is detected, the Webpack first transfers this file to the css-loader.
- The css-loader loads all CSS files and their own interrelationships into JSON (i.e., import otherCSS). Then Webpack passes the result to the style-loader.
- style-loader takes JSON, adds it to the style tag - - and inserts this tag into the index.html file.
6. Configure bootloaders
The loaders can be configured to work differently depending on the transfer parameters.
In the following example, the url-loader is configured to use a DataURL for images smaller than 1024 bytes and a URL for images larger than 1024 bytes. This can be done by passing the limit parameter in one of two ways :
7. The .babelrc file
babel-loader uses presets setting to convert ES6 to ES5 correctly and parse React JSX to JS. Settings can be passed through the query parameter, as shown below:
module: { loaders: [ { test: /\.jsx?$/, exclude: /(node_modules|bower_components)/, loader: 'babel', query: { presets: ['react', 'es2015'] } } ] } However, in many projects, the babel settings can become too large, so it’s best to keep them in the babel-loader configuration file called .babelrc. The babel-loader will automatically load the .babelrc file, if one exists.
It should look something like this:
//webpack.config.js module: { loaders: [ { test: /\.jsx?$/, exclude: /(node_modules|bower_components)/, loader: 'babel' } ] } //.bablerc { “presets”: [“react”, “es2015”] } 8. Plugins
Plugins are additional node modules that work with the resulting bundle.
For example, uglifyJSPlugin takes bundle.js, and then minimizes and obfusts its contents to reduce the file size.
Similarly, the extract-text-webpack-plugin internally uses the css-loader and style-loader to collect all the CSS files in one place. This plugin extracts the result in an external styles.css file and adds a link to this file to index.html .
//webpack.config.js //Take all the .css files, combine their contents and it extract them to a single "styles.css" var ETP = require("extract-text-webpack-plugin"); module: { loaders: [ {test: /\.css$/, loader:ETP.extract("style-loader","css-loader") } ] }, plugins: [ new ExtractTextPlugin("styles.css") //Extract to styles.css file ] } Note: if you want to simply embed CSS as a style element in HTML, this can be done without the extract-text-webpack-plugin plugin , but at the expense of CSS and style loaders , as shown below:
module: { loaders: [{ test: /\.css$/, loader: 'style!css' <--(short for style-loader!css-loader) }] 9. Boot Loaders and Plugins
As you have noticed, the loaders work at a separate file level during or before generating a bundle.
In turn, the plugins work at the level of a bundle or fragment after the end of the bundle generation . And some plugins like commonsChunksPlugins went even further and changed the way they created the bundles themselves.
10. Resolving File Extensions
Many Webpack configuration files have an extension property with an empty string , as shown below. An empty string is needed to facilitate importing without extensions such as require (“./ myJSFile”) or import myJSFile from ./myJSFile without file extensions.
{ resolve: { extensions: ['', '.js', '.jsx'] } } That's all!
Source: https://habr.com/ru/post/309230/
All Articles