Frontend: Development and Support (+ vote)

Let's imagine that you were transferred to a new project. Or you changed the job and only heard about the project. Here you sit at the workplace, the manager comes to you, shakes hands and ... right off immediately opens the project page, pokes a finger at the monitor and asks to insert a "informer about the upcoming event X". On this you part ... What to do? Where to begin? How to create an "informer"? Where to find the right template? And a sea of other issues.
Under the cut there will be a story, how we try to organize these processes, what tools we create for the preparation of SPA. In addition, we will talk about the technical details of the implementation of Live Coding / Hot Reload and a bit about VirtualDom and React with Angular.
Let's get started So, you are left alone with the project, the team told me where to find the repository, and then read README.md, that's all.
')
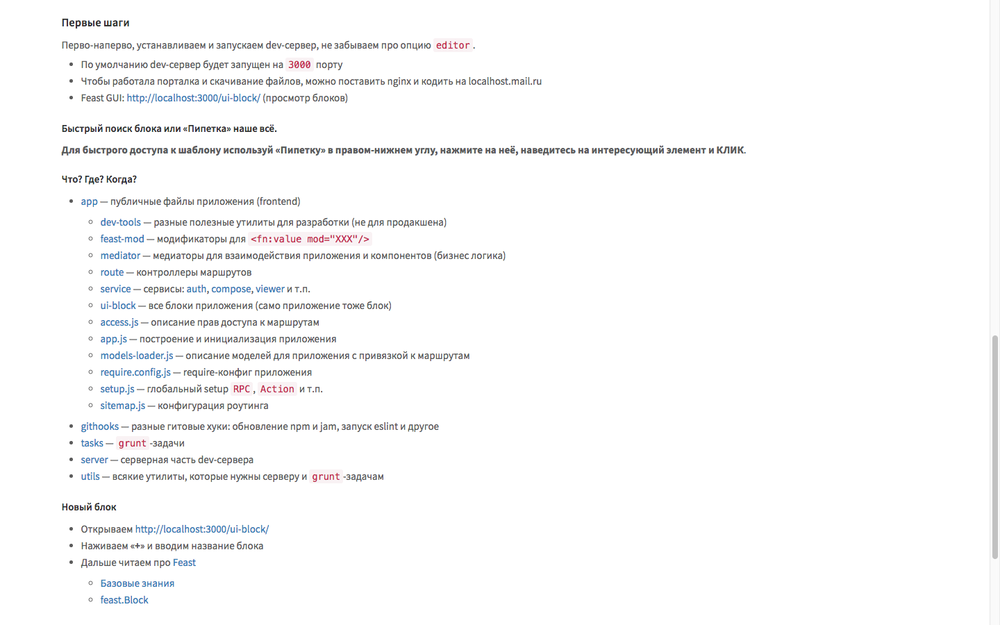
README.md
This is the starting point when immersed in the project, it meets you with basic information:
- Installation - all steps are described here, how to start a project so that even the “designer” can do it;
- Launch - examples of basic commands for launching a project;
- Startup options - a list of all possible parameters and their description;
- "First steps" - in fact, this is the right section:
- quick search for UI-block - description of the tool for the preparation of the application;
- "What? Where? When? ”- a brief description of the project structure;
- creating a UI block — minimal information on how to create a UI block;
- “Application logic, or where to look for event handling?”;
- Examples / screencasts - an experimental section with examples.
An example of what this looks like in the gitlab interface
Everything about everything will take about five minutes. The most important thing that you learn from the README: to solve the problem you need:
- Install NodeJS / npm.
- Clone the project repository.
- Run
npm installandnpm start. - Open the project in the browser and click on the "dropper" in the lower right corner. ;]
But let's order.
Installation
We have been using package development for a long time, so many parts (grunt and gulp tasks, utilities, UI components, etc.) are developed as separate npm or jam packages. This approach makes it possible to reuse the code between projects as much as possible, provides versioning (by semver) and, in addition, allows you to build the infrastructure for each package just for the task. And most importantly, no legacy, the package is independent and, who knows, it can eventually turn into a good opensource.
In addition, do not forget to use npm-hooks, for example
postinstall . We use it to install such git-hooks as:- pre-commit - coding style check (eslint);
- pre-push - run tests;
- post-merge - run
npm installandjam install.
The last hook may seem strange, but when you work with a bunch of packages that are dynamically updated, without it in any way. Having typed
git pull , the developer should get the current version of the project, which can be achieved only by forcing npm install .If the project depends on npm or another third-party package manager, take care of the local registry, so as not to depend on the outside world and its problems (left-pad, Roskomnadzor, etc.).
Launch
npm start is all you need to know, and it doesn't matter what is under your hood: gulp, grunt, webpack ... I already wrote above that in README.md there is a description of launch parameters: the application reads README.md at start, parses the list of options and their descriptions and if you use an unknown or undocumented option, it gives an error. This is the simple way to solve the problem of documentation: no description - no option.Startup example:
npm start -- --xhr --auth=oauth --build > project-name@0.1.0 start /git/project-name/ > node ./ "--xhr" "--auth=oauth" "--build" - : master (Sun Aug 29 2016 10:28:06 GMT+0300 (MSK)) - - xhr: true ( `XMLHttpRequest`) - auth: oauth ( `proxy`, `oauth`, `account`) - build: true ( ) - - 3000 - : localhost:3000 The first steps
Let's return to the task. So, README.md is read, the project is installed and running, go to the item “quick block search, or“ pipette ”- our everything”.
Pipette is a tool for analyzing the structure of components and their parameters. To use it, open the browser, click on the “pipette” and select the place where “the manager pointed with his finger”.
Usage example
Pipette

Inspector

Inspector
A inspector panel appeared below, which shows the structure of the blocks under the cursor. Finding the right, click on it. Now we can look at the whole chain of nested blocks, and also find out in which file and line they are called.
Now click on the file name, and ... the IDE opens, and the cursor is positioned on the desired line. There is an “eye” next to it. If you click on it, the GUI / viewer opens with the selected block.
All the main entry points found, now proceed to the addition of "informer."
Creating a UI block
There are two ways to create a block (both are described in the readme):
- through the console;
- using the GUI.
The console tool is needed when it is not possible to use the GUI, in all other cases it is more convenient and clearer to resort to the GUI.
GUI
This is a web interface for viewing, and most importantly, developing UI-blocks of the project. What he can do:
- view a list of all blocks;
- simple search by name and keywords;
- output of all use cases for a specific unit;
- creating a new block;
- rename block.

First of all, you need to find out if there are any such informers in the project. Using the search, we find a similar block, again use the “pipette” to study its structure and press “+”, enter the name of the new block, click “OK”, after which the GUI opens the preview of the created block. Again, use the eyedropper and open the IDE to edit the css / template / js.
So what happened? After clicking the “OK” button, the GUI creates a folder with a typical block, which in our architecture consists of at least four files:
- block-name .html - block template
<div></div> - block-name .scss - styles
.block-name { padding: 10px; background: red; } - block-name .js - behavior description
import feast from 'feast'; import template from 'feast-tpl!./block-name'; import styleSheet from 'feast-css!./block-name'; /** * @class UIBlockName * @extends feast.Block */ export default feast.Block.extend({ name: 'block-name', template, styleSheet }); - block-name .spec.js - the specification on the basis of which use cases are built
export default { 'base': { attrs: {} } };
When editing any of these files, all changes are applied without reloading the page. This is not just fashionable fun, but a huge time saver. Blocks can have logic, and Hot Reload allows you not to lose the current state, which happens when F5 / cmd + r. Even when editing a template, the connected blocks are automatically updated. In other words, the GUI program a little for you. ;]
So, almost without knowing anything about the project, you can add a new block. You do not need to read kilometers of documentation to accomplish a normal task. But this does not mean that “kilometers” are not needed: even as they are needed - to deepen the knowledge and life of the project without its main maintainers. For example, for working with API and business logic, we have an internal JSSDK, the documentation of which is generated based on JSDoc3.
Mini-total
It is necessary to study the documentation and code base of the project correctly, but already at the stage of thorough immersion, at first it is enough to describe the scenarios for performing typical tasks. Such instructions should be easy and intuitive. Automate everything that can be automated. As you can see, in our case it is not just the creation of a block: automation begins with the installation of the project, hooks, updating packages, etc. Entering the project should be easy and fun;]
Technical part
I'll start a little from afar. In early 2012, we created our own Fest template engine. He converted XML to a js function that can be used on the client and server. The function took an object of parameters and produced a string: the classic js template engine. Only, unlike the counterparts, the function at that time was super-optimized, we could run it on a pure V8, having achieved the performance of the C-template engine, which we used before.
[XML -> JSFUNC -> STRING -> DOM] During this time, on the basis of Fest, we have developed an internal library of blocks, which is used on several projects at once (Mail, Cloud, etc.). That is, buttons, inputs, forms, lists, etc. are common. Actually, these were the first steps in structuring the layout and components.
Time passed, and the question “How do we live on?” Got sharper, because Fest returns only a string, you can update the state in two ways: either “redraw everything” or “influence the DOM from JS”.
Of course, you have to use both approaches: somewhere it is easier and faster to redraw everything, somewhere you need to change only one css-class. In general, when working with a template engine that produces a string, there are pros / cons, and this is by no means performance, as many now think. There are several main problems:
- Redraw everything - re-initialization of events, re-getting references to the necessary DOM-fragments, “flashing” images, etc.
- Point impact - blurs and duplicates logic, complicating development.
Therefore, we began to move on, but with the possibility of minimal rewriting of ready-made components.
There were many experiments. We tried to introduce data-binding, very similar to Angulyarovsky, but, unlike him, Fest still issued a string, and data-binding was superimposed after insertion into the DOM. This allowed to maintain the original speed and work through the V8. Alas, on the big lists we still have the same problems with the ala- $ digest as that of the angulyar, even though our implementation was a bit faster (as part of our tasks).
Over time, React entered the market and gave us VirtualDom. After benchmarking, I was a little bit disheartened: the basic “list of letters” was about three times slower than ours (and this is a shortened implementation). In addition, we wanted not to rewrite our code, but only to replace the principle of updating the template. But a blessing in disguise: React gave impetus to the entire js-community, and soon, as mushrooms, alternative implementations of vdom began to grow: Incremental DOM , morphdom , Deku , mithril , Bobril, and many others.
The matter remained for the small: to carry out benchmarks on our tasks, choose the suitable one and write transpiler for our templates.
[XHTML -> JSFUNC -> VDOM? -> DOM] But the main goal was to get the most comfortable development of blocks, namely:
- Interface to create, view and test blocks.
- Live coding (CSS / HTML / JS).
- Automation of creating / editing blocks.
- Component inspection tools.
- Visualization of connections between components.
In addition, we already had a GUI / web interface to the current library of blocks, it only remained to unify the idea, so that each project could deploy a GUI for itself without much pain.
Development
Live coding
I think I’m not mistaken if I say: everyone knows what Webpack and BrowserSync are. Much has been written about them, so I will not focus on them, but I will show an alternative way: what to do when boxed solutions do not suit you. Just do not think that I urge you to reinvent the wheel: by no means, this is simply a lower-level version, which many people forget about and spend a lot of time on screwing the same Webpack.
If so, then node-watch + socket.io is all you need. Two ready-made tools that you can easily integrate into your project.
const fs = require('fs'); const http = require('http'); const watch = require('node-watch'); const socket = require('socket.io'); cosnt PORT = 1234; const app = http.createServer((req, res) => { res.writeHead(200, {'Content-Type': 'html/text'}); res.end(); }); const io = socket(app); app.listen(PORT, () => { watch('path/to', {recursive: true}, (file) => { fs.readFile(file, (err, content) => { const ext = file.split('.').pop(); io.emit(`file-changed:${ext}`, {file, content}); }); }); }); <script src=”//cdnjs.cloudflare.com/ajax/libs/socket.io/1.3.5/socket.io”></script> <script> const io = io(location.protocol + '//' + location.host) socket.on('file-changed:html, function (data) { // data.file, data.content }); </script> That's it, now you can receive changes on the client.
In reality, our situation looks something like this, the main difference from the above listing is the preprocessing of JS and CSS when returning to the client. Yes exactly; unlike Webpack, we do not use gangs in the dev environment, files are converted on demand.
Hot update blocks
To breathe new life into the fest, it was necessary to choose a library for working with vdom and write a transpiler for xhtml / xml, take into account the problems of implementation and solve them.
What problems? For example, in order to add a new functionality (construction / tag processing), it was necessary to make changes to the library and raise the version. In addition, templates could be compiled only on the server.
So it was Feast. ;]
It also converts xml / xhtml to JSFUNC, but this function does not return a string, but JSON, which is later transferred to citojs (this is a very fast and simple library for working with vdom), and citojs is already building or updating vdom.
In addition, now the compilation of templates takes place directly on the client, so the templates are given "as is" and on the client are converted first to AST, and then, according to the transformation rules, to JSFUNC.
For example, here are the rules for converting the tag `fn: for`
// <fn:for data="attrs.items" as="key" value="item">...</fn:for> 'fn:for': { scope: true, required: ['data'], expressions: ['data'], prepare: (node, {as, key, data}) => ({ as: attrs.as || '$value', key: attrs.key || '$index', data }), toCode: () => ['EACH($data, @@.children, function (&as, &key) {', '});']); } This allowed solving several problems at once:
- no longer need a server to compile;
- even the size of the excess html is smaller than the compiled JS;
- transformation rules can be supplemented on the fly;
- maximum meta information.
Therefore, when a new html is received on the client, it is re-translated to the JS function and the re-render of all blocks created based on this template is called:
socket.on('file-changed:html', (data) => { const updatedFile = data.file; feast.Block.all.some(Block => { if (updatedFile === Block.prototype.template.file) { const template = feast.parse(data.content, updatedFile); Block.setTemplate(template); Block.getInstances().forEach(block => block.render()); return true; } }); }); For CSS, about the same logic, the main change was the introduction of CSS modularity, to say goodbye to main.css once and for all and deliver css along with the component code, as well as to protect selectors from intersection and obfuscation.
CSS Modules
No matter how loud this may sound, the process itself is fairly simple and was already known ( for example ), but is not very common due to the lack of convenient tools. Everything changed with the advent of postcss and webpack. Before turning to our implementation, let's take a look at how this works for others, for example, React and Angular2.
React + webpack
import React from 'react'; import styles from './button.css'; export default class Button extends React.Component { render () { return <button className={styles.btn}> <span className={styles.icon}><Icon name={this.props.icon}/></span> <span className={styles.text}>{this.props.value}</span> </button>; } } React + webpack + react-css-modules
import React from 'react'; import CSSModules from 'react-css-modules'; import styles from './button.css'; class Button extends React.Component { render () { return <button styleName='btn'> <span styleName='icon'><Icon name={this.props.icon}/></span> <span styleName='text'>{this.props.value}</span> </button>; } } export default CSSModules(Button, styles); @CSSModules(styles) export default class Button extends React.Component { // ... } Angular2
Unlike React, Angulyar supports the similarity of modularity out of the box. By default, it adds specificity to all selectors as a unique attribute, but if you set a certain “flag”, it will use shadow dom.
@Component({ selector: `my-app`, template: `<div class="app">{{text}}</div>`, styles: [`.app { ... }`] // .app[_ngcontent-mjn-1] { } }); export class App { // … } Our option is something in between, it is not necessary to specially prepare a template for it, just load the css and add it to the block description:
import feast from 'feast'; import template from 'feast-tpl!./button.html'; import styleSheet from 'feast-css!./button.css'; export default feast.Block.extend({ name: 'button', template, styleSheet, }); In addition, there is still an experimental branch not just with the replacement of classes, but with full inline styles. This can be useful for working on weak devices (TVs, etc.).
Actually, the branch itself looks like this:
const file = "path/to/file.css"; fetch(file) .then(res => res.text()) .then(cssText => toCSSModule(file, cssText)) .then(updateCSSModuleAndRerenderBlocks) ; function toModule(file, cssText) { const exports = {}; cssText = cssText.replace(R_CSS_SELECTOR, (_, name) => { exports[name] = simpleHash(url + name); return '.' + exports[name]; }); return {file, cssText, exports}; } As you can see, absolutely no magic, everything is very trite: we get css as text, we find all the selectors, with the help of a simple algorithm, we consider hash and save to the object of export [the original name] => [new].
Well, the most interesting: JS, what's wrong with him?
JS / Hot Reload
Consider an example. Suppose we have a class
Foo : class Foo { constructor(value) { this.value = value; } log() { console.log(`Foo: ${this.value}`, this instanceof Foo); } } Further somewhere in the code:
var foo = new Foo(123); foo.log(); // "Foo: 123", true After that we decide to update the implementation on
NewFoo : class NewFoo { constructor(value) { this.value = value; } log() { console.log(`NewFoo: ${this.value}`, this instanceof NewFoo); } }); Yes, so that the already created copies continue to work correctly.
foo.log(); // "NewFoo: 123", true foo instanceof Foo; // true To do this trick, you do not need preprocessing, pure enough JS:
function replaceClass(OldClass, NewClass) { const newProto = NewClass.prototype; OldClass.prototype.__proto__ = newProto; // Object.keys(NewClass).forEach(name => { OldClass[name] = NewClass[name]; }); // Object.getOwnPropertyNames(newProto).forEach(name => { OldClass.prototype[name] = newProto[name]; }); } Yes, that's the whole function, ten lines - and the JS Hot Reload is ready. Nearly. I deliberately did not overload this function, but showed only the essence. In an amicable way, you need to still mark the old methods, which are no longer present, as unrequited.
But there is a problem:]
replaceClass(Foo, class NewFoo { /* ... */}); foo.constructor === Foo; // false (!!!) It can be solved in several ways:
- Still using Webpack, it wraps the creation of a class in a special wrapper that returns and updates the class being created.
- Use binding to create classes, for example
createClass('MyClassName', {...});. - You can also turn to Proxy, but you also need preprocessing here.
As a result, our scheme looks like this:
socket.on('file-changed:js', (data) => { const updatedFile = data.file; new Function('define', data.content)(hotDefine); }); hotDefine deals with all the magic: instead of the requested object (for example, feast) returns not the original, but the special FeastHotUpdater , which updates the implementation.Code Analysis Tools
As I showed in the example, at the moment the main tool that allows you to inspect elements directly from the browser is the “pipette”. One of the nice features is opening the desired file in the IDE. To do this, use the wonderful library of Roman Dvornov lahmatiy / open-in-editor :
const openInEditor = require('open-in-editor'); const editor = openInEditor.configure( {editor: 'phpstorm'}, (err) => console.error('Something went wrong: ' + err) ); editor.open('path/to/file.js:3:10') .catch(err => { console.error('[open-in-editor] Ooops:', err); }); Roman also has a similar component for inspection of React and Backbone , which can do much more than mine, and it looks superbly. ;]
Work example of component-inspector from Roman
Those who are well acquainted with React, Ember, Angular, Backbone, are well aware of such solutions as React Developer Tools, Ember Inspect, Batarand, Backbone Debugger, etc. These are all extensions to DevTools for dissecting the situation.
At first, I had exactly extensions in my plans, since the Chrome API has to do with it + there are examples, and all the extensions listed above are on github, so you can always see the implementation.
But alas, you can not put the extension to the user, and we very often have to study the problems on the machines not only colleagues. Therefore, while I focused on the tools through which you can get maximum information in the browser without reloading it. This is where the charm of compiling templates on the client is revealed: you don’t need two assemblies (combat and dev), the assembly is always one, when debugging, you always get all the possible meta-information about the component.
What else?
Logging
Bugs are always - it does not matter; trouble, if you can not understand what happened before. Therefore, we pay much attention to logging. The ideal situation, if at any time you can open the console in battle and understand what happened after your actions.

Code coverage
For the most part, this is just an experiment, but it is quite possible to use it to check the quality of manual tests. We take istanbul, run the code through it and roll it out onto test machines, then once every N seconds we drop the coverage into the log. This is the simple way to see how well your scripts are written for testers, whether they cover the functionality.
Display example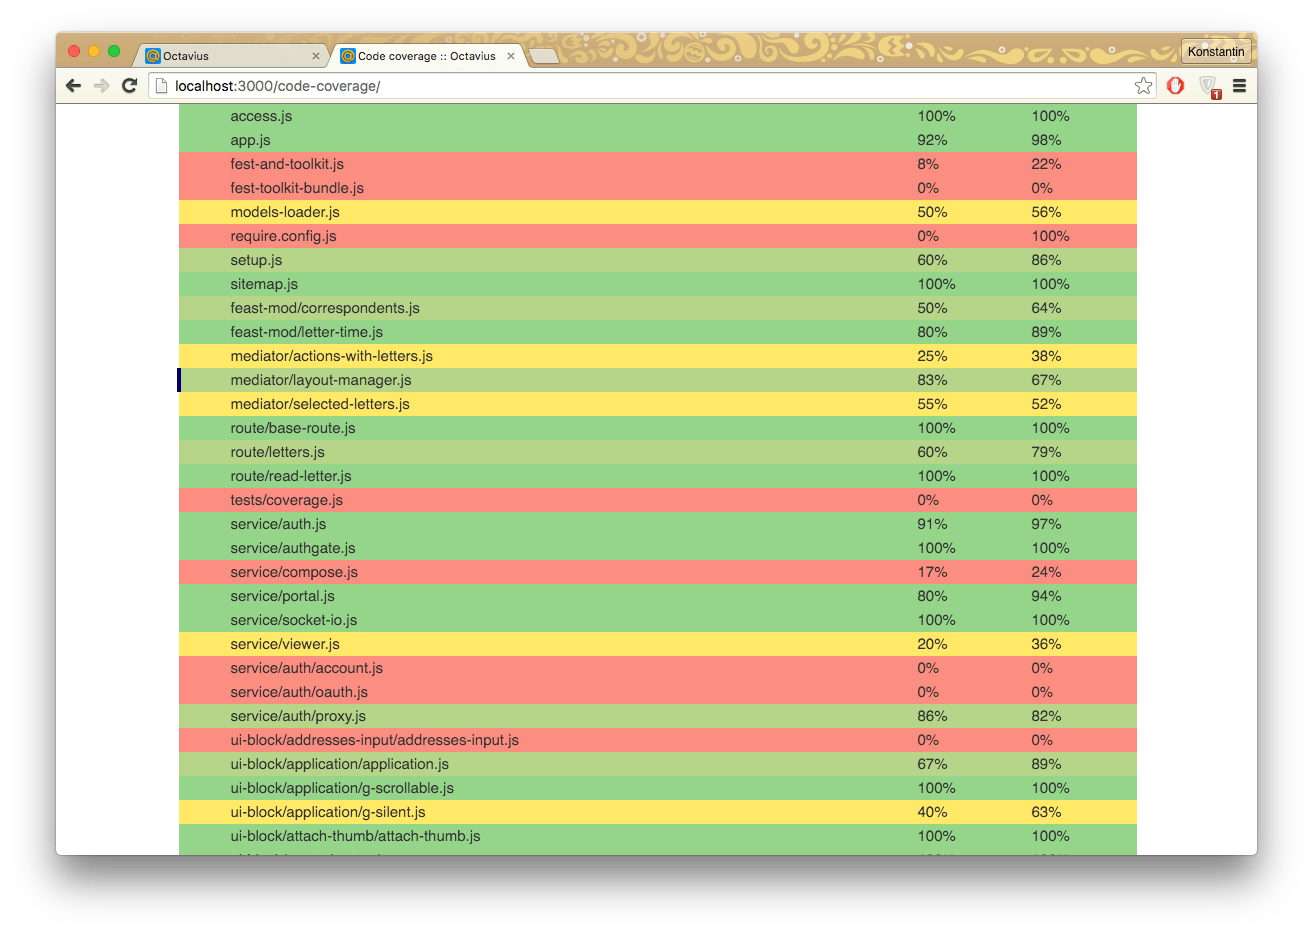

Application structure analysis
The farther, the more the application grows, branches, and once its structure becomes incomprehensible. That was the first attempt;]
The first attempt to visualize the structure of the application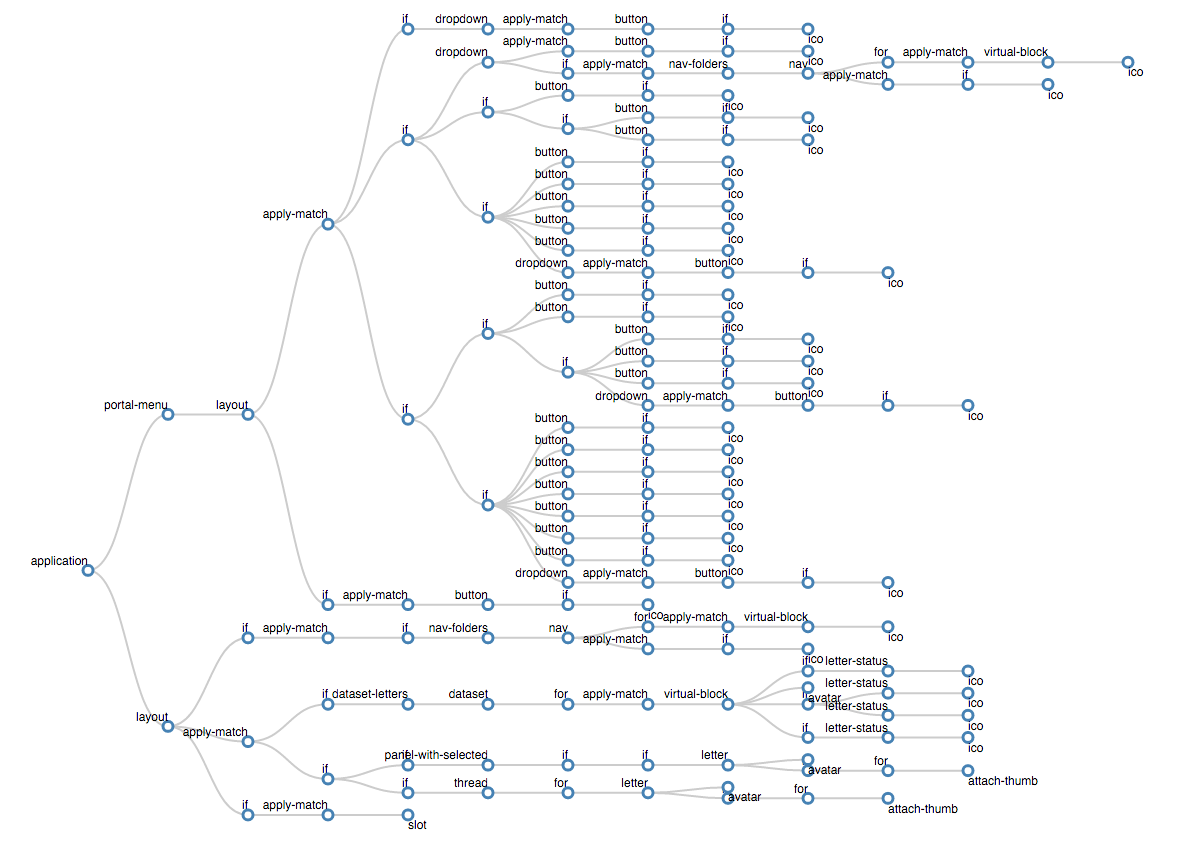
I think the idea is clear: this tree is not just nesting of blocks, but also the conditions of cycles. (, ).
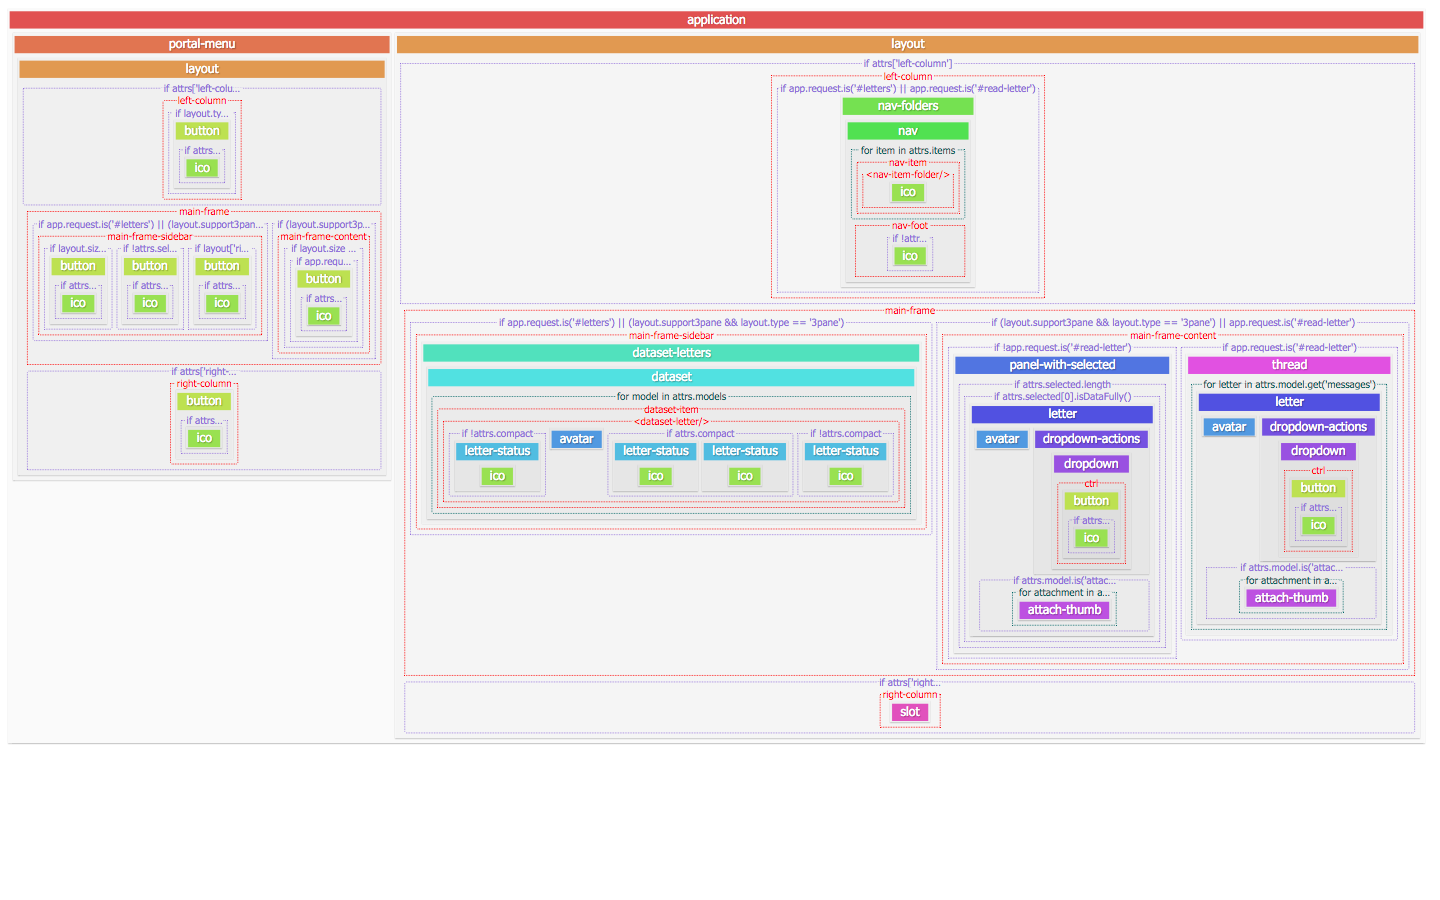
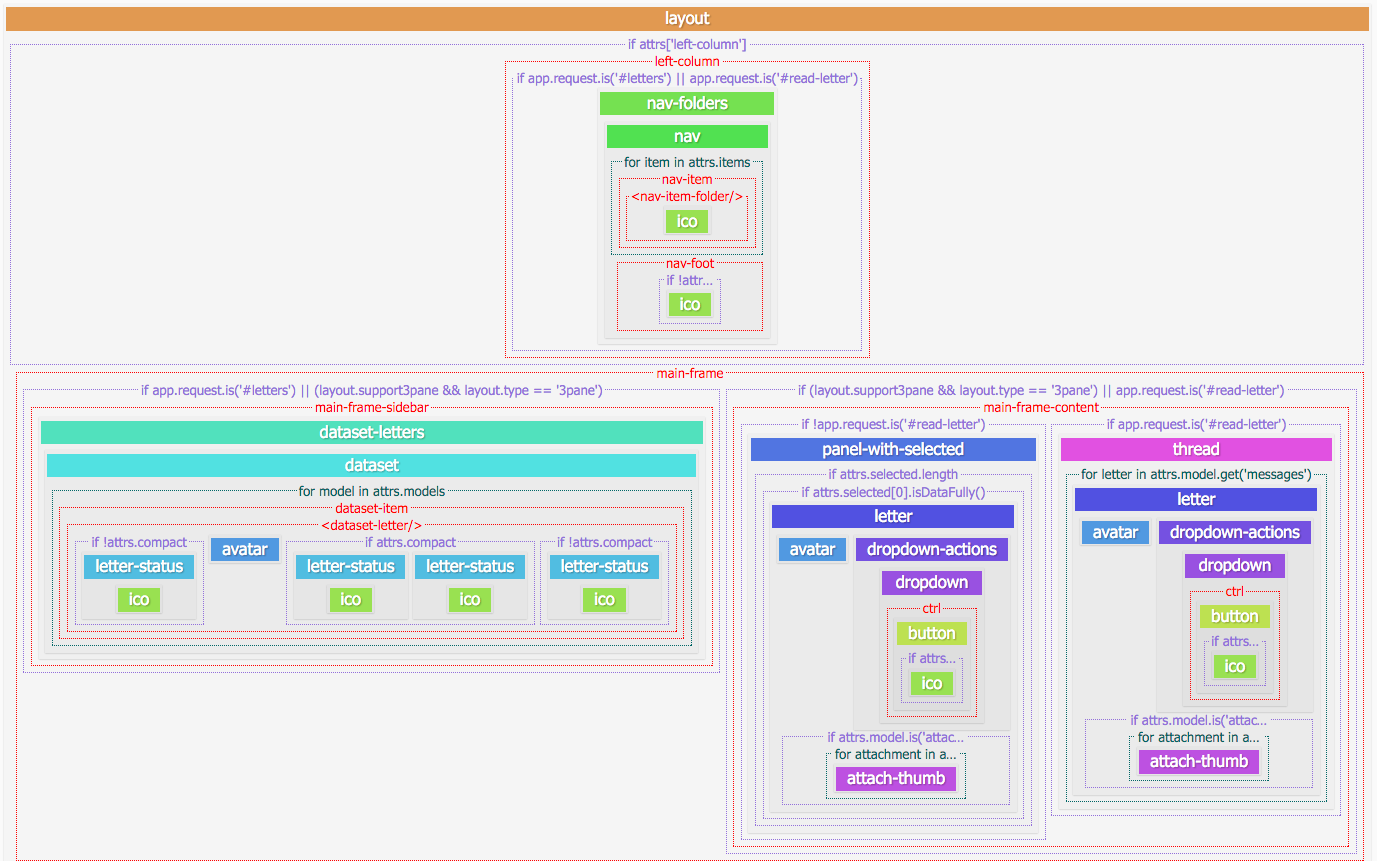
, , ; , . — (, , ).
Timeline
, , , — DevTools Timeline. , (, , . .). , , . timeline ( ).
dev-

Conclusion
, , , , , – . , «». , bash- . , , , . , , . , React, Vue, Ember, Angular, – Live Coding, Dev Tools . , React react-storybook .
PS .
Source: https://habr.com/ru/post/309212/
All Articles