Go to 2FA (Two-Factor Authentication for ASA SSL VPN)
The need to provide remote access to the corporate environment arises more and more often, it does not matter whether it is its users or partners who need access to a particular server in your organization.
For these purposes, most companies use VPN technology, which has proved itself as a reliably secured way to provide access to the organization’s local resources.
My company was no exception, and we, like many others, use this technology. And, like many others, we use Cisco ASA 55xx as a remote access gateway.
')
As the number of remote users increases, there is a need to facilitate the issuance of credentials. But at the same time, it is necessary to do so without compromising security.
For ourselves, we found a solution in applying two-factor authentication for connecting via Cisco SSL VPN using one-time passwords. And this publication will tell you how to organize such a solution with minimal time costs and zero costs for the necessary software (with the proviso that you already have a Cisco ASA in your infrastructure).
The market is replete with boxed solutions for generating one-time passwords, while offering a lot of options to get them, whether sending a password via SMS or using tokens, both hardware and software (for example, on a mobile phone). But the desire to save and the desire to save money for my employer, in the current crisis, forced me to find a free way to implement a service to generate one-time passwords. Which, with its free, is not much inferior to commercial solutions (it should be noted here, noting that this product has a commercial version, but we agreed that the costs in money, we will be zero).
So, we will need:
- Linux image with built-in toolkit - multiOTP, FreeRADIUS and nginx, to access the server on the web (http://download.multiotp.net/ - I used a ready-made image for VMware)
- Active Directory server
- Actually Cisco ASA (I, for convenience, use ASDM)
- Any software token supporting TOTP mechanism (I, for example, use Google Authenticator, but the same FreeOTP will do)
I will not go into the details of the unfolding of the image. At the output, you will receive Debian Linux with multiOTP and FreeRADIUS already installed, configured to work in a bundle and a web interface for administering OTP.
Step 1. We initiate the system and configure it for our network.
By default, the system comes with root \ root credentials. I think everyone guessed that it would be nice to change the root user password after the first login. It is also necessary to change the network settings (the default is '192.168.1.44' with the gateway '192.168.1.1'). After you can restart the system.
In Active Directory, create a user otp , with the password MySuperPassword .
Step 2. Configure the connection and import Active Directory users
For this we need access to the console, and, directly, the multiotp.php file, using which we will configure the connection settings to Active Directory.
Go to the / usr / local / bin / multiotp / directory and execute the following commands in turn:
Determines if an additional (permanent) pin is required when entering a one-time pin (0 or 1)
Determines whether a domain password is required when entering a one-time pin (0 or 1)
Indicates the type of LDAP server (0 = normal LDAP server, in our case 1 = Active Directory)
Indicates the format in which to represent the user name (this value displays only the name, without domain)
Same for group only
Specifies the method for determining the user's group membership.
Whether to use a secure connection to the LDAP server (of course - yes!)
Port for connecting to the LDAP server
Your Active Directory Server Address
Specify where to start searching for users in the domain
Specify a user who has rights to search in Active Directory
Specify user password to connect to Active Directory
We set the timeout for connecting to Active Directory
We set a time limit on the operation of importing users
We activate configuration of connection to Active Directory
We import users from Active Directory
Step 3. Generate the QR code for the token
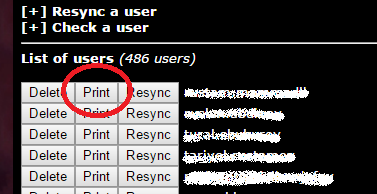
Everything is very simple here. Open the web interface of the OTP server in the browser, log in (do not forget to change the default password for the admin!), And click on the “Print” button:
The result of this action will be a page containing two QR codes. We boldly hammer on the first of them (in spite of the attractive Google Authenticator / Authenticator / 2 Steps Authenticator inscription), and again boldly scan the second code in the software token on the phone:

(yes, I intentionally tampered the QR code to make it unreadable).
After performing these actions in your application, every thirty seconds, a six-digit password will be generated.
To be sure, you can check in the same interface:

By typing the username and one-time password from the application on the phone. Got a positive response? So move on.
Step 4. We configure and test the work of FreeRADIUS
As I mentioned above - multiOTP is already configured to work with FreeRADIUS, it remains to carry out tests and enter information about our VPN gateway into the FreeRADIUS configuration file.
We return to the server console, to the / usr / local / bin / multiotp / directory , enter:
Including thereby more detailed logging.
In the FreeRADIUS client configuration file ( /etc/freeradius/clinets.conf ), we comment on all the lines related to localhost and add two entries:
- for the test
- for our VPN gateway.
Restart FreeRADIUS and try to log in:
where username = username, 100110 = password given to us by the application on the phone, localhost = address of the RADIUS server, 1812 is the port of the RADIUS server, testing321 is the password of the client of the RADIUS server (which we specified in the config file).
The result of this command will be an output similar to the following:
Now we need to make sure that the user is successfully authenticated. To do this, we look at the multiotp log itself:
And if the last entry there will be:
Then everything went well, and we can do
Step 5: Configure the Cisco ASA
Let's agree that we already have a configured group and policies for access via SLL VPN, configured in conjunction with Active Directory, and we need to add two-factor authentication for this profile.
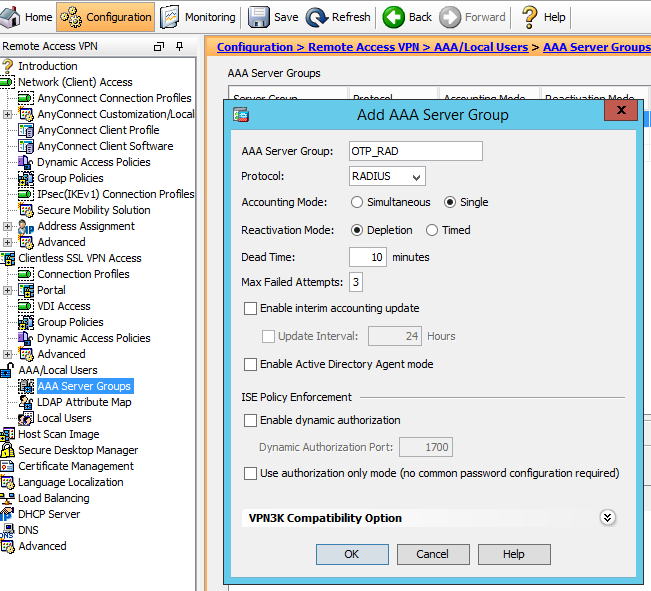
1. Add a new AAA server group:
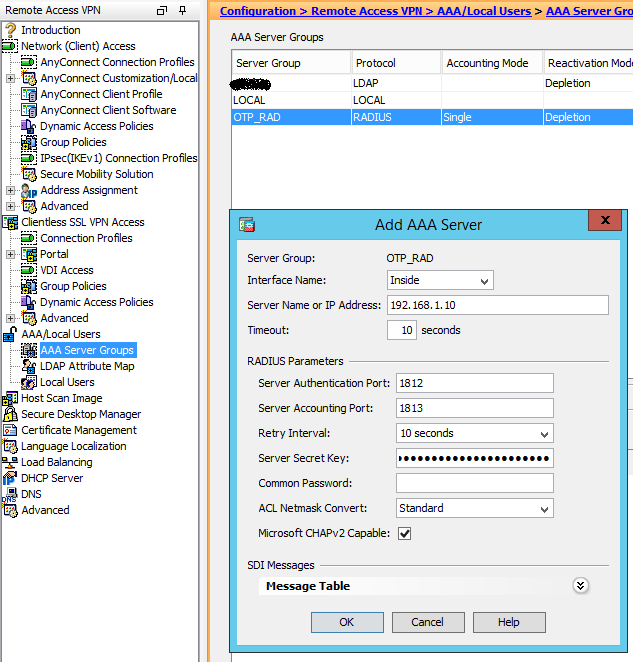
2. Add our multiOTP server to the group:
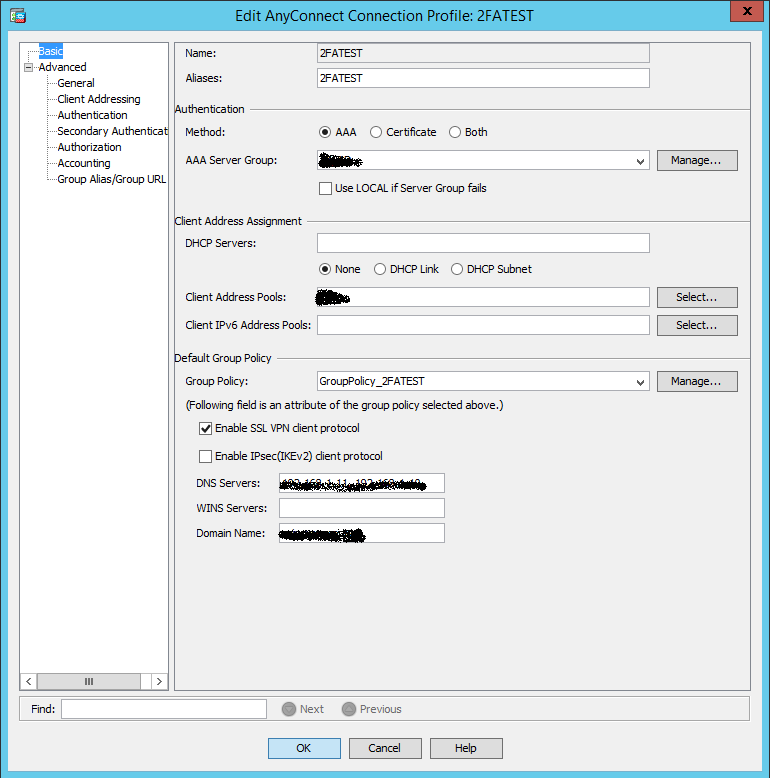
3. Edit the connection profile by setting the Active Directory server group as the main authentication server:
4. On the Advanced tab -> Authentification, we also select the Active Directory server group:

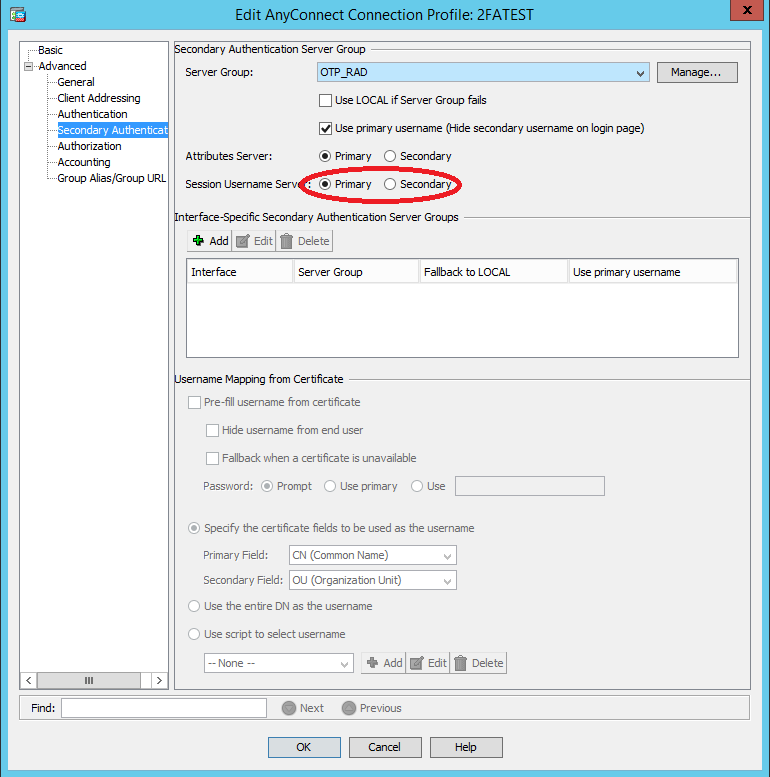
5. On the Advanced tab -> Secondary authentification, select the created server group in which the multiOTP server is registered. Note that the session username is inherited from the primary AAA server group:
Apply settings and
Step 6, he's the last
Check if we have two-factor authentication for SLL VPN:
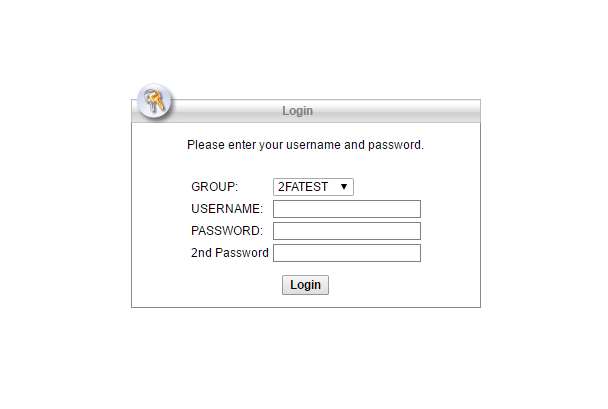
Woo-la! When connecting via the Cisco AnyConnect VPN Client, a second one-time password will also be requested.
I hope that this article will help someone, and that it will give someone some food for thought about how to use this free OTP server for other tasks. Share in the comments if you wish.
For these purposes, most companies use VPN technology, which has proved itself as a reliably secured way to provide access to the organization’s local resources.
My company was no exception, and we, like many others, use this technology. And, like many others, we use Cisco ASA 55xx as a remote access gateway.
')
As the number of remote users increases, there is a need to facilitate the issuance of credentials. But at the same time, it is necessary to do so without compromising security.
For ourselves, we found a solution in applying two-factor authentication for connecting via Cisco SSL VPN using one-time passwords. And this publication will tell you how to organize such a solution with minimal time costs and zero costs for the necessary software (with the proviso that you already have a Cisco ASA in your infrastructure).
The market is replete with boxed solutions for generating one-time passwords, while offering a lot of options to get them, whether sending a password via SMS or using tokens, both hardware and software (for example, on a mobile phone). But the desire to save and the desire to save money for my employer, in the current crisis, forced me to find a free way to implement a service to generate one-time passwords. Which, with its free, is not much inferior to commercial solutions (it should be noted here, noting that this product has a commercial version, but we agreed that the costs in money, we will be zero).
So, we will need:
- Linux image with built-in toolkit - multiOTP, FreeRADIUS and nginx, to access the server on the web (http://download.multiotp.net/ - I used a ready-made image for VMware)
- Active Directory server
- Actually Cisco ASA (I, for convenience, use ASDM)
- Any software token supporting TOTP mechanism (I, for example, use Google Authenticator, but the same FreeOTP will do)
I will not go into the details of the unfolding of the image. At the output, you will receive Debian Linux with multiOTP and FreeRADIUS already installed, configured to work in a bundle and a web interface for administering OTP.
Step 1. We initiate the system and configure it for our network.
By default, the system comes with root \ root credentials. I think everyone guessed that it would be nice to change the root user password after the first login. It is also necessary to change the network settings (the default is '192.168.1.44' with the gateway '192.168.1.1'). After you can restart the system.
In Active Directory, create a user otp , with the password MySuperPassword .
Step 2. Configure the connection and import Active Directory users
For this we need access to the console, and, directly, the multiotp.php file, using which we will configure the connection settings to Active Directory.
Go to the / usr / local / bin / multiotp / directory and execute the following commands in turn:
./multiotp.php -config default-request-prefix-pin=0 Determines if an additional (permanent) pin is required when entering a one-time pin (0 or 1)
./multiotp.php -config default-request-ldap-pwd=0 Determines whether a domain password is required when entering a one-time pin (0 or 1)
./multiotp.php -config ldap-server-type=1 Indicates the type of LDAP server (0 = normal LDAP server, in our case 1 = Active Directory)
./multiotp.php -config ldap-cn-identifier="sAMAccountName" Indicates the format in which to represent the user name (this value displays only the name, without domain)
./multiotp.php -config ldap-group-cn-identifier="sAMAccountName" Same for group only
./multiotp.php -config ldap-group-attribute="memberOf" Specifies the method for determining the user's group membership.
./multiotp.php -config ldap-ssl=1 Whether to use a secure connection to the LDAP server (of course - yes!)
./multiotp.php -config ldap-port=636 Port for connecting to the LDAP server
./multiotp.php -config ldap-domain-controllers=adSRV.domain.local Your Active Directory Server Address
./multiotp.php -config ldap-base-dn="CN=Users,DC=domain,DC=local" Specify where to start searching for users in the domain
./multiotp.php -config ldap-bind-dn="otp@domain.local" Specify a user who has rights to search in Active Directory
./multiotp.php -config ldap-server-password="MySuperPassword" Specify user password to connect to Active Directory
./multiotp.php -config ldap-network-timeout=10 We set the timeout for connecting to Active Directory
./multiotp.php -config ldap-time-limit=30 We set a time limit on the operation of importing users
./multiotp.php -config ldap-activated=1 We activate configuration of connection to Active Directory
./multiotp.php -debug -display-log -ldap-users-sync We import users from Active Directory
Step 3. Generate the QR code for the token
Everything is very simple here. Open the web interface of the OTP server in the browser, log in (do not forget to change the default password for the admin!), And click on the “Print” button:
The result of this action will be a page containing two QR codes. We boldly hammer on the first of them (in spite of the attractive Google Authenticator / Authenticator / 2 Steps Authenticator inscription), and again boldly scan the second code in the software token on the phone:
(yes, I intentionally tampered the QR code to make it unreadable).
After performing these actions in your application, every thirty seconds, a six-digit password will be generated.
To be sure, you can check in the same interface:
By typing the username and one-time password from the application on the phone. Got a positive response? So move on.
Step 4. We configure and test the work of FreeRADIUS
As I mentioned above - multiOTP is already configured to work with FreeRADIUS, it remains to carry out tests and enter information about our VPN gateway into the FreeRADIUS configuration file.
We return to the server console, to the / usr / local / bin / multiotp / directory , enter:
./multiotp.php -config debug=1 ./multiotp.php -config display-log=1 Including thereby more detailed logging.
In the FreeRADIUS client configuration file ( /etc/freeradius/clinets.conf ), we comment on all the lines related to localhost and add two entries:
client localhost { ipaddr = 127.0.0.1 secret = testing321 require_message_authenticator = no } - for the test
client 192.168.1.254/32 { shortname = CiscoASA secret = ConnectToRADIUSSecret } - for our VPN gateway.
Restart FreeRADIUS and try to log in:
radtest username 100110 localhost 1812 testing321 where username = username, 100110 = password given to us by the application on the phone, localhost = address of the RADIUS server, 1812 is the port of the RADIUS server, testing321 is the password of the client of the RADIUS server (which we specified in the config file).
The result of this command will be an output similar to the following:
Sending Access-Request of id 44 to 127.0.0.1 port 1812 User-Name = "username" User-Password = "100110" NAS-IP-Address = 127.0.1.1 NAS-Port = 1812 Message-Authenticator = 0x00000000000000000000000000000000 rad_recv: Access-Accept packet from host 127.0.0.1 port 1812, id=44, length=20 Now we need to make sure that the user is successfully authenticated. To do this, we look at the multiotp log itself:
tail /var/log/multiotp/multiotp.log And if the last entry there will be:
2016-09-01 08:58:17 notice username User OK: User username successfully logged in from 127.0.0.1 2016-09-01 08:58:17 debug Debug Debug: 0 OK: Token accepted from 127.0.0.1 Then everything went well, and we can do
Step 5: Configure the Cisco ASA
Let's agree that we already have a configured group and policies for access via SLL VPN, configured in conjunction with Active Directory, and we need to add two-factor authentication for this profile.
1. Add a new AAA server group:
2. Add our multiOTP server to the group:
3. Edit the connection profile by setting the Active Directory server group as the main authentication server:
4. On the Advanced tab -> Authentification, we also select the Active Directory server group:
5. On the Advanced tab -> Secondary authentification, select the created server group in which the multiOTP server is registered. Note that the session username is inherited from the primary AAA server group:
Apply settings and
Step 6, he's the last
Check if we have two-factor authentication for SLL VPN:
Woo-la! When connecting via the Cisco AnyConnect VPN Client, a second one-time password will also be requested.
I hope that this article will help someone, and that it will give someone some food for thought about how to use this free OTP server for other tasks. Share in the comments if you wish.
Source: https://habr.com/ru/post/308988/
All Articles