Meet p5.js
I have been a front end developer for over 5 years and always try to keep up with all the news. I remember that two years ago I became interested in JavaScript graphics. And then for a couple of months I started doing research about graphics in JavaScript, since I had a project on D3.js then. First, I started learning Canvas and SVG, which is part of HTML5, but I also need to write code in JS, for example, I had a project to customize an expensive watch on Canvas. The next project with graphics was with D3.js. It was quite simple, it was necessary to show graphs in D3.js on the basis of all the company's sales data. My latest gafi-based project will be on p5.js and I decided to find out everything about it, and in this publication I want to share my research about this p5.js.
P5.js was created by the Processing team in 2014. This is a javascript library with particular emphasis on visual art. The goal of P5.js coincides with the original purpose of Processing - it is to lower the threshold for entering programming for artists, designers, and teachers. With P5.js, you can easily create an infinitely large number of options for displaying information: from web format, static pictures for printing, to animated and interactive schemes.
Processing was created in 2001 with the goal of teaching non-programmers programming, but since then it has become the main language for tens of thousands of artists and designers. P5.js renders PDE files with Processing Source Code. When using this library, the programmer may not know JavaScript at all. Details on the differences between Processing and p5 can be found in this article .
Canvas is used for rendering, and p5.js supports working with sound and video. P5.js includes a set of objects, functions, constants with which you can create arbitrary forms. The whole range of p5.js features can be found in the directory on the official site .
P5 setup () is executed once the project is loaded, so this is the ideal place to initialize. You can connect the library from the server or CDN:
<script src="../p5.min.js"></script> <script src="//cdn.jsdelivr.net/p5.js/0.0.0/p5.min.js"></script> Let's create our first project on p5.js. Our goal is to create a drawing tool that transforms a simple image into an area of animated stars. To begin with, we define several global variables and write setup (). Each individual graphic work in p5.js is called a “sketch”, and each sketch consists of at least two functions — setup and draw.
You can upload files here.
var hintImage, skyImage, stars = []; function setup() {... } Inside our setup () function, we will create a canvas and hide the mouse cursor so that we can draw from ourselves. P5 adds an outline around the default form, in our case, we need to disable the lines.
createCanvas(800,500); noCursor(); noStroke(); 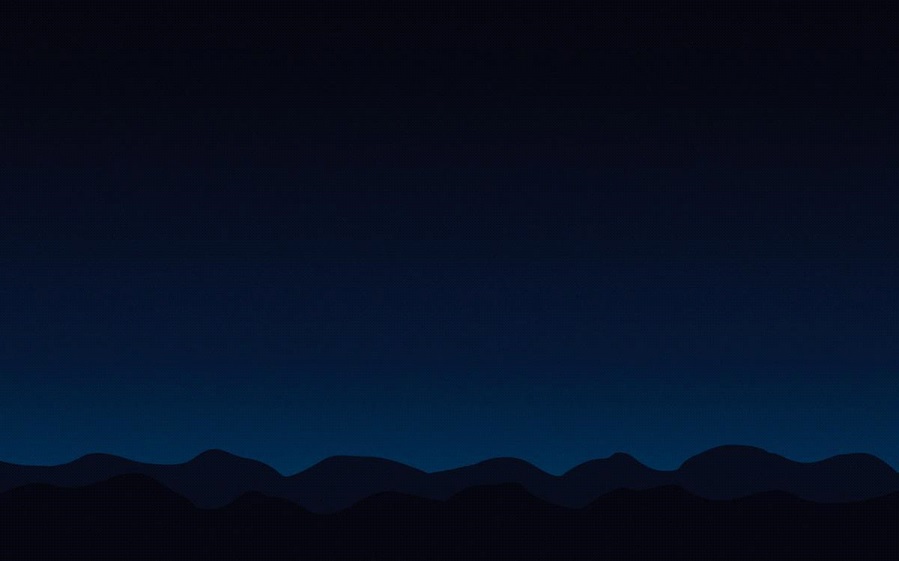
Next, we upload two images. One will serve as a background - in our case, the scene of the night sky. Another is the “hint” image. The idea is to put most of the stars on the black pixels of our hint image to recreate the background scene design. These images are fairly easy to create using the p5 drawing tools, but for brevity, we will use static images.
hintImage = loadImage("//bit.ly/hintImage"); skyImage = loadImage("//bit.ly/skyImage"); 
Another key function is draw (). It is called in a continuous loop, which is useful for animation.
function draw() {... } In the Draw function, our first task is to fill the canvas with a background image. P5 does not clear the canvas between draw () calls automatically, so we have to do it every frame, because in the end we get strange accumulation effects. To place the loaded image on the canvas, use the image () function and give it the x and y coordinates to determine the location.
image(skyImage, 0, 0); Next, we capture the current location of the mouse and save it as p5.Vector using createVector (). This object includes convenient functions for working with points in space, but we will mainly use it as a container.
var position = createVector(mouseX, mouseY); Using the newly saved mouse position, we can draw our cursor. We set the cursor color using fill (), passing in the RGB values and will use ellipse () to draw a circle at the mouse.
fill(255, 192, 0); ellipse(position.x, position.y, 8, 8); Using mouseIsPressed, we will make new stars be drawn while the mouse is being clamped. While gripping the mouse, we need to calculate a good place for the next star. We do this with a special function called findPixel (), which we will define later.
As soon as we have a signal, we will create a new copy of the Star object and press it to the end of our stellar array. And if the total number of stars exceeds 2000, we will begin to throw away the oldest of them.
if (mouseIsPressed) { var target = findPixel(); var star = new Star(position, target); stars.push(star); if (stars.length > 2000) stars.shift(); } At the end, we go through our array of stars and call update () and draw () on each of them. We will look at these methods later.
for (var i = 0; i < stars.length; i++) { stars[i].update(); stars[i].draw(); } Now setup () and draw () are in place, and we will work on auxiliary functions and objects. First, we will define a function that finds a place for each new star. All we have to do is check the random pixels in our image using get () to see if they are black or white.
In fact, we should only look at the value of red, since in both cases the RGB values match.
function findPixel() { var x, y; for (var i = 0; i < 15; i++) { x = floor(random(hintImage.width)); y = floor(random(hintImage.height)); if (red(hintImage.get(x,y)) < 255) break; } return createVector(x,y); } Now we need a reusable container that stores information about each star, and will also update and draw them. In JavaScript, there is no classic way to create classes in the traditional sense of the word, but we can get the same result by defining a function and setting it up for our own needs.
Each star has several properties (initial position, final location and diameter randomly generated), we define them in the “constructor function”, which is called for each new star created in our drawing cycle.
function Star(position, target) { this.position = position; this.target = target; this.diameter = random(1, 5); } Next, we will add an update () method for the Star function, which will use p5.Vector lerp () to calculate the new position between the current and target positions of the star. In this case, we move at 4% of the remaining distance at each iteration.
Star.prototype.update = function() { this.position = p5.Vector.lerp( this.position, this.target, 0.04 ); }; And finally, the draw () method, which draws a star on the canvas. Once again, we use fill () and ellipse (), although this time we call fill () with an alpha value for transparency.
To give stars a spark, the alpha value is determined using the noise () function. This returns the Perlin noise value for the specified coordinates, that is, you get a smooth, random number sequence. In the third parameter, we enter a value based on time; with it, the noise will be animated for some time.
Star.prototype.draw = function() { var alpha = noise( this.target.x, this.target.y, millis()/1000.0 ); fill(255, alpha * 255); ellipse( this.position.x, this.position.y, this.diameter, this.diameter ); }; This is what we ended up with:

')
With this, the work on our first sketch is finished.
Another good example of working with p5.js can be viewed in this video .
Reference material:
In conclusion, p5.js was a good discovery for me, and I hope that all my research helped me learn more about p5.js, and my first test project will be a good example for getting familiar with this JS framework.
Source: https://habr.com/ru/post/308986/
All Articles