UDL support
Have you ever wondered why you are writing code in Caché Object Script, and it is exported to an XML file?

So, it's time to change. Starting with the release of the Atelier development environment and the version of Caché 2016.2, you will have the opportunity to export and import files in the format in which you write in the studio, the so-called UDL (Universal Definition Language) format. Now you can write code that is not only fast, but also pleasing to the eye in the exported form. But another, equally important problem arises: if all new projects are in UDL format, then who will take care of backward compatibility?
At InterSystems, the issue of backward compatibility is taken very seriously, so we decided to give a new life to some old projects and add a new feature - working with UDL.
')
The first in line was a rather simple but very useful project called Cache Source Control. Its task is very simple - take all the project files and export them to a folder after each successful compilation, as well as import new files that appear in the folder. Before rebirth, this version control could export files in two formats:
Now it's enough to change the ExpMode parameter to the UDL format in order for it to work.
To install, just follow 4 simple steps:
And what if I want to export to another folder?
In principle, in conjunction with git, this project provides all the necessary functions.
The next project in the resurrection list was CacheUpdater. Its function can be perfectly understood by example. Suppose you have a GitHub repository and 100,500 servers that use it. It will be a nightmare if you want to change something (everywhere you have to use handles to update each server). This is exactly what CacheUpdater solves this problem - it periodically updates local files by downloading them from GitHub.
Its installation is a bit more complicated:
You are ready for battle, no additional settings are needed.
The same project is a fully implemented system for continuous integration with GitHub.
Done, to test the performance is enough. Then, it will be necessary to carry out the same manipulations with the creation of Task, as in CacheUpdater. Great, it works! And, probably, inadvertently in your head you had a question - “Why do I need CacheGitHubCI if I can use CacheUpdater?”.
So far we have only updated 3 repositories. There is something to strive for, in the list is Cache Tort Git , which represents a full-fledged work with git in conjunction with TortoiseGit .
So, it's time to change. Starting with the release of the Atelier development environment and the version of Caché 2016.2, you will have the opportunity to export and import files in the format in which you write in the studio, the so-called UDL (Universal Definition Language) format. Now you can write code that is not only fast, but also pleasing to the eye in the exported form. But another, equally important problem arises: if all new projects are in UDL format, then who will take care of backward compatibility?
let's start
At InterSystems, the issue of backward compatibility is taken very seriously, so we decided to give a new life to some old projects and add a new feature - working with UDL.
')
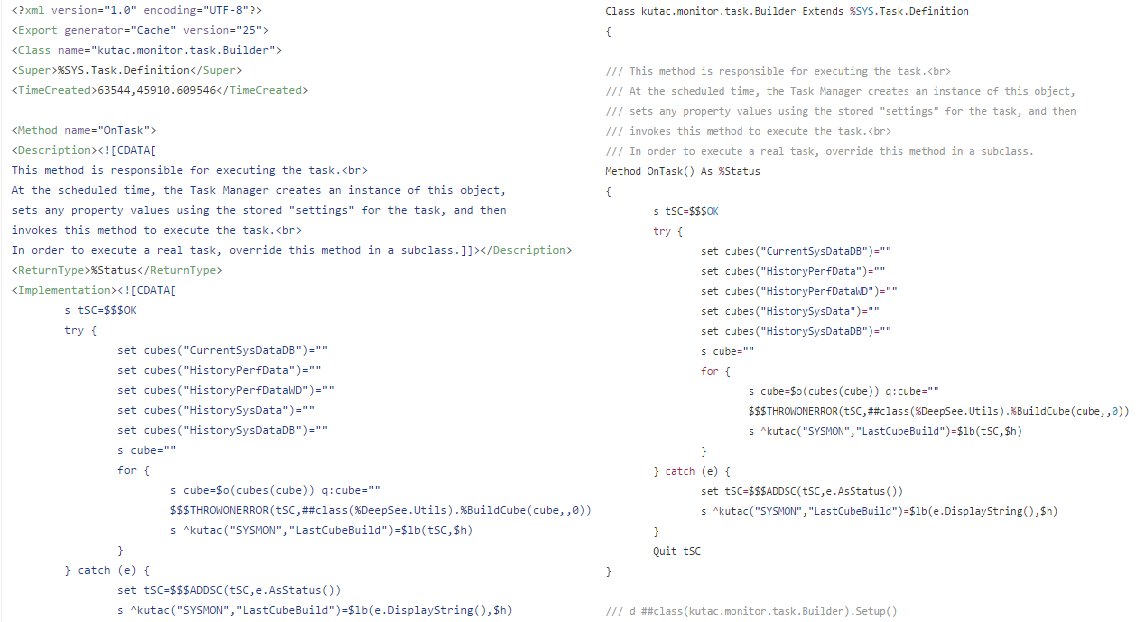
Comparison
As it is clear in the picture - COS exported to XML, on the right - UDL:
Caché Source Control
The first in line was a rather simple but very useful project called Cache Source Control. Its task is very simple - take all the project files and export them to a folder after each successful compilation, as well as import new files that appear in the folder. Before rebirth, this version control could export files in two formats:
- xml - all files had the extension .xml
- (cls, mac, int, dfi) .xml - all files had the extension .cls.xml, etc.
Now it's enough to change the ExpMode parameter to the UDL format in order for it to work.
Installation
To install, just follow 4 simple steps:
- Download or clone repository
- Import SourceControl.cls.xml file in Studio
- Open the portal, go to Configuration / Additional Settings / Source Control and select Util.SourceControl as the class of version control in your area
- Open a terminal, open your area and run
do ##class(Util.SourceControl).Init()
And what if I want to export to another folder?
Decision
There are several options for this. .. # ExpMode can have values 0, 1, 2 for export to .xml, .cls.xml and in UDL formats, respectively. Parameter .. # SourceFolder specifies where to save the files. .. # RefreshTime indicates how many seconds you need to check for new files in the folder to import them.
In principle, in conjunction with git, this project provides all the necessary functions.
Cacheupdater
The next project in the resurrection list was CacheUpdater. Its function can be perfectly understood by example. Suppose you have a GitHub repository and 100,500 servers that use it. It will be a nightmare if you want to change something (everywhere you have to use handles to update each server). This is exactly what CacheUpdater solves this problem - it periodically updates local files by downloading them from GitHub.
Installation
Its installation is a bit more complicated:
- Also download all files
- Import Task.cls.xml file into Studio
- Open System Operation / Task Manager / New Task
- Think up any name for the task, select the area in which you want to synchronize files, select GitHubUpdater as the type of task, enter the data of the repository and your account on GitHub
- Click Finish
- Select update frequency
You are ready for battle, no additional settings are needed.
CacheGitHubCI
The same project is a fully implemented system for continuous integration with GitHub.
Project Installation
- Just download the Install.cls.xml file (if you want, you can download all the files) and import it into the project
- Run in terminal ^
Set pVars("Namespace") = "{namespace}" Set pVars("IP") = "{IP}" Do ##class(CacheGitHubCI.Install).setup(.pVars)
where namespace is the area where you want to install the project. If not, it will be created automatically;
IP is an optional parameter of your server (used for webhook operation).
For example,Set pVars("Namespace") = "SAMPLES" Set pVars("IP") = "45.45.45.45:57776" Do ##class(CacheGitHubCI.Install).setup(.pVars)
Done, to test the performance is enough. Then, it will be necessary to carry out the same manipulations with the creation of Task, as in CacheUpdater. Great, it works! And, probably, inadvertently in your head you had a question - “Why do I need CacheGitHubCI if I can use CacheUpdater?”.
Answer
CacheGitHubCI allows you to specify what actions should be performed before and after compilation, to do unit tests. You can configure webhook'i, so that everything is updated, as soon as a new commit in the repository, and much more. How to set up all the buns of this system can be found in the repository itself.
Total
So far we have only updated 3 repositories. There is something to strive for, in the list is Cache Tort Git , which represents a full-fledged work with git in conjunction with TortoiseGit .
Source: https://habr.com/ru/post/308936/
All Articles