We connect ATOL KKM to AndroidStudio
Good afternoon, Habr.
Recently it became necessary to pick up the ATOL KKM, in a project being developed in Android Studio. The main difficulty is that the official manual describes how to connect only to Eclipse.

Search on the network prompted useful advice.
Create the jniLibs and libs folders along the path: app / src / main, as in the screenshot below:
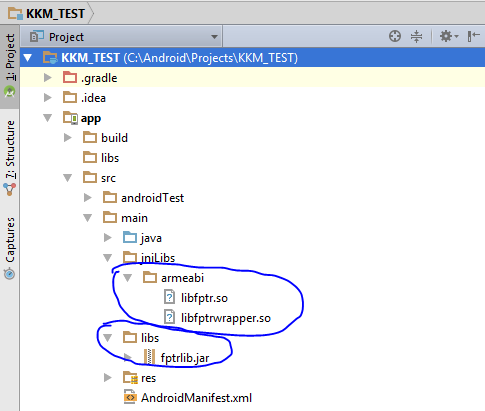
')
In jniLibs, create an armeabi folder, and place .so files in it. In libs, the jar file. Right-click on the jar file, and select "Add As Library".
Next, select File - New - Import Module, and find the folder with the project (FptrLibRes). Add it to the project. In app.gradle - add the text below (should be added automatically, but just in case):
Make changes to the main manifest:
Now we will create a test application that allows access to the standard settings page:
Next, we work on the official manual.
So let me leave. I hope someone will save time and nerves.
If someone has comments and prompts, with great pleasure I will listen to them.
UPD: Due to changes in legislation (FL-54), the connection procedure has changed. Read about it in the next article .
Recently it became necessary to pick up the ATOL KKM, in a project being developed in Android Studio. The main difficulty is that the official manual describes how to connect only to Eclipse.
Search on the network prompted useful advice.
Create the jniLibs and libs folders along the path: app / src / main, as in the screenshot below:
')
In jniLibs, create an armeabi folder, and place .so files in it. In libs, the jar file. Right-click on the jar file, and select "Add As Library".
Next, select File - New - Import Module, and find the folder with the project (FptrLibRes). Add it to the project. In app.gradle - add the text below (should be added automatically, but just in case):
gradle
dependencies { compile fileTree(dir: 'libs', include: ['*.jar']) testCompile 'junit:junit:4.12' compile 'com.android.support:appcompat-v7:23.4.0' compile files('src/main/libs/fptrlib.jar') compile project(':fptrLibRes') } Make changes to the main manifest:
AndroidManifest file
<?xml version="1.0" encoding="utf-8"?> <manifest xmlns:android="http://schemas.android.com/apk/res/android" package="ru.kkm"> <uses-permission android:name="android.permission.BLUETOOTH_ADMIN"/> <uses-permission android:name="android.permission.BLUETOOTH"/> <uses-permission android:name="android.permission.WRITE_EXTERNAL_STORAGE"/> <application android:allowBackup="true" android:icon="@mipmap/ic_launcher" android:label="@string/app_name" android:supportsRtl="true" android:theme="@style/AppTheme"> <activity android:name=".MainActivity"> <intent-filter> <action android:name="android.intent.action.MAIN" /> <category android:name="android.intent.category.LAUNCHER" /> </intent-filter> </activity> <activity android:name="com.atol.drivers.fptr.settings.SettingsActivity" android:label=" " android:windowSoftInputMode="adjustPan"> <intent-filter> <action android:name="android.intent.action.VIEW"/> </intent-filter> </activity> <activity android:name="com.atol.drivers.fptr.settings.DeviceListActivity" android:configChanges="orientation|keyboardHidden" android:label=" "/> </application> </manifest> Now we will create a test application that allows access to the standard settings page:
Test code
package ru.kkm; import android.content.Intent; import android.support.v7.app.AppCompatActivity; import android.os.Bundle; import android.view.View; import android.widget.Toast; import com.atol.drivers.fptr.IFptr; import com.atol.drivers.fptr.settings.SettingsActivity; public class MainActivity extends AppCompatActivity { IFptr fptr = null; @Override protected void onCreate(Bundle savedInstanceState) { super.onCreate(savedInstanceState); setContentView(R.layout.activity_main); try{ fptr = new IFptr(); fptr.create(this); } catch (NullPointerException ex){ fptr = null; } } public void onClick(View view){ switch (view.getId()){ case R.id.button: Intent intent = new Intent(this, SettingsActivity.class); intent.putExtra(SettingsActivity.DEVICE_SETTINGS, fptr.get_DeviceSettings()); startActivityForResult(intent, 1); break; } } @Override protected void onActivityResult(int requestCode, int resultCode, Intent data) { if(requestCode == 1){ if(data!=null && data.getExtras()!=null){ String settings = data.getExtras().getString(SettingsActivity.DEVICE_SETTINGS); Toast.makeText(this, settings, Toast.LENGTH_LONG).show(); } } } } Screen layout
<?xml version="1.0" encoding="utf-8"?> <RelativeLayout xmlns:android="http://schemas.android.com/apk/res/android" xmlns:tools="http://schemas.android.com/tools" android:layout_width="match_parent" android:layout_height="match_parent" android:paddingBottom="@dimen/activity_vertical_margin" android:paddingLeft="@dimen/activity_horizontal_margin" android:paddingRight="@dimen/activity_horizontal_margin" android:paddingTop="@dimen/activity_vertical_margin" tools:context="ru.cse.kkm_test.MainActivity"> <TextView android:layout_width="wrap_content" android:layout_height="wrap_content" android:text="Hello World!" android:id="@+id/textView" /> <Button android:layout_width="wrap_content" android:layout_height="wrap_content" android:text="New Button" android:id="@+id/button" android:onClick="onClick" android:layout_below="@+id/textView" android:layout_alignParentLeft="true" android:layout_alignParentStart="true" android:layout_marginTop="46dp" /> </RelativeLayout> Next, we work on the official manual.
So let me leave. I hope someone will save time and nerves.
If someone has comments and prompts, with great pleasure I will listen to them.
UPD: Due to changes in legislation (FL-54), the connection procedure has changed. Read about it in the next article .
Source: https://habr.com/ru/post/308900/
All Articles