We work with a hybrid cloud: VMware vCloud Connector, part 2
We work with a hybrid cloud: VMware vCloud Connector, part 1
We work with a hybrid cloud: replication and disaster recovery to a service provider cloud using Veeam Cloud Connect Replication
In the first part, we talked about how to deploy vCloud Connector - a tool for working with a hybrid cloud based on VMware. Today we will go through the main functionality of vCloud Connector. We show how to work with virtual machines located in different infrastructures (on, off, console access), move virtual machines between remote infrastructures and synchronize directories.

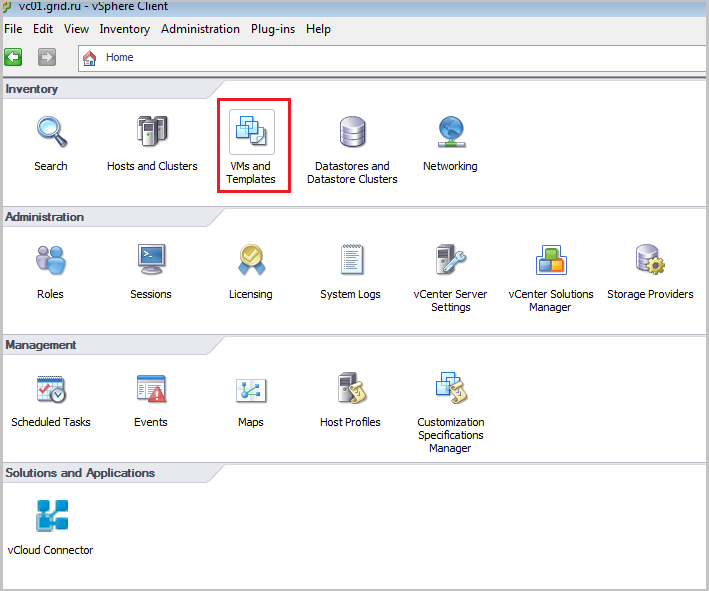
ON / OFF. Everything is simple here. Go to the interface vCloud Connector.
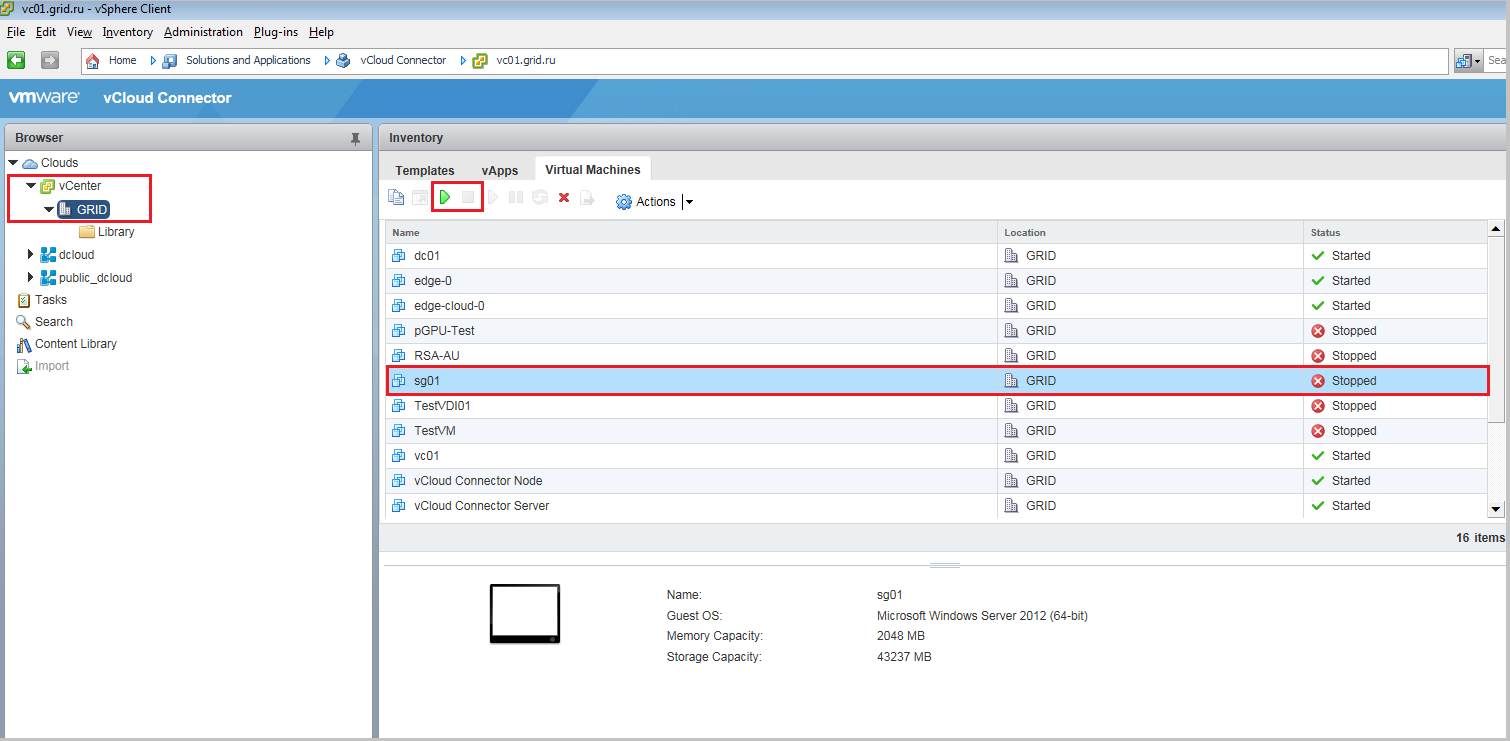
In the left menu, select the infrastructure. In the right pane, go to the Virtual Machines tab and select the desired virtual machine. We click on the Power On control panel if we want to turn on the machine, Power Off if we want to turn it off.
')
Console access. Before you begin, check whether the VMware Client Integration Plug-in plugin is installed . Open the console itself in Internet Explorer.
In Internet Explorer settings, add the vCloud Connector Server address to compatibility mode and a list of trusted sites.
Select a virtual machine in the list. Click on the thumbnail below.
To open the console in full screen, click on the keyboard combination Win + ↑.
To make the mouse active outside the console screen, press Ctrl + Alt.

Copying virtual machines. Copy the virtual machine from the vSphere infrastructure to the vCloud Director. For this, the virtual machine must be turned off.
Now let's do the opposite: copy vApp from vCloud Director to vSphere infrastructure. In this scenario, only vApp can be copied.
Copying will help if you need to duplicate a separate virtual machine in the remote infrastructure. If there is a whole directory of such machines or templates, then it’s more convenient to use the directory synchronization function. You designate a master directory, from where the changes will be automatically translated to the remote infrastructure directory.
Configure directory synchronization between vCloud Director and vSphere infrastructure. In this scenario, the directory in the vSphere infrastructure will be the main one.
Now we will try to synchronize our directory in vCloud Director with the directory in the vSphere-infrastructure.
You can do the opposite: configure the synchronization of the directory from the vSphere-infrastructure with the directory vCloud Director. To do this, you need to repeat all the same actions, only as the main directory we will have a directory from the vCloud Director.
That's all they wanted to talk about working with the vCloud Connector. In the next post we will talk about how to organize backup and replication to the cloud provider site using a hybrid cloud.
PS In the previous post, we wrote about the fact that vCloud Connector allows you to stretch VXLAN between two remote infrastructures. This feature is available if the vSphere Distributed Switch is installed no higher than version 5.1 in the vSphere infrastructure. Our vSphere is already in version 6.
We work with a hybrid cloud: VMware vCloud Connector, part 1
We work with a hybrid cloud: replication and disaster recovery to a service provider cloud using Veeam Cloud Connect Replication
In the first part, we talked about how to deploy vCloud Connector - a tool for working with a hybrid cloud based on VMware. Today we will go through the main functionality of vCloud Connector. We show how to work with virtual machines located in different infrastructures (on, off, console access), move virtual machines between remote infrastructures and synchronize directories.
Virtual Machine Operations
ON / OFF. Everything is simple here. Go to the interface vCloud Connector.
In the left menu, select the infrastructure. In the right pane, go to the Virtual Machines tab and select the desired virtual machine. We click on the Power On control panel if we want to turn on the machine, Power Off if we want to turn it off.
')
Console access. Before you begin, check whether the VMware Client Integration Plug-in plugin is installed . Open the console itself in Internet Explorer.
In Internet Explorer settings, add the vCloud Connector Server address to compatibility mode and a list of trusted sites.
Select a virtual machine in the list. Click on the thumbnail below.
To open the console in full screen, click on the keyboard combination Win + ↑.
To make the mouse active outside the console screen, press Ctrl + Alt.
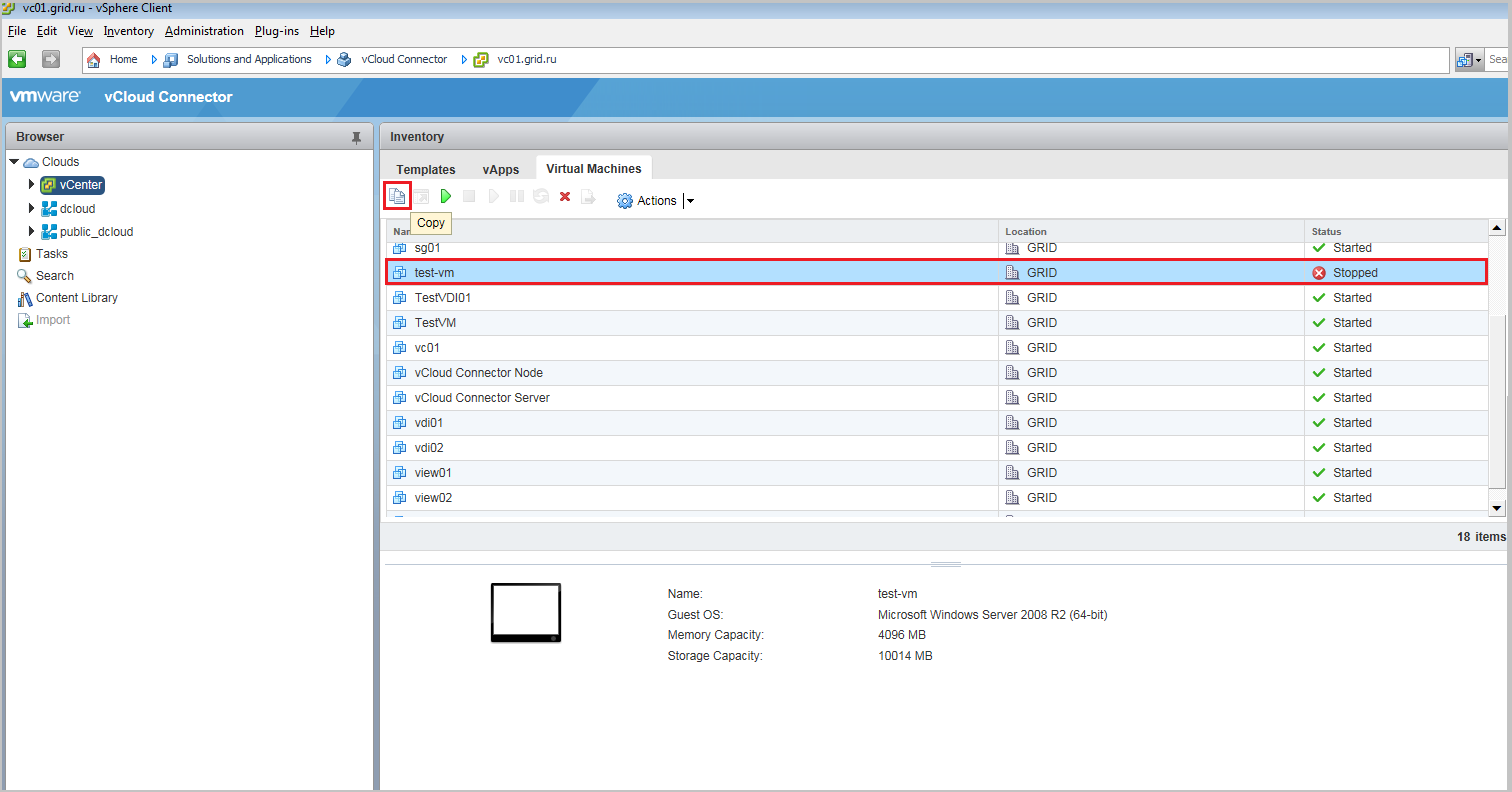
Copying virtual machines. Copy the virtual machine from the vSphere infrastructure to the vCloud Director. For this, the virtual machine must be turned off.
- Select the virtual machine and click on the Copy icon.
- Select the infrastructure to copy the machine. We set the name of the virtual machine and the description. Select the directory in which we copy our virtual machine. Click Next.
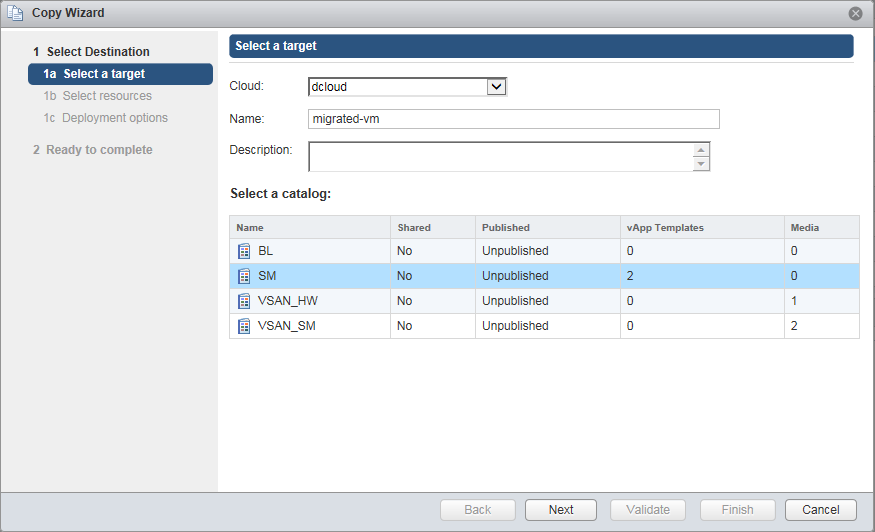
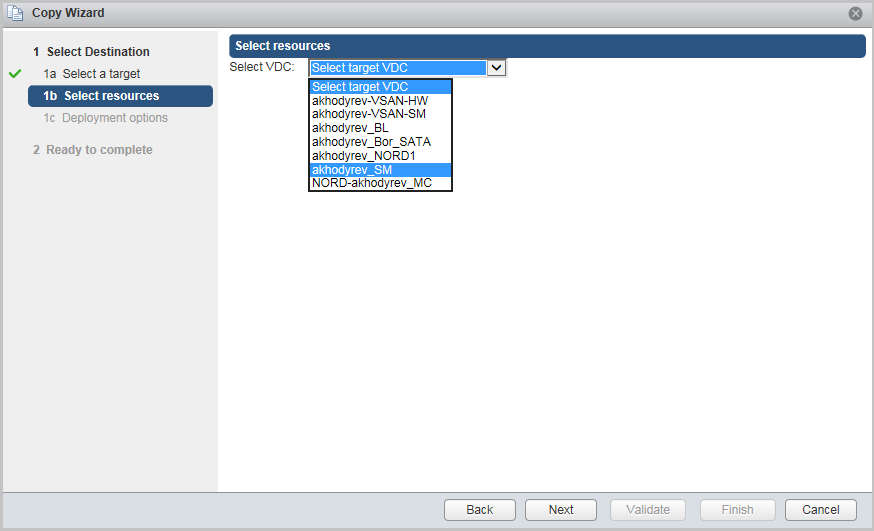
- Choose a virtual data center. Click Next.
- Check Deploy vApp if you want the virtual machine to be deployed immediately in vCloud Director immediately after copying.

- In this case:
- select the network to which the virtual machine will be connected;
- set customization settings;
- set an administrator password;
You can also make sure that after deployment the virtual machine is turned on (the Power on vApp after deployment checkbox), and the vApp itself is removed from the directory (Remove temporary vApp in destination vCloud catalog). Click Next.
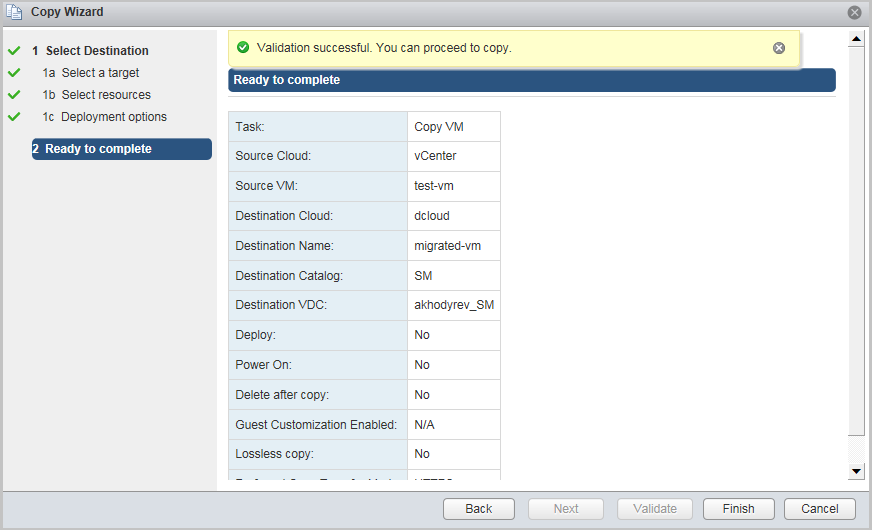
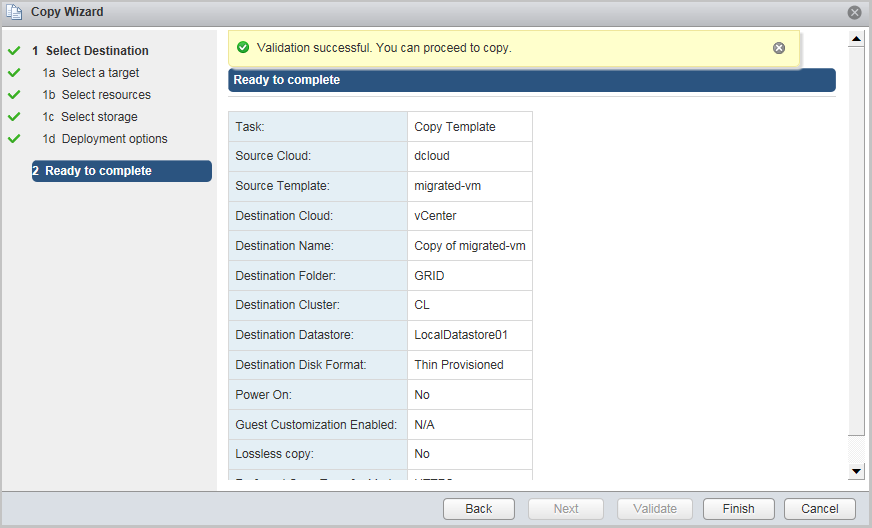
- Check all copy options and click Validate.

- After the successful validation process, click Finish.
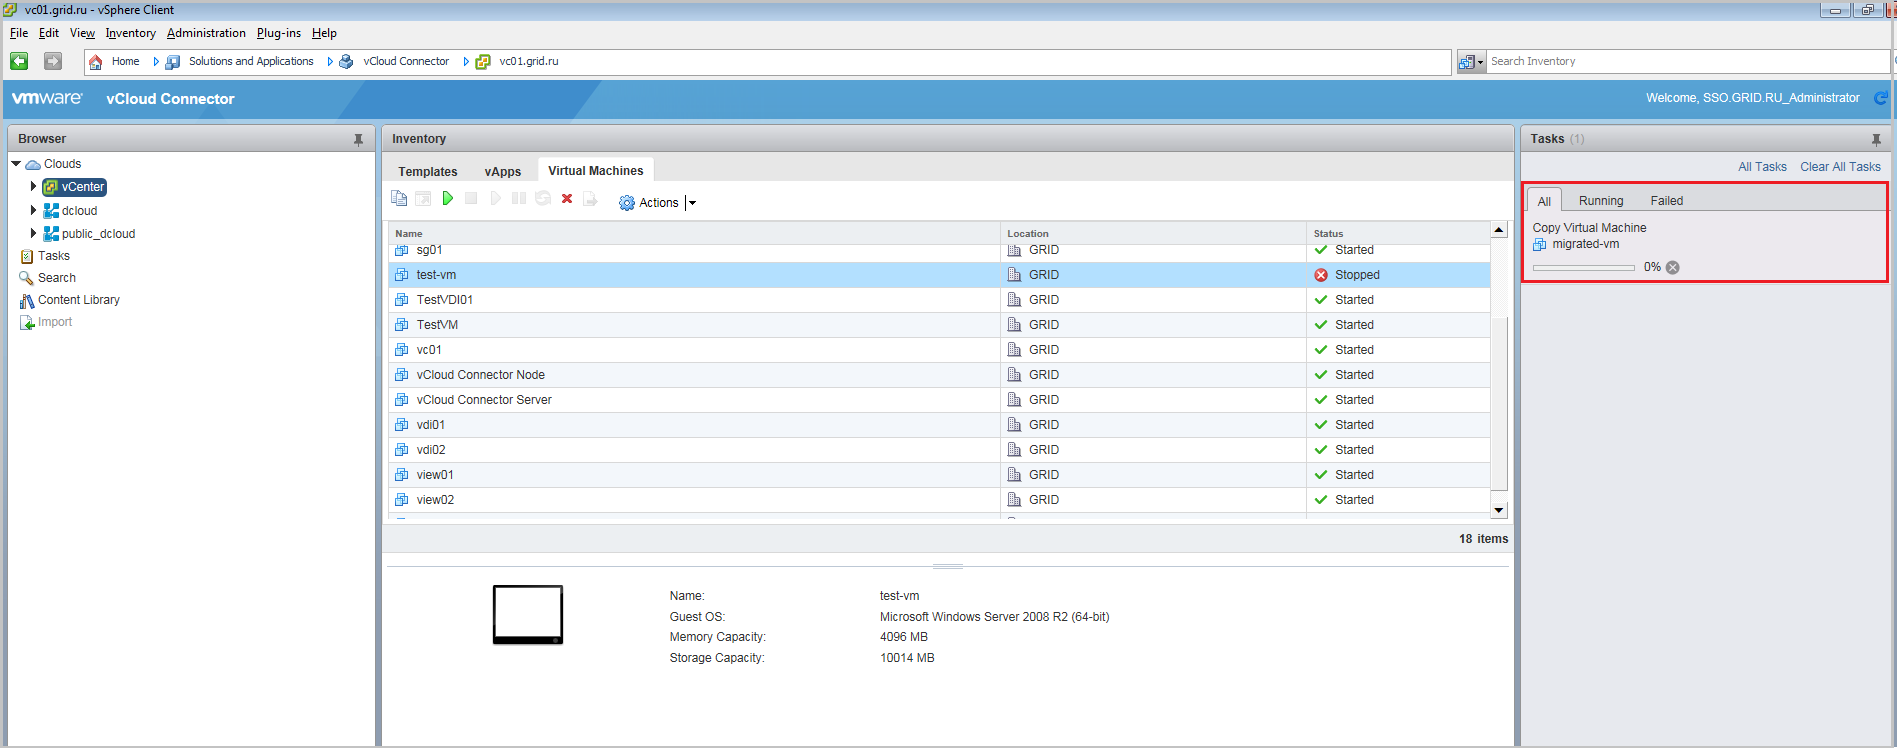
- The copy process begins.
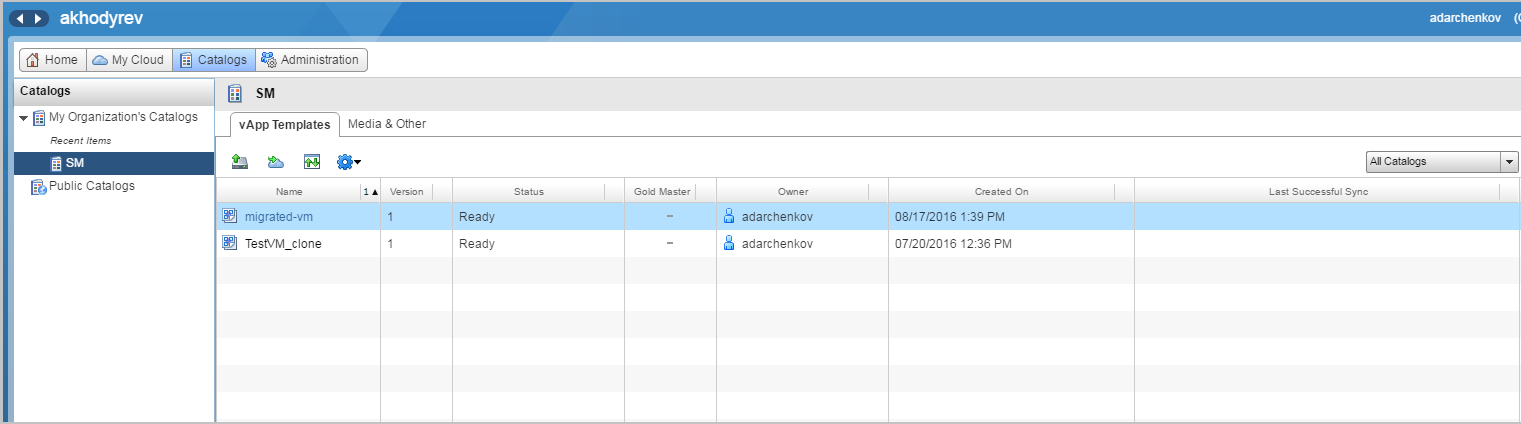
- After copying to vCloud, the virtual machine will be in its vApp in the vCloud Director directory.
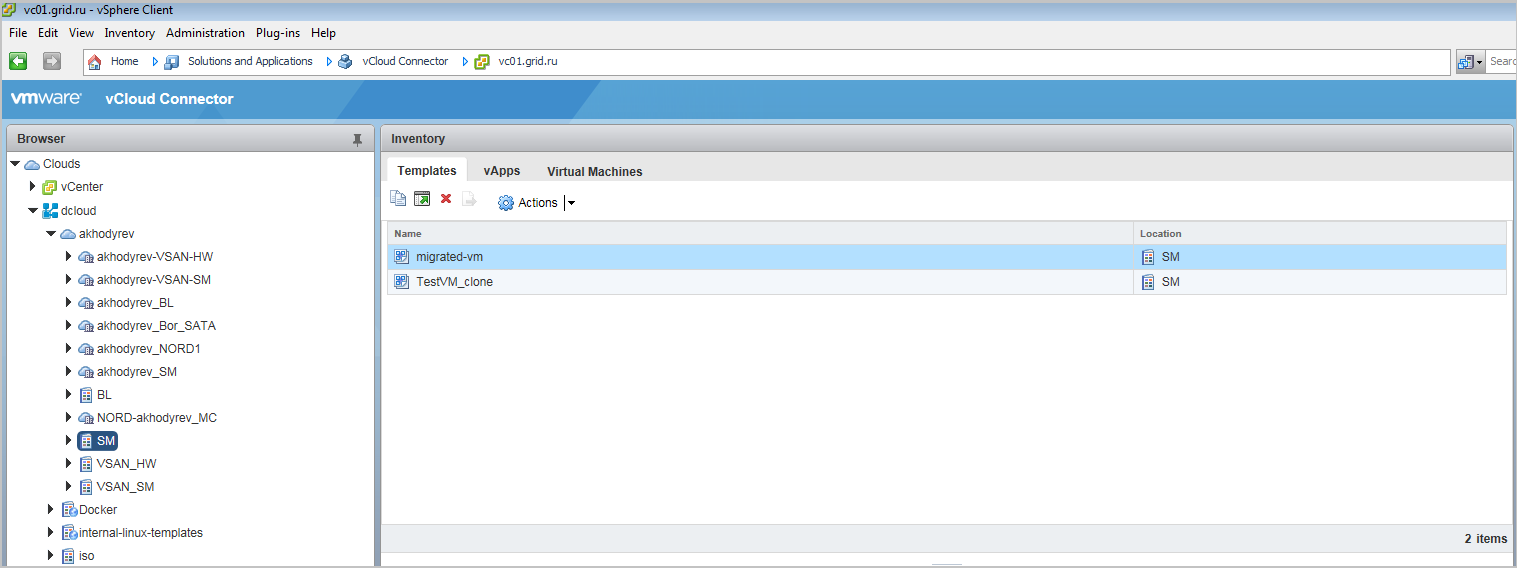
- If we look in the same directory through the vCloud Connector interface, we will also see our vApp.
Now let's do the opposite: copy vApp from vCloud Director to vSphere infrastructure. In this scenario, only vApp can be copied.
- In the vCloud Connector interface, select the vApp from the vCloud Director infrastructure and click on the Copy icon.
- We choose the infrastructure in which we will copy. Set the name. Click Next.

- Choose a cluster.
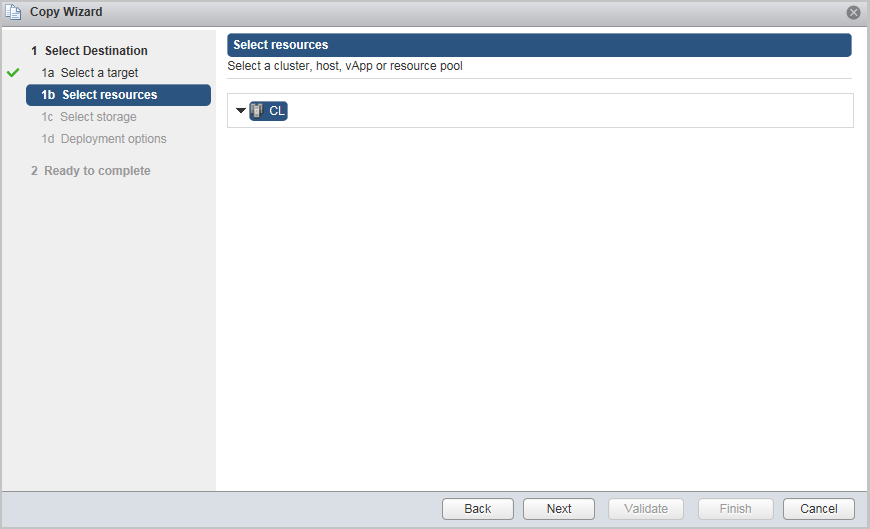
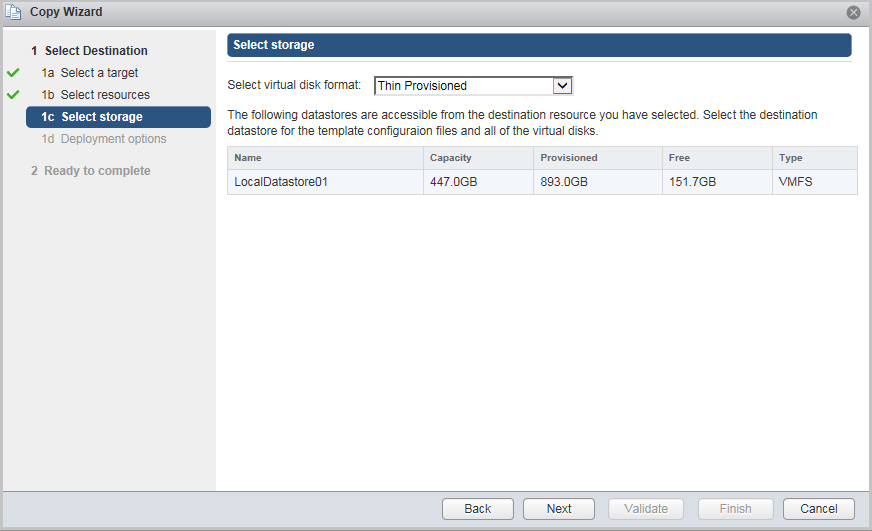
- Select the storage where the vApp will be deployed. Click Next
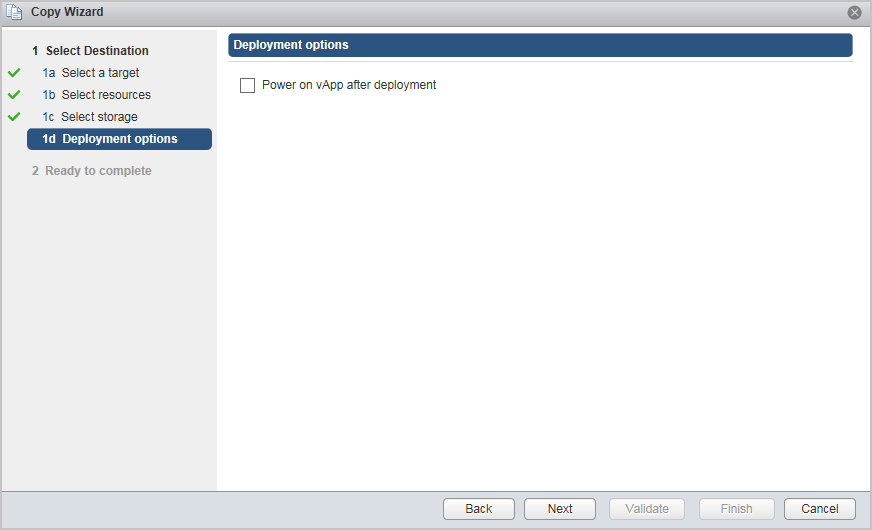
- Here you can also configure the vApp to automatically turn on after the copy is completed. Click Next.
- Check all copy options and click Validate.
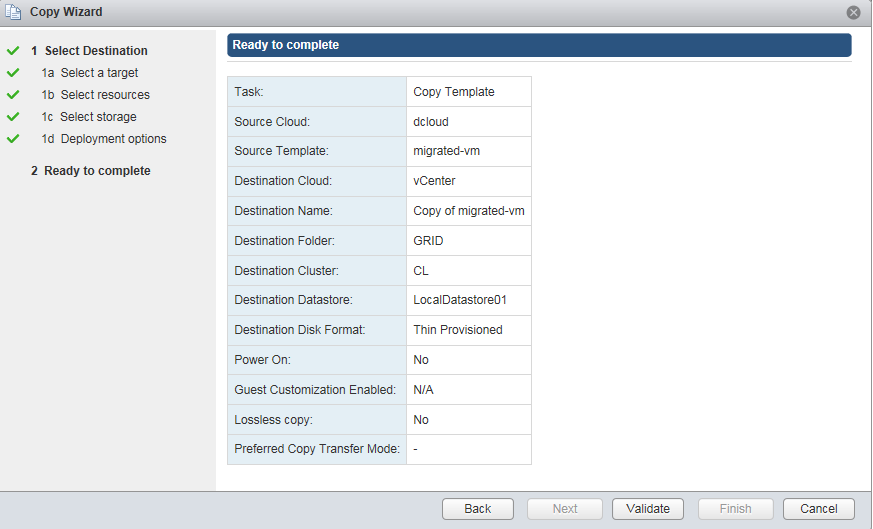
- After validation, click Finish.
Directory synchronization
Copying will help if you need to duplicate a separate virtual machine in the remote infrastructure. If there is a whole directory of such machines or templates, then it’s more convenient to use the directory synchronization function. You designate a master directory, from where the changes will be automatically translated to the remote infrastructure directory.
Configure directory synchronization between vCloud Director and vSphere infrastructure. In this scenario, the directory in the vSphere infrastructure will be the main one.
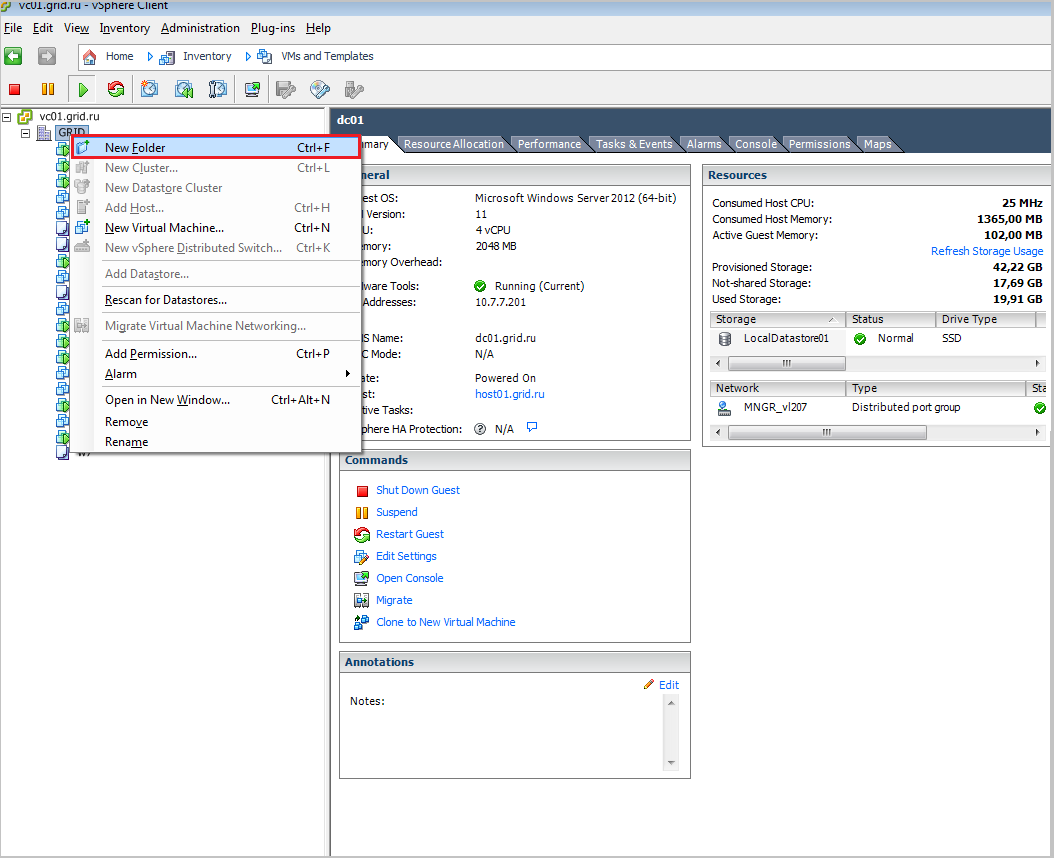
- On the vSphere-infrastructure side, we create a folder, the contents of which will be synchronized with the directory in the vCloud Director infrastructure. Name the folder Library.
- In the created Library folder, we add the virtual machine templates that we want to duplicate in the vCloud Director directory. We put the test-vm virtual machine template there.

- Go to the interface vCloud Connector. Click Reload to display the created Library folder.

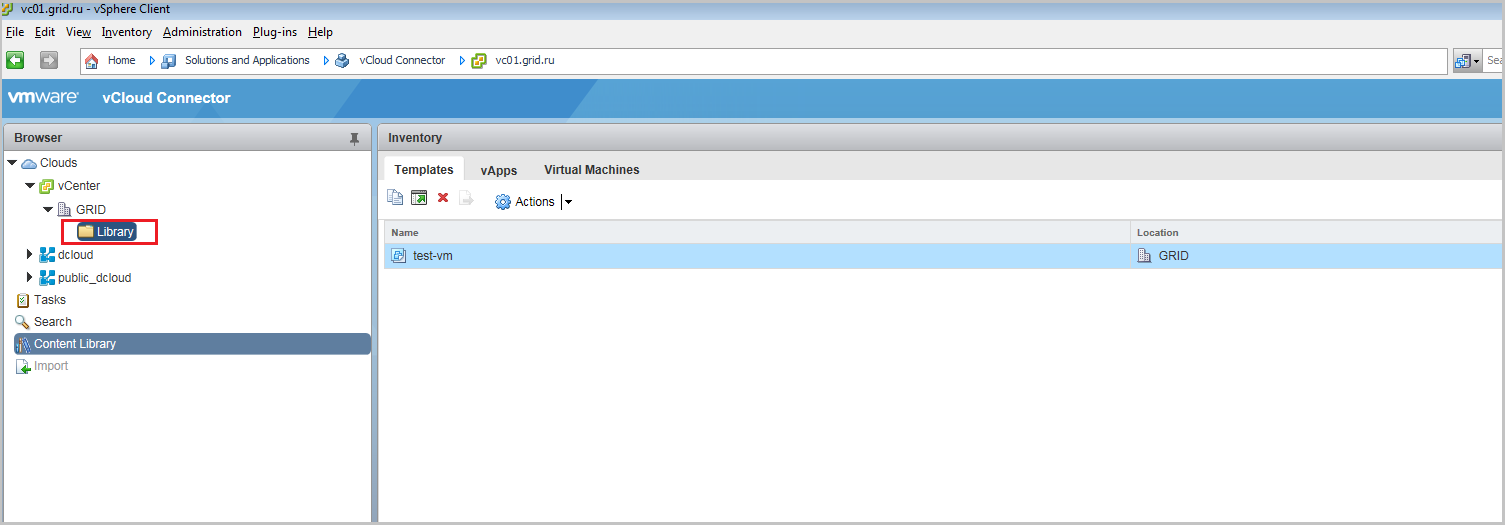
- In the left menu we find the Library folder.
- Click on it with the right mouse button. Select the option Publish to Content Library.
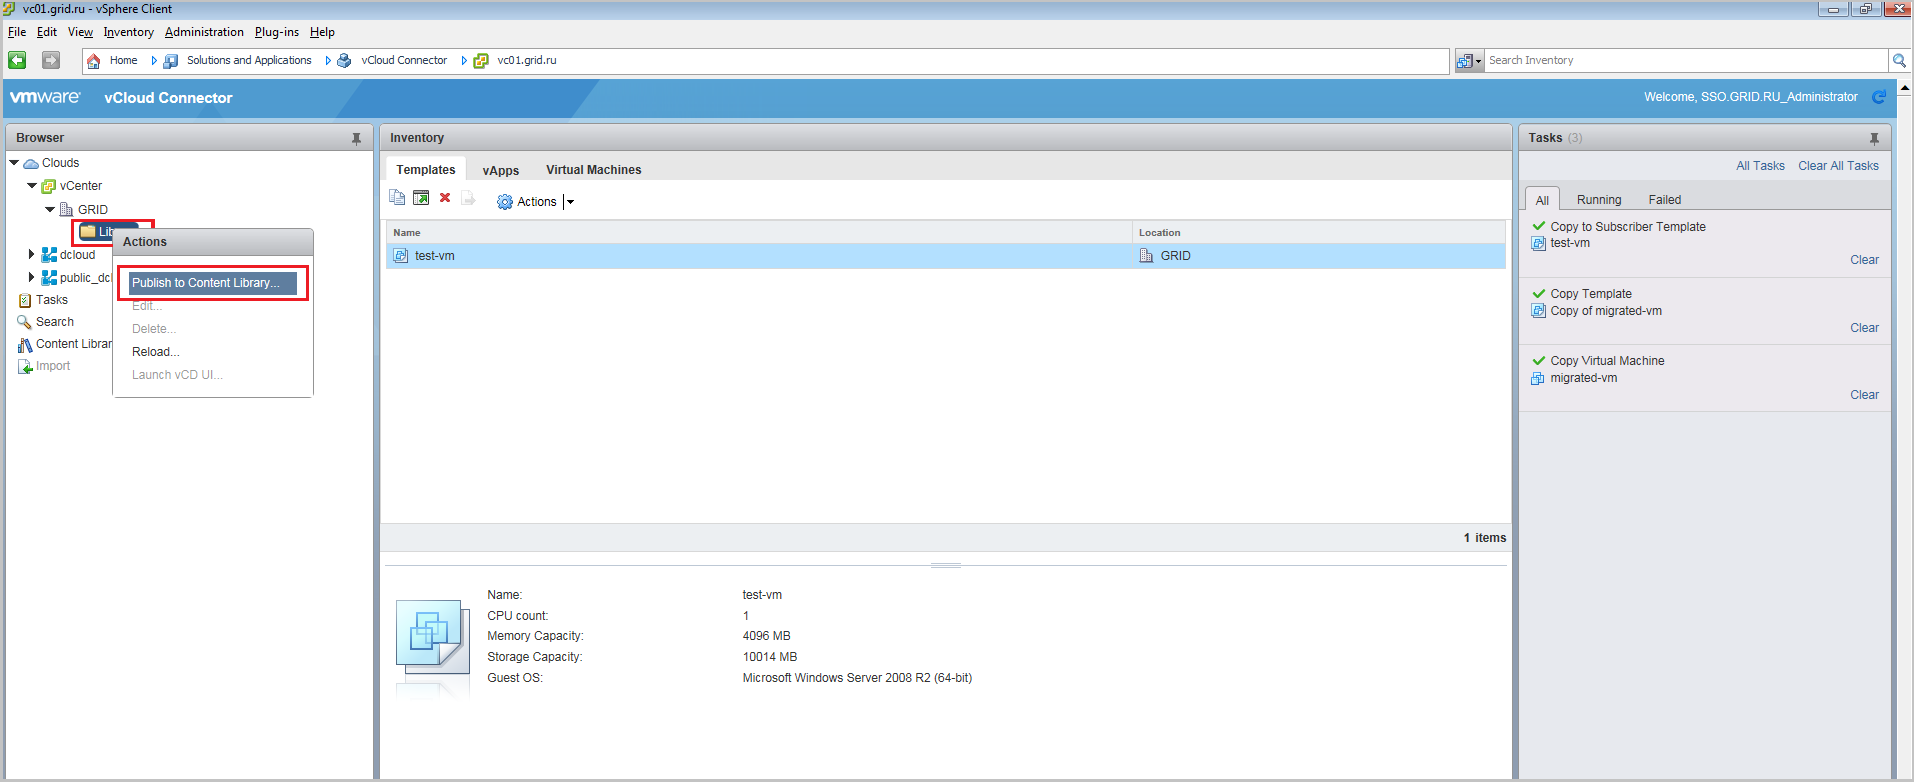
- We confirm the action.

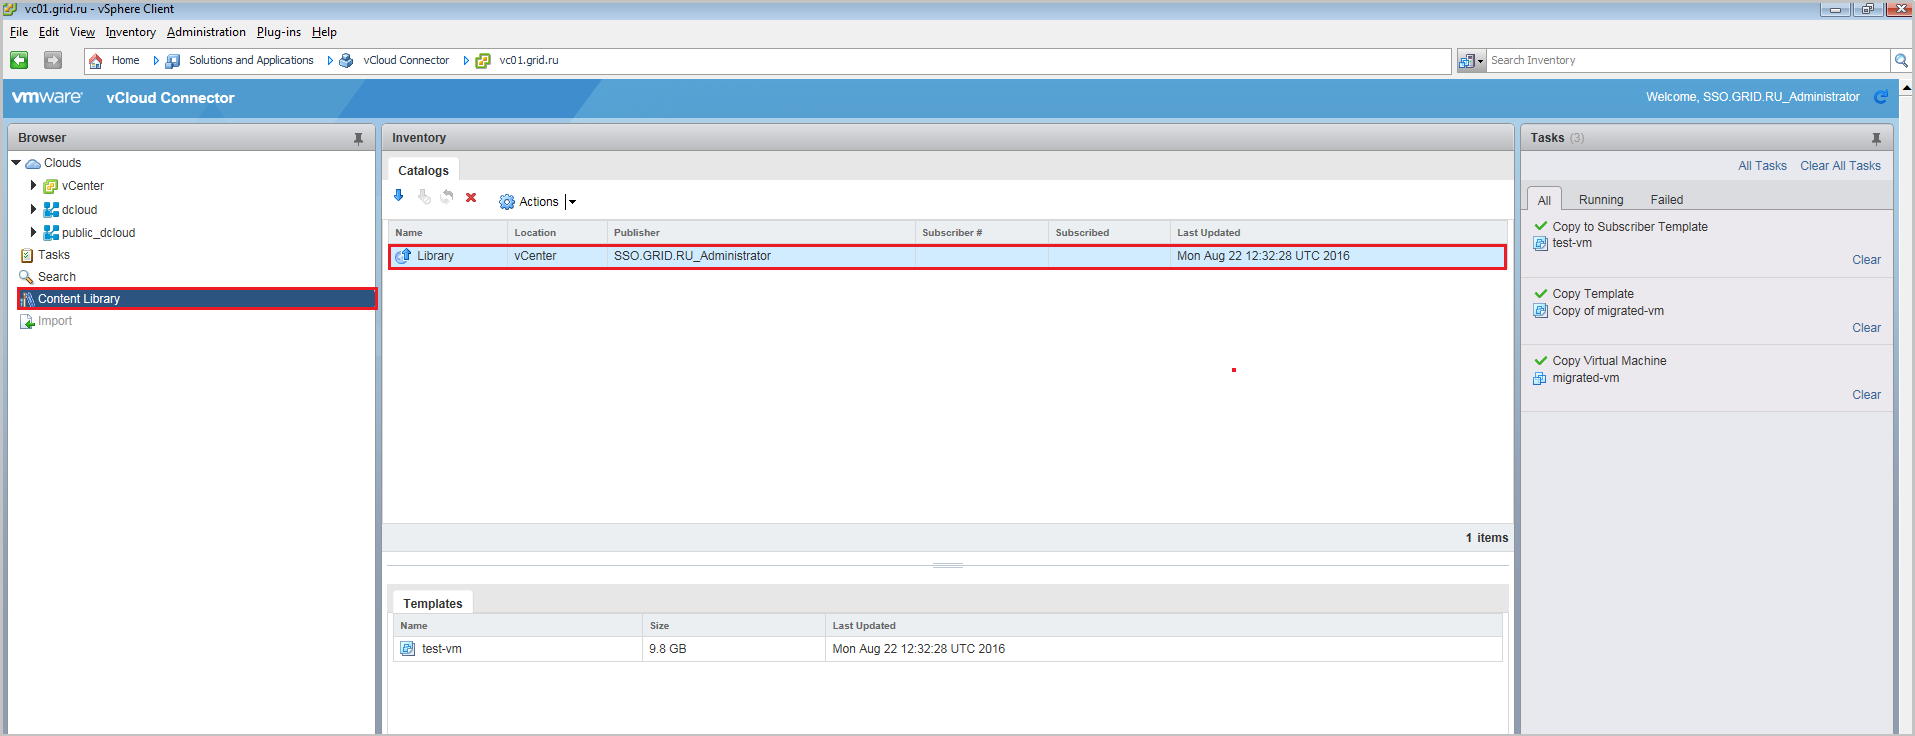
- The Library folder appears in the Content Library section.
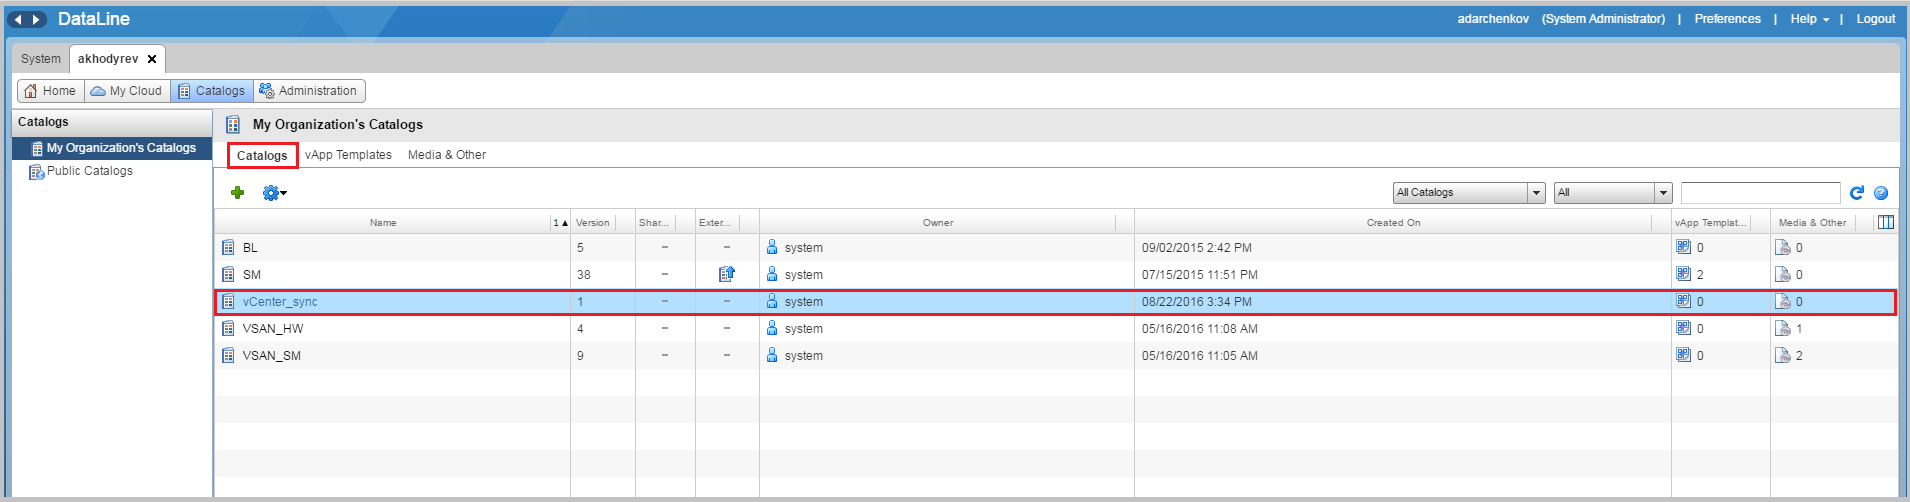
- Now we will create a new directory on the vCloud Director side. Let's call it vCenter_sync. This directory will be synchronized with the Library folder. Instructions for creating directories in vCloud Director can be found here . It is important: if you select an existing directory, its contents will be destroyed during the first synchronization.
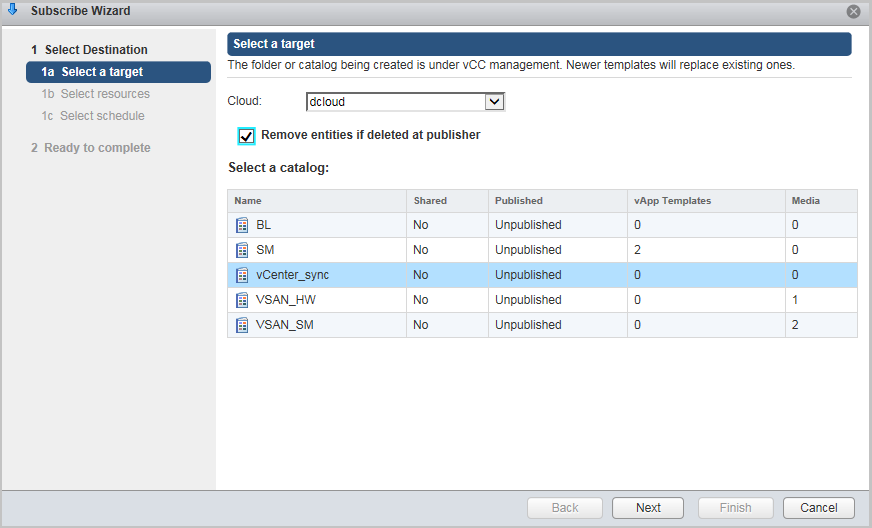
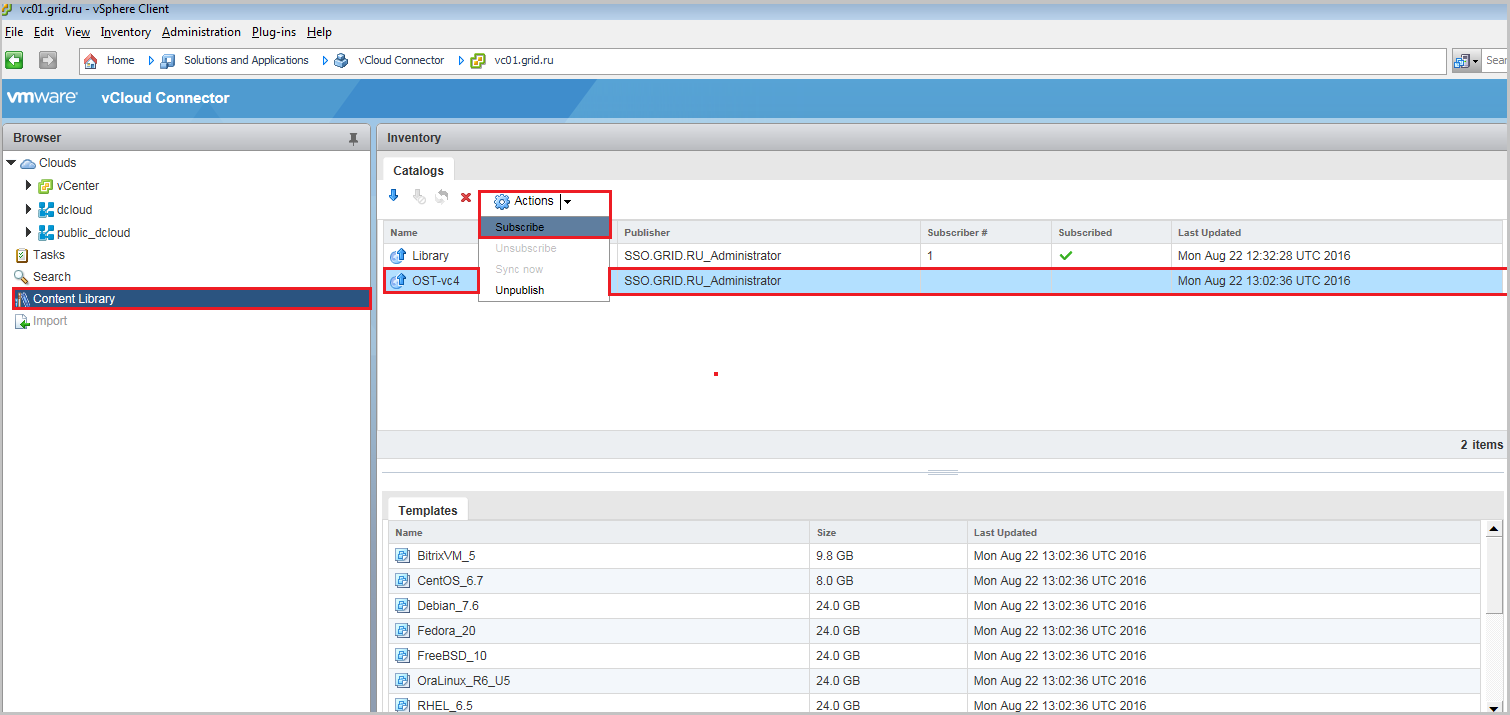
- We return to the vCloud Connector interface. Go to the Content Library. Select the Library directory on the side of the vSphere infrastructure and click on Subscribe.

- In the window that appears, select the infrastructure and directory that will be synchronized with the Library directory. Activate if you want to delete the files in the Library directory and delete the file in the vCenter_sync directory. Click Next .
- Choose a virtual data center. Click Next .

- We select the synchronization schedule.
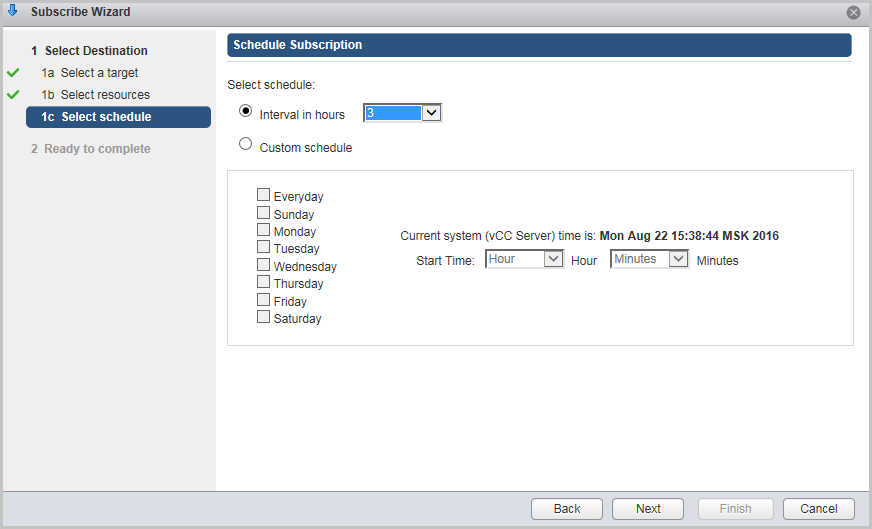
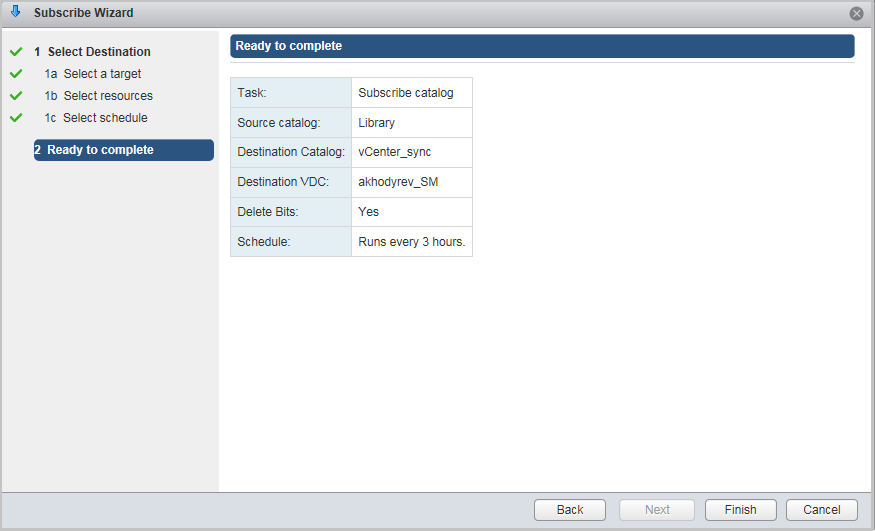
- Check all sync options and click Finish .
Now we will try to synchronize our directory in vCloud Director with the directory in the vSphere-infrastructure.
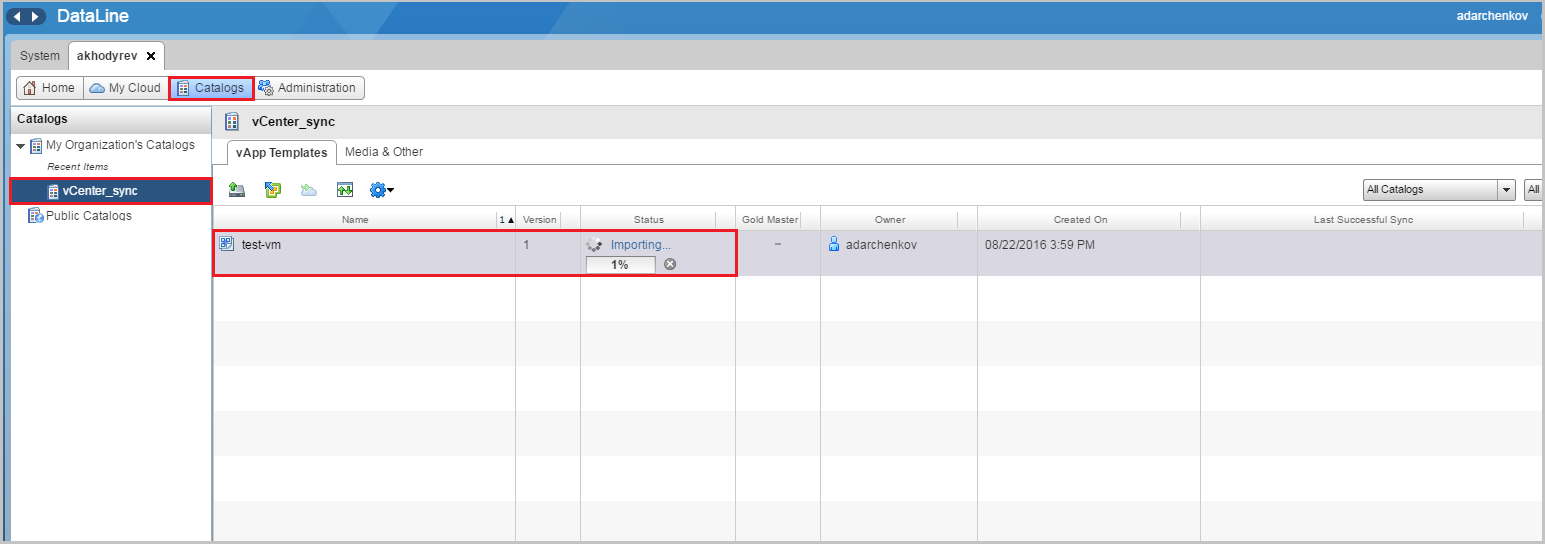
- Go to the Content Library. Select the directory on the side of the vSphere-infrastructure (Library) and click on Sync Now. We used manual synchronization to not wait for the specified three hours in the schedule.

- We confirm synchronization. Click Sync Now.

- The virtual machine template test-vm from the Library folder will begin to be imported into the vCenter-sync directory on the vCloud Director side.
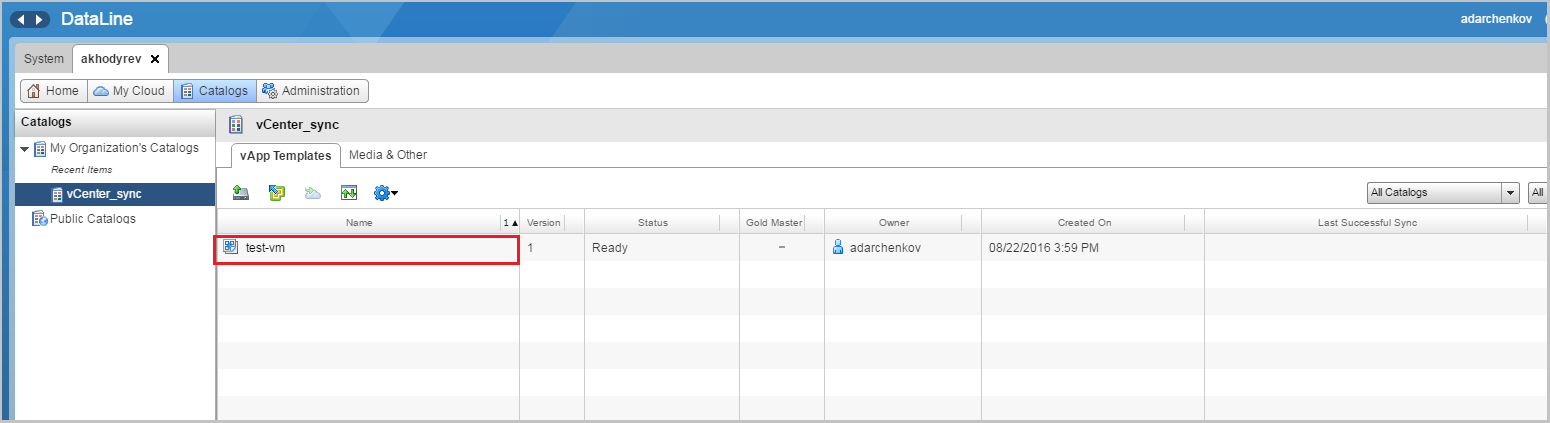
- After successful synchronization, the test-vm virtual machine will appear in the vCenter-sync directory on the vCloud Director side.
You can do the opposite: configure the synchronization of the directory from the vSphere-infrastructure with the directory vCloud Director. To do this, you need to repeat all the same actions, only as the main directory we will have a directory from the vCloud Director.
- In the vCloud Connector interface, we find the required directory in the vCloud Director infrastructure in the left menu. Click on the directory with the right mouse button and select the Publish to Content Library option.

- Create a new directory on the side of the vSphere-infrastructure (see above).
- We sign the vCloud Director directory on the directory from the vSphere-infrastructure. To do this, select the directory and click on Subscribe.
- Next, set the sync settings, as we did before.
That's all they wanted to talk about working with the vCloud Connector. In the next post we will talk about how to organize backup and replication to the cloud provider site using a hybrid cloud.
PS In the previous post, we wrote about the fact that vCloud Connector allows you to stretch VXLAN between two remote infrastructures. This feature is available if the vSphere Distributed Switch is installed no higher than version 5.1 in the vSphere infrastructure. Our vSphere is already in version 6.
We work with a hybrid cloud: VMware vCloud Connector, part 1
Source: https://habr.com/ru/post/308418/
All Articles