Docker: flexible network without NAT for all occasions

Time does not stand on the spot, and the beloved Docker from all versions has a new functionality from version to version. It happens that when you read Changelog for a new version, you see there something that can come in handy and make some things better than there are at the moment.
So it was in my case. I want to note that many of the tasks that have to be done, I do according to the principle of keep it simple. That is almost always, if you can use simple tools and steps to solve the problem, I will choose this way. I understand that a simple or complex step or tool is a subjective assessment, but because we work in a team, then such criteria may be appropriate when choosing tools:
')
- Is the tool used in infrastructure?
- If something new is required, then is it possible to use what is already there?
- How much service maintenance (update, restart) will differ from other services?
- <...>
This article will focus on the network aspect of Docker. I'll tell you about everything in order, but I want to note that this time I will not say "we use the host network, avoiding the use of NAT in every way".
How Docker works with the network can be found here . Highlight the main points:
- default bridge network;
- host network;
- user defined network.
As I said earlier in some of my public speaking, we need maximum network performance for our containers. If we talk about production, we do not use NAT for containers.
For a long time (yes, why hide it - to this day), we use the --net = host parameter to launch containers, thereby obtaining a “native” eth inside the container. Yes, in this case, one benefit - isolation - we, of course, lose ... But looking at the pros and cons in our particular case, we intentionally came to this decision, because there were no tasks to isolate the network between running applications within the same host. I want to remind you that I am writing about a specific Docker application site - in Badoo.
What we know about our services:
- we have a map where services are hosted on servers;
- we have a map of ports for each service and its type (or types, if there are many);
- we have an agreement that the ports should be unique.
Based on the foregoing, we guarantee the following:
- if we run several services on the same machine with --net = host , then we will not get the intersection of the ports: everything will start and will work;
- if one of the eth-interfaces becomes not enough for us, then we will physically connect one more and by means of, for example, DNS, spread the load between them.
Everything is good, then why did I have to change something?
It was evening, there was nothing to do ... Earlier it was said that we continue to transfer our services to containers. If you follow this scenario, as is usually the case, the most difficult ones remain for later. The reasons for this can be mass:
- service is critical;
- lack of sufficient experience to offer the most transparent and quick service transfer to the container;
- You can "add something else to your taste."
So. There was (and is) we have one such service, which has long been written. It still works fine to this day, but it has several drawbacks:
- it works on the same core (yes, it happens);
- filling the first space, it is worth noting that you can start several service instances and use taskset / - cpuset-cpus ;
- the service “heavily” uses the network, and it also requires a large number of ports for outgoing connections.
This is how the service started before:
- on the machine where the service was planned to raise, it was necessary to add an additional IP address (or even several) - ip a add (here you can immediately point out the many disadvantages of this approach that we know about);
- it is worth remembering the above, in order not to get, for example, 2 identical addresses on different machines;
- in the configuration of the daemon, it was worth pointing out at what address it works, just in order not to “eat” all the ports of a neighbor or host system.
How could solve the problem, if it was too lazy to invent new methods:
- leave everything as it is, but wrap in a container;
- bring up all the same additional IP addresses on dockerhost;
- Bind the application to a specific address.
How did I decide to approach the task? Initially, of course, it all looked like an experiment, but why hide it - it was an experiment. It seemed to me that the MACVLAN technology, which at that time was noted in Docker as Experimental (version 1.11.2), is suitable for this service, but in version 1.12 everything is already available in the main functionality.
MACVLAN is essentially a Linux switch, which is based on static matching of MAC and VLAN. It uses unicast filtering, not promiscuous mode. MACVLAN can work in private mode, VEPA, bridge, passthru. MACVLAN is a reverse VLAN in Linux. This technology allows you to take one real interface and make on its basis several virtual ones with different MAC addresses.
Also, the IPVLAN technology ( https://www.kernel.org/doc/Documentation/networking/ipvlan.txt ) has recently appeared. The main difference from MACVLAN is that IPVLAN can work in L3 mode. In this article I will consider the use of MACVLAN (in bridge mode), because:
- there is no restriction in 1 MAC address from one link on the active network equipment;
- the number of containers on the host will not be so large that it can lead to mac capacity exceeding. Over time, this moment in our country can, of course, change;
- L3 is not needed at this stage.
A little more about MACVLAN vs IPVLAN can be found at http://hicu.be/macvlan-vs-ipvlan .
Here you can read the theory and how it works in Docker: https://github.com/docker/docker/blob/master/experimental/vlan-networks.md .
The theory is great, but even there we see that overhead is the place to be. You can and should look at the comparative tests of the MACVLAN bandwidth on the Internet (for example, http://comp.photo777.org/docker-network-performance/ and http://delaat.net/rp/2014-2015/p92/report. pdf ), but also an integral part of the experiment is to conduct the test in their laboratory conditions. To believe a word is good, but “to touch it” and draw conclusions yourself is interesting and necessary.
So let's go!
In order to check if MACVLAN is working in Docker, we need to include support for experimental features in the latter.
If this functionality is not included in the build, then you will see the following error messages in the logs:
# docker network create -d macvlan --subnet=1.1.1.0/24 --gateway=1.1.1.1 -o parent=eth0 cppbig_vlan Error response from daemon: plugin not found And in the process logs will be the following:
docker[2012]: time="2016-08-04T11:44:44.095241242Z" level=warning msg="Unable to locate plugin: macvlan, retrying in 1s" docker[2012]: time="2016-08-04T11:44:45.095489283Z" level=warning msg="Unable to locate plugin: macvlan, retrying in 2s" docker[2012]: time="2016-08-04T11:44:47.095750785Z" level=warning msg="Unable to locate plugin: macvlan, retrying in 4s" docker[2012]: time="2016-08-04T11:44:51.095970433Z" level=warning msg="Unable to locate plugin: macvlan, retrying in 8s" docker[2012]: time="2016-08-04T11:44:59.096197565Z" level=error msg="Handler for POST /v1.23/networks/create returned error: plugin not found" If you see such messages, then Docker’s MACVLAN support is not enabled.
The test was symbolic, using iperf . For each option, I started first 1 client, then 8 in parallel. There were 2 options:
- --net = host ;
- --net = macvlan .
Look at the test details
We start the server:
We start the client:
On the server we get the result:
On the client:
We are launching 8 clients in parallel:
On the server we get the result:
On the client:
2. Start the server using MACVLAN:
We start the client:
On the server we get the result:
On the client:
We are launching 8 clients in parallel:
On the server we get the result:
On the client:
# docker run -it --net=host --name=iperf_w_host_net --entrypoint=/bin/bash dockerio.badoo.com/itops/sle_12_base:latest # iperf3 -s -p 12345 ----------------------------------------------------------- Server listening on 12345 ----------------------------------------------------------- We start the client:
# iperf3 -c 1.1.1.2 -p 12345 -t 30 On the server we get the result:
- - - - - - - - - - - - - - - - - - - - - - - - -
[ ID] Interval Transfer Bandwidth
[ 5] 0.00-30.04 sec 0.00 Bytes 0.00 bits/sec sender
[ 5] 0.00-30.04 sec 2.45 GBytes 702 Mbits/sec receiver
On the client:
- - - - - - - - - - - - - - - - - - - - - - - - -
[ ID] Interval Transfer Bandwidth Retr
[ 4] 0.00-30.00 sec 2.46 GBytes 703 Mbits/sec 0 sender
[ 4] 0.00-30.00 sec 2.45 GBytes 703 Mbits/sec receiver
We are launching 8 clients in parallel:
# iperf3 -c 1.1.1.2 -p 12345 -t 30 -P 8 On the server we get the result:
- - - - - - - - - - - - - - - - - - - - - - - - -
[ ID] Interval Transfer Bandwidth
[ 5] 0.00-30.03 sec 0.00 Bytes 0.00 bits/sec sender
[ 5] 0.00-30.03 sec 314 MBytes 87.7 Mbits/sec receiver
[ 7] 0.00-30.03 sec 0.00 Bytes 0.00 bits/sec sender
[ 7] 0.00-30.03 sec 328 MBytes 91.5 Mbits/sec receiver
[ 9] 0.00-30.03 sec 0.00 Bytes 0.00 bits/sec sender
[ 9] 0.00-30.03 sec 305 MBytes 85.2 Mbits/sec receiver
[ 11] 0.00-30.03 sec 0.00 Bytes 0.00 bits/sec sender
[ 11] 0.00-30.03 sec 312 MBytes 87.3 Mbits/sec receiver
[ 13] 0.00-30.03 sec 0.00 Bytes 0.00 bits/sec sender
[ 13] 0.00-30.03 sec 316 MBytes 88.3 Mbits/sec receiver
[ 15] 0.00-30.03 sec 0.00 Bytes 0.00 bits/sec sender
[ 15] 0.00-30.03 sec 310 MBytes 86.7 Mbits/sec receiver
[ 17] 0.00-30.03 sec 0.00 Bytes 0.00 bits/sec sender
[ 17] 0.00-30.03 sec 313 MBytes 87.5 Mbits/sec receiver
[ 19] 0.00-30.03 sec 0.00 Bytes 0.00 bits/sec sender
[ 19] 0.00-30.03 sec 321 MBytes 89.7 Mbits/sec receiver
[SUM] 0.00-30.03 sec 0.00 Bytes 0.00 bits/sec sender
[SUM] 0.00-30.03 sec 2.46 GBytes 704 Mbits/sec receiver
On the client:
- - - - - - - - - - - - - - - - - - - - - - - - -
[ ID] Interval Transfer Bandwidth Retr
[ 4] 0.00-30.00 sec 315 MBytes 88.1 Mbits/sec 0 sender
[ 4] 0.00-30.00 sec 314 MBytes 87.8 Mbits/sec receiver
[ 6] 0.00-30.00 sec 330 MBytes 92.3 Mbits/sec 0 sender
[ 6] 0.00-30.00 sec 328 MBytes 91.6 Mbits/sec receiver
[ 8] 0.00-30.00 sec 306 MBytes 85.6 Mbits/sec 0 sender
[ 8] 0.00-30.00 sec 305 MBytes 85.3 Mbits/sec receiver
[ 10] 0.00-30.00 sec 313 MBytes 87.5 Mbits/sec 0 sender
[ 10] 0.00-30.00 sec 312 MBytes 87.4 Mbits/sec receiver
[ 12] 0.00-30.00 sec 317 MBytes 88.8 Mbits/sec 0 sender
[ 12] 0.00-30.00 sec 316 MBytes 88.4 Mbits/sec receiver
[ 14] 0.00-30.00 sec 312 MBytes 87.1 Mbits/sec 0 sender
[ 14] 0.00-30.00 sec 310 MBytes 86.8 Mbits/sec receiver
[ 16] 0.00-30.00 sec 314 MBytes 87.9 Mbits/sec 0 sender
[ 16] 0.00-30.00 sec 313 MBytes 87.6 Mbits/sec receiver
[ 18] 0.00-30.00 sec 322 MBytes 90.2 Mbits/sec 0 sender
[ 18] 0.00-30.00 sec 321 MBytes 89.8 Mbits/sec receiver
[SUM] 0.00-30.00 sec 2.47 GBytes 707 Mbits/sec 0 sender
[SUM] 0.00-30.00 sec 2.46 GBytes 705 Mbits/sec receiver
2. Start the server using MACVLAN:
# docker run -it --net=cppbig_vlan --name=iperf_w_macvlan_net --ip=1.1.1.202 --entrypoint=/bin/bash dockerio.badoo.com/itops/sle_12_base:latest # iperf3 -s -p 12345 ----------------------------------------------------------- Server listening on 12345 ----------------------------------------------------------- We start the client:
# iperf3 -c 1.1.1.202 -p 12345 -t 30 On the server we get the result:
- - - - - - - - - - - - - - - - - - - - - - - - -
[ ID] Interval Transfer Bandwidth
[ 5] 0.00-30.04 sec 0.00 Bytes 0.00 bits/sec sender
[ 5] 0.00-30.04 sec 2.45 GBytes 701 Mbits/sec receiver
On the client:
- - - - - - - - - - - - - - - - - - - - - - - - -
[ ID] Interval Transfer Bandwidth Retr
[ 4] 0.00-30.00 sec 2.46 GBytes 703 Mbits/sec 0 sender
[ 4] 0.00-30.00 sec 2.45 GBytes 702 Mbits/sec receiver
We are launching 8 clients in parallel:
# iperf3 -c 1.1.1.202 -p 12345 -t 30 -P 8 On the server we get the result:
- - - - - - - - - - - - - - - - - - - - - - - - -
[ ID] Interval Transfer Bandwidth
[ 5] 0.00-30.03 sec 0.00 Bytes 0.00 bits/sec sender
[ 5] 0.00-30.03 sec 306 MBytes 85.4 Mbits/sec receiver
[ 7] 0.00-30.03 sec 0.00 Bytes 0.00 bits/sec sender
[ 7] 0.00-30.03 sec 319 MBytes 89.1 Mbits/sec receiver
[ 9] 0.00-30.03 sec 0.00 Bytes 0.00 bits/sec sender
[ 9] 0.00-30.03 sec 307 MBytes 85.8 Mbits/sec receiver
[ 11] 0.00-30.03 sec 0.00 Bytes 0.00 bits/sec sender
[ 11] 0.00-30.03 sec 311 MBytes 87.0 Mbits/sec receiver
[ 13] 0.00-30.03 sec 0.00 Bytes 0.00 bits/sec sender
[ 13] 0.00-30.03 sec 317 MBytes 88.6 Mbits/sec receiver
[ 15] 0.00-30.03 sec 0.00 Bytes 0.00 bits/sec sender
[ 15] 0.00-30.03 sec 322 MBytes 90.1 Mbits/sec receiver
[ 17] 0.00-30.03 sec 0.00 Bytes 0.00 bits/sec sender
[ 17] 0.00-30.03 sec 313 MBytes 87.5 Mbits/sec receiver
[ 19] 0.00-30.03 sec 0.00 Bytes 0.00 bits/sec sender
[ 19] 0.00-30.03 sec 310 MBytes 86.7 Mbits/sec receiver
[SUM] 0.00-30.03 sec 0.00 Bytes 0.00 bits/sec sender
[SUM] 0.00-30.03 sec 2.45 GBytes 700 Mbits/sec receiver
On the client:
- - - - - - - - - - - - - - - - - - - - - - - - -
[ ID] Interval Transfer Bandwidth Retr
[ 4] 0.00-30.00 sec 307 MBytes 85.8 Mbits/sec 0 sender
[ 4] 0.00-30.00 sec 306 MBytes 85.5 Mbits/sec receiver
[ 6] 0.00-30.00 sec 320 MBytes 89.6 Mbits/sec 0 sender
[ 6] 0.00-30.00 sec 319 MBytes 89.2 Mbits/sec receiver
[ 8] 0.00-30.00 sec 308 MBytes 86.2 Mbits/sec 0 sender
[ 8] 0.00-30.00 sec 307 MBytes 85.9 Mbits/sec receiver
[ 10] 0.00-30.00 sec 313 MBytes 87.5 Mbits/sec 0 sender
[ 10] 0.00-30.00 sec 311 MBytes 87.1 Mbits/sec receiver
[ 12] 0.00-30.00 sec 318 MBytes 89.0 Mbits/sec 0 sender
[ 12] 0.00-30.00 sec 317 MBytes 88.6 Mbits/sec receiver
[ 14] 0.00-30.00 sec 324 MBytes 90.5 Mbits/sec 0 sender
[ 14] 0.00-30.00 sec 322 MBytes 90.2 Mbits/sec receiver
[ 16] 0.00-30.00 sec 314 MBytes 87.9 Mbits/sec 0 sender
[ 16] 0.00-30.00 sec 313 MBytes 87.6 Mbits/sec receiver
[ 18] 0.00-30.00 sec 311 MBytes 87.1 Mbits/sec 0 sender
[ 18] 0.00-30.00 sec 310 MBytes 86.8 Mbits/sec receiver
[SUM] 0.00-30.00 sec 2.46 GBytes 704 Mbits/sec 0 sender
[SUM] 0.00-30.00 sec 2.45 GBytes 701 Mbits/sec receiver
As can be seen from the results, there is overhead, but in this case it can be considered not critical.
Limitations of technology by design: the availability of the container from the host and the availability of the host from the container is missing. We need this functionality because:
- a part of the service availability checks is checked by Zabbix “helpers” that are performed on the host where the service is running;
- there is a need to use caching DNS, which is located on the host system. In our case, this is Unbound;
- there is a need to use access to some other services running on the host system.
- These are just some of the reasons why we need access to the “host <==> container”. It is impossible to take and remake the architecture of such nodes overnight.
Options for overcoming this limitation:
- Use two or more physical links on the machine. This allows interaction through a neighboring interface. For example, take eth1 and give it specifically for MACVLAN, and continue to use eth0 on the host system. The option is certainly not bad, but it entails the need to keep the same number of links on all the machines where we plan to launch such services. Implement it is expensive, not fast and not always possible.
- Use another additional IP address on the host system, hang it on the virtual MACVLAN interface, which you need to raise on the host system. This is about as difficult from the point of view of support (“not to forget / not to forget”), as the previous sentence is time. And, since earlier I said that our service itself requires an additional address, then in the end, to start such a service, we need:
- the address for the host host's main interface (1);
- address for the service (2);
- address for the virtual interface through which we will interact with the service (3).
In this case, it turns out that we need too many IP addresses, which, by and large, will be used a little. In addition to the excessive expenditure of IP addresses, it is also worth remembering that we will need to support static routes through this very virtual interface to the container. This is not an insurmountable complexity, but the complication of the system as a whole is a fact.
The attentive reader will ask the question: “Why the address on the main interface and on the MACVLAN interface, if you can give the address of the main interface to the virtual one?” In this case, we will leave our system without addresses on the real interfaces, but I’m not ready for that step yet.
In the previous two variants it was assumed that the addresses of all interfaces belong to the same network. As it is easy to imagine, even with 100 servers in such a subnet, if we have three addresses, then we will not get into / 24 anymore. - Service IP. The idea is that we make a separate subnet for services. What it looks like:
- we start to send “tagged” traffic to the server;
- native VLAN is left as the main network for dockerhost (eth0);
- we lifted the virtual interface with 802q, without the IP address on a host to the system;
- use for the service IP-address from the service network.
Consider, as has already become clear, we will point three. In order for everything to work, we need to do a few things:
- in order to send "tagged" traffic to the interface, who do we need? That's right, networkers! We ask them to switch the access port to the port to which we are sending 2 VLANs;
- raise an additional interface on the host:
# cat /etc/sysconfig/network/ifcfg-vlan8 BOOTPROTO='static' STARTMODE='auto' VLAN='yes' ETHERDEVICE='eth0' # ip -d link show vlan8 31: vlan8@eth0: <BROADCAST,MULTICAST,UP,LOWER_UP> mtu 1500 qdisc noqueue state UP mode DEFAULT group default qlen 1000 link/ether e4:11:5b:ea:b6:30 brd ff:ff:ff:ff:ff:ff promiscuity 1 vlan protocol 802.1Q id 8 <REORDER_HDR> - get a MACVLAN network in Docker
# docker network create -d macvlan --subnet=1.1.2.0/24 --gateway=1.1.2.1 -o parent=vlan8 c_services - make sure the Docker network appears:
# docker network ls | grep c_services a791089219e0 c_services macvlan
Everything is done, all is well. Then I decided to look at the general graphics on the host (or to be more precise, a colleague turned my attention to this). Here is a picture we saw there:
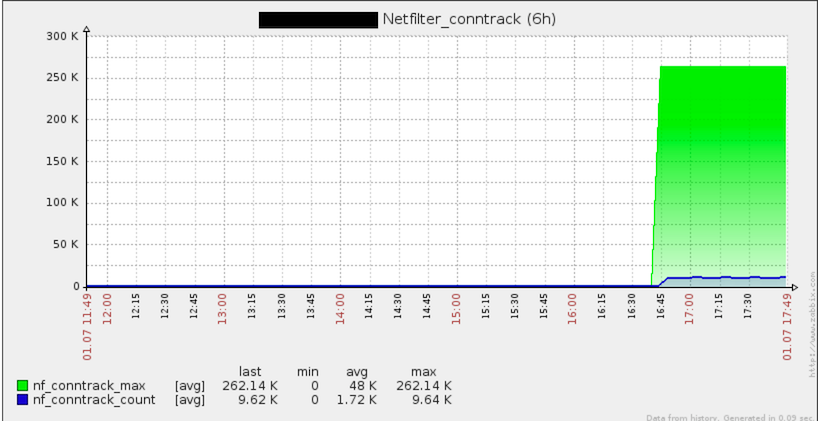
Yes, you can see the use of conntrack on the host.
How so? Well, do not need the same conntrack for MACVLAN ?! As it was already in the evening, I decided to test even the most incredible theories. In confirmation of my theoretical knowledge, connection tracking was not really needed. Without it, everything continued to work. Unloading modules, somehow tied to the conntrack, was impossible only at the time of launch of my container. The ideas left me, and I went home, deciding that the morning of the evening was wiser.
The next day, I was once again convinced of the accuracy of this statement. So, I decided to use the “clumsy” method so that Docker could not load nf_conntrack. At first, I just renamed it (since blacklist is ignored when loading a module via modprobe), and then I started my container again. The container, as expected, rose and felt great, but in the log I saw messages that four rules could not be added to iptables. It turns out that conntrack is needed? Here are the rules that did not want to be added:
-t nat -A OUTPUT -d 127.0.0.11 -p udp --dport 53 -j DNAT --to-destination 127.0.0.11:35373 -t nat -A POSTROUTING -s 127.0.0.11 -p udp --sport 35373 -j SNAT --to-source :53 -t nat -A OUTPUT -d 127.0.0.11 -p tcp --dport 53 -j DNAT --to-destination 127.0.0.11:41214 -t nat -A POSTROUTING -s 127.0.0.11 -p tcp --sport 41214 -j SNAT --to-source :53 Port 53? There is a job associated with the "resolver". And then I, to my surprise, find out about the embedded DNS server. Well, albeit built-in, but is it possible to turn it off somehow with options? No you can not :)
Then I tried to return the module, start the service, correct the rules from iptables and unload the modules ... But it was not there. By picking up modinfo, I found out which module depends on which one, and which one pulls someone along. When creating a network, Docker forcibly makes modprobe xt_nat , which, in turn, depends on nf_conntrack , here is the confirmation:
# modinfo xt_nat filename: /lib/modules/4.4.0-3.1-default/kernel/net/netfilter/xt_nat.ko alias: ip6t_DNAT alias: ip6t_SNAT alias: ipt_DNAT alias: ipt_SNAT author: Patrick McHardy <kaber@trash.net> license: GPL srcversion: 9982FF46CE7467C8F2361B5 depends: x_tables,nf_nat intree: Y vermagic: 4.4.0-3.1-default SMP preempt mod_unload modversions As I said, everything works without these modules. Accordingly, we can conclude that in our case they are not needed. The question remains: why, nevertheless, are they needed? I was not lazy and looked in 2 places:
- on Docker issues;
- in source code.
And what did I find there? True: for any user defined network Docker makes modprobe. We look at the code and see 2 points of interest to us:
if out, err := exec.Command("modprobe", "-va", "nf_nat").CombinedOutput(); err != nil { logrus.Warnf("Running modprobe nf_nat failed with message: `%s`, error: %v", strings.TrimSpace(string(out)), err) } if out, err := exec.Command("modprobe", "-va", "xt_conntrack").CombinedOutput(); err != nil { logrus.Warnf("Running modprobe xt_conntrack failed with message: `%s`, error: %v", strings.TrimSpace(string(out)), err) } And here's another:
if err := r.setupIPTable(); err != nil { return fmt.Errorf("setting up IP table rules failed: %v", err) } Making a patch, or rather, throwing out all unnecessary :) Making a new Docker build.
We look. Everything is OK, everything works.
At this stage, we can assume that our entire circuit in the laboratory is working, it remains to do just a little - to attach it to our service. Well, back to the service and look at its overall architecture:
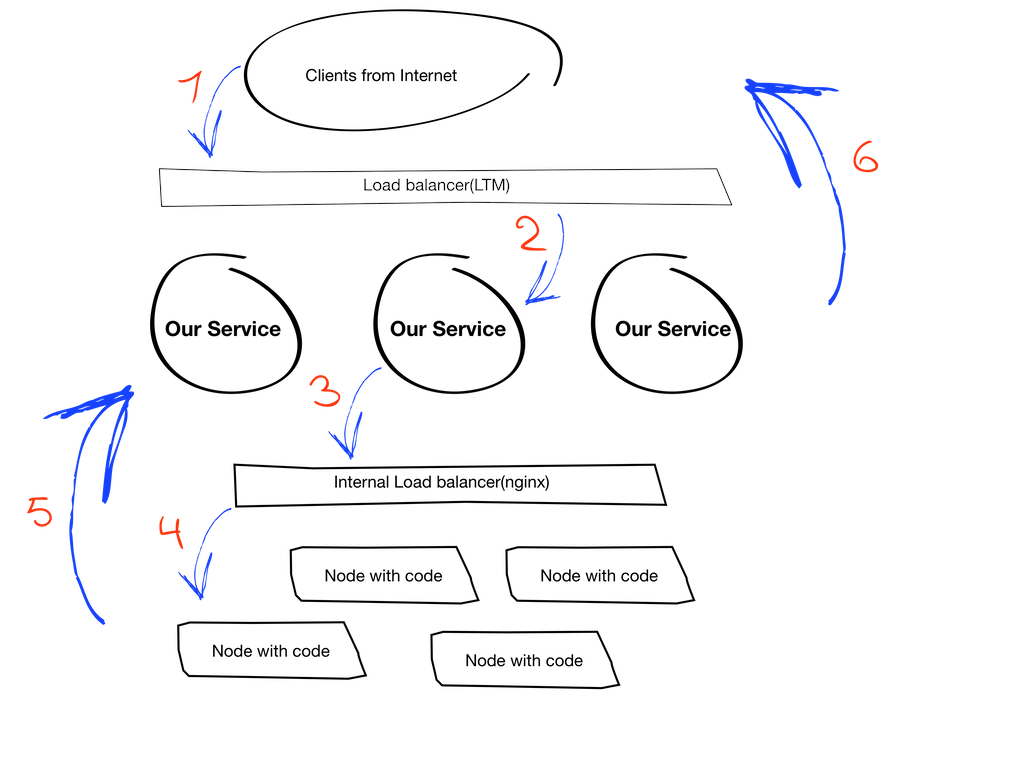
Explanation of how it works:
- (1 and 6) the mobile client establishes a connection with a certain URL, followed by a balancer;
- (2) the balancer selects the required instance of our service and allows you to establish a client-service connection;
- (3 and 4) then our service proxies requests from the client to the cluster with the code, but also through the balancer in the form of nginx. This is where we returned to our request that nginx should be on the same machine as the service. At the moment there is also a limitation in that it should be on the host, and not in the container (this, by the way, would solve the problem immediately). We will not discuss the reasons for this requirement in this article, but accept it as a condition.
- (5) each instance of our service has a specific id that the code needs to understand through which instance to respond to the client.
In the first approximation, nothing prevents us from collecting an image with our service and launching it already in the container, but there is one BUT. It so happened that for those services that need interaction with the external balancer, we have a certain set of static routes, for example, like this:
# ip r default via 1.1.2.254 dev eth0 10.0.0.0/8 via 1.1.2.1 dev eth0 1.1.2.0/24 dev eth0 proto kernel scope link src 1.1.2.14 192.168.0.0/16 via 1.1.2.1 dev eth0 Those. everything that needs to go to or from our internal networks goes through .1, and the rest through .254.
Why is this a problem in our case? Because when you run the container in its routes, we see the following:
# ip r default via 1.1.2.1 dev eth0 1.1.2.0/24 dev eth0 proto kernel scope link src 1.1.2.14 Attempting to change the routes inside the container will not lead to anything, because it is not privileged ( --priveleged ). It remains to change the routes by hand after starting the container from the host (there is a big misconception here, but more on that - further). Here are two options:
- do it with your hands, using the container namespace;
- take pipework https://github.com/jpetazzo/pipework and do the same, but with it.
I will say right away that you can live with this, but there are dangers like a student: “you can forget, score or drink” :)
Striving for the ideal, we made all routes through default gw for this service network, and the complexity of the routing was shifted to the network department. Everything. More precisely, I thought that everything ...
It seemed to me at that time - the solution is excellent. If everything worked exactly as I expected, it would have been so, but this would not have been the end of it. A little later, it became clear that with such a scheme we get asymmetric routing for those networks that have a route through our LTM. To make it a little more clear, I will try to show what subnets we can have.
- A network that has only 1 default gw and no external balancer.
- A network with more than one GW: for example, an external request balancer. The difficulty is that we do not drive internal traffic through it.
After talking with networkers, we made the following conclusions:
- they are not ready to take responsibility and monitor all networks in which the routing will be exactly like that;
- we, for our part, are not ready to support static routes for all such networks on servers
It turned out that if we wanted to do something simple, we got the problem out of the blue, and if we hadn’t thought about possible difficulties right away, it would have rather sad consequences.
I always say that you should not forget about ideas that came to mind before, but were rejected. We returned to the idea of using static routes inside the container.
, , :
- ;
- IP ;
- ;
- ( , ).
( --privileged ) . Linux capabilities, . . NET_ADMIN .
, , , .
, Dockerfile .
Dockerfile:
FROM dockerio.badoo.com/itops/sle_12_base:latest MAINTAINER #MAINTEINER# RUN /usr/bin/zypper -q -n in iproute2 RUN groupadd -g 1001 wwwaccess RUN mkdir -p /local/SERVICE/{var,conf} COPY get_configs.sh /local/SERVICE/ COPY config.cfg /local/SERVICE/ ADD SERVICE-CERTS/ /local/SERVICE-CERTS/ ADD SERVICE/bin/SERVICE-BINARY-${DVERSION} /local/SERVICE/bin/ ADD SERVICE/conf/ /local/SERVICE/conf/ COPY routes.sh /etc/cont-init.d/00-routes.sh COPY env.sh /etc/cont-init.d/01-env.sh COPY finish.sh /etc/cont-finish.d/00-finish.sh COPY run /etc/services.d/SERVICE/ COPY finish /etc/services.d/SERVICE/ RUN touch /tmp/fresh_container ENTRYPOINT ["/init"] :
- s6 overlay supervisor ;
- iproute, ;
- , ( /etc/cont-init.d/), , , , (/etc/cont-finish.d/);
- /tmp/fresh_container , , . , ;
:
- get_configs.sh — , , , , , , . Docker Meetup ;
- routes.sh — , :
#!/usr/bin/with-contenv sh if [ ! -x /usr/sbin/ip ];then echo -e "\e[31mCan't execute /usr/sbin/ip\e[0m"; [ $(pgrep s6-svscan) ] && s6-svscanctl -t /var/run/s6/services exit 1; else LTMGW=$(/usr/sbin/ip r show | /usr/bin/grep default | /usr/bin/awk {'print $3'} | /usr/bin/awk -F \. {'print $1"."$2"."$3".254"'}) DEFGW=$(/usr/sbin/ip r show | /usr/bin/grep default | /usr/bin/awk {'print $3'} | /usr/bin/awk -F \. {'print $1"."$2"."$3".1"'}) /usr/sbin/ip r replace default via ${LTMGW} /usr/sbin/ip r add 192.168.0.0/16 via 10.10.8.1 dev eth0 /usr/sbin/ip r add 10.0.0.0/8 via 10.10.8.1 dev eth0 echo -e "\e[32mAll job with routes done:\e[0m\n$(/usr/sbin/ip r show)" fi - env.sh — , ; 1 :
#!/usr/bin/with-contenv sh if [ ! -z "${ISTEST}" ];then exit 0;fi if [ ! -n "${SERVICETYPE}" ];then echo -e "\e[31mPlease set SERVICE type\e[0m"; [ $(pgrep s6-svscan) ] && s6-svscanctl -t /var/run/s6/services exit 1; fi bash /local/SERVICE/get_configs.sh || exit 1 echo -e "\e[32mSERVICE ${SERVICETYPE} is running\e[0m" - finish.sh — , pid- . ( ), , , pid- :)
- run — , :
#!/usr/bin/with-contenv bash exec /local/SERVICE/bin/SERVICE-${DVERSION} -l /local/SERVICE/var/mobile-${SERVICETYPE}.log -P /local/SERVICE/var/mobile-${SERVICETYPE}.pid -c /local/SERVICE/conf/SERVICE.conf -v ${VERBOSITY} - finish — , , :
#!/bin/sh [ $(pgrep s6-svscan) ] && s6-svscanctl -t /var/run/s6/services
:
docker run -d --net=c_services --ip=1.1.2.17 --name=SERVICE-INSTANCE16 -h SERVICE-INSTANCE16.local --cap-add=NET_ADMIN --add-host='nginx.localhost:1.1.1.17' -e SERVICETYPE=INSTANCE16_eu1 -e HOST_IP=1.1.1.17 --volumes-from=badoo_loop dockerio.badoo.com/cteam/SERVICE:2.30.0_994 . , , MACVLAN/IPVLAN , .
banuchka
Site Reliability Engineer, Badoo
Source: https://habr.com/ru/post/308402/
All Articles