Creation of plasticine animation for use in the mobile game
The article describes how to make graphics for a computer game using plasticine or clay, and what is needed for this. It is supposed to break the article into two parts.
The first part is in front of you, and it will be about how to build a studio at home to create plasticine animation, as well as about the features of the shooting and the techniques used for this. Actually, I am a programmer, so I have more experience in creating games than in shooting, so the material in the first part will be simpler and may contain some inaccuracies.
The second part will contain game-specific information about the use of the created animation (how to combine clay and drawing graphics, the differences between shooting for games and plot rollers), as well as the most general facts about how to make a game (there is no point in writing how to create skeleton of the game on Unity3D or another engine, it will be more interesting to indicate where you can get sounds in addition to the created animation, in how many languages it is better to release the game or how to get free versions of useful utilities for a beginner developer.
')
There is little information on such a topic on the Internet, and even less in Russian. Basically, the plasticine animation is referred to as a lesson in circles for children. I will try to correct this situation and show that it can be used as a substitute for hand-drawn graphics for a small game.
- This is original . The phrase "Indie is dying" is a delusion. The market is full of monotonous games, and pixel graphics, which are so popular now with independent developers, are already fed up with the nineties (this is just my opinion, of course). To stand out among thousands of identical games, you should try the original style.
- This is interesting . Personally, I have long wanted to try to make stop-motion animation, and was not disappointed in the process of work - shooting is interesting each time, and gives an unusual (for a programmer) experience.
- It's easy . Relatively simple, of course, but if suddenly you can’t draw and model on a computer, many learn to make simple plasticine figures in kindergarten, so most likely you also have such experience. Perhaps this is the method that suits you.
- Plasticine animation looks cool . Many gamers still remember the wonderful The Neverhood with nostalgia. Of course, such a project is difficult to do, but everything comes with experience.
To create a plasticine animation, only the material for modeling and the camera on which you will fix the models are minimally necessary. About the material and work with him in detail in the next section, and about the cameras and related shooting things below.
Choosing a good camera for filming goes far beyond the article, so I will say this - you can shoot almost anything you want.
The necessary camera settings for shooting are turning off the autofocus (definitely not changing the focus every time something changes in the frame) and switching to all settings for the image (exposure, white balance) in manual mode. If necessary, it will be possible to change the image parameters during post-processing in a graphic editor in batch mode for all frames at once.
It is also important to have a tripod for steady fixing the camera, and ideally also a way to make a frame remotely, so as not to shake the camera when you press the shutter button with your finger. Such methods can be:
- Photographing through a computer when the camera is connected with a cord (special software is required, is available in most programs for stop-motion shooting, and the camera supports this function).
- Special wireless key fob for photographing (for example, such ), for a specific camera. Or a universal bluetooth keychain for a smartphone if you are shooting on a smartphone. Suitable as a Chinese hack for 100 rubles, and heaped smart watches, most importantly, to ensure the stillness of the camera.
- The application on the smartphone (Example for Android and iPhone ) for remote control of the camera.
The choice of method depends on the available camera and financial preferences.
The next step for good shooting is to create high-quality lighting . A table lamp that can be easily guided in the right direction with a bright light bulb will do. Many recommend incandescent bulbs, because near them it is convenient to heat the clay before the animation, but heat can also be obtained from other sources (at least by leaning the clay against a glass of warm water).
The models themselves are conveniently placed on a low table. The table can be placed against the wall, so that you can fix the background on it. Using the stop-motion technique means that it is necessary to change the position of the models every frame, so it is better to think in advance about whether it is convenient to regularly take models and put them in place.
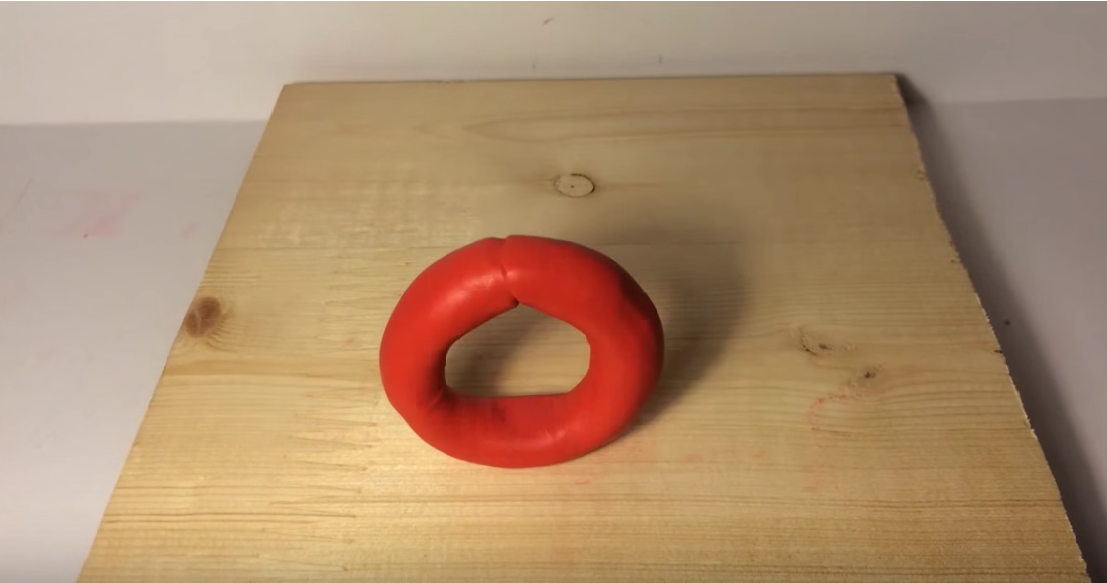
The background can be a regular white sheet (depending on the scale of the shooting, A4-A3 format), securely fixed with scotch tape. You can attach colored paper of the desired color or background image on top of the sheet. It is better to have a couple of background options in case of shooting objects of different colors (white background for dark objects and dark for light ones) - for game graphics, objects will most likely have to be cut out of frame for further processing. The better the camera and the lighting will be, and the more contrast the objects will be compared to the objects and the background will be more uniform in the frames, the easier it will be after this processing. More information about the methods of processing personnel will be discussed in the second part of the article. Using paper is also convenient because it is easy to make auxiliary marks with a pencil and erase them.
An example of a model and background, with marks:
In principle, you can shoot without specialized software, but its use greatly simplifies the process. The capabilities of the programs are not very different, so almost any will do. A list of specialized programs for PC with reviews can be found here (in English). You can also use programs for smartphones, selected by searching for the query "stop motion".
The most necessary and convenient features that provide specialized programs (the minimum required set, be sure to check their availability before using or buying the program):
- Compatibility with the selected method of remote photographing and the camera (the program supports the corresponding model of the remote control and the camera). I forgot about this item and spent quite a long time trying to make friends with the selected hardware and software, which I will write in more detail at the end of the section in the configuration description of my studio.
- Grid on the screen and the ability to display additional marks. It is very convenient for alignment and aiming - you can mark the position in which the model should be at the end of the animation or individual points that must be passed during the movement. So you can greatly simplify, for example, shooting a falling object, noting on the screen its previously calculated coordinates at each point in time.

- Ability to make the current frame partially transparent and display the previous one under it . In practice, it is also necessary to have a setting for the transparency level, since for different scenes it is convenient to have different levels of visibility of the previous frame. This feature is key to creating a good animation and the number of its applications is countless. The use of combined frames will allow you to accurately plan the speed of movement of objects, comparing the distance between them on adjacent frames in real time, and allow you to detect an object that has accidentally entered the frame (for example, an animator’s hand). Also, thanks to the combined frames, you can relatively accurately restore the scene from the previous frame if it was damaged. And the scene in the process of work is damaged more often than we would like, for various reasons: they accidentally touched a hand, made a pause for several days between shootings, a cat ran past, etc.
Another couple of moments relevant for software for smartphones:
- Check the possibility of free export of the created frames as images ! Oddly enough, sometimes program developers accidentally or specifically limit the capture of captured frames in the form of images, and only involve working with them within the program as a project, and you can only get video at the output. You can, of course, search for images in the file system or examine the format of the project file — check to see if it is just a zip archive, but these methods already fall into the category of hacking. It is easier to change the program (or buy the full version, sometimes a restriction for this is introduced).
- Ensure that the selected program supports the use of all camera modes . It would be logical to shoot at the maximum possible resolution for the camera.
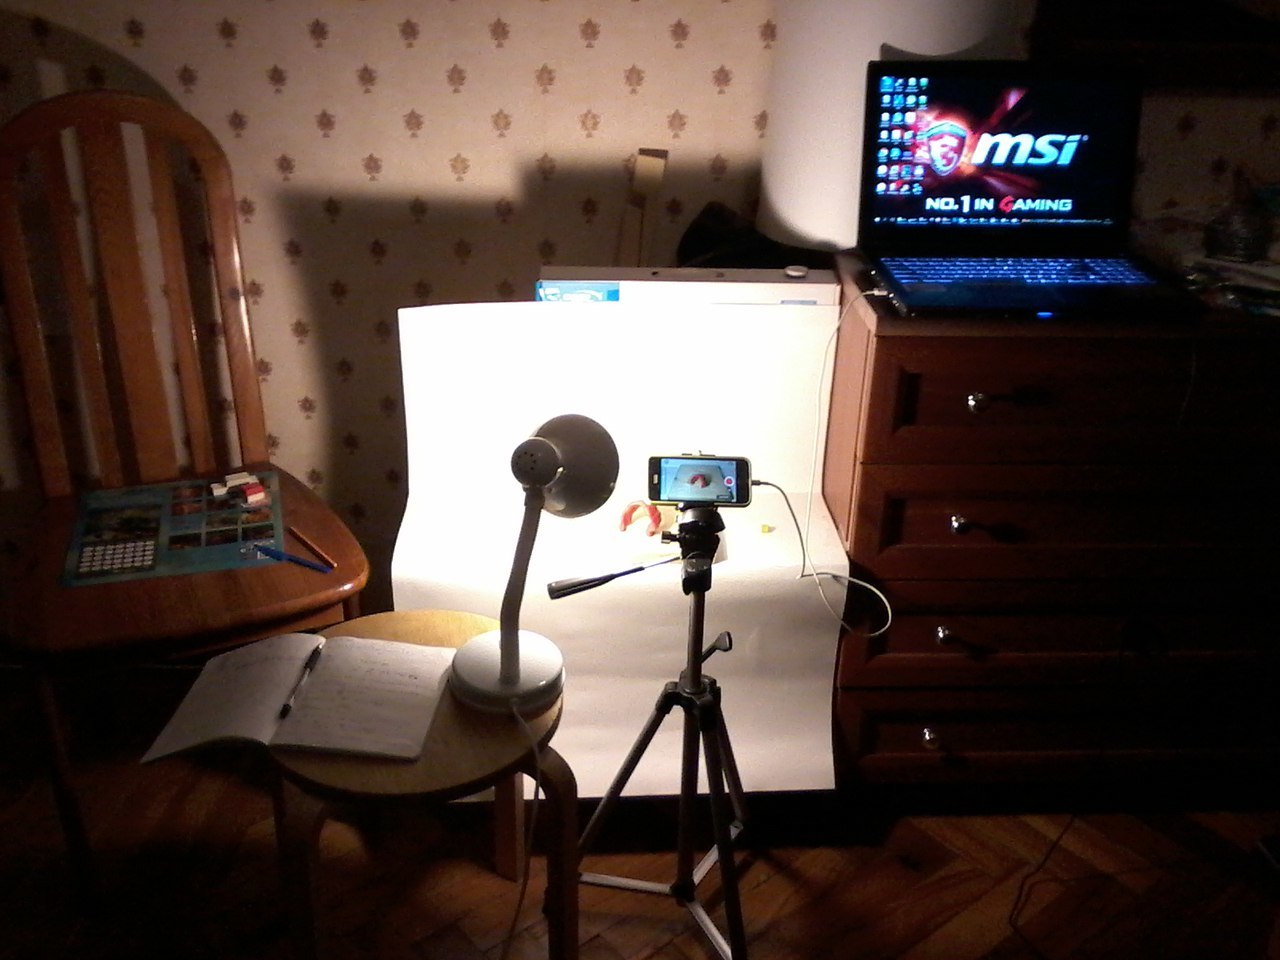
The configuration of my studio (chosen from what was already at hand):
iPhone 5s + tripod + simple bluetooth shutter + “Puppet animation” program for iOS for creating animation (in the paid version it has all the features I need). Unfortunately, by default, the program does not normally work with bluetooth shutters, so I cannot recommend it to others, but I managed to find a way to make it support remote photography (I wrote down in detail the process of using the bug for myself, which allowed using the program with remote controls) .
When the studio is ready, you can start sculpting models.
First of all, about what to sculpt. The usual clay is suitable, which is sold in art stores, in the office, among school supplies. It is common and cheap. Complete with plasticine often come plastic tools for working with small parts. You can try to use clay, just keep in mind that it will take a lot of material. Much more than initially thought.
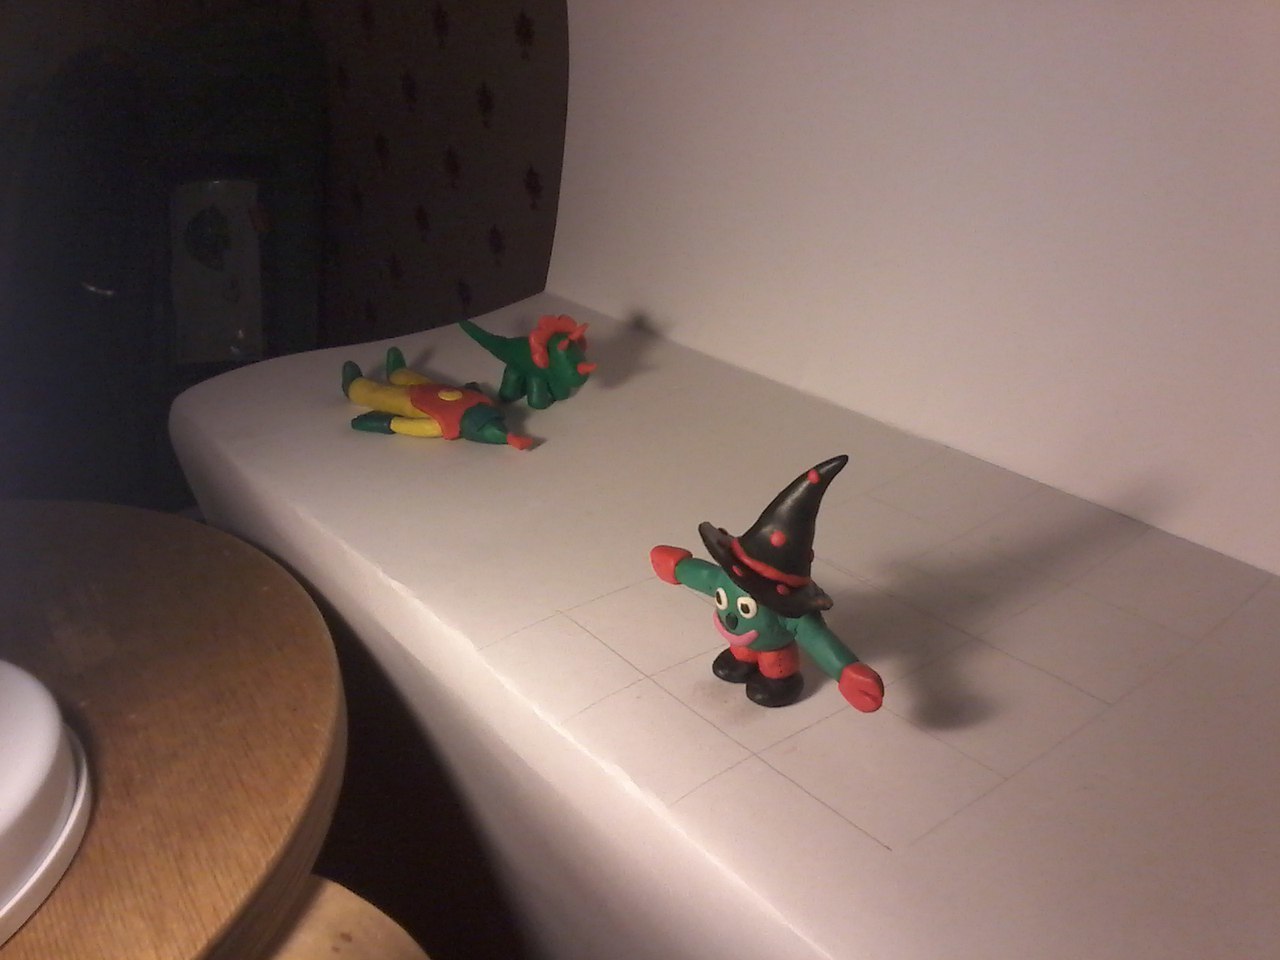
Of the minuses - the plasticine is soft, which sometimes interferes, the model may remain unstable in the established pose. For example, in the pose as in the screenshot below, the hands of the figures slowly lower themselves.
This can be avoided if inside the clay figure there is a skeleton of soft wire.
If the model has been standing for a long time without action, then it should be slightly heated before shooting, otherwise it is possible that some limb will simply break off during the deformation. If you are going to leave the models for a few days, you should wrap them in food film so that they do not collect dust on themselves.
According to the modeling technique there are many lessons, do not pay attention, for children or not the lesson is positioned, interesting techniques can occur in any.
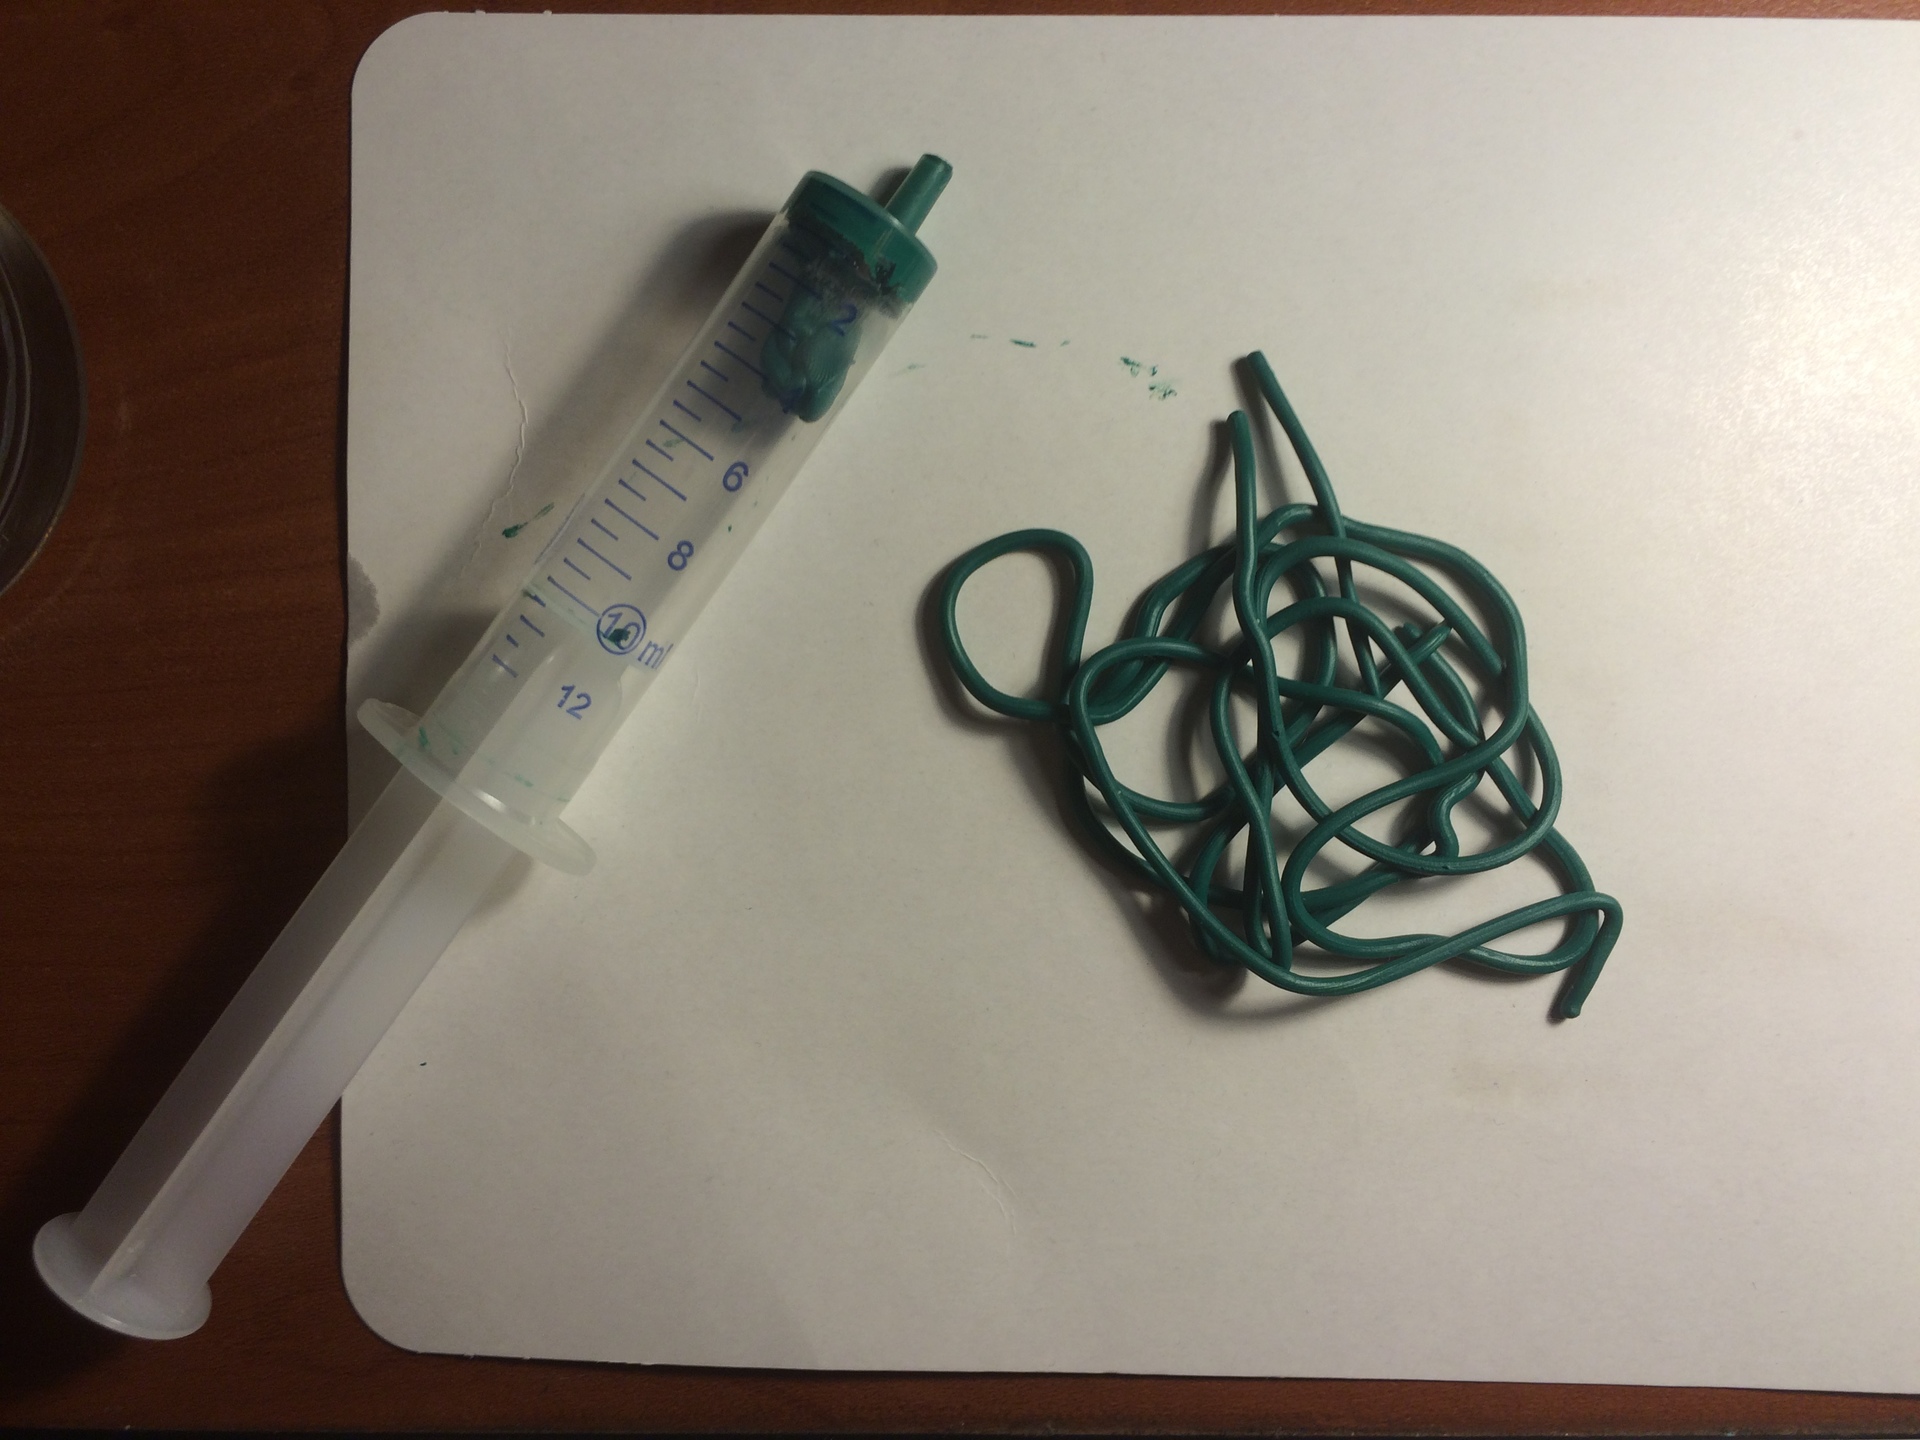
An example of an unusual technique is to throw the clay into warm water so that it softens and draw it into a syringe. Then, squeezing it out, you can get thin "macaroni", which can be turned into complex shapes.
A more detailed description of the method
If there are a lot of examples of creating models, then with examples of unusual animation effects from plasticine, things are worse, but in this area there is a lot of room for creativity.
Here are some basic interesting-looking techniques:
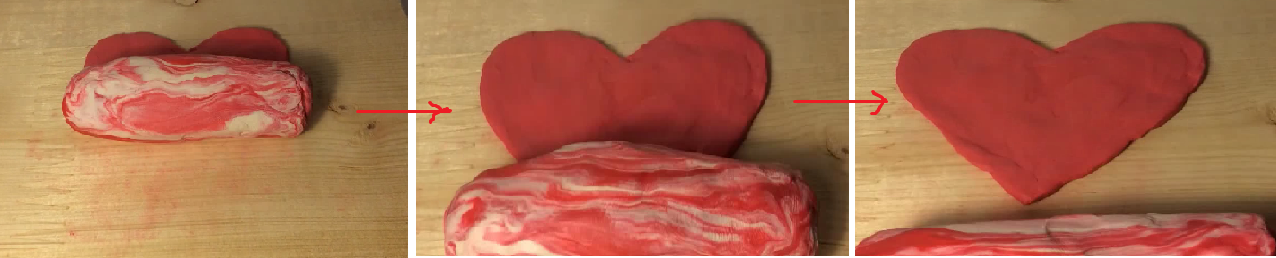
Slow transformation of one shape into another (morph)
Smooth resizing
Substitution between frames of a new model
Sometimes it is useful to replace frames in the reverse order (for example, a piece is cut off from the heart, and its folding is removed, which after a turn in time gives the desired effect of its appearance from under the log rolling down).
Jumps and flights
It is worth to dwell on this. In each frame additional props are built, keeping the model in the air at the desired height, then post-processing props in each frame are erased.
Here is an example of a training video on how to make a jumping ball:
The use of these techniques in the dynamics can be seen in the videos at the end of the article.
It is worth exploring the basic principles of classic animation, for example, the rules of Disney animation .
First you need to choose what frame rate you need. For beginners, 6 or 8 frames per second is suitable, professionals choose 24. Realism of animation strongly depends on frequency, but for a mobile game you should also think about the size of the images, it is important to find a balance between quality and size.
After that, you can paint on paper words with a sequence of key frames. For a start, I recommend keeping in mind the rules of the animation “Preparing or abandoning movement” and “Mitigating the beginning and ending of movement”, given in the principles of Disney animation by clicking the link at the beginning of the section.
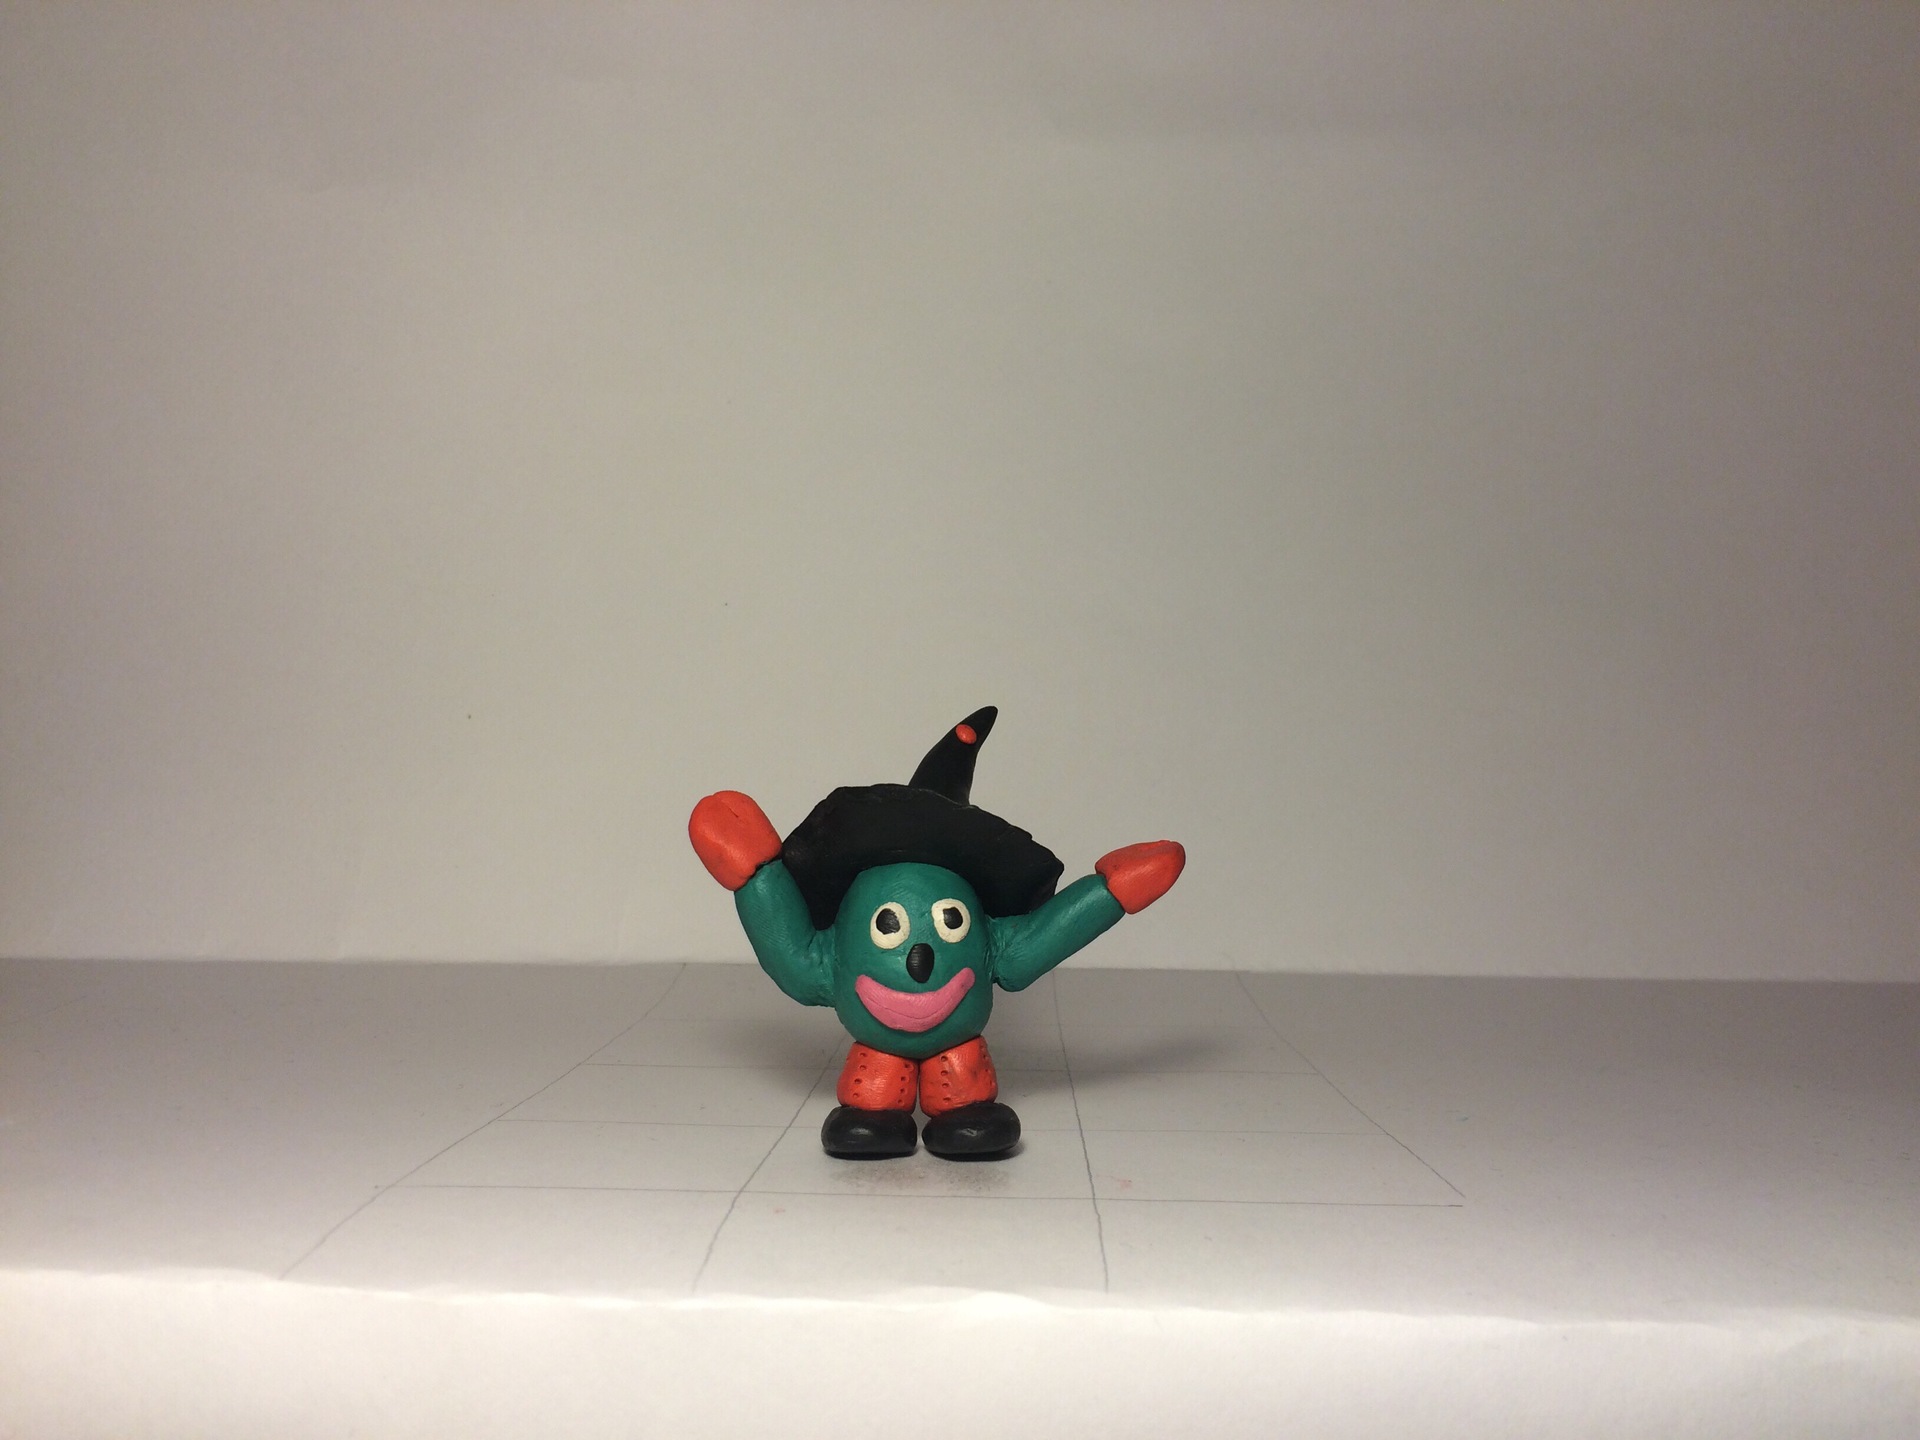
An example of such a sequence for animating a wave is:
“In the first 5 frames the model stands still, the next 10-12 frames raises the hand upwards, then 20 frames waves the hand from left to right three times, then 10-12 frames lowers the hand downwards.” According to this manual, you can start shooting. The resulting animation:

That's all, in the next part I will talk about how to process the animation so that it can be used in the game.
And finally, a few clips made during the experiments:
The first part is in front of you, and it will be about how to build a studio at home to create plasticine animation, as well as about the features of the shooting and the techniques used for this. Actually, I am a programmer, so I have more experience in creating games than in shooting, so the material in the first part will be simpler and may contain some inaccuracies.
The second part will contain game-specific information about the use of the created animation (how to combine clay and drawing graphics, the differences between shooting for games and plot rollers), as well as the most general facts about how to make a game (there is no point in writing how to create skeleton of the game on Unity3D or another engine, it will be more interesting to indicate where you can get sounds in addition to the created animation, in how many languages it is better to release the game or how to get free versions of useful utilities for a beginner developer.
')
There is little information on such a topic on the Internet, and even less in Russian. Basically, the plasticine animation is referred to as a lesson in circles for children. I will try to correct this situation and show that it can be used as a substitute for hand-drawn graphics for a small game.
Why do you need
- This is original . The phrase "Indie is dying" is a delusion. The market is full of monotonous games, and pixel graphics, which are so popular now with independent developers, are already fed up with the nineties (this is just my opinion, of course). To stand out among thousands of identical games, you should try the original style.
- This is interesting . Personally, I have long wanted to try to make stop-motion animation, and was not disappointed in the process of work - shooting is interesting each time, and gives an unusual (for a programmer) experience.
- It's easy . Relatively simple, of course, but if suddenly you can’t draw and model on a computer, many learn to make simple plasticine figures in kindergarten, so most likely you also have such experience. Perhaps this is the method that suits you.
- Plasticine animation looks cool . Many gamers still remember the wonderful The Neverhood with nostalgia. Of course, such a project is difficult to do, but everything comes with experience.
What is needed
To create a plasticine animation, only the material for modeling and the camera on which you will fix the models are minimally necessary. About the material and work with him in detail in the next section, and about the cameras and related shooting things below.
Choosing a good camera for filming goes far beyond the article, so I will say this - you can shoot almost anything you want.
The necessary camera settings for shooting are turning off the autofocus (definitely not changing the focus every time something changes in the frame) and switching to all settings for the image (exposure, white balance) in manual mode. If necessary, it will be possible to change the image parameters during post-processing in a graphic editor in batch mode for all frames at once.
It is also important to have a tripod for steady fixing the camera, and ideally also a way to make a frame remotely, so as not to shake the camera when you press the shutter button with your finger. Such methods can be:
- Photographing through a computer when the camera is connected with a cord (special software is required, is available in most programs for stop-motion shooting, and the camera supports this function).
- Special wireless key fob for photographing (for example, such ), for a specific camera. Or a universal bluetooth keychain for a smartphone if you are shooting on a smartphone. Suitable as a Chinese hack for 100 rubles, and heaped smart watches, most importantly, to ensure the stillness of the camera.
- The application on the smartphone (Example for Android and iPhone ) for remote control of the camera.
The choice of method depends on the available camera and financial preferences.
The next step for good shooting is to create high-quality lighting . A table lamp that can be easily guided in the right direction with a bright light bulb will do. Many recommend incandescent bulbs, because near them it is convenient to heat the clay before the animation, but heat can also be obtained from other sources (at least by leaning the clay against a glass of warm water).
The models themselves are conveniently placed on a low table. The table can be placed against the wall, so that you can fix the background on it. Using the stop-motion technique means that it is necessary to change the position of the models every frame, so it is better to think in advance about whether it is convenient to regularly take models and put them in place.
The background can be a regular white sheet (depending on the scale of the shooting, A4-A3 format), securely fixed with scotch tape. You can attach colored paper of the desired color or background image on top of the sheet. It is better to have a couple of background options in case of shooting objects of different colors (white background for dark objects and dark for light ones) - for game graphics, objects will most likely have to be cut out of frame for further processing. The better the camera and the lighting will be, and the more contrast the objects will be compared to the objects and the background will be more uniform in the frames, the easier it will be after this processing. More information about the methods of processing personnel will be discussed in the second part of the article. Using paper is also convenient because it is easy to make auxiliary marks with a pencil and erase them.
An example of a model and background, with marks:
Soft
In principle, you can shoot without specialized software, but its use greatly simplifies the process. The capabilities of the programs are not very different, so almost any will do. A list of specialized programs for PC with reviews can be found here (in English). You can also use programs for smartphones, selected by searching for the query "stop motion".
The most necessary and convenient features that provide specialized programs (the minimum required set, be sure to check their availability before using or buying the program):
- Compatibility with the selected method of remote photographing and the camera (the program supports the corresponding model of the remote control and the camera). I forgot about this item and spent quite a long time trying to make friends with the selected hardware and software, which I will write in more detail at the end of the section in the configuration description of my studio.
- Grid on the screen and the ability to display additional marks. It is very convenient for alignment and aiming - you can mark the position in which the model should be at the end of the animation or individual points that must be passed during the movement. So you can greatly simplify, for example, shooting a falling object, noting on the screen its previously calculated coordinates at each point in time.
- Ability to make the current frame partially transparent and display the previous one under it . In practice, it is also necessary to have a setting for the transparency level, since for different scenes it is convenient to have different levels of visibility of the previous frame. This feature is key to creating a good animation and the number of its applications is countless. The use of combined frames will allow you to accurately plan the speed of movement of objects, comparing the distance between them on adjacent frames in real time, and allow you to detect an object that has accidentally entered the frame (for example, an animator’s hand). Also, thanks to the combined frames, you can relatively accurately restore the scene from the previous frame if it was damaged. And the scene in the process of work is damaged more often than we would like, for various reasons: they accidentally touched a hand, made a pause for several days between shootings, a cat ran past, etc.
Another couple of moments relevant for software for smartphones:
- Check the possibility of free export of the created frames as images ! Oddly enough, sometimes program developers accidentally or specifically limit the capture of captured frames in the form of images, and only involve working with them within the program as a project, and you can only get video at the output. You can, of course, search for images in the file system or examine the format of the project file — check to see if it is just a zip archive, but these methods already fall into the category of hacking. It is easier to change the program (or buy the full version, sometimes a restriction for this is introduced).
- Ensure that the selected program supports the use of all camera modes . It would be logical to shoot at the maximum possible resolution for the camera.
The configuration of my studio (chosen from what was already at hand):
iPhone 5s + tripod + simple bluetooth shutter + “Puppet animation” program for iOS for creating animation (in the paid version it has all the features I need). Unfortunately, by default, the program does not normally work with bluetooth shutters, so I cannot recommend it to others, but I managed to find a way to make it support remote photography (I wrote down in detail the process of using the bug for myself, which allowed using the program with remote controls) .
When the studio is ready, you can start sculpting models.
Features modeling models of clay
First of all, about what to sculpt. The usual clay is suitable, which is sold in art stores, in the office, among school supplies. It is common and cheap. Complete with plasticine often come plastic tools for working with small parts. You can try to use clay, just keep in mind that it will take a lot of material. Much more than initially thought.
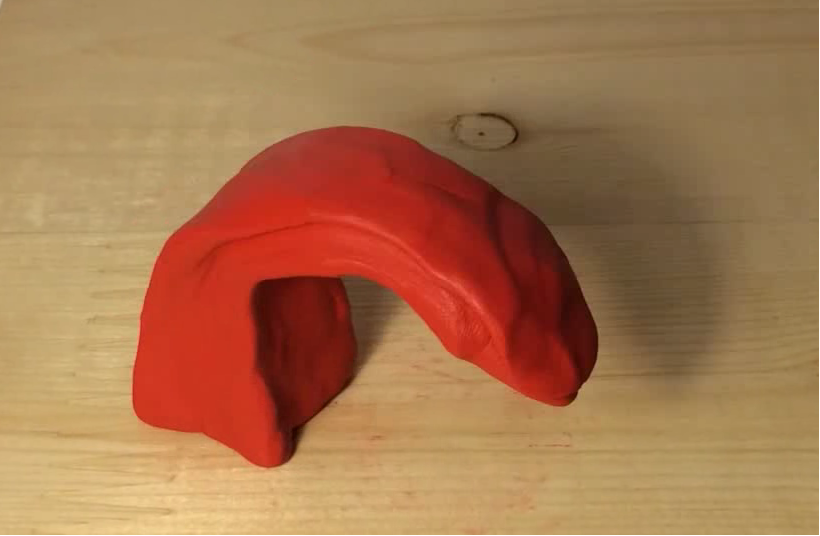
Of the minuses - the plasticine is soft, which sometimes interferes, the model may remain unstable in the established pose. For example, in the pose as in the screenshot below, the hands of the figures slowly lower themselves.
This can be avoided if inside the clay figure there is a skeleton of soft wire.
If the model has been standing for a long time without action, then it should be slightly heated before shooting, otherwise it is possible that some limb will simply break off during the deformation. If you are going to leave the models for a few days, you should wrap them in food film so that they do not collect dust on themselves.
According to the modeling technique there are many lessons, do not pay attention, for children or not the lesson is positioned, interesting techniques can occur in any.
An example of an unusual technique is to throw the clay into warm water so that it softens and draw it into a syringe. Then, squeezing it out, you can get thin "macaroni", which can be turned into complex shapes.
A more detailed description of the method
Create stop-motion animation effects
If there are a lot of examples of creating models, then with examples of unusual animation effects from plasticine, things are worse, but in this area there is a lot of room for creativity.
Here are some basic interesting-looking techniques:
Slow transformation of one shape into another (morph)
Smooth resizing
Substitution between frames of a new model
Sometimes it is useful to replace frames in the reverse order (for example, a piece is cut off from the heart, and its folding is removed, which after a turn in time gives the desired effect of its appearance from under the log rolling down).
Jumps and flights
It is worth to dwell on this. In each frame additional props are built, keeping the model in the air at the desired height, then post-processing props in each frame are erased.
Here is an example of a training video on how to make a jumping ball:
The use of these techniques in the dynamics can be seen in the videos at the end of the article.
Model animation
It is worth exploring the basic principles of classic animation, for example, the rules of Disney animation .
First you need to choose what frame rate you need. For beginners, 6 or 8 frames per second is suitable, professionals choose 24. Realism of animation strongly depends on frequency, but for a mobile game you should also think about the size of the images, it is important to find a balance between quality and size.
After that, you can paint on paper words with a sequence of key frames. For a start, I recommend keeping in mind the rules of the animation “Preparing or abandoning movement” and “Mitigating the beginning and ending of movement”, given in the principles of Disney animation by clicking the link at the beginning of the section.
An example of such a sequence for animating a wave is:
“In the first 5 frames the model stands still, the next 10-12 frames raises the hand upwards, then 20 frames waves the hand from left to right three times, then 10-12 frames lowers the hand downwards.” According to this manual, you can start shooting. The resulting animation:
That's all, in the next part I will talk about how to process the animation so that it can be used in the game.
And finally, a few clips made during the experiments:
Source: https://habr.com/ru/post/308288/
All Articles