2D magic in detail. Part Four. Water
- I've been drinking water for the project.
- Oh, cool! Why is it flat? Give waves!
...
- Listen, you then talked about the waves, remember? Check it out!
- Yes, good waves, but you have not done the refraction and caustic yet?
...
- Hi, I was playing with Unity here all night, see what reflections and caustics are coded!
- Darova, and really good! And when your water is boiling, reflections are not buggy?
...
- Hai, finally realized a boil, like nothing?
- Oh, just right! Listen, count how cool if you freeze a boiling wave?
...
- Catch the picture, the ice seems to come up with nothing?
- Norm, listen, and your ice freezes, does it increase in volume? And by the way, when will you start to do game play?
Variations on the log with a friend.
Yes, you already understood, finally I will tell you about the implementation of water in the project. Let's start?
 Previous articles
Part one. Shine.
Part two. Structure.
Part Three Global coverage.
Part Four. Water
Table of contents
- 3D peeping
- Wishlist
- First damn lump
- Statics
- Water generation
- Dynamics
- Temperature
- Conclusion and intrigue
 3D peeping
To begin with, let's see how the "adult guys" make water from all sorts of large 3D projects.
In general, dragging ideas from 3D is a great plan, in 2D cool algorithms are noticeably less.
So, from the simplest to the more complex:
Flat water without physics. They threw a polygon to the level and rejoice. Because fps does not sag and looks good (the artists tried and collected a beautiful shader). You can not interact, you say? So we have a racing game, water is visible only on the horizon!
Polygonal water without physics. Planned a map with bad weather, and the water is flat, like a mirror? Add polygons, recall the sines and now, storm waves are piling up on the horizon. If you do not accidentally drive into the water, it is not even noticeable that the water is not real.
Flat water with physics. With the races finished, do Skyrim. Flat water with beautiful effects, several checks in the physics engine and on the water you can swim. No storms and waves to you, but to whom are they needed in rpg, when dragons are flying across the sky, and fus-ro knocks passers-by down?
Polygonal water with physics. Tied up with fantasy and started doing GTA. And there are already realistic waves, and even with the physics of water transport (as in this excellent article ). Good water, can you still complicate it?
- Particle system Even as you can! If you're the guys from Dark Energy Digital, and once made Hydrophobia with "honest" water that can flow, splash and flood. And if you have a powerful video card (or two) and a processor that can calculate all this.
Wishlist
Now, when we have references from large projects, we dream what we would like to implement in our project.
Remember the joking entry at the beginning of the article? This is not at all a joke - every time I threw screenshots or videos from another demo to a friend, he suggested some completely insane ideas. And this is great, because most of these ideas were implemented, making the project even more interesting from the point of view of development. Therefore, the list below was compiled iteratively, without the mailstone and plan.
Here is the list of women:
- The ability to add new volumes of water in realtime or "evaporate" existing ones.
- Waves on the surface of the water.
- Temperature, the possibility of freezing and boiling water.
- Interaction with other modules: wind, physical bodies, weather.
- Close interaction with the lighting system: caustic, light scattering, reflection.
- Ability to customize the editor.
And about interactions with modules - the topic is almost endless. See for yourself - in the article about the light, I told you that the project has the ability to turn on god rays - rays of light visible due to dust in the air. And now, when I completed the boiling water, nothing prevents to generate steam particles, above which these god rays will be visible! But the wind can interact with the particles, which means that the vapor above the hot water will dissipate nicely. And there are so many such interactions that you do not have time to write down, let alone prototype.
First damn lump
We will not go through the team that made Hydrophobia to "honestly" model a liquid - this method is too demanding of resources. Need to simplify. If pixelart is in the project, all planes are either horizontal or vertical. And empty space at the level is represented as a set of rectangles. We will work with them.
In preprocessing at the beginning of the level:
- We divide all empty space at the level into rectangular non-intersecting volumes.
- We find the relationship of the volumes with each other and build a graph of "flows" of water.
In real time:
- For each volume, we separately calculate the waves on the surface (ignoring the fact that with the help of waves, water can flow from volume to volume).
- Calculate the flow of water using the graph.
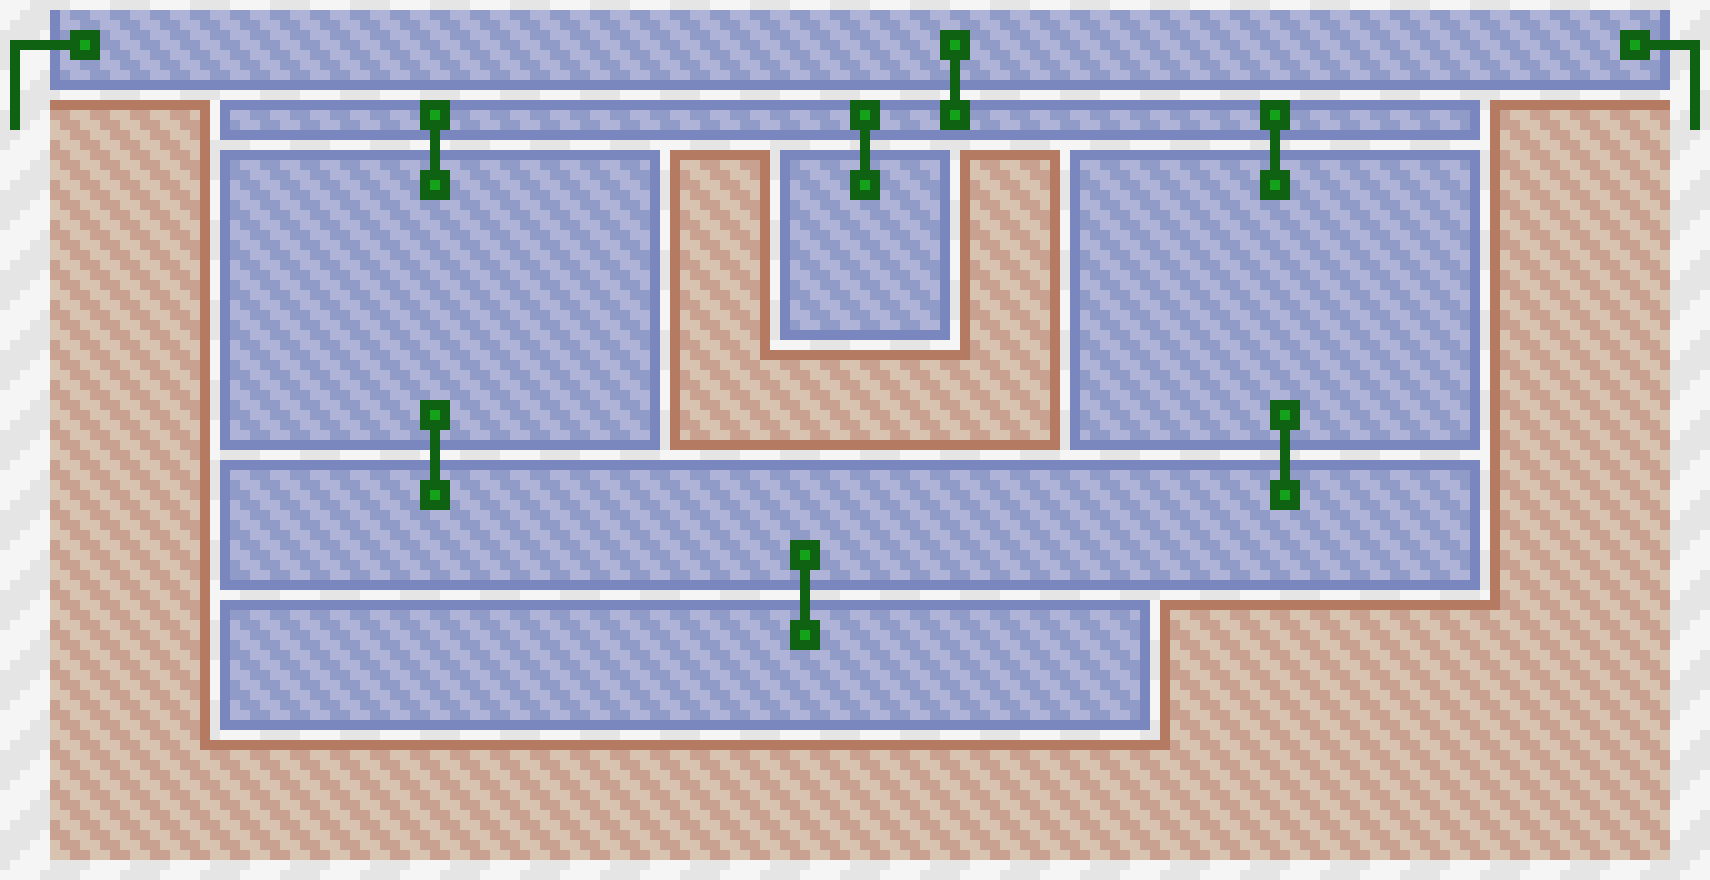
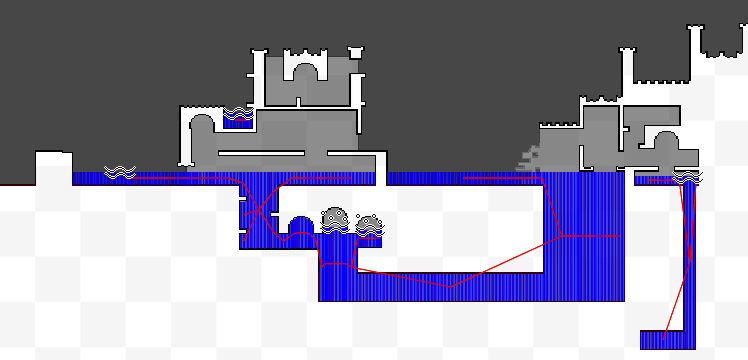
Water volume graph
But to tell you the truth, nothing happened. Pitfalls so much that you can build a couple of five-story building. For example: you need to synchronize waves, deal with pressure in communicating vessels, etc. But every cloud has a silver lining - the implementation of the region tree, which is used throughout the project, was once written to implement this method.
Statics
Since the dynamic water did not work out at all, let's simplify our life for ourselves - we will adjust the water in the editor, and leave the waves in for the illusion of dynamics. In fact, we turn to option number 3 from the list of options.
Water is a very controversial thing, because it can flow: you can’t say "there will be water at these points," place meshes for the liquid and get a good picture. Well, okay, let the level designers (we will in the future) place some key points where the water should be exactly, and the engine will pour it out of its reserves, and exactly to the level of key points. Of course, you can put one “anchor” under another, but this is not a problem of the engine, but of those designers who are unknown to us: our code will accurately fill the level to the highest key point with water.
Another feature is the individual anchors for creating bubbles. If the algorithm finds such an anchor, it will try not to fill it with water, leaving a neat cavern with air.
Now that we have an understanding of what results we will get, it's time to develop an algorithm, is it not?
Water generation
In general, water can fill the entire level. Since the walls are made up of rectangular pieces and can be located anywhere, the water volume is a non-convex rectangular polygon with holes. What a muck. Let's break into simpler shapes.
A small spoiler to make it clearer. As a result of preprocessing, we must get some water volumes, in which we simply count the waves. In fact, one water volume is a set of water columns with a thickness of one pixel.
Let's deal with the empty space in which there can be a liquid. Great region tree, about which I told in past articles, will help a lot. Using it, we will get all rectangular volumes not occupied by walls:
- Starting from the bottom (initially left) corner of the tree, we are looking for the first empty area above.
- Starting with the found empty region, we are looking for the first non-empty region above.
- Add the resulting segment to the list.
- If you have reached the top (in a geometrical sense) of the tree border, move 1 pixel to the right.
- If you have not reached the right boundary of the tree, go to pt.1.
- We collect rectangles from the list of segments (and they are rather well sorted).
- We build connections between adjacent rectangles.

Instead of a thousand words
Most likely, you can get these rectangles in a much more beautiful way. I would be glad to comment on this topic.
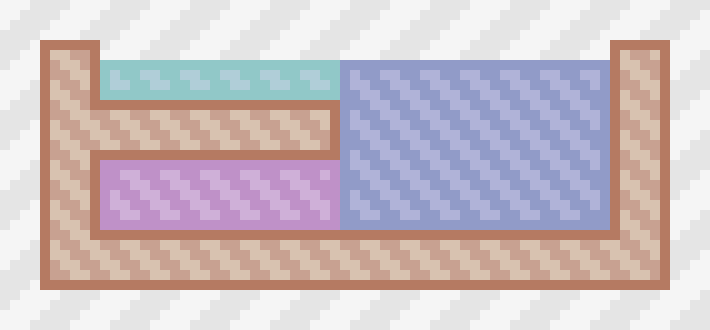
In fact, rectangles are not the best choice. Due to the large number of parts (for example, the teeth on the towers), rectangular water volumes will be very large. This will reduce productivity. Calm water is flat, and the shape of the bottom is not important to us, therefore we combine adjacent rectangles in this way:
A ( B), B - ( A) - .
After this stage, a small amount of water volumes with a ribbed bottom will remain; this is clearly seen in the figure below.

Marking white space on the map (with links)
Now you need to find all the marks left on the map by the designers and "trim" our blanks according to their level. An algorithm like this will cope with this:
- We collect all the labels of the water level (
 ), sort them by y-coordinate in descending order.
 - For each tag:
2.1. Find the rectangle that owns the label.
2.2. If the rectangle is not found, the label is in the wall, ignore it and go to Fri. 2
2.2. Reduce the height of the rectangle to the level of the label.
2.3. If the height of the rectangle has become equal to zero - delete the rectangle.
2.4. Find all adjacent rectangles, the bottom edge of which is higher than the mark and delete them.
2.5. Find all the other adjacent rectangles, go to Fri. 2.3 (recursively cut all rectangles by water level). - Collect all marks of air bubbles (
 ), sort them by y-coordinate in descending order.
 - For each tag:
4.1. Find the rectangle that owns the label.
4.2. If the rectangle is not found, the label is in the wall, ignore it and go to Fri. four.
4.2. Reduce the height of the rectangle to the level of the label.
4.3. If the height of the rectangle has become equal to zero - delete the rectangle.
4.4. Find all adjacent rectangles, the bottom edge of which is higher than the mark and delete them.
4.5. Find all the other adjacent rectangles whose top edge is above the level of the label , go to step 4.3 (recursively cut all the rectangles by the level of the air bubble).
As you can see, the difference between water marks and air bubbles marks is that the first pass through all neighbors recursively, and the second stop when the neighbor is completely below the bubble level.
And now in the pictures:
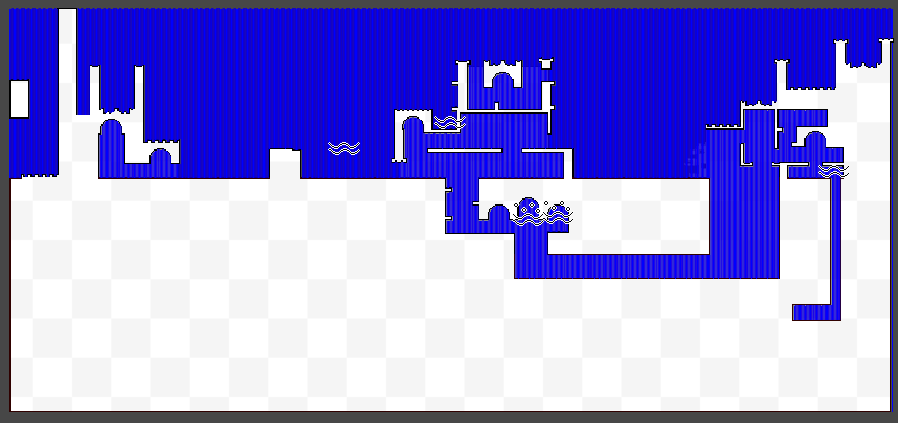
Added water markers to the map
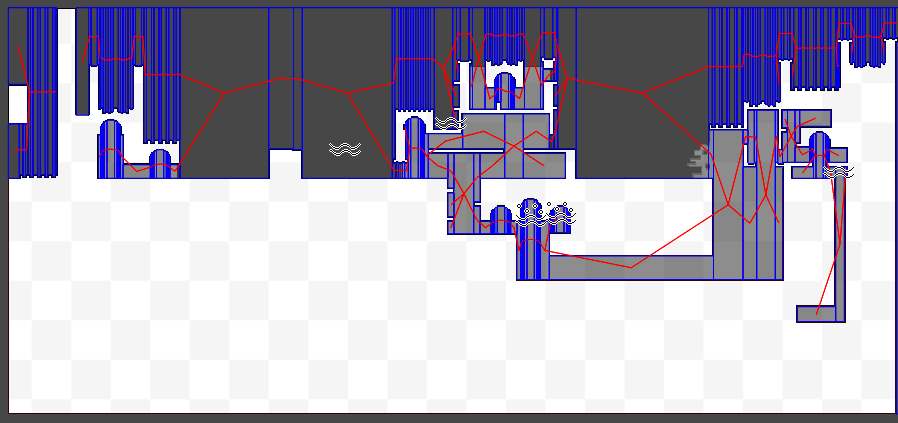
Same thing but with connections
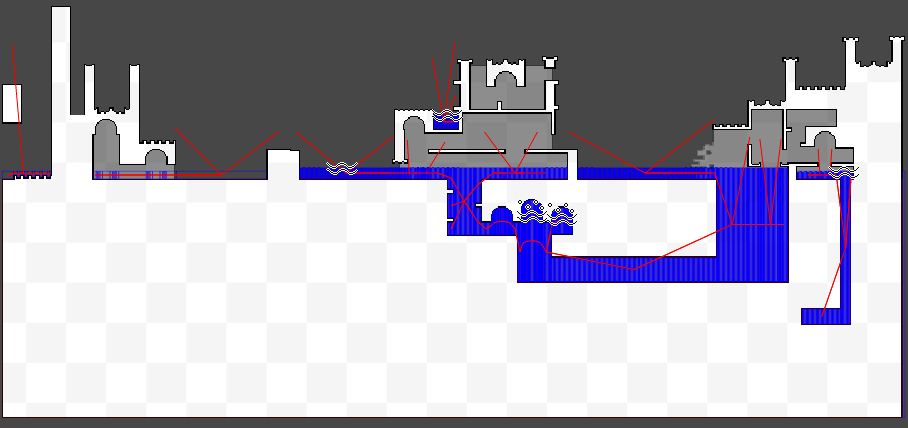
Cut the rectangles on the water level
Removed unnecessary links and rectangles

Debase visualization of water volumes obtained
Despite the fact that we cut the rectangles by the level of labels, in each of them we keep an array of initial heights (the y-coordinate of the ceiling above the water). In the future, these heights will be needed to limit the waves - otherwise the waves will be able to pass through the walls.
It's time to see what it looks like in the editor:
Dynamics
Since we have abandoned the current water in real time, let's make some beautiful waves. After the generation of water, we get something like this manager for water:
namespace NewEngine.Core.Water { public class WaterManager : MonoBehaviour { // // ... WaterPolygon[] waters; CombineInstance[] combineInstances = null; Mesh mesh; public void Generate() { if (tree == null) return; waters = WaterGenerator.Generate(tree, waveCeil); Debug.Log("Regenerate water"); } void FixedUpdate() { if (waters == null) return; var viewportRect = cameraManager.ViewRect; WaterPolygon.Update(waters, ref combineInstances, viewportRect, /* , , */); mesh.Clear(); mesh.CombineMeshes(combineInstances); } } } So far, from all this code, we ( well, or me, as a narrator ) are only interested in WaterPolygon . These are the very minimal pieces of water for which you can build waves. And these elements are connected with each other (information about the graph remains available in these landfills). If you miss the unimportant details, this class looks like this:
namespace NewEngine.Core.Water { public class WaterPolygon { // "" - // ( y, ), (, ) class Line { public int min; // y- public int max; // y- public int target; // y- , public int height; // y- (, MAX_WAVE_HEIGHT, ) public float speed; float lastDelta; public void Add(float additionalWater); public void Sleep(); public void Update(float tension, float dampening, float foamThreshold, float foamForce, float foamDampening, float airTemperature, float airTranscalency, float verticalTranscalency, float minBoilTemperature, float minBoilBubble, float maxBoilBubble, float boilFrequency); } // y Line, , x int x; // ; WaterPolygon[] left; WaterPolygon[] right; // "" Line[] lines; // bool sleeping; int sleepingFrames; // AABB int minWaterY; float maxWaterY; // UnityEngine Mesh mesh; // , , :) public static void Update(WaterPolygon[] water, ref CombineInstance[] combineInstances, Geom.IntRect viewportRect, int outsideCameraSleepOffset, float heightSleepThreshold, float speedSleepThreshold, float tension, float dampening, float spread, int steps, float foamThreshold, float foamForce, float foamDampening, float airTemperature, float airTranscalency, float verticalTranscalency, float horisontalTranscalency, float minBoilTemperature, float minBoilBubble, float maxBoilBubble, float boilFrequency, int sleepingUpdateFrames); // AABB offset public bool IsOutside(Geom.IntRect viewportRect, int offset); // - , lines void UpdateFirst(Geom.IntRect viewportRect, int outsideCameraSleepOffset, float tension, float dampening, int steps, float foamThreshold, float foamForce, float foamDampening, float airTemperature, float airTranscalency, float verticalTranscalency, float minBoilTemperature, float minBoilBubble, float maxBoilBubble, float boilFrequency, int sleepingUpdateFrames); // - , (left right) void UpdateSecond(float heightSleepThreshold, float speedSleepThreshold, float spread, int steps, float foamThreshold, float foamForce, float foamDampening, float horisontalTranscalency, float airTemperature, float minBoilTemperature); // void Sleep(bool withClear); // ( ), void FindLine(bool isRight, out Line line, out WaterPolygon water); // public void CreateMesh(ref CombineInstance combineInstance); } } I will not talk about the physics of fluid, because I made waves in one good tutorial . If in a nutshell: we represent water in the form of connected springs, where the spring is known for the current height, speed and optimum height. The springs oscillate and transmit vibrations to neighbors. The width of the spring in the project - one pixel.
But there is one important addition. In the tutorial there is only one "water testing ground" while we have a whole graph of them. And you need to synchronize the waves correctly. The example is clearer:

Let's say we have this level
It will consist of three water ranges.

At some point, a wave appears in the blue polygon.

The algorithm finds a suitable neighbor based on the height of the left column and synchronizes the wave.

For very large waves, the algorithm will choose another neighbor.
Minute optimizations. It makes no sense to count the waves for:
- Polygons off-screen.
- Polygons with no waves.
At the next calculation of the waves, a check is made - whether all the waves were less than the threshold value, and if yes - bed time! If the polygon is entirely outside the screen, the threshold value is slightly higher. Accordingly, a connected test site or the influence of other modules (physics, wind, etc.) can wake up water.
So far, water has no reason to hesitate. Nothing can disturb her peace, nor the battles of battle mages, nor a banal hurricane. Cold as the heart of Morra. Time to melt the ice.
Temperature
Despite the somewhat manic elaboration of useless little things, I don’t really want to spend another six months on realistic thermodynamics. So simplify utterly. And a little bit more.
Let's start with the weather manager. Someday there will be both storms and calmness, but for now, only this:
namespace NewEngine.Core.Weather { public class WeatherManager : MonoBehaviour { [SerializeField, Range(-100, 200)] float airTemperature; public float AirTemperature { get { return airTemperature; } } } } The concept is:
- The temperature of the water is initially equal to the air temperature.
- At temperatures below 0 ° C water freezes.
- At a temperature of 100 ° C water boils.
- Water volumes exchange temperature with each other.
- Water volumes exchange temperature with the atmosphere, taking into account the volume (in a geometric sense) of the atmosphere.
- Optimization and deoptimization:
6.1 Boiling water never sleeps.
6.2. When the water is "awakened", a simplified calculation of changes in the temperature of the liquid during sleep occurs.
The temperature for WaterPoligon.Line will be stored only for the upper and lower ends of the water column.
class Line { public int min; public int max; ... public float minTemperature; public float maxTemperature; ... } Extremely inaccurate way - after all, all the pillars have different heights, but we will do.
At first there was the idea of breaking the pillars into a certain number of pieces and counting the transfer of heat between these pieces (both in one column and between neighboring ones). In this case, one could make “layered water” - ice / water / ice, which is impossible in the current implementation.
The transfer of temperature is carried out in three different "directions". The first and most obvious - between the edges of the water column:
if (length > 0) { ... float avgTemperature = (maxTemperature + minTemperature) * 0.5f; float ratioTranscalency = verticalTranscalency / length; maxTemperature = maxTemperature + (avgTemperature - maxTemperature) * ratioTranscalency; minTemperature = minTemperature + (avgTemperature - minTemperature) * ratioTranscalency; } The second is more interesting. Heat transfer between the air and the top edge of the pillar. When generating water, we received the height , in fact, the coordinate of the ceiling. So, at any time we can get the height of the air gap above the water. The more air above the water, the faster the heat exchange takes place. Controversial statement. But in the open air the water will cool / warm up faster than in low caves:
float length = height - min; if (length > 0) { if (height < max) { float airVolume = Mathf.Min(max - height, MAX_AIR_VOLUME); maxTemperature = maxTemperature + (airTemperature - maxTemperature) * Mathf.Clamp01(airTranscalency * airVolume); } ... } There remains a heat exchange between adjacent columns. Since temperature information is stored only at the edges of the pillars, linear interpolation enters the scene.

For lovers of pictures
static void UpdateTemperatureDelta(float horisontalTranscalency, float[] minTemperatureDelta, float[] maxTemperatureDelta, int i, Line line, Line other) { if (line.height <= line.min || other.height <= other.min) { minTemperatureDelta[i] = 0; maxTemperatureDelta[i] = 0; return; } float height = line.height - line.min; float otherHeight = other.height - other.min; if (Mathf.Max(line.height, other.height) - Mathf.Min(line.min, other.min) >= height + otherHeight) { minTemperatureDelta[i] = 0; maxTemperatureDelta[i] = 0; return; } float minY = Mathf.Max(line.min, other.min); float maxY = Mathf.Min(line.height, other.height); float minT = (minY - line.min) / height; float maxT = (maxY - line.min) / height; float otherMinT = (minY - other.min) / otherHeight; float otherMaxT = (maxY - other.min) / otherHeight; float minTemperature = Mathf.Lerp(line.minTemperature, line.maxTemperature, minT); float maxTemperature = Mathf.Lerp(line.minTemperature, line.maxTemperature, maxT); float otherMinTemperature = Mathf.Lerp(other.minTemperature, other.maxTemperature, otherMinT); float otherMaxTemperature = Mathf.Lerp(other.minTemperature, other.maxTemperature, otherMaxT); float ratio = horisontalTranscalency * Mathf.Clamp01(height / otherHeight); minTemperatureDelta[i] = ratio * (minTemperature - otherMinTemperature); maxTemperatureDelta[i] = ratio * (maxTemperature - otherMaxTemperature); } The temperature exchange is similar in structure to wave exchange, but the wave is transmitted only to one adjacent WaterPolygon 'on each side, and the heat to each of its neighbors.
And the final touch - boiling and freezing of water. If the temperature is higher than or equal to 100 ° C, we add a random spring velocity to the liquid column, and the higher the temperature, the greater the velocity spread (in fact, not exactly 100 ° C, water begins to bubble a little earlier).
Well, if the temperature is below or equal to 0 ° C - we keep the spring speed equal to zero and stop responding to the transmission of speeds from the adjacent spring columns.
Or in other words:
if (height < max) { if (maxTemperature >= minBoilTemperature) { float depth = target - min; float ratio = Mathf.Clamp01((maxTemperature - minBoilTemperature) / (100 - minBoilTemperature)); float heightValue = Mathf.Min(depth * 2, Mathf.Max(minBoilBubble, ratio * maxBoilBubble)); float frequency = Mathf.Lerp(0, boilFrequency, ratio * ratio); if (Random.value > 1 - frequency) height += Random.Range(-heightValue, heightValue); } } if (maxTemperature <= 0) { speed = 0; return; } Gradual boiling water
Conclusion and intrigue
After all of the above, the project has water that can be "poured" to the level in the editor. Exciting, boiling, hardening in the cold, life-giving moisture!
It would be a shame to get an ugly picture by writing so much code. Reflections, refractions, caustics - our everything! So, again, thick shaders, interaction with the lighting system, render texture and all that.
But about this - in the next article. :)
')
Source: https://habr.com/ru/post/308220/
All Articles