Automation of mobile applications based on Appium

Author: Anton Sirota (QA, Automation)
In this article, based on a lecture that I recently read, we will look at the Appium framework. This is an introductory material designed to understand how mobile applications are being automated in principle, what is required for this, what to start with, and what difficulties you will have to face.
Automation of mobile applications is a relatively new phenomenon, but its demand is constantly growing. There are some difficulties with Appium, although in general the process of automation with its use has already been debugged.
')
Content
Environment for mobile automation
Search and work with items
Work with the driver
Work with contexts
Emulator or real device?
Possible problems / difficulties
Mobile automation process
Cloud services
Types of mobile applications:
Native.
Web.
Hybrid.
Before talking about automation, it is worth considering the types of mobile applications themselves.
Native applications. The main type of mobile applications are installed on the phone and work directly on the phone. Native applications do not require a browser and the Internet, and if they do, they are not dependent on their presence.
Web applications. Now often there are adaptive designs that adapt the web application from the desktop version to the mobile one. You need to test such applications in conditions as close as possible to the real environment — on emulators or devices.
Hybrid applications. Native applications that have built-in the ability to open web pages when access to the web is implemented through the native application.
Environment for automation
| iOS Automation | Android Automatoin |
|---|---|
| Mac OS | Mac OS / Windows / Linux |
| Xcode | Android SDK |
| Node js | Emulator setup |
| Appium | Appium |
| Application | Application |
| Haxm driver (for SDK Emulator) |
Before you begin the process of automation, it is important to understand what environment will need to be configured. And, of course, the two main operating systems that will have to deal with - iOS and Android.
What requires iOS to start? Apple is a complete system, so if tomorrow you need to automate an iOS application, you will need a Mac operating system, as an option - everything can be deployed on Mac-mini. Why? Because we will need xCode with Mac OS.
Appium will be the next tool. There are two ways to launch Appium: UI or console. To install and run the console version, we will additionally need NodeJs. A UI-version can be downloaded from the official site, and it will immediately be ready to go.
If we are talking about automating web applications, we will need to make sure that the emulator has a browser installed. For Android, this will be Google Chrome, for iOS, Safari (which by default always already exists in the emulator).
If we are testing the native application that the developers gave us, we need to make sure that it is on our machine, and indicate the way - how it can be accessed in Appium.
For Android automation, the issue of choosing an operating system is not so critical - here everything can be configured under Windows, Linux and MacOS. It should be noted that it is not always possible to deploy Android automation under a virtual machine due to the lack of a graphics adapter, without which we simply cannot run the Android emulator. To start, we will need the Android SDK, i.e., the development kit for Android, which already has a built-in emulator.
The next step is to set up an emulator. There you can create and configure an emulator and emulate almost any Android device.
We also need Appium and the .apk application itself, or Chrome.apk for Android. It is important to know that the standard Android emulator doesn’t have a big problem: SDK - the emulator is very slow, you can tick the “Use host GPU” checkbox when creating the emulator, and the Haxm driver (mentioned in the list) must be installed. Then the emulator starts to work with more or less decent speed. Of course, there are more stable and faster tools like Genymotion - it is conditionally free, but if you want to use it in your project, you will have to purchase a paid license.
Search and work with items
Tools:
Appium Inspector
UI Automator Viewer (Android)
UI Automation (iOS)
Locators:
• Xpath
• Id
• Class
• Name
• UI Automation id
• Css (mobile web only)
• Accessibility id (ios only)
If you work with a mobile web application, you can simply open it in the browser, reduce it to the size of the device you need and find the necessary elements.
If the application is native or hybrid, you need Appium Inspector - the built-in inspector in Appium works with both Android and iOS. That is, if you are running the UI version of Appium, you can click Inspect, after which a tree of application elements will appear. There are also separate programs: UI Automator Viewer for Android and UI Automation for iOS. These are auxiliary tools that allow you to see the elements and find them, so that you can use them in the future for automation.
What locators are there? Even for native applications, we can use the same markup language as for web applications - Xpath. IDs if items have any IDs. You can also use Class or Name, there is also a UI Automation ID - it can be useful if you don’t see any element in the standard tree. That is, when an element is on the device, is on the emulator, we see it, but it is not in the element tree and in xml - this also happens. UI Automation allows you to record your actions, to generate after this code, parts of which can be used in automation. You can use CSS, but you need to consider that CSS locators will only work when automating mobile web applications.
An example of finding locators in native applications
Opening UI Automation Viewer, on the left you will see a screenshot of the screen, on the right - a tree of elements that are in the application. We can go through the tree and build the Xpath. The locator will use two slashes and include elements that allow you to build a dependency.
We have a tree and details for each element of the application. That is, we take some element, and we can see from it a class, index, text, id, etc. All this can be used when searching for an item. When building a locator, we can find an element by class if the class is unique. Also, we may have a resource_id, inside which there is id =, such elements can be located directly by id =. Appium Inspector will be very similar to the UI Automation viewer, which comes in the Android SDK package (the tools folder, and in it the uiautomatorviewer.bat file that launches the UI Automation viewer and allows you to view the tree of elements). With it, you can see the elements not only on the emulator - you can find the same elements from a real device if it is connected via a cable.
In UI Automation Viewer, you can click on the device screenshot button, then it connects to the emulator using ADB and gets a screenshot and xml of the open application through it. After receiving a screenshot and a tree of elements, we can check whether we have the necessary elements and check which attributes can be used to create a unique locator. Thus, elements in native applications are found.
Work with the driver
WebDriver - RemoteWebDriver - AppiumDriver = IOSDriver / AndroidDriver
Before working with the driver, you need to set up the environment, the emulator, install the application on the emulator, open it and make sure that the application elements are available in the element tree. That is, check that you are ready for further automation.
After that, you can build automation directly. It is also worth mentioning the layers in automation, where the end point is your application, which is installed on the device, a lower level, the device, and the Appium interacts with it, which is installed separately. Commands in Appium are transmitted from code, which in general will look almost the same as when automating web applications using Selenium. That is, you use the same Page Object, you also work with elements, only this will not be WebElements, but MobileElements. The code itself interacts with Appium through the driver.
A web driver is an interface in which there is a framework of possible actions. Next comes the RemoteWebDriver, which inherits WebDriver. Next is AppiumDriver, which will be necessary when automating mobile native applications (when automating mobile web applications, you can use RemoteWebDriver). And already from AppiumDriver, IOSDriver and AndroidDriver are inherited, in which certain actions are implemented in their own way for each operating system.
If more:
WebDriver - basic interface.
RemoteWebDriver - often used for automation with the use of Selenium Grid (automation of web applications).
AppiumDriver is a general abstract class for automating mobile applications.
IOSDriver - used for iOS Automation.
AndroidDriver - used for Android Automation.
Using RemoteWebDriver when automating mobile web applications is not always convenient, because sometimes there is a need to refer to certain native parts. In the same Facebook, if you automate the mobile web version of the application, after entering the login and password, you will be prompted to remember the password. After apruv, a native pop-up pops up, which will block the site until you click “Ok”. To do this, you already need AppiumDriver (or iOSDriver / AndroidDriver), which can work with the native context, since RemoteWebDriver can only work with web contexts.
AppiumDriver (General abstract class for Mobile) is an abstract class for mobile automation and for automation of Android / iOS. Depending on the device, you can use IOSDriver or AndroidDriver, which is inherited from AppiumDriver.
Initialization example
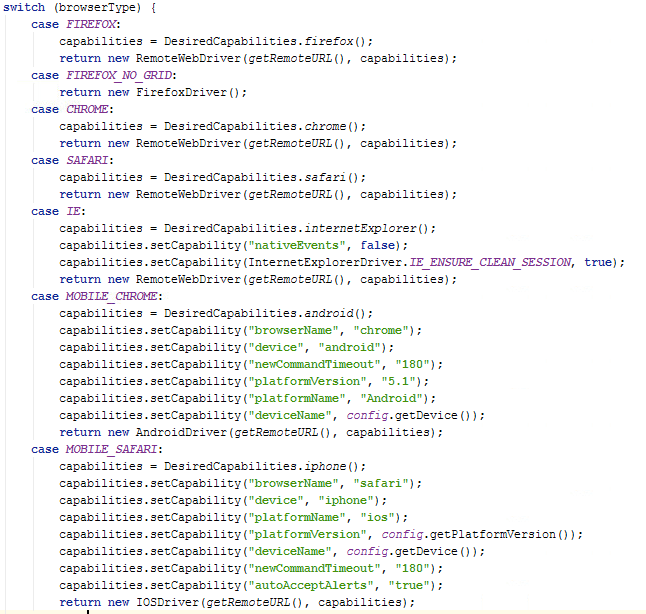
This example is taken from a real project. Here we can specify the required capability. After the automation environment is ready, you can implement everything in the code, which will further send the necessary requests to Appium. To do this, you need to specify the URL at which it will go to Appium, and the necessary capability.
The initialization example shows the settings for Mobile Chrome and Mobile Safari. The capability is indicated by a browserName, where we indicate whether it will be Chrome or Safari. Further, we can use different devices and platforms. There are also autoAcceptAlerts to prevent native allergies from popping up, and newCommandTimeout, which is set to tell the driver how easy it is for him to end the session.
Work with contexts
Get all contexts:
getDriver (). getContextHandles ();
Switch context:
getDriver (). context (" WEBVIEW ");
getDriver (). context (" NATIVE_APP ");
getDriver (). context (" CONTEXT_NAME ");
This is mostly true for hybrid apps. When automating native applications, either Appium Inspector or UI Automator Viewer will help us. As for hybrid applications, when a native application opens, after certain steps, you can open a web page in the same application, or a part of it will be displayed.

In this example, Appium Inspector is open. This is what it looks like when an iOS application is open. The element tree opens here sequentially. You select any element and, if there are more elements inside, the next tree of internal elements will be displayed. Here you can see contexts, that is, you can choose NATIVE_VIEW — native context, or WEB_VIEW — web context.
It also happens that you have a native header in the application, and below is the embedded web page. In such cases, you have several contexts, and you can switch between them to find the right items.
How it works? If you talk about how this is implemented in the code, you have a driver in which you can get all contexts by calling the getContextHandles () method.
Also, you have an Appium-inspector to confirm that all contexts are available; It is possible to deduce from the code all contexts that exist at the moment, after which you can switch to these contexts.
That is, the main thing you need is the getContextHandles () method, which takes all the contexts that are on the current open page of the application.
If you need to switch between contexts, open the native application in the test, go through it to the web part, after which you need to switch from the native context to the web. To do this, call the context () method, which is in AppimDriver, and specify in it the context to which you want to switch - for example, WEB_VIEW or NATIVE_VIEW.
Devices or emulators
| Real device | Emulator | |
|---|---|---|
| Easy setup | Android: Quick install iOS: You have to dig | Android: There are pitfalls when setting up iOS: requires xcode and minimum settings |
| Run speed | Quickly | Android: speed depends on the emulator iOS: low startup speed, fast run |
| Stability | Relatively stable | Android: There are certain instabilities iOS: The problem can be solved with additional bash scripts |
| Behavior | May differ depending on OS version. | May differ depending on OS version. |
| Item availability | In WebView, elements can be defined as Native. | WebView elements are available as web elements. |
We worked with real devices and emulators. In each case, there were pros and cons.
The real Android device as a whole manages to be set up pretty quickly. You need to make sure that developer mode is enabled on the device. And after connecting the device, you need to confirm the connection on the phone itself by clicking on the “Ok” window that popped up, and that’s it - with minimal effort you are ready to automate Android mobile applications.
If we are dealing with iOS, we will have to rummage - there are difficulties in connecting a real device. A bundle with Appium is possible, but you need to spend time to set it up.
If we talk about the Android-emulator, the main pitfall is the problem of speed. The standard emulator is very slow, but installing the haxm driver and choosing Use Host GPU when setting up the emulator speeds it up.
If it is web automation, it is important to install the correct version of the browser. For example, if you have an x86 platform, you need to install Google Chrome x86 versions too.
If we consider the iOS-emulator, in general, everything is not so difficult - you will need the minimum settings. You need to run Appium so that the emulator of the required version is on Xcode. For example, to run the test on the iPhone 6, under iOS 9.3, you just need to make sure that this version is present in Xcode.
In general, real devices work faster than emulators. In the case of emulators, for Android, the speed depends on the emulator itself. As an alternative to Android, there is a Genymotion emulator, which installs pretty quickly and runs faster and more stable than the standard one. Using Genymotion, you can drive tests in several threads on one machine, which allows you to significantly increase the speed of passing tests.
If we talk about the IOS-emulator, we get a high run speed, but a low test launch speed. Because if we run a test in a new session (and more often we need it to work on a clean application), it will reopen the emulator each time, which takes time. In this case, the tests themselves run pretty quickly.
In Android emulators, certain instabilities can be observed. If we talk about real devices, everything is relatively stable. But in general, problems with unstable runs under a standard emulator can be partially solved with additional batch scripts - they will kill all unnecessary processes (which could remain from the previous run) before starting the tests and start a clean session of Appium and the emulator before running the test group.
There are cases when the behavior of the application may differ depending on the version of the operating system, some pop-up windows may not appear at all or vice versa pop up constantly. These are trifles, but this happens - such moments also have to be processed somehow.
Item availability
So far, we have noticed this only in one project: in the native application a web page opens, and the elements on this page are defined differently on the emulator and the real device. It happens that the elements on a real device are defined as native, and in the emulator everything works as a WebView, i.e., as a regular web site where we can find elements even on the CSS locator.
As I already noted, we noticed a similar difference in one project: we could find an element using the CSS locator that would work fine on the emulator, but when we run the same test on real devices, it basically doesn’t find anything, context, and sees everything as a native context.
Possible problems
Some items may not be available.
Not all standard methods work correctly (ex. Scroll / swipe).
Need to keep track of updates.
You need to monitor compliance with the versions (OS, Appium, Emulator).
It is important to properly configure the emulator.
In the case of the automation of mobile applications is still not as perfectly debugged as in web automation, but in general, all the problems that we have considered are solved. You just have to spend some time on this.
As I mentioned earlier, some items may not be available. We had a case when the validation on the page was visually visible, but it was not in the element tree. You can call getPageSource (), as with web automation, and the xml of the currently open page will be returned to us, i.e., everything that is visible on the page at the moment. But more often, if the item is not available in the inspector, xml will not open anything new either. In this case, there are two possible solutions: either leave this case for manual testing, or talk to developers, ask them to add ID or other additional attributes.
Not all standard methods work correctly. And here you need to understand that Appium is a relatively new framework, if we compare it, say, with Selenium. This is noticeable when it comes to such actions as scroll / swipe, when we need to scroll left / right or up / down in the native application. In AppiumDriver, there is a scrollToText () method that can scroll the page to specific text, but, unfortunately, for the time being it does not always work for iOS. Be prepared that you have to write your custom scroll - there are certain solutions on the Internet that can be used.
AppiumDriver also has a swipe method, but it has a lot of parameters. Therefore, to use it in tests, most often you will need to write your own wrapper, which will move the screen by a certain number of percent or pixels left and right. That is, in general, the question is solved, but the problem will have to be faced.
You need to keep track of updates and compliance with the version - one of the things that previously did not work in Appium, it works successfully in new versions. That is, we will have to update Appium as Application, just like the API in the code. In both cases, we must try to maintain the latest version, because it is regularly improved and improved. At the same time, if you have the latest version of Appium and some old xCode with an old emulator, the application will probably not work.
Mobile Automation Workflow
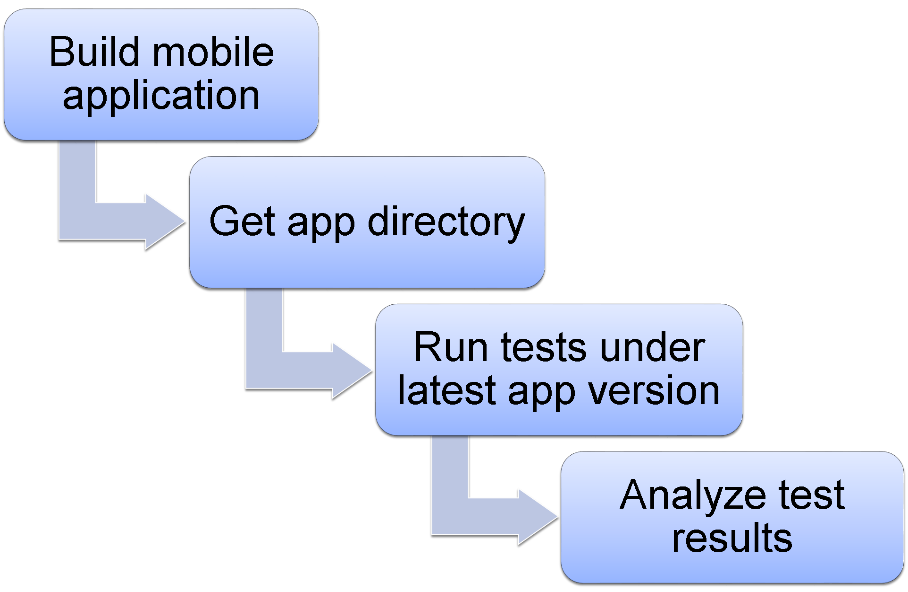
Actually, this is how everything should work ideally. A native application is a file that we need to take from somewhere, and then use it when running tests. So that the automation process is implemented correctly, you need an assembly that will assemble the mobile application. For example, the automatic assembly of the Android application that will create the .apk file. Next, the Jenkins task can be automatically launched by the trigger, which will transfer the location of the assembled .apk application and run the necessary tests on it. You can configure the application build and run tests on it every night, so we will always have up-to-date tests, and we will be able to see and analyze test run results every morning and detect bugs as quickly as possible.
Cloud Services
To automate iOS tests, we needed Mac-mini. But what if we need to provide multi-threading? Suppose there are 300 tests, and they all go in a single stream for 12 hours, and we need to get the results in just an hour. Work becomes much more difficult: for each thread you need a separate mac-machine. In this case, you need to constantly monitor the updates of versions of Appium, Xcode and OS.
In cloud services you pay a relatively small amount for the possibility of its unlimited use and you can select the desired number of streams. With the right approach, you can convince the customer that, at the expense of the obtained opportunities and saving time, to support local testing environments, he will save rather than spend too much.
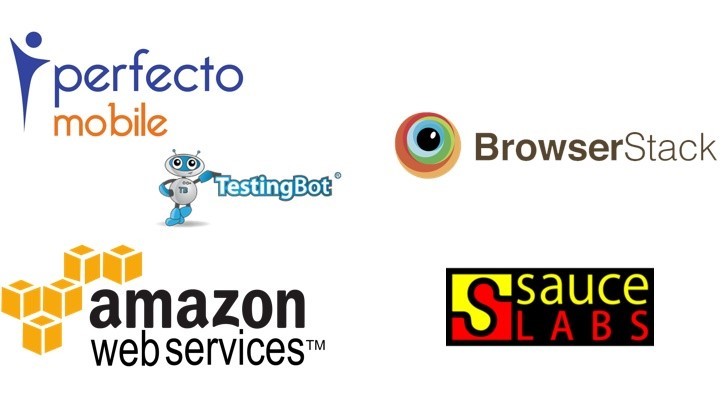
Take a BrowserStack. This vendor allocates virtual machines, and we simply indicate in the code RemoteUrl, on which the tests will be run. And, if we specified a run in three streams, it will automatically be distributed to three cars on the side of the browserstack. In addition, they update all applications on time and closely monitor compatibility. It means that it will be much easier to work. The most significant advantage of cloud services is that you do not spend a lot of time setting up and supporting environments for automated testing.
Benefits of Cloud Services
:• Do not waste time setting environment.
• Do not waste time supporting the environment.
• Stable work.
• Higher test passing speed (most often).
• Simple multithreading implementation.
Cloud services also provide a video of what is happening - this applies to mobile and web applications. And if you need to test under a certain system, for example, Windows XP or Internet Explorer 8, you can easily set the parameters when running the test, and the cloud service will automatically start the test under the desired environment. By the way, for manual testing the same browserstack provides the possibility of free use.
Now you can not waste time on setting up the environment and its support: just tell the test how it should run, and we always know that all the latest updates are already installed there.
Stable work of cloud services means that you will not need to write additional scripts that control the stability of the run and the start of scripts in a clean session. Tests in cloud services usually run faster, although if you have an absolutely top-end and very expensive Mac machine, you can win in speed. But if you have Mac-mini the year before last, even with good parameters the same before the last year, the test will not be as fast as most cloud services.
Moreover, the cloud service allows us to run one task in several streams and, accordingly, your 9-hour tests can be run in an hour or two.
Source: https://habr.com/ru/post/308180/
All Articles