Trello Clone on Phoenix and React. Parts 1-3

Trello is one of my favorite apps. I have been using it since its inception, and I really like the way it works, its simplicity and flexibility. Every time, starting to learn a new technology, I prefer to create a full-fledged application in which I can put into practice everything that I learned to solve real problems and test these solutions. So, starting to learn Elixir and its Phoenix Framework, I realized: I have to practice using all this amazing material I have met and share it in the form of a guide on how to implement the simple but functional Trello dedication.
- Introduction and selection of technology stack
- Initial setup of the Phoenix Framework project
- User Model and JWT Authentication
- Front-end for registration on React and Redux
- Initial database population and controller to enter the application
- Front-end authentication on React and Redux
- We configure sockets and channels
- We display the list and create new boards
- Add new board users
- We trace the connected users of boards
- Add lists and cards
- We spread the project on Heroku
At the beginning of the year, having decided to get acquainted with Elixir and the Phoenix Framework, I came across an interesting series of articles on the web devoted to the implementation of the Trello clone using Elixir, Phoenix and React. It seemed to me quite interesting, I did not find a Russian translation, but I wanted to share it. Finally, the hands reached the translation.
I should note that I am completely unfamiliar with the React ecosystem, this part will be given as is; In addition, some moments in Elixir / Phoenix have changed over this time - projects are not in place. I also hope to find time in the future to implement the front-end with Angular2 and publish an article about it, since I’m doing a bunch of Angular2 <-> Phoenix Channels <-> Elixir / Phoenix Framework.
In my opinion, in the original cycle of the article, the blocks are too short, so one publication here will contain several parts, links to the original will be next to the subtitles.
In controversial cases, I will give the original names of the terms, in case of discrepancies in the translations, please forgive and send alternative suggestions. Corrections of any errors, typos and inaccuracies are also welcome.
And I apologize for the duplication of the entry - even under the spoiler, it was not possible to post both the note and the introduction from the author before the kat. Decided that the introduction is more important.
Introduction and selection of technology stack
Trello is one of my favorite apps. I have been using it since its inception, and I really like the way it works, its simplicity and flexibility. Every time, starting to learn a new technology, I prefer to create a full-fledged application in which I can put into practice everything that I learned to solve real problems and test these solutions. So, starting to learn Elixir and its Phoenix Framework, I realized: I have to practice using all this amazing material I have met and share it in the form of a guide on how to implement the simple but functional Trello dedication.
What are we going to do
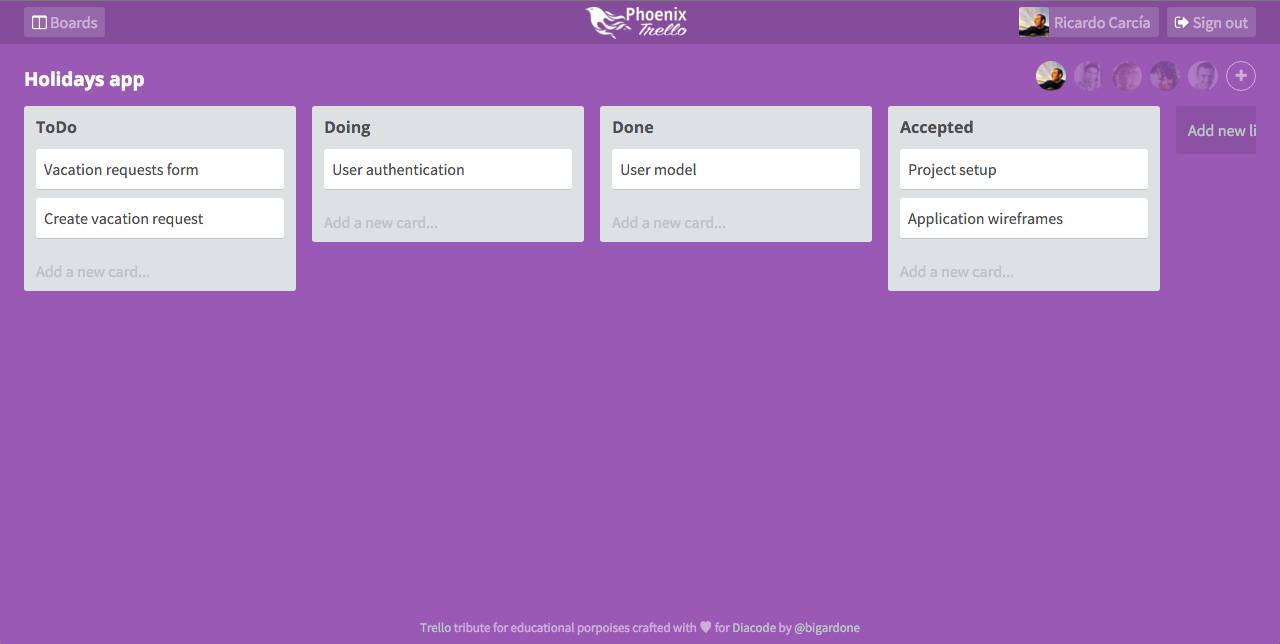
In fact, we will create a one-page application in which existing users can log in, create several boards, share them with other users and add lists and cards to them. Connected users will be shown when viewing the board, and any changes automatically immediately - in the style of Trello - will be reflected in the browser of each such user.
Current technology stack
Phoenix manages static resources with npm and collects them out of the box using Brunch or Webpack , so it's pretty easy to really separate the front-end and back-end, while maintaining a single code base. So, for the back-end we will use:
- Elixir
- Phoenix Framework
- Ecto
- PostgreSQL
And to create a one-page application for the front-end:
- Webpack
- Sass for style sheets
- React
- React router
- Redux
- ES6 / ES7 JavaScript
We will use a few more dependencies of Elixir and npm packages, but I’ll talk about them later in the process.
Why this stack?
Elixir is a very fast and powerful functional language based on Erlang and having a friendly syntax very similar to Ruby. It is very reliable and specializes in parallelism, and thanks to the Erlang virtual machine ( Erlang VM , BEAM - approx. Translator ) can cope with thousands of parallel processes. I am new to Elixir, so I still have a lot to learn, but based on what has already been learned, I can say that it is very impressive.
We will use Phoenix - currently the most popular web framework for Elixir, which not only implements some of the points and standards introduced into Rails web development, but also offers many other cool features like the static resource management method I mentioned above, and, most importantly for me, the built-in realtime functionality using websockets without any difficulties and additional external dependencies (and trust me - it works like a clock).
At the same time, we will use React , react-router and Redux , because I just love using this combination to create one-page applications and manage their state. Instead of using CoffieScript as usual, in the new year (the article was written in early January 2016 - note of the translator ) I want to work with ES6 and ES7, so this is a great opportunity to start and get involved.
Final result
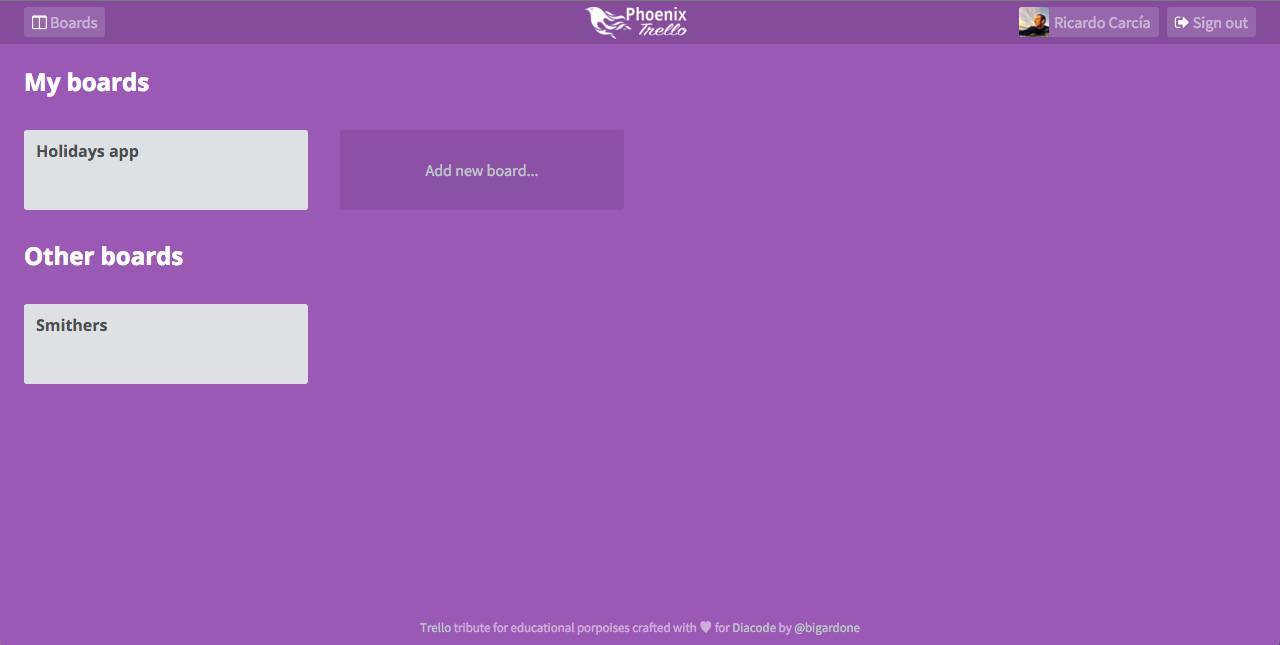
The app will consist of four different views. The first two are registration and login screens:
The main screen will contain a list of the user's own boards and boards to which it has been connected by other users:
And finally, the board view, where all users will be able to see who is connected to it, as well as manage lists and cards:
But enough talk. Let us stop here so that I can start preparing the second part, in which we will see how to create a new Phoenix project, what needs to be changed to use Webpack instead of Brunch, and how to set up the base for the front-end.
Initial setup of the Phoenix Framework project
So, after we chose the current technology stack, let's start by creating a new Phoenix project. Before this, you must have Elixir and Phoenix already installed, so use the official websites for installation instructions .
Static resources using Webpack
In contrast to Ruby on Rails, Phoenix does not have its own resource processing pipeline (asset pipeline, some Russian-language Rails resources translate the term as file file - translator ), instead using Brunch as a means to build resources, which I personally consider more modern and flexible. Cool, that there is no need to use and Brunch , if you do not want, you can use Webpack . I have never dealt with Brunch , so we’ll use Webpack instead.
Phoenix includes node.js as an optional dependency , since it is required for Brunch, but since Webpack also needs node.js, make sure you have the latest one installed.
Create a new Phoenix project without Brunch:
$ mix phoenix.new --no-brunch phoenix_trello ... ... ... $ cd phoenix_trello Well, now we have a new project without the means of assembling resources. Create a new package.json file and install Webpack as a dependency for development ( dev dependency - approx. Translator ):
$ npm init ... ( Enter ) ... ... $ npm i webpack --save-dev Now our package.json should look something like this:
{ "name": "phoenix_trello", "devDependencies": { "webpack": "^1.12.9" }, "dependencies": { }, } For the project, we need a lot of dependencies, so instead of scrolling all of them here, please look at the source file in the project repository and copy them from there to your package.json . Now you need to run the following command to install all the packages:
$ npm install We also need to add the webpack.config.js configuration file to tell Webpack how to collect resources:
'use strict'; var path = require('path'); var ExtractTextPlugin = require('extract-text-webpack-plugin'); var webpack = require('webpack'); function join(dest) { return path.resolve(__dirname, dest); } function web(dest) { return join('web/static/' + dest); } var config = module.exports = { entry: { application: [ web('css/application.sass'), web('js/application.js'), ], }, output: { path: join('priv/static'), filename: 'js/application.js', }, resolve: { extesions: ['', '.js', '.sass'], modulesDirectories: ['node_modules'], }, module: { noParse: /vendor\/phoenix/, loaders: [ { test: /\.js$/, exclude: /node_modules/, loader: 'babel', query: { cacheDirectory: true, plugins: ['transform-decorators-legacy'], presets: ['react', 'es2015', 'stage-2', 'stage-0'], }, }, { test: /\.sass$/, loader: ExtractTextPlugin.extract('style', 'css!sass?indentedSyntax&includePaths[]=' + __dirname + '/node_modules'), }, ], }, plugins: [ new ExtractTextPlugin('css/application.css'), ], }; if (process.env.NODE_ENV === 'production') { config.plugins.push( new webpack.optimize.DedupePlugin(), new webpack.optimize.UglifyJsPlugin({ minimize: true }) ); } Here we indicate that we need two webpack entry points , one for JavaScript and the other for style sheets, both located in the web/static directory. Output files will be created in priv/static . Since we are going to take advantage of some of the features of ES6 / 7 and JSX , we will use Babel with some presets created for this purpose.
The last step is to tell Phoenix to start the Webpack each time the development server starts, so that Webpack tracks changes in the development process and generates the corresponding resource files referenced by the front-end view. To do this, add the description of the "observer" to the config/dev.exs :
config :phoenix_trello, PhoenixTrello.Endpoint, http: [port: 4000], debug_errors: true, code_reloader: true, cache_static_lookup: false, check_origin: false, watchers: [ node: ["node_modules/webpack/bin/webpack.js", "--watch", "--color"] ] ... If we now start the development server, we can see that the Webpack is also working and tracking changes:
$ mix phoenix.server [info] Running PhoenixTrello.Endpoint with Cowboy using http on port 4000 Hash: 93bc1d4743159d9afc35 Version: webpack 1.12.10 Time: 6488ms Asset Size Chunks Chunk Names js/application.js 1.28 MB 0 [emitted] application css/application.css 49.3 kB 0 [emitted] application [0] multi application 40 bytes {0} [built] + 397 hidden modules Child extract-text-webpack-plugin: + 2 hidden modules One more thing to do. If we look in the priv/static/js directory, we find the phoenix.js file. This file contains everything we need to use websocket and channels , so let's move it to our base directory with web/static/js sources so that we can connect it at the moment it is needed.
Main structure front-end
Now we have everything to start programming; Let's start by creating the structure of the front-end application, which, among others, will need the following packages:
- bourbon and bourbon-neat , my favorite library of inclusions (mixin) for Sass
- history to manage history from javascript
- react and react-dom
- redux and react-redux for state control
- react-router as a library for routing (routing)
- redux-simple-router to save changes to routes in the (state) state
I'm not going to waste time discussing style sheets, because I still correct them, but I would like to note that I usually use css-buritto , which, in my personal opinion, is very useful for creating a suitable structure for Sass files.
We need to configure the Redux storage (redux store), so create the following file:
//web/static/js/store/index.js import { createStore, applyMiddleware } from 'redux'; import createLogger from 'redux-logger'; import thunkMiddleware from 'redux-thunk'; import { syncHistory } from 'react-router-redux'; import reducers from '../reducers'; const loggerMiddleware = createLogger({ level: 'info', collapsed: true, }); export default function configureStore(browserHistory) { const reduxRouterMiddleware = syncHistory(browserHistory); const createStoreWithMiddleware = applyMiddleware(reduxRouterMiddleware, thunkMiddleware, loggerMiddleware)(createStore); return createStoreWithMiddleware(reducers); } In fact, we set up a store (Store) with three intermediate layers (middleware):
- reduxRouterMiddleware for sending router actions to the storage
- redux-thunk to transmit asynchronous action
- redux-logger for logging any actions and state changes in the browser console
We also need to pass a combination of state reducers (state reducers), so create a basic version of this file:
//web/static/js/reducers/index.js import { combineReducers } from 'redux'; import { routeReducer } from 'redux-simple-router'; import session from './session'; export default combineReducers({ routing: routeReducer, session: session, }); As a starting point, we will need only two converters (reducer): the routerReducer , which will automatically transfer the routing changes to the state, and the session that looks something like this:
//web/static/js/reducers/session.js const initialState = { currentUser: null, socket: null, error: null, }; export default function reducer(state = initialState, action = {}) { return state; } The initial state of the latter will contain the currentUser objects, which we will transmit after authenticating visitors, the socket that we will use to connect to the channels (channels), and error to track any problems during user authentication.
When finished with this, we can go to our main application.js file and draw the Root component:
//web/static/js/application.js import React from 'react'; import ReactDOM from 'react-dom'; import { browserHistory } from 'react-router'; import configureStore from './store'; import Root from './containers/root'; const store = configureStore(browserHistory); const target = document.getElementById('main_container'); const node = <Root routerHistory={browserHistory} store={store}/>; ReactDOM.render(node, target); We create an object containing the browser history, set up the storages, and finally draw the Root component in the main application template, which will be the Redux routing Provider for the routes :
//web/static/js/containers/root.js import React from 'react'; import { Provider } from 'react-redux'; import { Router } from 'react-router'; import invariant from 'invariant'; import routes from '../routes'; export default class Root extends React.Component { _renderRouter() { invariant( this.props.routerHistory, '<Root /> needs either a routingContext or routerHistory to render.' ); return ( <Router history={this.props.routerHistory}> {routes} </Router> ); } render() { return ( <Provider store={this.props.store}> {this._renderRouter()} </Provider> ); } } Now let's describe a very simple route file:
//web/static/js/routes/index.js import { IndexRoute, Route } from 'react-router'; import React from 'react'; import MainLayout from '../layouts/main'; import RegistrationsNew from '../views/registrations/new'; export default ( <Route component={MainLayout}> <Route path="/" component={RegistrationsNew} /> </Route> ); Our application will be wrapped inside the MainLayout component, and the root path will draw the registration screen. The final version of this file will become somewhat more complicated due to the authentication mechanism, which we will implement later, but we will talk about this later.
Finally, we need to add an html-container in which we will draw the Root component in the main template of the Phoenix application:
<!-- web/templates/layout/app.html.eex --> <!DOCTYPE html> <html lang="en"> <head> <meta charset="utf-8"> <meta http-equiv="X-UA-Compatible" content="IE=edge"> <meta name="viewport" content="width=device-width, initial-scale=1"> <meta name="description" content=""> <meta name="author" content="ricardo@codeloveandboards.com"> <title>Phoenix Trello</title> <link rel="stylesheet" href="<%= static_path(@conn, "/css/application.css") %>"> </head> <body> <main id="main_container" role="main"></main> <script src="<%= static_path(@conn, "/js/application.js") %>"></script> </body> </html> Notice that the link and script tags link to static resources generated by the webpack .
Since we are going to manage the routing on the front-end, we need to tell Phoenix to send any http requests to the Page event of the (action) index PageController controller, which will only draw the main template and the Root component:
# master/web/router.ex defmodule PhoenixTrello.Router do use PhoenixTrello.Web, :router pipeline :browser do plug :accepts, ["html"] plug :fetch_session plug :fetch_flash plug :protect_from_forgery plug :put_secure_browser_headers end scope "/", PhoenixTrello do pipe_through :browser # Use the default browser stack get "*path", PageController, :index end end That's all for now. In the next post we will look at how to create the first migration for the database, the User model, and the functionality to create a new user account.
User Model and JWT Authentication
User registration
Now that our project is fully configured, we are ready to create a User model and instructions for migrating the database. In this part we will see how to do this, as well as allow the visitor to create a new user account.
User Model and Migration
Phoenix uses Ecto as an intermediary for any interaction with the database. In the case of Rails, we can say that Ecto would be something similar to ActiveRecords, although it shares similar functionality across modules.
Before proceeding, you need to create a database ( but before that you need to configure the database connection settings in config/dev.exs - comment of the translator ):
$ mix ecto.create Now create a new migration and model Ecto. The model generator receives as parameters the name of the module, its plural form for naming the scheme, and the required fields in the form : , so let's execute:
$ mix phoenix.gen.model User users first_name:string last_name:string email:string encrypted_password:string If we look at the resulting migration file, we immediately note its similarity to the Rails migration file:
# priv/repo/migrations/20151224075404_create_user.exs defmodule PhoenixTrello.Repo.Migrations.CreateUser do use Ecto.Migration def change do create table(:users) do add :first_name, :string, null: false add :last_name, :string, null: false add :email, :string, null: false add :crypted_password, :string, null: false timestamps end create unique_index(:users, [:email]) end end I added a ban on null in the field contents and even a unique index for the email field. I do this because I prefer to shift the responsibility for data integrity to the database instead of relying on the application, as many other developers do. I think it's just a matter of personal preference.
Now let's create a users table in the database:
$ mix ecto.migrate It is time to look at the User model closer:
# web/models/user.ex defmodule PhoenixTrello.User do use Ecto.Schema import Ecto.Changeset schema "users" do field :first_name, :string field :last_name, :string field :email, :string field :encrypted_password, :string timestamps end @required_fields ~w(first_name last_name email) @optional_fields ~w(encrypted_password) def changeset(model, params \\ :empty) do model |> cast(params, @required_fields, @optional_fields) end end In it you can see two main sections:
- A schema block in which all the metadata related to the table fields is located
- The changeset function, in which you can define all the checks and transformations applied to the data before they are ready for use in our application.
Note translator:
Some changes have been made to the latest versions of Ecto. For example, the atom: empty is marked as deprecated, an empty associative array (map) %{} must be used instead, and the cast / 4 function is recommended to be replaced with a bunch of cast / 3 and validate_required / 3. Naturally, the latest Phoenix version generator follows these guidelines.
Checks and transformations of a changeset
So, when a user is registered, we would like to additionally introduce some checks, since we have previously added a ban on using null as a field value and introduced a requirement for email uniqueness. We are obligated to reflect this in the User model in order to handle possible errors caused by incorrect data. I would also like to encrypt the encrypted_field field so that even despite the use of an unencrypted string as a password, it is recorded in a protected form.
Let's update the model and first add some checks:
# web/models/user.ex defmodule PhoenixTrello.User do # ... schema "users" do # ... field :password, :string, virtual: true # ... end @required_fields ~w(first_name last_name email password) @optional_fields ~w(encrypted_password) def changeset(model, params \\ :empty) do model |> cast(params, @required_fields, @optional_fields) |> validate_format(:email, ~r/@/) |> validate_length(:password, min: 5) |> validate_confirmation(:password, message: "Password does not match") |> unique_constraint(:email, message: "Email already taken") end end Basically, we made the following modifications:
- added a new virtual
passwordfield that will not be written to the database, but can be used like any other field for any other purposes. In our case, we will fill it out from the registration form. passwordfield is required- added
emailformat check - added password checking, requiring its length of at least 5 characters; an array of parameters will also be checked for password identity with the
password_confirmationfield - added a unique restriction to check for the presence of an existing email
With these changes we covered all the required checks. However, before writing data, you must also fill in the encrypted_password field. To do this, use the comeonin password hashing library, adding it to mix.exs as an application and dependency:
# mix.exs defmodule PhoenixTrello.Mixfile do use Mix.Project # ... def application do [mod: {PhoenixTrello, []}, applications: [ # ... :comeonin ] ] end #... defp deps do [ # ... {:comeonin, "~> 2.0"}, # ... ] end end Do not forget to install the library with the command:
$ mix deps.get After installing comeonin, let's go back to the User model and to generate encrypted_password add a new step to the changeset chain:
# web/models/user.ex defmodule PhoenixTrello.User do # ... def changeset(model, params \\ :empty) do model # ... |> generate_encrypted_password end defp generate_encrypted_password(current_changeset) do case current_changeset do %Ecto.Changeset{valid?: true, changes: %{password: password}} -> put_change(current_changeset, :encrypted_password, Comeonin.Bcrypt.hashpwsalt(password)) _ -> current_changeset end end end In this new method, we first check if the changes in the set are correct and if the password has changed. If so, we encrypt the password using comeonin and put the result in the set_of_keyword field of our set, otherwise we return the set as is.
Router
Now that the User model is ready, we router.ex continue the registration process by adding a chain to the file router.ex :api and our first route:
# web/router.ex defmodule PhoenixTrello.Router do use PhoenixTrello.Web, :router #... pipeline :api do plug :accepts, ["json"] end scope "/api", PhoenixTrello do pipe_through :api scope "/v1" do post "/registrations", RegistrationController, :create end end #... end So, any POST request to /api/v1/registrations will be processed by the processor: action :create RegistrationController controller that accepts data in json format ... in general, everything is pretty obvious :)
Controller
Before starting the implementation of the controller, let's think about what we need. The visitor will go to the registration page, fill out the form and send it. If the data received by the controller is correct, we will need to add a new user to the database, enter it into the system and return to the front-end in json data about the user along with the authentication token jwt as a result of the login. This token is what is required not only for sending with each request for user authentication, but also for user access to the application's secure screens.
To implement authentication and jwt generation, we will use the Guardian library, which copes with this task quite well. Just add the following to mix.exs:
# mix.exs defmodule PhoenixTrello.Mixfile do use Mix.Project #... defp deps do [ # ... {:guardian, "~> 0.9.0"}, # ... ] end end After running mix deps.get will need to make the library settings in config.exs:
# config/confg.exs #... config :guardian, Guardian, issuer: "PhoenixTrello", ttl: { 3, :days }, verify_issuer: true, secret_key: <your guardian secret key>, serializer: PhoenixTrello.GuardianSerializer You will also need to create the GuardianSerializer , which tells the Guardian how to encode and decode information about the user to the token and from the token:
# lib/phoenix_trello/guardian_serializer.ex defmodule PhoenixTrello.GuardianSerializer do @behaviour Guardian.Serializer alias PhoenixTrello.{Repo, User} def for_token(user = %User{}), do: { :ok, "User:#{user.id}" } def for_token(_), do: { :error, "Unknown resource type" } def from_token("User:" <> id), do: { :ok, Repo.get(User, String.to_integer(id)) } def from_token(_), do: { :error, "Unknown resource type" } end Now everything is ready to implement the RegistrationController :
# web/controllers/api/v1/registration_controller.ex defmodule PhoenixTrello.RegistrationController do use PhoenixTrello.Web, :controller alias PhoenixTrello.{Repo, User} plug :scrub_params, "user" when action in [:create] def create(conn, %{"user" => user_params}) do changeset = User.changeset(%User{}, user_params) case Repo.insert(changeset) do {:ok, user} -> {:ok, jwt, _full_claims} = Guardian.encode_and_sign(user, :token) conn |> put_status(:created) |> render(PhoenixTrello.SessionView, "show.json", jwt: jwt, user: user) {:error, changeset} -> conn |> put_status(:unprocessable_entity) |> render(PhoenixTrello.RegistrationView, "error.json", changeset: changeset) end end end Thanks to the pattern matching mechanism (pattern matching), the create handler expects the "user" key in the parameters. With these parameters, we will create a User set and add it to the database. If all goes well, we will use the Guardian to encode and sign ( encode_and_sign method) the data of the new user, get the jwt token and convert it along with the user data to json . Otherwise, if the data set is incorrect, we will display errors in the form of json so that we can show them to the user in the registration form.
JSON serialization
Phoenix uses Poison as the default JSON library. Since this is one of the dependencies of Phoenix, we will not need to do something special to install it. What really needs to be done is to update the User model and indicate which fields need to be serialized:
# web/models/user.ex defmodule PhoenixTrello.User do use PhoenixTrello.Web, :model # ... @derive {Poison.Encoder, only: [:id, :first_name, :last_name, :email]} # ... end From this point on, when converting user data or a list of users into json format in response to an event in the controller or channel, the library simply returns the specified fields. Simply steamed turnips!
Having received a back-end, ready for registration of new users, in the next publication we will move to the front-end, and in order to complete the registration process, we will program some cool pieces on React and Redux . In the meantime, do not forget to take a look at the live demo and source code of the final result.
')
Source: https://habr.com/ru/post/308056/
All Articles