We use Secure Boot in Linux to the fullest
Secure Boot technology is aimed at preventing the execution of untrusted code when booting the operating system, that is, protection against bootkits and Evil Maid attacks. Devices with Secure Boot contain in non-volatile memory a public key database that verifies the signatures of downloadable UEFI applications, such as OS loaders and drivers. Applications signed with a trusted key and with the correct checksum are allowed to load, the rest are blocked.
More details about Secure Boot can be found in a series of articles from CodeRush .
In order for Secure Boot to provide security, signed applications must comply with some “code of honor”: do not have loopholes for unrestricted access to the system and the parameters of Secure Boot, as well as require the same from the applications they download. If a signed application provides the ability to use unfair use directly or by downloading other applications, it becomes a security threat to all users who trust this application. Such a threat is represented by the shim loader signed by Microsoft and GRUB loaded by it .
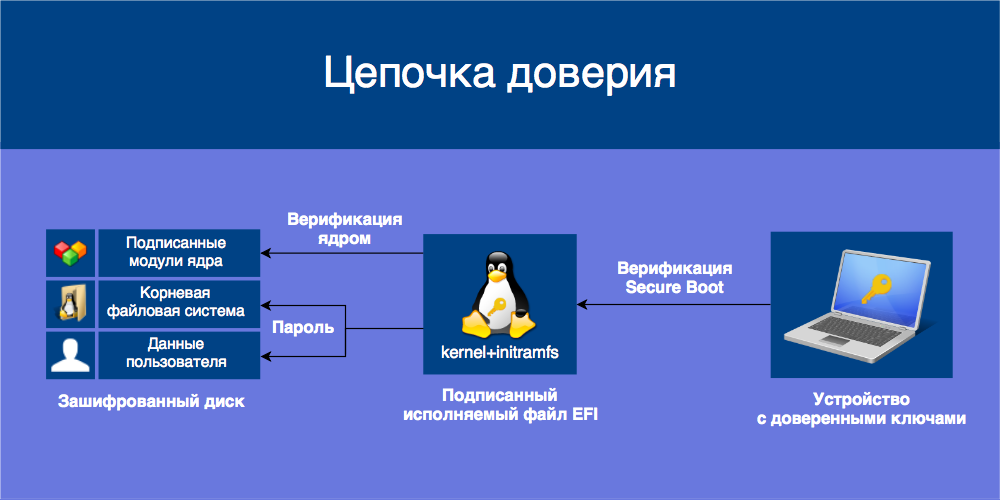
To protect against this, we will install Ubuntu with encryption of the entire drive based on LUKS and LVM, protect initramfs from changes, merging it with the kernel into one UEFI application, and sign it with our own keys.
Out-of-box solution constraints
Ubuntu, like other common distributions, offers the option of encrypting the entire LVM drive during installation. The distribution in this configuration without errors is installed on UEFI with active Secure Boot.
But Canonical is primarily interested in operating the OS on devices with Secure Boot enabled, and not in providing security through it . If you want to use Secure Boot as a security tool, then you are on your own.
How does Ubuntu implement Secure Boot encryption for the entire disk and what’s wrong with that?
Red Hat developed the shim loader so that it worked on all devices and served the benefit of humanity, observing the strict requirements of the Secure Boot standard and downloading only trusted UEFI applications. Canonical uses shim as a proxy, embedding its public key into it and signing it with Microsoft. Shim loads GRUB, signed by the Canonical dongle, which then loads the kernel, signed by Canonical.
Let's start with the fact that not the entire disk is encrypted - / boot remains unencrypted, and therefore the initramfs in it. Access to initramfs means root access. Fail.
/ boot remains unencrypted because the default GRUB cannot decrypt a disk without cryptographic modules. Which for some reason is not embedded in the signed GRUB. GRUB is not allowed to load additional modules into Secure Boot . Double Fail 1 .
GRUB must verify loadable kernels and reject incorrectly signed ones. He does not do this . Triple Fail.
Grub loads its settings from a file and by default provides access to the console. The authenticity of the configuration file is not checked, with the help of its modification or via the console you can do anything: load the UEFI Shell, another kernel, initramfs or transfer the arguments to the kernel and get root access. Fatal Error 2 .
What does all this mean?
If you have a Microsoft 3 key on your system, then anyone can boot from an external device, install a bootkit and gain complete control over your device. There is no need to disable Secure Boot: it no longer works.
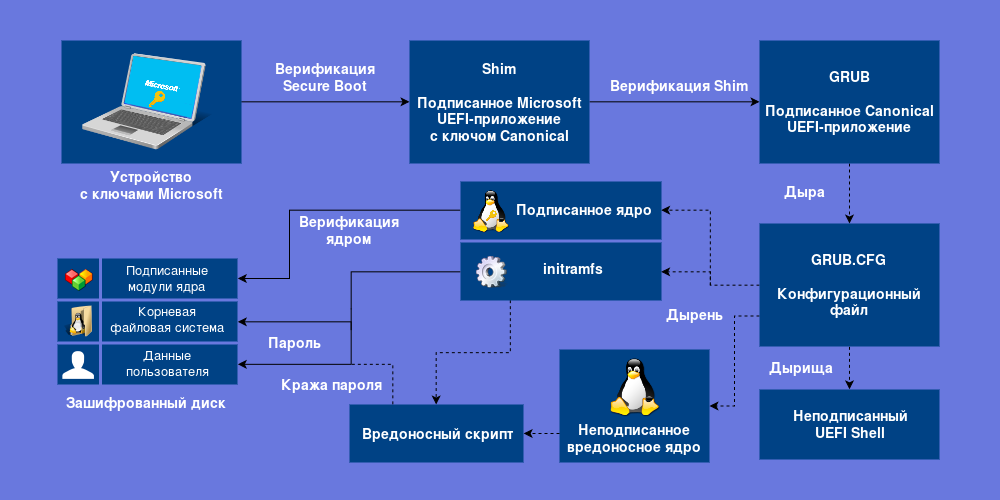
According to the Microsoft UEFI application signing policy , all signed GRUB and shim bootloaders used to download GRUB should already be blacklisted.
Speak , you just need to disable booting from external devices? This is a fight with symptoms. If you have an unprotected GRUB installed, this will not save you. If your device is Windows, then you can choose from it a device to boot, and it is likely that your firmware will allow it 4 . There is still PXE Network Boot . It will only help the password to turn on the device.
Conclusion
It is necessary to abandon the keys of others. The user must control the secure boot. The loader must be signed by the user, all unencrypted and writable elements in the boot system must be verified. User data must be encrypted. What we will try to achieve.
Installing Ubuntu with full disk encryption using LUKS and LVM
LUKS - Linux Unified Key Setup - a dm-crypt cryptographic system wrapper that allows you to create virtual encrypted devices in files and on physical disks. With LUKS, you can encrypt data on the entire disk so that you need to enter a password before loading the OS.
LVM - Logical Volume Manager is a logical volume manager with which we will divide the cryptocontainer into volumes. LVM volumes are automatically mounted after entering the password to the cryptocontainer; a separate password is not required for each volume.
The following instructions should be applicable to any Ubuntu-based distribution, others will require adjustments. First boot from the Live CD or installation image in Try before installing mode.
Markup and Encryption
To boot from disk in UEFI mode, it must be marked up in GPT format. Disk layout will be discussed using KDE Partition Manager and GParted. If you do not have them, install one that matches your environment.
sudo apt-get install partitionmanager # KDE sudo apt-get install gparted # GNOME Start the partition editor and select the disk you are interested in, usually it is the first one in the system - / dev / sda. Look at the properties of the disk.
KDE Partition Manager: , GParted: View -> Device Information. The row of the partition table shows the partition table used. If the disk is marked in dos / msdos (MBR) format, then it must be converted to GPT. It is possible to do this without losing data, but I will not describe it here, look for instructions on the Internet. If there is no important data on the disk and you want to format it in GPT, create a new table.
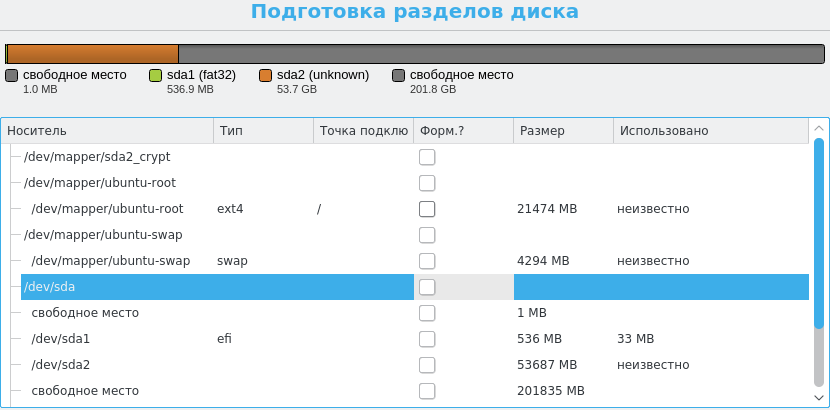
KDE Partition Manager: New Partition Table — GPT GParted: Device -> Create Partition Table — gpt The disk must have at least one ESP partition (EFI System Partition) in which the boot loaders will be stored. If the UEFI mode is installed on this disk, then one such partition already exists. In any case, I recommend creating a new one with a size of at least 100 MB. ESP should be formatted in one of the FAT formats, preferably in FAT32, and also marked as bootable.
KDE Partition Manager: -> New File system: fat32 Size: 128.00 MiB Free space before: 0.00 — GPT OK, Apply (Properties), boot OK, Apply GParted: -> New File system: fat32 New size: 128 MiB Free space preceding: 1 MiB — GPT Add, Apply (Manage Flags), boot Close Next you need to create a partition for encryption. In the same way as ESP, only without formatting (unformatted), setting flags and larger in size - so as to accommodate the system and the swap partition. In this section, we will create a LUKS cryptocontainer through the terminal, having previously switched to the superuser mode.
sudo -i We format the section with the indication of modern encryption and hashing algorithms. In XTS mode, the key length must be specified twice as large, so for AES-256 you need to specify a key with a length of 512 bits. The --iter-time parameter specifies the time, in milliseconds, spent on key generation from the entered password using the PBKDF2 function. More iterations complicate brute force, but also increase the waiting time after entering the correct password.
cryptsetup luksFormat --cipher aes-xts-plain64 --key-size 512 --hash sha512 --iter-time 2000 /dev/sda2 Confirm the formatting by writing YES , enter the password. Now open the cryptocontainer (sda2_crypt is the name for the mapping) and enter the same password.
cryptsetup luksOpen /dev/sda2 sda2_crypt The container should become available as a block device / dev / mapper / sda2_crypt. Let us turn to the layout of logical volumes inside the cryptocontainer. Initialize the LVM physical partition on top of / dev / mapper / sda2_crypt.
pvcreate /dev/mapper/sda2_crypt Inside this physical partition, create a volume group called ubuntu .
vgcreate ubuntu /dev/mapper/sda2_crypt Now we can create logical volumes within this group. First create a volume for the swap partition and initialize it. The recommended size is from sqrt (RAM) to 2xRAM in gigabytes.
lvcreate -n swap -L 4G ubuntu # swap 4 ubuntu mkswap /dev/ubuntu/swap Add a volume for the root and create an ext4 file system in it. It is considered good practice to leave free space and expand volumes as needed, therefore we will allocate 20 GB for the root. If desired, additional volumes for home, usr, var, and so on can be allocated in the free space. You can select all free space for a volume using the -l 100%FREE parameter.
lvcreate -n root -L 20G ubuntu mkfs.ext4 /dev/ubuntu/root With the markup finished, you can proceed to the installation.
Installation
Since we are planning to create the bootloader ourselves, and the Ubuntu installer does not support / boot encryption, we will start the installation without creating a bootloader.
ubiquity -b At the disk layout stage, select Manual .
Here we need to specify the mount points. Select / dev / mapper / ubuntu-root, specify the use of Ext4 as a journaling file system , the Mount Point in / , without formatting. Ubiquity will pick up / dev / mapper / ubuntu-swap as a swap partition and remember one of the EFI system partitions. The markup screen should look like this:
')
Finish the installation and do not reboot.
Configuring crypttab, fstab and resume
Mount the root of the installed system in / mnt, link / dev, / sys and / proc with / mnt / dev, / mnt / sys and / mnt / proc respectively, and also /etc/resolv.conf with / mnt / etc / resolv. conf so that you have access to the network. Now change the root directory with chroot .
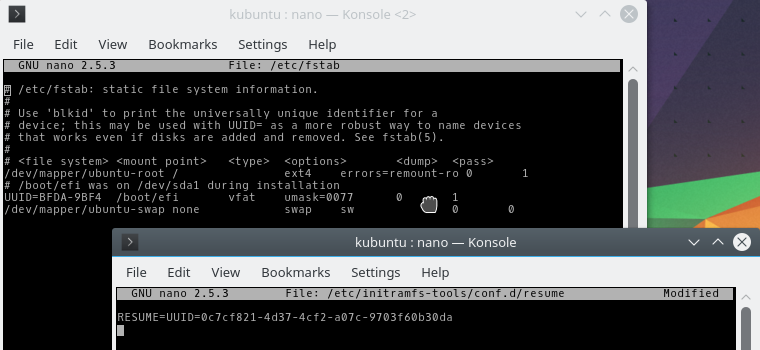
mount /dev/ubuntu/root /mnt mount --bind /dev /mnt/dev mount --bind /sys /mnt/sys mount --bind /proc /mnt/proc mount --bind /etc/resolv.conf /mnt/etc/resolv.conf chroot /mnt mount -a # ESP /boot/efi , /etc/fstab You need to manually fill in / etc / crypttab - a file that describes crypto containers that are mounted when loading.
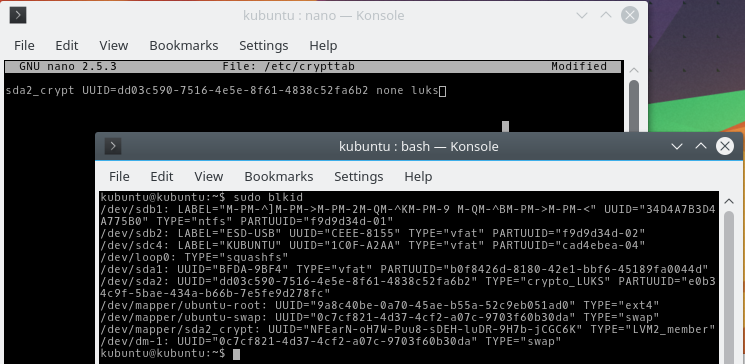
nano /etc/crypttab Add to it an entry for / dev / sda2, mounted on / dev / mapper / sda2_crypt. Set up the mount by UUID, not by device name. To find the UUID / dev / sda2, open another terminal and use the command:
sudo blkid The line starting with / dev / sda2 will contain its UUID. Copy it ( Ctrl + Shift + C ). In / etc / crypttab add an entry like mapping_name UUID = <UUID> none luks , inserting the UUID ( Ctrl + Shift + V ). Close nano by pressing Ctrl + X and Y , confirming the save.
Make sure that the mounted partitions are described correctly in / etc / fstab, and the /etc/initrmfs-tools/conf.d/resume section has a partition for waking from hibernation.
After all the changes, update the initramfs image.
update-initramfs -u Do not log out and chroot ,
Build Loader
The Linux kernel supports booting directly from UEFI if it has been compiled with the CONFIG_EFI_STUB parameter. In this case, initramfs is usually stored side by side in ESP, and the path to it is passed in arguments to the kernel.
However, the lack of verification initramfs allows you to embed malicious code into it, with write access to the ESP. Teddy Reed offers to compile the kernel by building initramfs into it .
The process of compiling the kernel is quite long, it will have to be done after each change of initramfs. Fortunately, there is another way. The systemd package (previously in gummiboot ) contains linuxx64.efi.stub , a UEFI application stub into which you can embed the kernel, initramfs, and arguments passed to the kernel. By signing this UEFI application, we will protect the kernel and initramfs from changes.
This operation will require the binutils .
sudo apt-get install binutils We write in / tmp / cmdline the arguments that will be passed to the kernel.
echo -n "quite splash" > /tmp/cmdline The / boot contains kernel images ( vmlinuz - * - generic ) and initramfs ( initrd.img - * - generic ). Determine the latest version and embed them in the workpiece.
objcopy \ --add-section .osrel=/etc/os-release --change-section-vma .osrel=0x20000 \ --add-section .cmdline=/tmp/cmdline --change-section-vma .cmdline=0x30000 \ --add-section .linux=/boot/vmlinuz-4.4.0-34-generic --change-section-vma .linux=0x2000000 \ --add-section .initrd=/boot/initrd.img-4.4.0-34-generic --change-section-vma .initrd=0x3000000 \ /usr/lib/systemd/boot/efi/linuxx64.efi.stub ubuntu.efi The resulting UEFI application ubuntu.efi must be located in ESP in the EFI / BOOT / directory. The Ubuntu installer should have defined ESP and set up the mount in / boot / efi. If there are no other bootloaders in this ESP, then ubuntu.efi can be copied to /boot/efi/EFI/BOOT/BOOTX64.EFI, then it will load when you select this section in the UEFI boot menu.
mkdir -p /boot/efi/EFI/BOOT cp ubuntu.efi /boot/efi/EFI/BOOT/BOOTX64.EFI If a ESP has already recorded the BOOTX64.EFI boot loader, then you can create another ESP, or write ubuntu.efi under a different name and add the corresponding boot record via the UEFI (UEFI Shell) console built into your firmware. Using efibootmgr not recommended 5 .
UPD: If the UEFI Shell is not built into your firmware, you can download it from here . Put it in EFI / BOOT / BOOTX64.EFI of any ESP and boot with disabled Secure Boot. To add a boot entry, enter the following command:
bcfg boot add 0 fs0:\EFI\BOOT\UBUNTU.EFI # 0 -- , # fs0 -- , # ESP, \UBUNTU.EFI Thanks to Prototik for the UEFI Shell link. A list of other teams can be found here .
If you have Secure Boot enabled, it will not work with ubuntu.efi, since it is not signed. Temporarily disable Secure Boot and boot, or continue from chroot.
Configure Secure Boot
Generating keys, installing them into the firmware and signing UEFI applications described the CodeRush here , so I will assume that you understand and can do everything.
It remains only to sign the bootloader we created.
sbsign --key ISK.key --cert ISK.pem --output BOOTX64.EFI ubuntu.efi Place the BOOTX64.EFI in the EFI / BOOT directory / EFI partition from which you plan to boot.
Automation
To ensure that the bootloader is automatically updated and signed when the initramfs is updated, create the update-efi-loader script in /etc/initramfs/post-update.d/, changing the paths where required.
#!/bin/sh echo -n "quiet splash" > /tmp/cmdline objcopy \ --add-section .osrel=/etc/os-release --change-section-vma .osrel=0x20000 \ --add-section .cmdline=/tmp/cmdline --change-section-vma .cmdline=0x30000 \ --add-section .linux=/boot/vmlinuz-$(uname -r) --change-section-vma .linux=0x2000000 \ --add-section .initrd=/boot/initrd.img-$(uname -r) --change-section-vma .initrd=0x3000000 \ /usr/lib/systemd/boot/efi/linuxx64.efi.stub /tmp/ubuntu.efi sbsign --key /root/keys/ISK.key --cert /root/keys/ISK.pem --output /boot/efi/EFI/BOOT/BOOTX64.EFI /tmp/ubuntu.efi Give the script the right to execute.
chmod a+x /etc/initramfs/post-update.d/update-efi-loader When updating the kernel, you will have to perform this operation manually.
Signing drivers and kernel modules
If you need to install third-party or own drivers and kernel modules, you need to sign them. To sign kernel modules, you need a certificate in the DER format and a key without a password, that is, generated with the -nodes parameter.
openssl req -new -nodes -utf8 -sha256 -days 36500 -batch -x509 \ -subj "/CN=Kernel Key" -outform DER -out kernel.der \ -keyout kernel.key For signing, use the sign-file script.
/usr/src/linux-headers-$(uname -r)/scripts/sign-file sha256 kernel.key kernel.der module.ko To add this certificate to the firmware, you need to convert it to PEM format, then to ESL and sign it with the KEK key.
openssl x509 -inform der -in kernel.der -outform pem -out kernel.pem cert-to-efi-sig-list -g "$(uuidgen)" kernel.pem kernel.esl sign-efi-sig-list -k KEK.key -c KEK.pem kernel kernel.esl kernel.auth Obvious tips
If your task is to protect the data on the device, then Secure Boot will do its job and no more. The rest is yours.
Do not add other people's keys to the firmware. Even from Microsoft. First of all from Microsoft.
Do not sign UEFI Shell, KeyTool or other applications that have access to the record in NVRAM. Use them in Setup Mode.
Do not leave the device turned on without supervision. The device in suspend to RAM contains the decrypted data and master keys of cryptocontainers in RAM.
Set a password for UEFI Setup is not easier than from your cryptocontainer.
When physically accessing the device internals, you can disable Secure Boot by dropping NVRAM's memory or damaging it, and also leave the hardware tab. Such an attack is successful only when it is invisible. Make it so that you can find out about it: glue the screws on the case with hard-to-reproduce stickers, smear them with varnish and sparkles. Seal your device.
Put the first in the download list unsigned application. If you don’t see a message from Secure Boot one day, your device is definitely compromised.
Reliably disconnected from the Internet device stored in the safe, you still can not think of anything. Vulnerabilities in the implementation of Secure Boot in specific firmware are not excluded.
Bonus: the return of hibernation
When encrypting the entire disk instead of the standby mode, hibernation is used to save the state and continue working from the point of stopping, it is also sleep mode or suspend to disk.
For security reasons, kernel developers have disabled the possibility of hibernation when verification of kernel modules is enabled . It is argued that the recovery image is not verified upon waking, the swap partition can be replaced and then the system will wake up with unchecked and potentially malicious code.

This is true if initramfs is not verified and / or the swap partition is not encrypted. However, regardless of the use of hibernation under such conditions, the initramfs can be replaced, and sensitive data restored from the swap partition. In our configuration, initramfs is verified by being included in the signed boot file, and the swap partition is encrypted. So this restriction is meaningless to us.
Back in 2013, Chung-Yi Lee proposed to verify the recovery image , and in 2015 he introduced a patch that implements his idea. But things are there. Therefore, we assume that we are sufficiently protected with our encryption, and we will return to us hibernation without verification.
Method 1: Disable Kernel Module Verification
Enabled verification of kernel modules disables hibernation. By default, verification of kernel modules is enabled with Secure Boot, but it does not depend on Secure Boot. It can be disabled, leaving only the Secure Boot.
This should not cause much damage to safety. Kernel modules are installed from a trusted source along with a kernel update and are stored on an encrypted disk and in a verified initramfs. Third-party drivers are installed manually, and they will be signed by us or not, does not matter, because we already trust them. SecureApt for the kernel and TLS / HTTPS for third-party drivers should be protected from MiTM, and then only root access to the decrypted disk remains. But in this case, the attacker already has our data.
“Leave a request” to disable module verification is possible using mokutil , and the shim loader shim confirm it.
sudo apt-get install mokutil shim sudo mokutil --disable-validation Enter the password, which is then required to confirm character-by-character. Now you need to boot via shim and select Change Secure Boot state (sic!) In it. Place /usr/lib/shim.efi in EFI / BOOT / BOOTX64.EFI on one of the ESPs or add a boot record via UEFI Shell. Pre-disable Secure Boot, then return it back.
UPD 01/12/17: Together with shim.efi, MokManager should be saved alongside. The latest versions of the shim.efi and MokManager packages are located in / usr / lib / shim / , shimx64.efi and mmx64.efi.signed respectively. You need to rename mmx64.efi.signed to mmx64.efi .
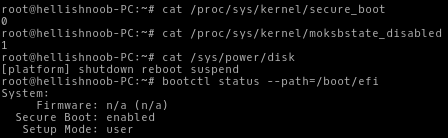
Now Secure Boot and Hibernation are working, UEFI applications are being verified, but there are no kernel modules.
In principle, shim and mokutil no longer required, they can be removed.
Method 2: Use the old kernel version
A patch that disables hibernation, appeared in Ubuntu-4.4.0-18.34. Ubuntu-4.4.0-17.33 should be free from it. However, staying at the old core, ignoring security updates, is not the best option.
Method 3: Compile your kernel
If your time is worth nothing, then you can compile your kernel without this limitation. There is no guarantee that after long suffering you will be satisfied with the result. But if you really want this, praise Linus Torvalds and the GPLv2, you have the right to do so. You can pre-test the kernel compiled by me , so as not to waste your time.
Getting the source code
apt-get
The easiest way to get the source code for the kernel of your version is to download it from the repository.
In /etc/apt/sources.list , pointers to the source repositories should be present. Usually there are already commented out entries with deb-src . Uncomment them for the xenial main and xenial-security main repositories, or add them yourself, and then update the apt index.
$ sudo nano /etc/apt/sources.list ... deb-src http://ru.archive.ubuntu.com/ubuntu/ xenial main restricted deb-src http://security.ubuntu.com/ubuntu xenial-security main restricted ... $ apt-get update Download the source code and go to the created directory.
apt-get source linux-image-$(uname -r) cd linux-4.4.0 Please note that apt will download the current version of the source code. Check the version number of the .dsc file.
linux_4.4.0-34.53.dsc git
If you want to keep the kernel up to date and recompile it as updates are released while preserving their changes, select git. The initial download will take a long time.
Install git.
sudo apt-get install git Create a local copy of the git-repository of the kernel of the current release of Ubuntu and go to the directory created.
git clone git://kernel.ubuntu.com/ubuntu/ubuntu-xenial.git cd ubuntu-xenial By default, git points to the master branch corresponding to the latest release version. You can switch to another version by the release tag of this version. To list all tags for a given mask, use git tag -l <> .
$ git tag -l Ubuntu-* ... Ubuntu-4.4.0-33.52 Ubuntu-4.4.0-34.53 Ubuntu-4.4.0-35.54 ... Create a temp branch for the tag corresponding to your version, and switch to it.
git checkout -b temp Ubuntu-4.4.0-34.53 Customization
Download the packages required for compilation (build dependencies).
sudo apt-get build-dep sudo apt-get ccache fakeroot kernel-package libncurses5-dev Make sure that scripts have the right to execute, start cleaning.
chmod a+x debian/rules chmod a+x debian/scripts/* chmod a+x debian/scripts/misc/* fakeroot debian/rules clean Copy the old configuration file to the current directory, run the configuration, select Load and load the config . There is no need to change anything else, exit and save the configuration - Exit → Yes .
cp /boot/config-4.4.0-34-generic config fakeroot debian/rules editconfigs Modify the kernel / power / hibernate.c file to remove the secure_modules () check.
--- a/kernel/power/hibernate.c +++ b/kernel/power/hibernate.c @@ -67,7 +67,7 @@ static const struct platform_hibernation_ops *hibernation_ops; bool hibernation_available(void) { - return ((nohibernate == 0) && !secure_modules()); + return (nohibernate == 0); } /** -- Prepare the file for commit.
git add kernel/power/hibernate.c If you have not made commits and have not entered your data, do it now.
git config --global user.email "you@example.com" git config --global user.name "Your Name" Make a commit, enter a comment.
$ git commit ... Allow hibernation on Secure Boot Now your changes are saved in a new snapshot. If you want to upgrade to the next version and apply the same changes to it, use git rebase < >
$ git rebase Ubuntu-4.4.0-35.54 , … : Allow hibernation on Secure Boot Compilation scripts determine the kernel version of the last entry in the change history (changelog) in the debian.master directory. Add a new entry to change the version.
EDITOR=nano debchange -c debian.master/changelog -l "custom" The custom1 suffix will be added to the version , which will be reflected when building .deb packages and will allow installing them if packages of the same version are already installed without a suffix. However, this suffix applies only to the package name, but not to its contents: the kernel and the directory with its modules will have the same version 4.4.0-34-generic , and during installation, the old files will be overwritten with new ones. To avoid this, change the version of the ABI c 34 to, for example, 3400.
linux (4.4.0-3400.53custom1) UNRELEASED; urgency=medium * Allow hibernation on Secure Boot ... Compilation
Run the cleaning again and compile the kernel. If you are not an experienced kernel developer and do not understand how ABI checks and modules work (I don’t understand), disable them (skipabi = true, skipmodule = true), otherwise your compilation will break at one of the last stages. It uses multi-threaded packet building with the number of threads equal to the number of processor cores. The goal of binary-generic means to compile the usual kind of kernel, the architecture is determined automatically.
fakeroot debian/rules clean skipabi=true skipmodule=true DEB_BUILD_OPTIONS=parallel=$(getconf _NPROCESSORS_ONLN) do_tools=false no_dumpfile=1 \ fakeroot debian\rules binary-generic If the compilation was successful, three .deb packages will appear in your home directory. You must install linux-image- <version> .deb , and also preferably linux-image-extra- <version> .deb . This can be done using dpkg -i < > or via QApt by opening the package in the file manager, if it supports it. Be careful: if you have not changed the ABI version, the old kernel and modules will be overwritten.
Reassemble the boot file.
echo -n "quiet splash" > /tmp/cmdline objcopy \ --add-section .osrel=/etc/os-release --change-section-vma .osrel=0x20000 \ --add-section .cmdline=/tmp/cmdline --change-section-vma .cmdline=0x30000 \ --add-section .linux=/boot/vmlinuz-4.4.0-34-generic --change-section-vma .linux=0x2000000 \ --add-section .initrd=/boot/initrd.img-4.4.0-34-generic --change-section-vma .initrd=0x3000000 \ /usr/lib/systemd/boot/efi/linuxx64.efi.stub /tmp/test.efi sbsign --key /root/keys/my.key --cert /root/keys/my.pem --output /boot/efi/EFI/BOOT/BOOTX64.EFI /tmp/test.efi 
, . , , Secure Boot.
4.
, . , , , KDE Plasma, Kubuntu .
Linux, — . , . . , Qemu KVM . .
: . , — . - . , Qubes OS. Secure Boot. Fail.
, .
Notes
Source: https://habr.com/ru/post/308032/
All Articles