Writing a multiplatform bot for transferring money from card to card using Microsoft Bot Framework V1
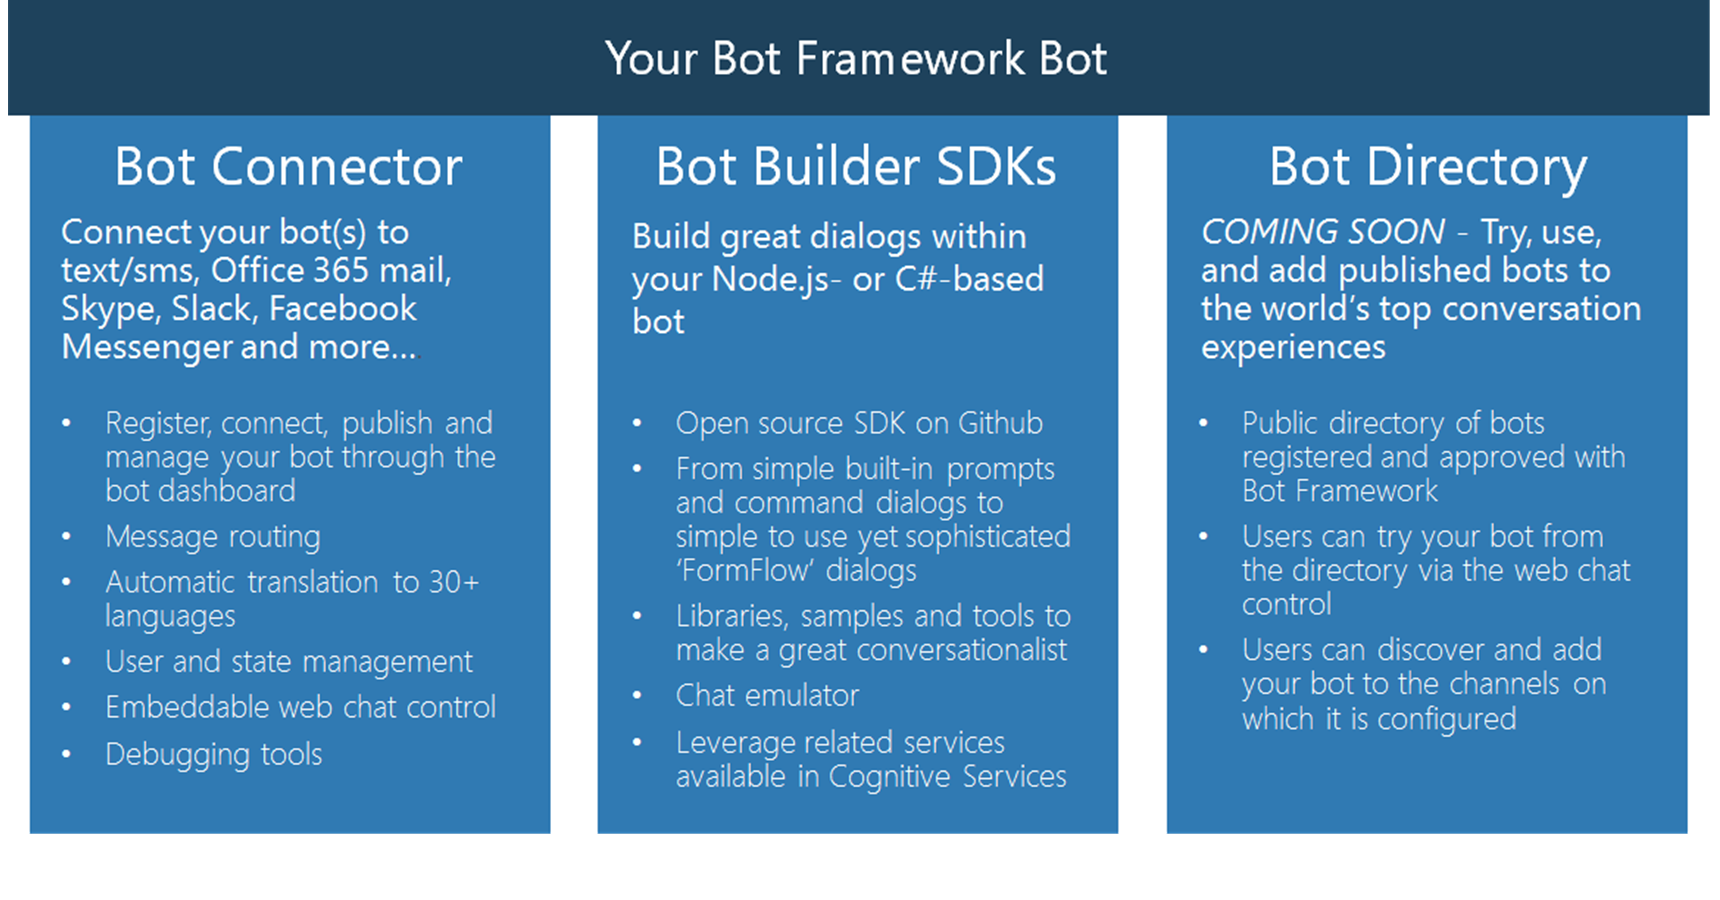
During the Microsoft Build 2016 conference, the Microsoft Bot Framework was announced (session with Build 2016: video ). With it, you can create a bot (in C # or Node.js), which can then be connected to various channels / applications: SMS, Skype, Telegram, Slack, etc. We write a bot using the Bot Builder SDK from Microsoft, and the Bot Connector takes over the problems of interacting with third-party APIs (see image). It sounds beautiful, we will try to create a simple bot that could transfer money from card to card (let's take the logic of the transfer from Alpha Bank - a test stand, API description: Alpha Bank ), having experienced all the charms of the product in the alpha version.
Disclaimer: while writing an article, Microsoft released a new version of the framework, so wait for the second series: we are migrating the bot from v1 to V3.
For the successful development of the bot, we will need:
')
Now download the project template for the Bot Framework: aka.ms/bf-bc-vstemplate . To make the new type of project available in Visual Studio 2015, we will copy the downloaded archive into the folder “% USERPROFILE% \ Documents \ Visual Studio 2015 \ Templates \ ProjectTemplates \ Visual C #". Now we are ready to create the simplest echo-bot.
Open Visual Studio 2015, we have a new type of project:

The created project is a Web API project with one controller - MessagesController , which, in turn, has only one available Post method:
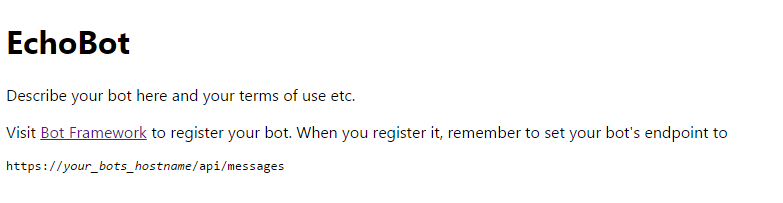
This method accepts a single parameter of the Message type, which represents not only the message sent to our bot, but also an event, for example, adding a new user to the chat or ending a conversation. To find out exactly what the message object is, you need to check its Type property, which is done in the controller. If this is a regular message from the user (message.Type == "Message"), we can read the message itself, process it and respond - using the CreateReplyMessage method . A simple bot is ready, now we try to start it and test its performance. Microsoft provides a convenient utility Bot Framework Emulator ( download for v1 ), which allows you to conveniently run and debug bots on a local machine. Launch our EchoBot project, the browser will show such a page at localhost : 3978 /
Let's start the now installed Bot Framework Emulator, which knows that our running bot should be looked for on port 3978:
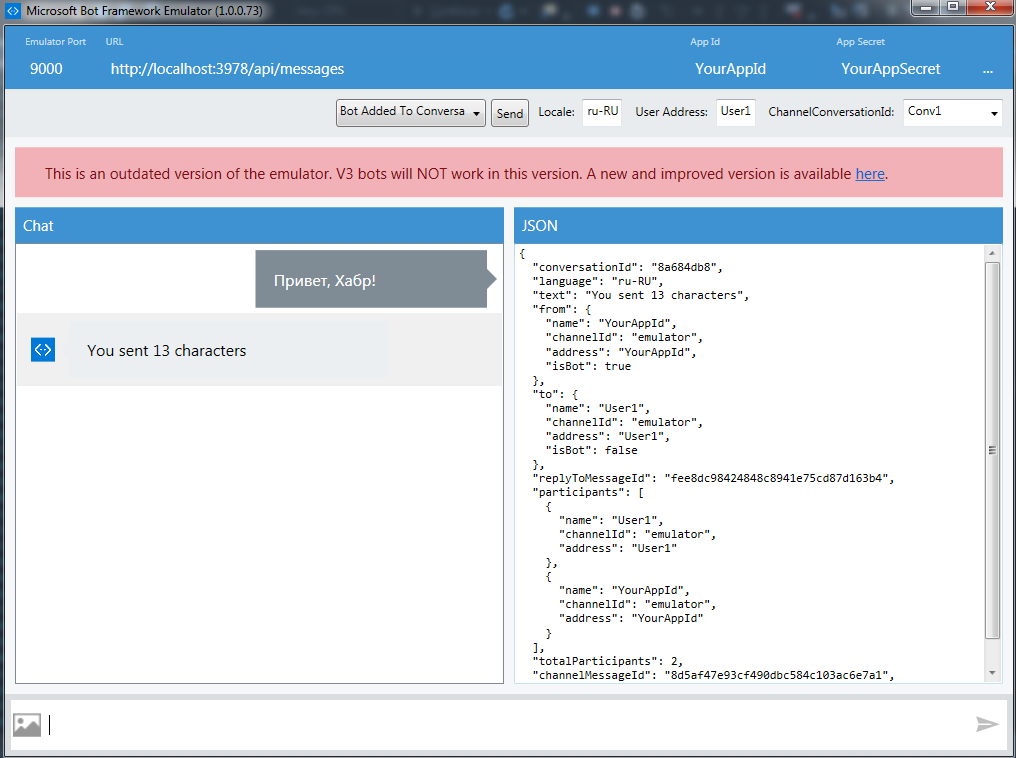
Send a message to the bot, we will receive an answer. As you can see, everything works. Now consider the creation of a bot that, based on the data entered by the user, could transfer money from card to card.
In order to transfer money from card to card, we need information about these cards and the amount of transfer. To facilitate the task of writing standard scripts using the Microsoft Bot Framework, support was created for the two most common options for interacting with the bot: Dialogs and FormFlow. In our case, FormFlow is suitable because all the work of a bot can be represented as filling a form with data and then processing it. Dialogs, on the other hand, allows you to work with simpler scenarios, for example, an alert scenario when a given event occurs (it can be useful for monitoring servers). Let's start creating a bot by adding a class, which will be a form that the user needs to fill out. This class must be marked as [Serializable] , and properties from the Microsoft.Bot.Builder.FormFlow namespace are used for property annotation:
In order for the Bot Framework to use the class in FormFlow, all open fields or properties must be of one of the following types:
The Prompt attribute is responsible for what text will be displayed as a hint to fill the field, Describe - what the field will be called for the user. Now, using the FormBuilder class , we need to tell the Bot Framework that we want to use the CardToCardTransfer class as a form for the dialogue. Create a new class CardToCardFormBuilder:
We create an instance of the FormBuilder <CardToCardTransfer> class, indicating that we use CardToCardTransfer as the form. Now using the call method chain, we do the following
Everything is quite simple, but now we want to add a simple validation of the entered values and the calculation of the commission. To calculate the commission, we use the fact that we have a class AlfabankService that implements all the interaction with the banking API. To validate the card number, create the CardValidator class. To specify the delegate used to validate the field, the Field method must be passed to the third parameter. The calculation of the commission also has to be done in the validation method, because in version 1 the Bot Framework did not provide other mechanisms for this.
The last step is to integrate CardToCardFormBuilder into the controller. To do this, we need a method that returns an IDialog <CardToCardTransfer> in order to pass it in turn to the Conversation.SendAsync method as a second parameter.
The actual binding occurs in the Chain.From (() => FormDialog.FromForm (CardToCardFormBuilder.MakeForm) code, and then in the Do method we pass a method that waits for the completion of the query and processes it, responding to error handling. Now we can run the bot and test its operation in the emulator:

You can make sure that the bot works as expected, now we make friends with the Bot Connector.
First we need to download our bot to some public URL, for example, in Azure (a free subscription will do): https://alfacard2cardbot.azurewebsites.net . Now go to dev.botframework.com using a Microsoft account. In the top menu, select "Register a Bot", enter all the required fields: name, description, Messaging endpoint - the same public URL, etc.

Do not forget to update our web.config, adding there AppId and AppSecret, generated to us at this step. We will see these changes. Now our bot has appeared in the “My Bots” menu; you can make sure that the Connector Bot interacts correctly with the bot using the “Test connection to your bot” window at the bottom left. Now it remains to add interaction with Telegram, to do this, in the right column, select “Add another channel” - “Telegram” - “Add”, this window will open, in which the steps describe how to add Telegram bot:

Telegram bot can write @ AlfaCard2CardBot , money will not be transferred, test environment. The code can be found in GitHub: https://github.com/StanislavUshakov/AlfaCardToCardBot .
In the next series we will migrate the bot to version 3!
Disclaimer: while writing an article, Microsoft released a new version of the framework, so wait for the second series: we are migrating the bot from v1 to V3.
Preparing the development environment
For the successful development of the bot, we will need:
')
- Visual Studio 2015
- Microsoft account to login to dev.botframework.com
- URL with the code of our bot. This URL must be publicly available.
- Telegram / Skype / etc developer accounts to be able to add communication channels (for each application, there are different tricks and settings).
Now download the project template for the Bot Framework: aka.ms/bf-bc-vstemplate . To make the new type of project available in Visual Studio 2015, we will copy the downloaded archive into the folder “% USERPROFILE% \ Documents \ Visual Studio 2015 \ Templates \ ProjectTemplates \ Visual C #". Now we are ready to create the simplest echo-bot.
First bot
Open Visual Studio 2015, we have a new type of project:
The created project is a Web API project with one controller - MessagesController , which, in turn, has only one available Post method:
MessagesController
[BotAuthentication] public class MessagesController : ApiController { /// <summary> /// POST: api/Messages /// Receive a message from a user and reply to it /// </summary> public async Task<Message> Post([FromBody]Message message) { if (message.Type == "Message") { // calculate something for us to return int length = (message.Text ?? string.Empty).Length; // return our reply to the user return message.CreateReplyMessage($"You sent {length} characters"); } else { return HandleSystemMessage(message); } } private Message HandleSystemMessage(Message message) { if (message.Type == "Ping") { Message reply = message.CreateReplyMessage(); reply.Type = "Ping"; return reply; } else if (message.Type == "DeleteUserData") { // Implement user deletion here // If we handle user deletion, return a real message } else if (message.Type == "BotAddedToConversation") { } else if (message.Type == "BotRemovedFromConversation") { } else if (message.Type == "UserAddedToConversation") { } else if (message.Type == "UserRemovedFromConversation") { } else if (message.Type == "EndOfConversation") { } return null; } } This method accepts a single parameter of the Message type, which represents not only the message sent to our bot, but also an event, for example, adding a new user to the chat or ending a conversation. To find out exactly what the message object is, you need to check its Type property, which is done in the controller. If this is a regular message from the user (message.Type == "Message"), we can read the message itself, process it and respond - using the CreateReplyMessage method . A simple bot is ready, now we try to start it and test its performance. Microsoft provides a convenient utility Bot Framework Emulator ( download for v1 ), which allows you to conveniently run and debug bots on a local machine. Launch our EchoBot project, the browser will show such a page at localhost : 3978 /
Let's start the now installed Bot Framework Emulator, which knows that our running bot should be looked for on port 3978:
Send a message to the bot, we will receive an answer. As you can see, everything works. Now consider the creation of a bot that, based on the data entered by the user, could transfer money from card to card.
Bot to transfer money from card to card
In order to transfer money from card to card, we need information about these cards and the amount of transfer. To facilitate the task of writing standard scripts using the Microsoft Bot Framework, support was created for the two most common options for interacting with the bot: Dialogs and FormFlow. In our case, FormFlow is suitable because all the work of a bot can be represented as filling a form with data and then processing it. Dialogs, on the other hand, allows you to work with simpler scenarios, for example, an alert scenario when a given event occurs (it can be useful for monitoring servers). Let's start creating a bot by adding a class, which will be a form that the user needs to fill out. This class must be marked as [Serializable] , and properties from the Microsoft.Bot.Builder.FormFlow namespace are used for property annotation:
CardToCardTransfer
[Serializable] public class CardToCardTransfer { [Prompt(" :")] [Describe(" , ")] public string SourceCardNumber; [Prompt(" :")] [Describe(" , ")] public string DestinationCardNumber; [Prompt("VALID THRU ():")] [Describe("VALID THRU ()")] public Month ValidThruMonth; [Prompt("VALID THRU ():")] [Describe("VALID THRU ()")] [Numeric(2016, 2050)] public int ValidThruYear; [Prompt("CVV:")] [Describe("CVV ( )")] public string CVV; [Prompt(" ():")] [Describe(" ()")] public int Amount; [Prompt(" ():")] [Describe(" ()")] public double Fee; } In order for the Bot Framework to use the class in FormFlow, all open fields or properties must be of one of the following types:
- Integral types: sbyte, byte, short, ushort, int, uint, long, ulong
- Numeric floating point types: float, double
- Strings
- Datetime
- Transfers
- List of listings
The Prompt attribute is responsible for what text will be displayed as a hint to fill the field, Describe - what the field will be called for the user. Now, using the FormBuilder class , we need to tell the Bot Framework that we want to use the CardToCardTransfer class as a form for the dialogue. Create a new class CardToCardFormBuilder:
CardToCardFormBuilder
public static class CardToCardFormBuilder { public static IForm<CardToCardTransfer> MakeForm() { FormBuilder<CardToCardTransfer> _order = new FormBuilder<CardToCardTransfer>(); return _order .Message(" !") .Field(nameof(CardToCardTransfer.SourceCardNumber)) .Field(nameof(CardToCardTransfer.ValidThruMonth)) .Field(nameof(CardToCardTransfer.ValidThruYear)) .Field(nameof(CardToCardTransfer.DestinationCardNumber), null, validateCard) .Field(nameof(CardToCardTransfer.CVV)) .Field(nameof(CardToCardTransfer.Amount)) .OnCompletionAsync(async (context, cardTocardTransfer) => { Debug.WriteLine("{0}", cardTocardTransfer); }) .Build(); } } We create an instance of the FormBuilder <CardToCardTransfer> class, indicating that we use CardToCardTransfer as the form. Now using the call method chain, we do the following
- The Message method sets a welcome message.
- The Field method sets the fields, the value of which the user must enter, the order is important.
- The OnCompletionAsync method allows you to specify the delegate that will be called when the user fills in all the fields.
- The Build method does the main work - returns an object that implements the IForm <CardToCardTransfer> .
Everything is quite simple, but now we want to add a simple validation of the entered values and the calculation of the commission. To calculate the commission, we use the fact that we have a class AlfabankService that implements all the interaction with the banking API. To validate the card number, create the CardValidator class. To specify the delegate used to validate the field, the Field method must be passed to the third parameter. The calculation of the commission also has to be done in the validation method, because in version 1 the Bot Framework did not provide other mechanisms for this.
CardToCardFormBuilder with validation and commission calculation
public static class CardToCardFormBuilder { public static IForm<CardToCardTransfer> MakeForm() { FormBuilder<CardToCardTransfer> _order = new FormBuilder<CardToCardTransfer>(); ValidateAsyncDelegate<CardToCardTransfer> validateCard = async (state, value) => { var cardNumber = value as string; string errorMessage; ValidateResult result = new ValidateResult(); result.IsValid = CardValidator.IsCardValid(cardNumber, out errorMessage); result.Feedback = errorMessage; return result; }; return _order .Message(" !") .Field(nameof(CardToCardTransfer.SourceCardNumber), null, validateCard) .Field(nameof(CardToCardTransfer.Fee), state => false) .Field(nameof(CardToCardTransfer.ValidThruMonth)) .Field(nameof(CardToCardTransfer.ValidThruYear)) .Field(nameof(CardToCardTransfer.DestinationCardNumber), null, validateCard) .Field(nameof(CardToCardTransfer.CVV)) .Field(nameof(CardToCardTransfer.Amount), null, async (state, value) => { int amount = int.Parse(value.ToString()); var alfabankService = new AlfabankService(); string auth = await alfabankService.AuthorizePartner(); state.Fee = (double) await alfabankService.GetCommission(auth, state.SourceCardNumber, state.DestinationCardNumber, amount); ValidateResult result = new ValidateResult(); result.IsValid = true; return result; }) .Confirm(" {Amount} {SourceCardNumber} {DestinationCardNumber}? {Fee} . (y/n)") .OnCompletionAsync(async (context, cardTocardTransfer) => { Debug.WriteLine("{0}", cardTocardTransfer); }) .Build(); } } The last step is to integrate CardToCardFormBuilder into the controller. To do this, we need a method that returns an IDialog <CardToCardTransfer> in order to pass it in turn to the Conversation.SendAsync method as a second parameter.
MessagesController
[BotAuthentication] public class MessagesController : ApiController { internal static IDialog<CardToCardTransfer> MakeRoot() { return Chain.From(() => FormDialog.FromForm(CardToCardFormBuilder.MakeForm)) .Do(async (context, order) => { try { var completed = await order; var alfaService = new AlfabankService(); string expDate = completed.ValidThruYear.ToString() + ((int)completed.ValidThruMonth).ToString("D2"); string confirmationUrl = await alfaService.TransferMoney(completed.SourceCardNumber, expDate, completed.CVV, completed.DestinationCardNumber, completed.Amount); await context.PostAsync($" . {confirmationUrl}"); } catch (FormCanceledException<CardToCardTransfer> e) { string reply; if (e.InnerException == null) { reply = $" , !"; } else { reply = ", . ."; } await context.PostAsync(reply); } }); } /// <summary> /// POST: api/Messages /// Receive a message from a user and reply to it /// </summary> public async Task<Message> Post([FromBody]Message message) { if (message.Type == "Message") { return await Conversation.SendAsync(message, MakeRoot); } else { return HandleSystemMessage(message); } } The actual binding occurs in the Chain.From (() => FormDialog.FromForm (CardToCardFormBuilder.MakeForm) code, and then in the Do method we pass a method that waits for the completion of the query and processes it, responding to error handling. Now we can run the bot and test its operation in the emulator:
You can make sure that the bot works as expected, now we make friends with the Bot Connector.
Registering bot in Bot Connector
First we need to download our bot to some public URL, for example, in Azure (a free subscription will do): https://alfacard2cardbot.azurewebsites.net . Now go to dev.botframework.com using a Microsoft account. In the top menu, select "Register a Bot", enter all the required fields: name, description, Messaging endpoint - the same public URL, etc.
Do not forget to update our web.config, adding there AppId and AppSecret, generated to us at this step. We will see these changes. Now our bot has appeared in the “My Bots” menu; you can make sure that the Connector Bot interacts correctly with the bot using the “Test connection to your bot” window at the bottom left. Now it remains to add interaction with Telegram, to do this, in the right column, select “Add another channel” - “Telegram” - “Add”, this window will open, in which the steps describe how to add Telegram bot:
Source code, testing, conclusion
Telegram bot can write @ AlfaCard2CardBot , money will not be transferred, test environment. The code can be found in GitHub: https://github.com/StanislavUshakov/AlfaCardToCardBot .
In the next series we will migrate the bot to version 3!
Source: https://habr.com/ru/post/307530/
All Articles