Chargebox on Arduino
Creating a machine for charging tablets and phones
Main components:

')
Task
Create a machine that will accept coins, further include a timer, and output power to the USB HUB.
Already different cords are connected to the hub. Approximate performance 5V, 1A, depends on the power supply.
Design
The power supply to the hub is controlled by a relay.
The power supply is connected to the network, and its cable passes through the relay, which will be controlled by the Arduino board (On / Off).
The coin acceptor is connected to the Arduino to transmit a signal about the coin, and it is powered by a 12 volt unit.
Arduino needs to be flashed; this is done via the computer’s USB port and the Arduino code editor .
Charging starts after pressing the button.
Scheme and Code
The setup and loop function, extract from the original documentation
The setup () function is called when a sketch starts. Use it to initialize variables, pin modes, start using libraries, etc. After the setup of the Arduino board.
It is a func- tion of the initial values, a loop, a loop () Use it to actively control the Arduino board.
All code and scheme tested for performance.
Listing and diagram show in the form in which I found.
Main components:
- Arduino uno
- LD Display 2x16
- Coin Receiver Wei-Ya HI 07
- Relay
')
Task
Create a machine that will accept coins, further include a timer, and output power to the USB HUB.
Already different cords are connected to the hub. Approximate performance 5V, 1A, depends on the power supply.
Design
The power supply to the hub is controlled by a relay.
The power supply is connected to the network, and its cable passes through the relay, which will be controlled by the Arduino board (On / Off).
The coin acceptor is connected to the Arduino to transmit a signal about the coin, and it is powered by a 12 volt unit.
Arduino needs to be flashed; this is done via the computer’s USB port and the Arduino code editor .
Charging starts after pressing the button.
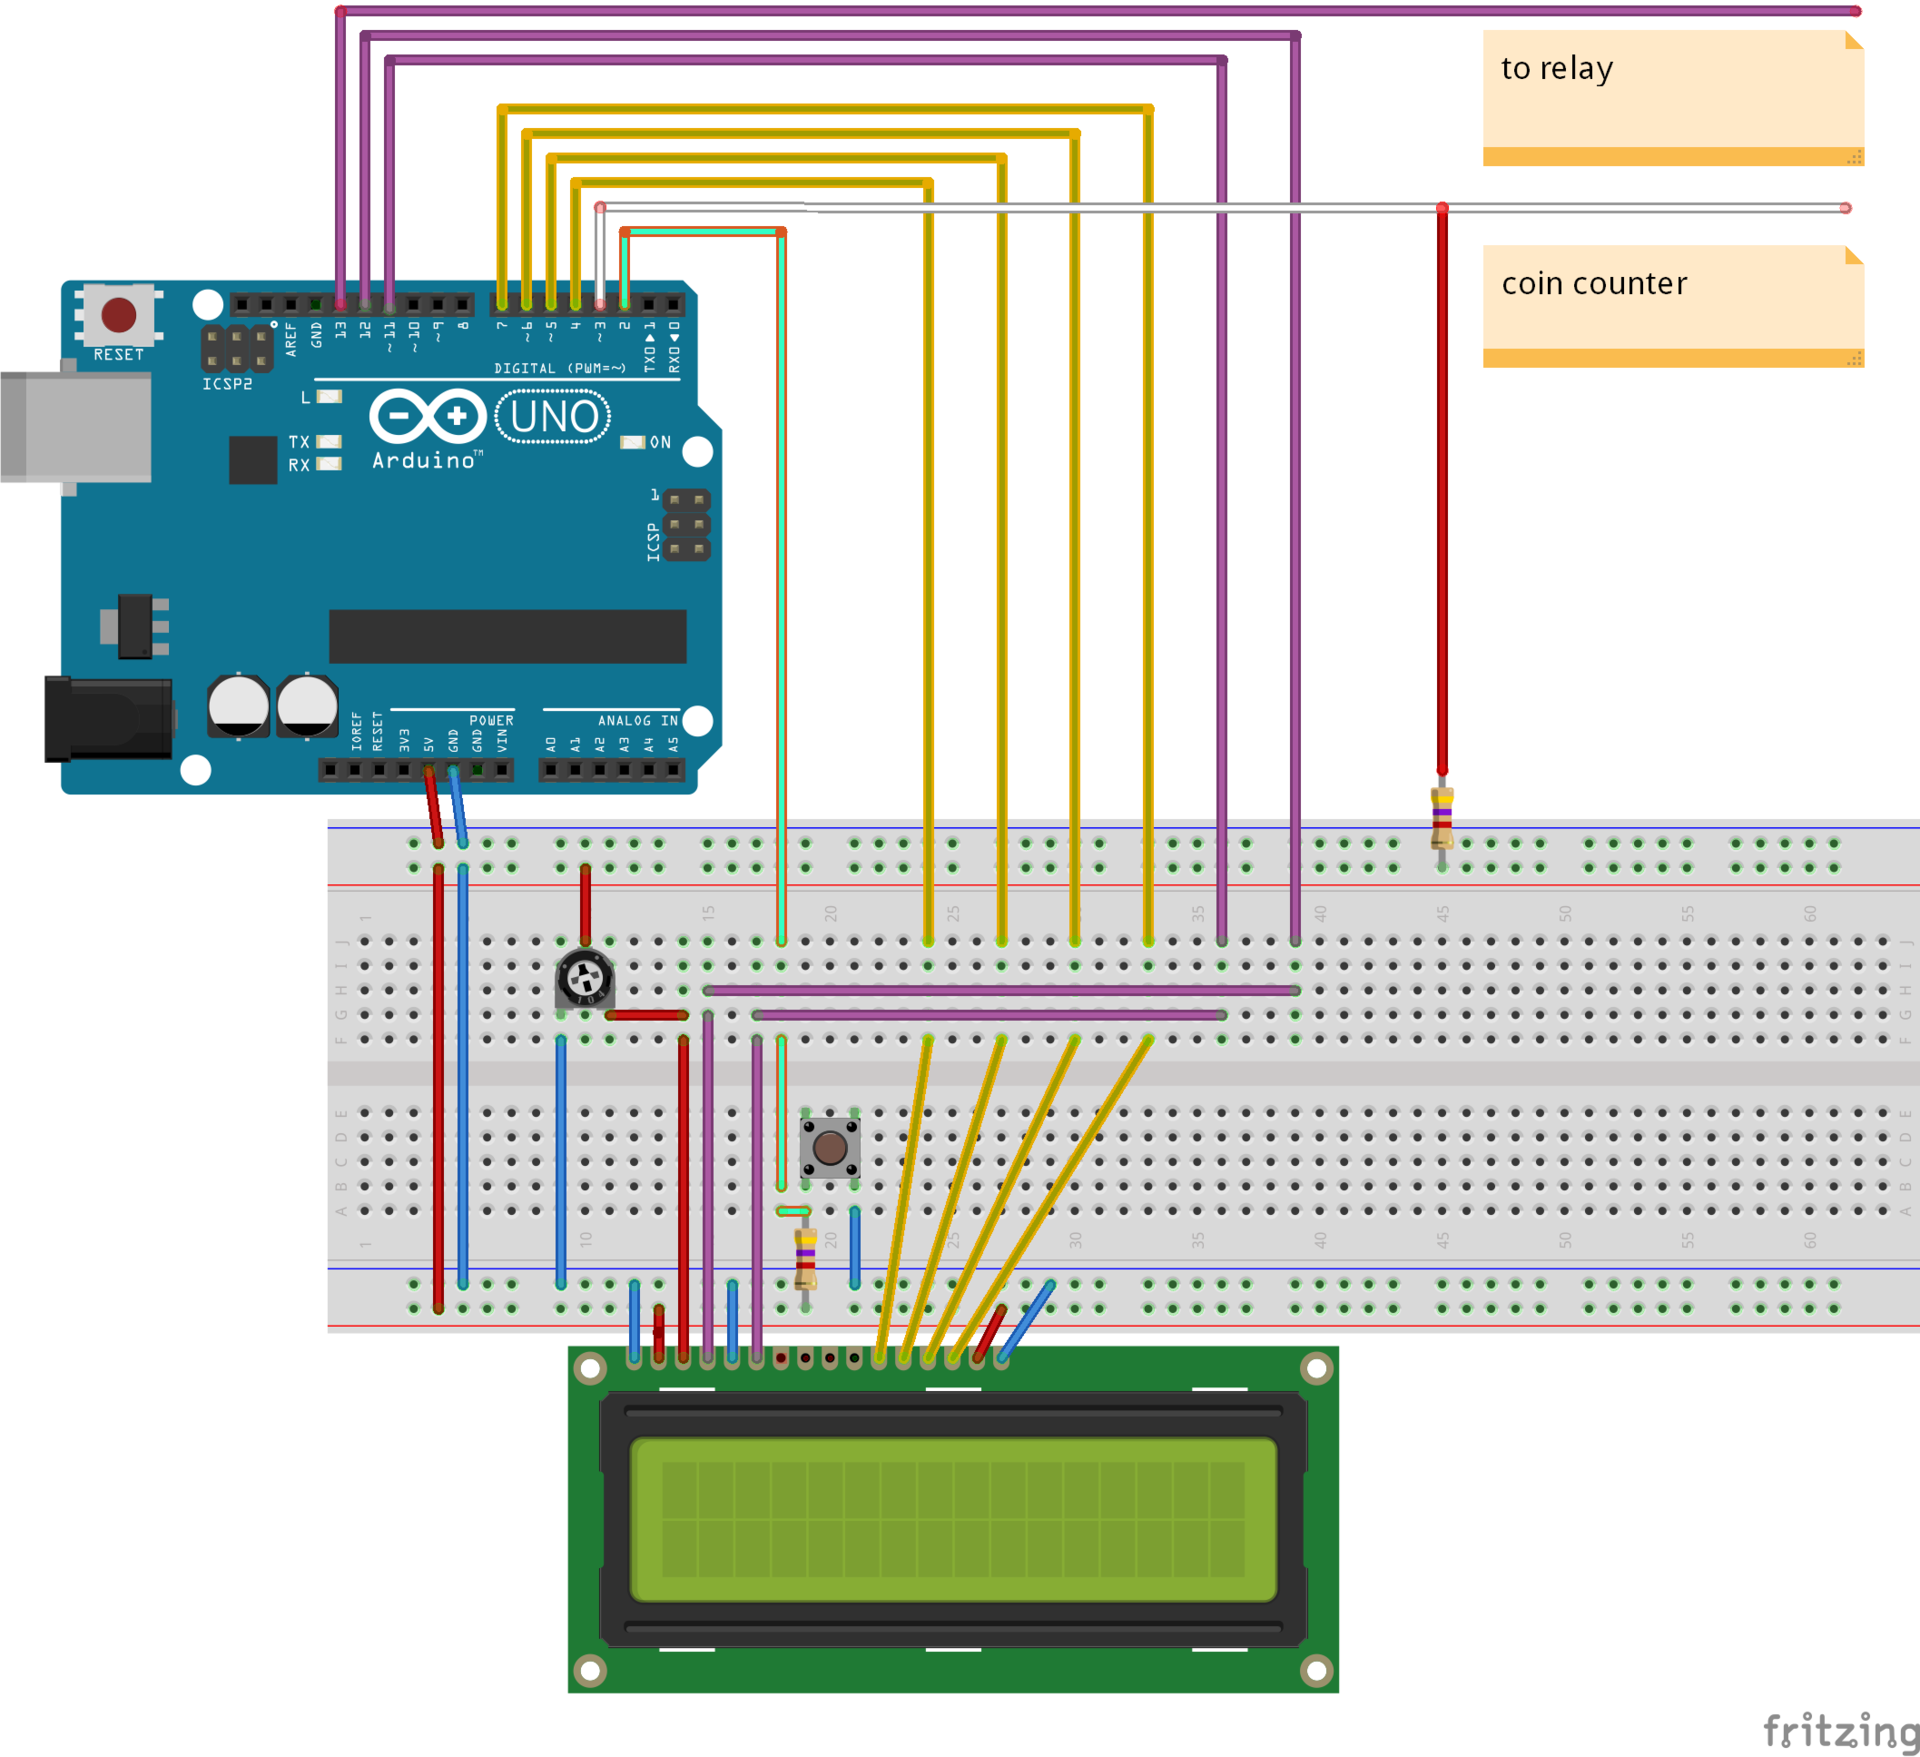
Scheme and Code
- Red and Blue wire - power, power
- Button - Start Charging
- Trimmer Resistor - Display Brightness
- 2 Pull-up resistors (pull-up-resistor) + -4.7 kΩ
- Light green wire - logical input for a button
- Yellow, Violet (12,11) - logical inputs to the display
- White - a logical input for the coin box
- Violet (13) - for relay (On / Off)
// WEI-YA HI-07 const int moneyPin3=3; const int button1Pin = 2; // 1 2 const int add5V = 10; const int ledPin = 13; // float sum=0.0; // int time; // int button1State; int moneyPin; int pulse1=0; unsigned long timeCount1=0; // WH1602 #include <LiquidCrystal.h> // LiquidCrystal lcd(12,11,7,6,5,4); byte p20[8] = { // B10000, B10000, B10000, B10000, B10000, B10000, B10000, B10000, }; byte p40[8] = { B11000, B11000, B11000, B11000, B11000, B11000, B11000, B11000, }; byte p60[8] = { B11100, B11100, B11100, B11100, B11100, B11100, B11100, B11100, }; byte p80[8] = { B11110, B11110, B11110, B11110, B11110, B11110, B11110, B11110, }; byte p100[8] = { B11111, B11111, B11111, B11111, B11111, B11111, B11111, B11111, }; void setup() { Serial.begin(9600); // pinMode(button1Pin, INPUT); //, pinMode(ledPin, OUTPUT); //13, pinMode(moneyPin3,INPUT); //, pinMode(add5V,INPUT); //+5V pin attachInterrupt(1,count_pulse1,FALLING); Serial.println("Coin ready!"); lcd.begin(16,2); lcd.clear(); lcd.setCursor(0,1); lcd.print("Coin ready!"); lcd.setCursor(0,0); lcd.print("Hello=)"); lcd.createChar(0, p20); // (j) lcd.createChar(1, p40); lcd.createChar(2, p60); lcd.createChar(3, p80); lcd.createChar(4, p100); } void loop() { moneyPin = digitalRead(moneyPin3);//C if (pulse1=0) // { lcd.clear(); lcd.setCursor(0,1); lcd.print("Coin ready!"); lcd.setCursor(0,0); lcd.print("Hello=)"); delay(200); } if (pulse1>0 && timeCount1<300) // { lcd.clear(); lcd.setCursor(0,0);lcd.print("Error:/"); lcd.setCursor(0,1);lcd.print("Fast pulse!"); delay(1100); pulse1=0; lcd.clear(); lcd.setCursor(0,0);lcd.print("Waiting!"); lcd.setCursor(0,1);lcd.print("Check the power!"); delay(1100); pulse1=0; } if(pulse1>0 && timeCount1>300) // { sum+=0.25; time=sum*4; lcd.clear(); lcd.setCursor(0,0);lcd.print(time); lcd.setCursor(4,0);lcd.print("minute"); // . lcd.setCursor(0,1);lcd.print("Total="); // . lcd.setCursor(6,1);lcd.print(sum); } button1State = digitalRead(button1Pin); // digitalWrite(add5V, HIGH ); // digitalWrite(ledPin, HIGH ); // if ((button1State == LOW) && (sum != 0))// 0 // { digitalWrite(ledPin, LOW); lcd.clear(); lcd.setCursor(0,0);lcd.print("Power ok!"); for (int i = 0; i<16; i++) // (16 ) { for (int j=0; j<5; j++) { lcd.setCursor(i, 1); // lcd.write(j); // delay(sum*3200); // = 64 ((0.25*3100/1000)*(16*5)) } } digitalWrite(ledPin, HIGH ); lcd.clear(); lcd.setCursor(0,0);lcd.print("Power off!"); sum=0; } // if (sum==20 || sum>20){ lcd.clear(); lcd.setCursor(0,0);lcd.print("It's too much!!!"); lcd.setCursor(0,1);lcd.print("Start Now!!!"); delay(1000); } if (sum<0){ lcd.clear(); lcd.setCursor(0,0);lcd.print("Error=("); sum=0.0; delay(1000); } } void count_pulse1(){ //detachInterrupt(0); detachInterrupt(1); pulse1++; if(pulse1==1) timeCount1=millis(); //attachInterrupt(0,count_pulse,FALLING); attachInterrupt(1,count_pulse1,FALLING); } The setup and loop function, extract from the original documentation
The setup () function is called when a sketch starts. Use it to initialize variables, pin modes, start using libraries, etc. After the setup of the Arduino board.
It is a func- tion of the initial values, a loop, a loop () Use it to actively control the Arduino board.
All code and scheme tested for performance.
Listing and diagram show in the form in which I found.
Source: https://habr.com/ru/post/307518/
All Articles