We create a mobile game on Monogame, solving typical problems of a novice developer.
The purpose of this article is to systematize the materials for creating simple games on the Monogame framework. The article will cover solutions to typical tasks that all developers have to face when creating games for mobile platforms: texture independence of screen resolution, menu creation and game scene (screen) change, nuances of working with sound and fonts, and maintaining records. The article provides sample code, as well as links to useful and relevant sources of information on Monogame and development for the Windows platform as a whole, and of course, my story of creating my first games.
I always wanted to learn how to program, and the most fascinating learning process, in my opinion, is the creation of games, because it allows you to get a visual, tangible result of your work on this thorny path. This is very important for the learning process, as it allows to warm up interest and motivates to move on.
Being a user of the Windows operating system both on a personal computer and on a phone, I decided that the most logical would be to stop choosing C #, since I wanted to use native development tools and start learning about it using the example of creating a simple phone game. Taking up the task, I set myself the goal of exploring the basic capabilities of the language, development environment and the entire ecosystem from Microsoft as a whole, with an eye to its further development in the field of programming.
Having shared their ideas and aspirations with a friend, a talented graphic designer, for whom the development of mobile games was also a novelty, they decided to start creating our “best in the world” game.
')
As a result of our work, a simple and unpretentious game for training visual memory, written without third-party libraries in C # and XAML, turned out. The player is given time to fill the location of the circles on the screen, then he needs to restore them from memory. In total, the game has 10 levels, each of which increases the number of circles. Attempts are given one or two more than the number of objects on the screen. To complete the game, the player has 5 lives.

The development and publication of the first game allowed me to figure out and get some experience on the following important points:
1) Basic knowledge of C #, XAML, and the WinRT platform as a whole.
2) Localization of the application [ link ].
3) Adding an evaluation mechanism [ link ].
4) Account creation and publishing in the Windows Store.
5) Setting up and adding ads AdDuplex, Smaato, Microsoft Advertising in the application through Microsoft advertising intermediary [ link , link , link ].
By the time of the publication of the first game, a new idea and understanding of what I want from my next project had finally been formed. I defined for myself the basic requirements for the future game:
1) Control should be carried out with one touch (one finger).
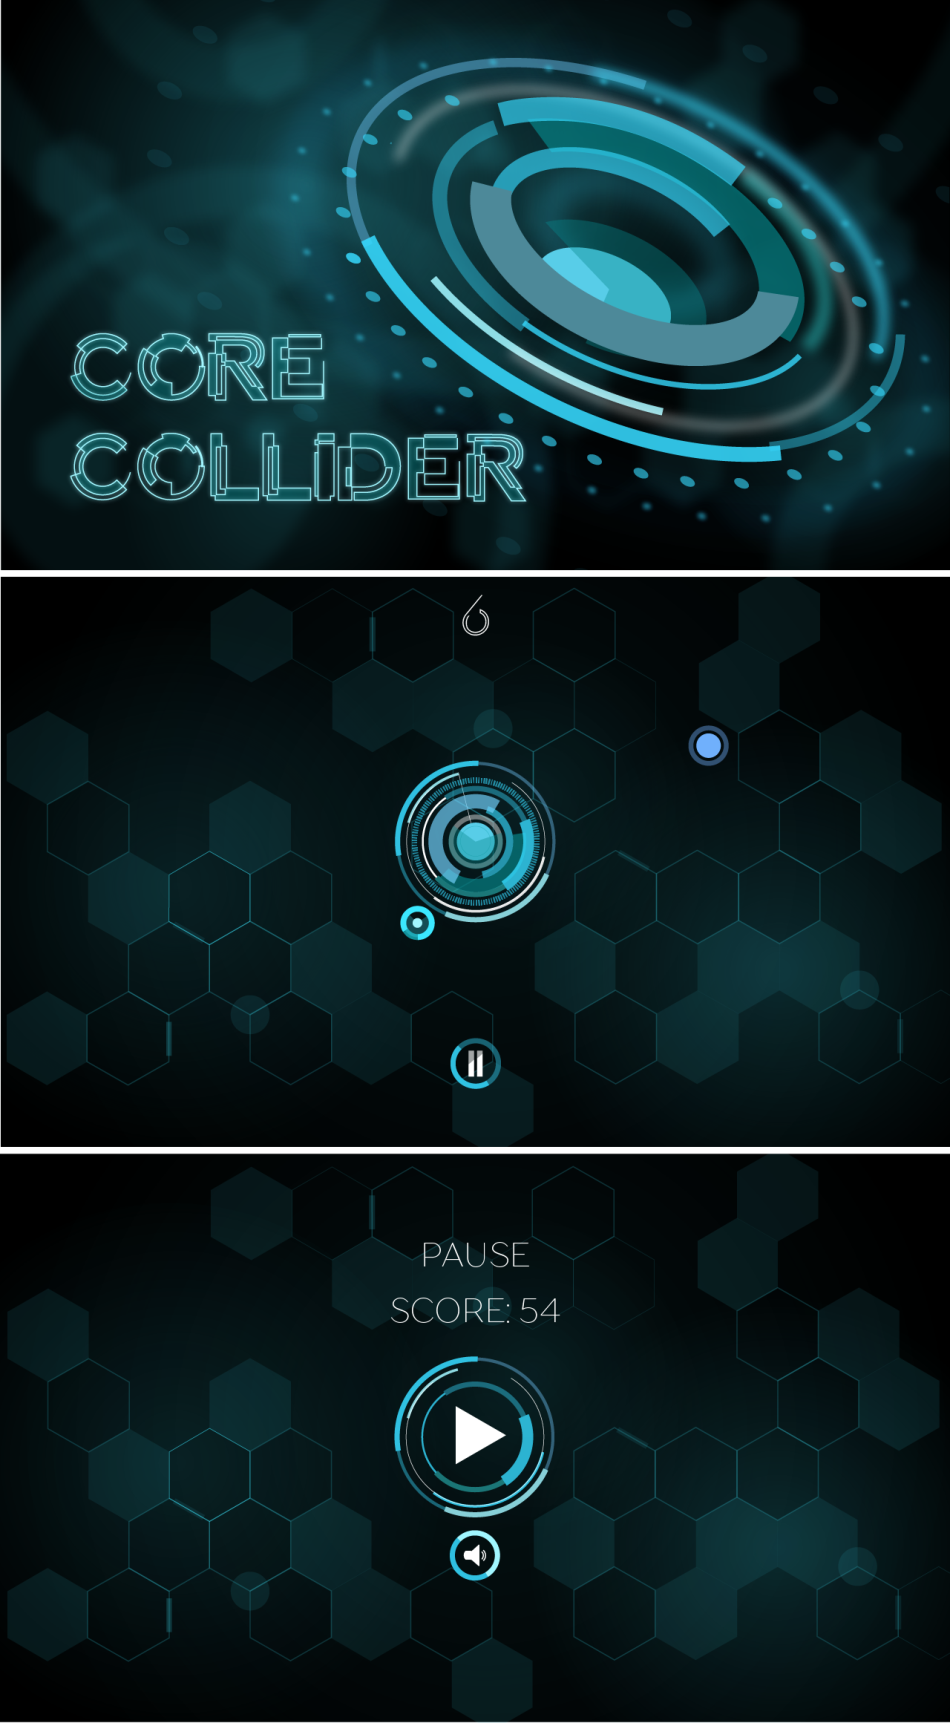
2) No levels and contain the following scenes: start screen, menu, instructions, game, pause, restart.
3) Must be infinite, aiming to set the maximum number of points.
4) Must be fun and challenging.
5) Of course beautiful.
The concept of the game was as follows: in the center of the screen is an object (let's call it “core”), to which other objects are continuously and in an arbitrary direction, and the player’s task is to protect the core. Each successful reflection of an object flying to the core gives points to the player, and failure leads to defeat, and the game begins anew.
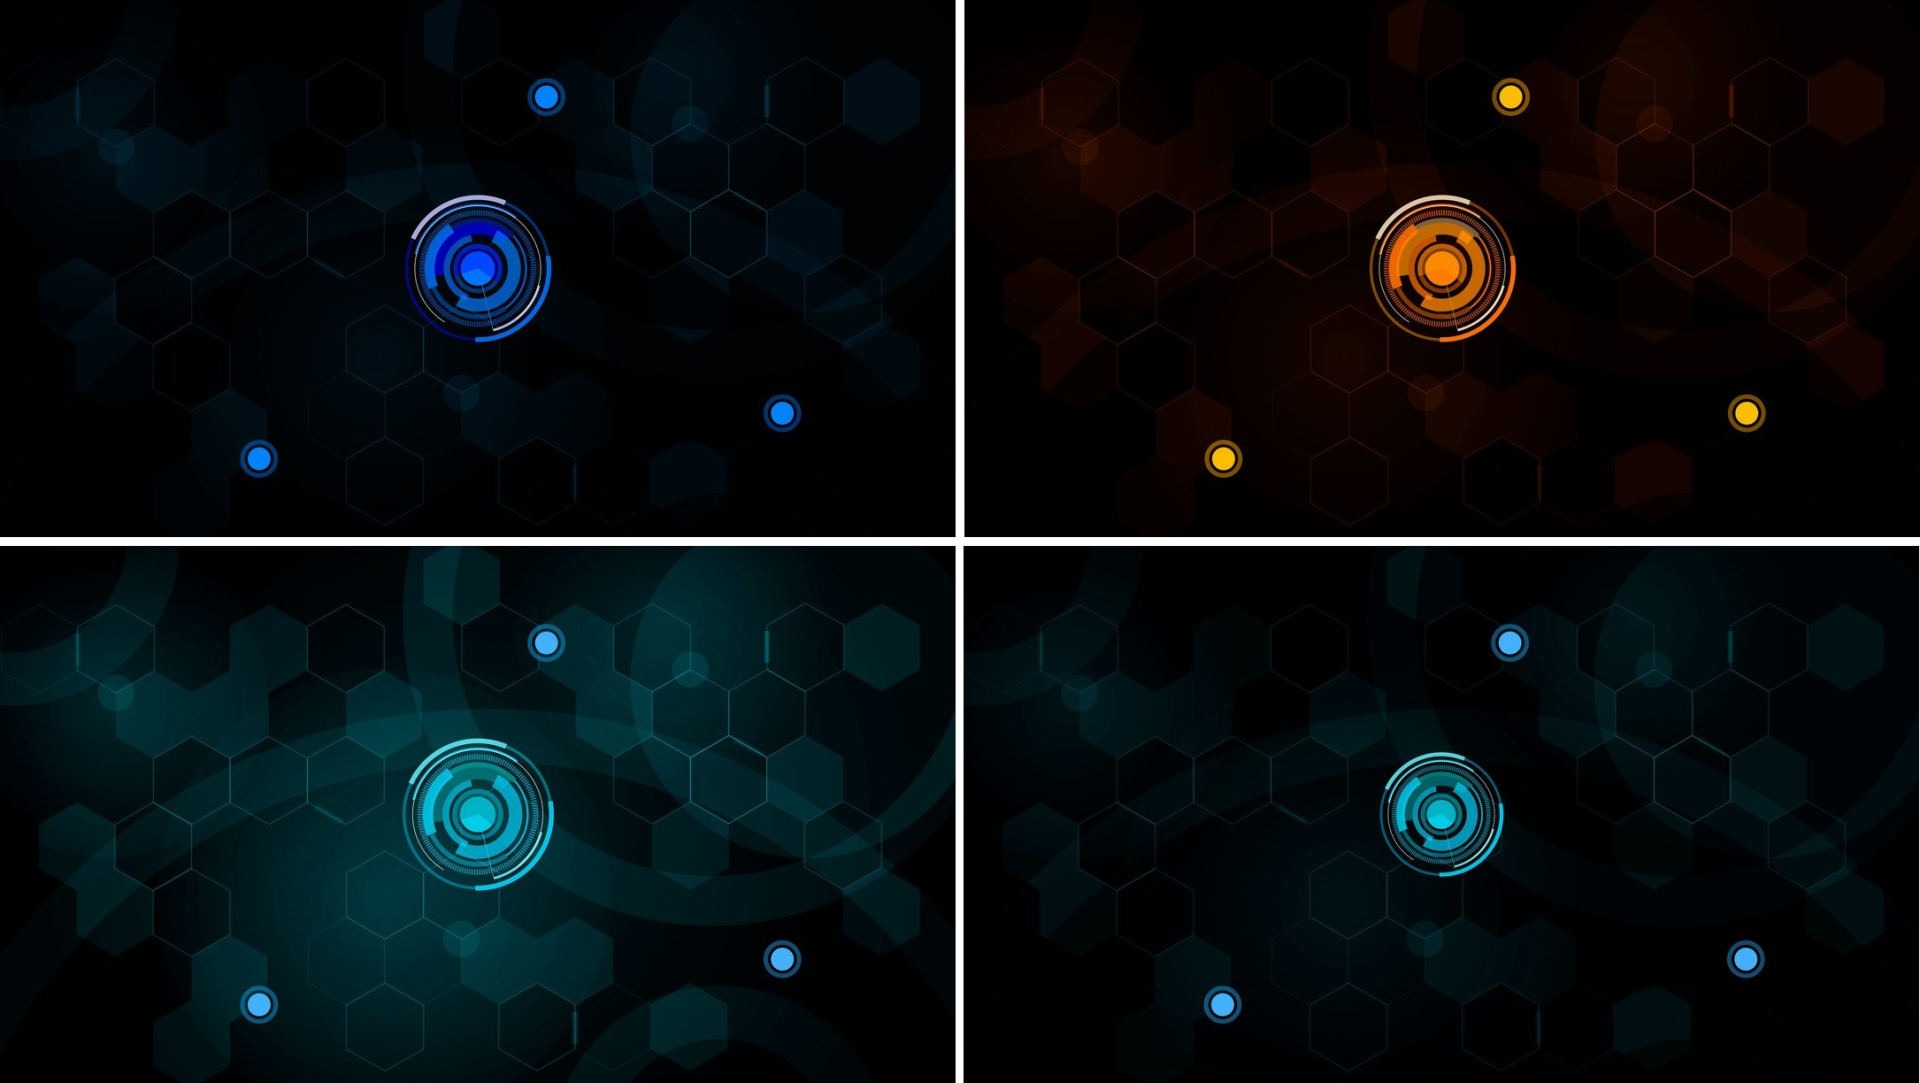
The designer patiently and responsibly approached the embodiment of my "hotelok", creating the concept of the game in the style of sci-fi.
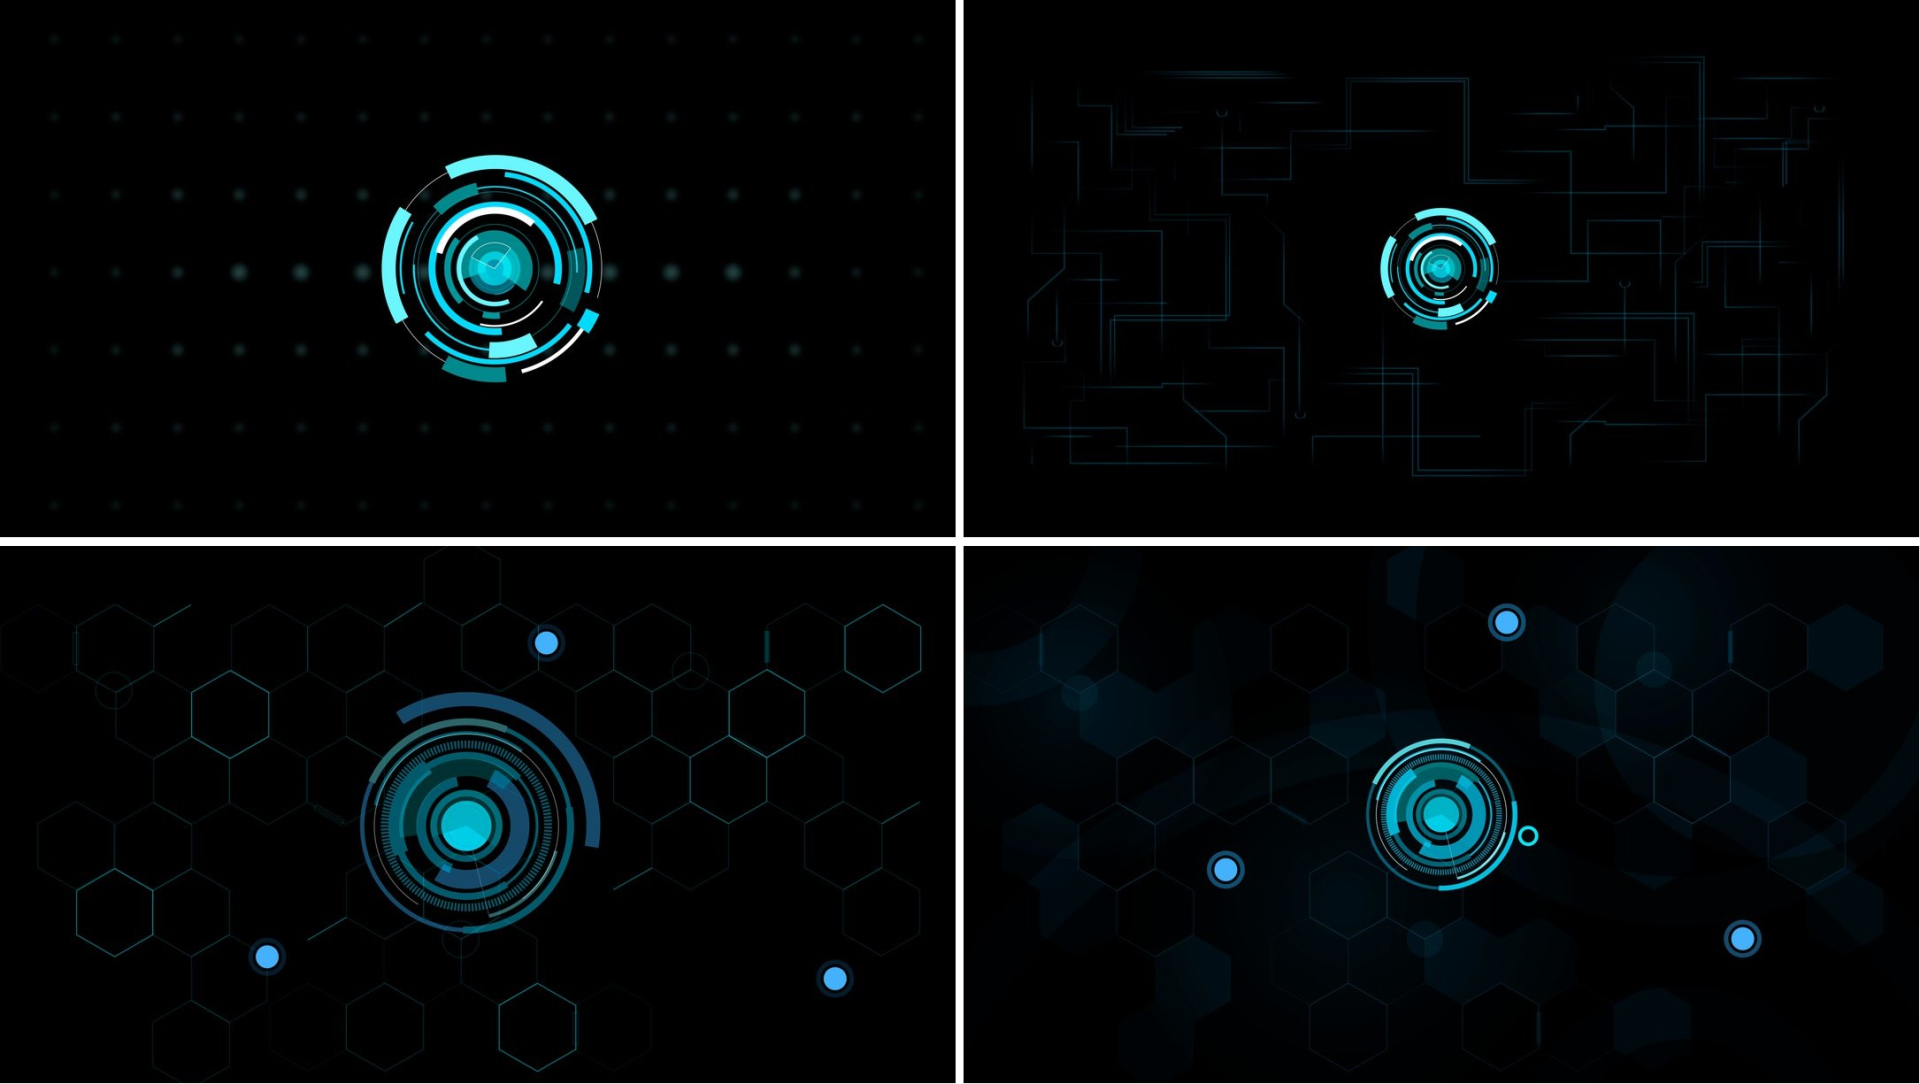
Having stopped on the main decisions in design of figures, then painfully selected between color scales.
I did not want to move away from native development tools - it was necessary to consolidate the knowledge gained. Therefore, further followed the analysis of existing free C # engines. One of the determining factors in choosing was the availability of a large number of training materials and examples. As a result, I chose Monogame, which is a cross-platform OpenSource implementation of the once popular Microsoft XNA 4 framework.
MonoGame provides an opportunity to develop not only for different platforms, but also on different platforms. On the official website on the download page you can find packages for various operating systems: Windows, MacOS, Linux. On Linux, as well as on MacOS, you will need Xamarin Studio . Development for Windows 8.1 will require the Windows 8.1 SDK, which is included in the full-featured free Visual Studio Community 2013, and for Windows 10, the Windows 10 SDK and the Visual Studio Community 2015, respectively.
Beginners should note that the ready-made MonoGame game template for Windows Phone 8.1 is available only in Visual Studio Community 2013, in the 2015 version you will already see the template for the UAP application.
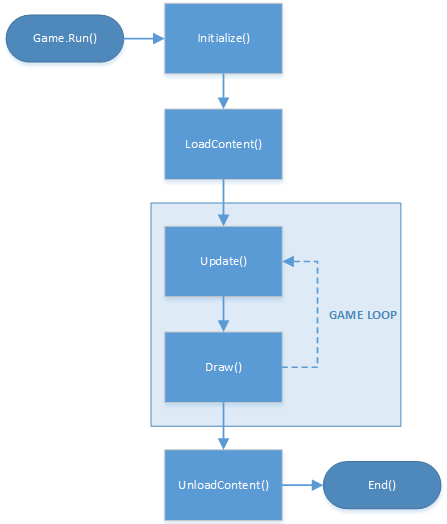
In MonoGame the game cycle model is implemented:
[ link to source ]
1) In the Initialize () method, the variables and objects used, the initial state of the game, are initialized.
2) Then in the LoadContent () method, various resources are loaded into the application, which are used in the game - audio files, image files, and so on.
3) The Update () and Draw ( ) methods represent the game loop. With a certain periodicity (by default, 60 times per second), in the Update () method, game objects are polled, calculations are made, for example, the positions of characters. The Draw () method is only responsible for redrawing scenes and game objects. Both methods take a GameTime object as a parameter - it stores the time elapsed since the beginning of the game.
4) Upon exiting the game loop, control is transferred to the UnloadContent () method. In this method, the previously used resources are unloaded.
5) After that, the game ends and the application closes.
This algorithm is presented in the Game1 {} class when creating a MonoGame project:
The global variable GraphicsDeviceManager graphics allows you to access the graphics device of your computer, smartphone, tablet, game console. Another global object - SpriteBatch spriteBatch is used to draw sprites - images that are used in the game.
The Content object provides access to game content. It should be noted that adding to the project of various textures, audio files, fonts, etc. occurs through MonoGame Pipeline - a utility that converts source files to .xnb files, with which the application is already working directly.
According to the principle of working on the Internet, there are quite a lot of materials and good lessons , therefore I will not talk about this in detail. I would like to dwell on the main tasks that any game developer has to face, put them together and give solutions using the example of the game presented in the article.
For scaling graphics, it is convenient to use vector transformation matrices. To do this, in the game class field, create a Matrix variable to access the transformed textures and a Rectangle variable to store the values of the scaled screen edges.
In the class constructor, create a variable to store the scale value of the graphics, which can be defined as the ratio of the device screen resolution value to the height resolution of the textures. In the example, the value is 1080, since the textures were used with a resolution of 1920 × 1080 pixels. Next, set the scale value for the transformation matrix along the XYZ axes.
At the game cycle rendering stage (In the Draw () method), we use the scale value as a parameter for the overloaded SpriteBatch.Begin () method [ link ]:
For convenience of further work, it is now possible to set the borders and center of the screen in accordance with the current scale.
Now, for correct work with the touchscreen, it is necessary to set the limits for handling clicks in the Initialize () method:
To get an application certification in the Windows Store, you must follow the recommendations of Microsoft [ link , link ].
As for working with sound, the application or game being launched should not interrupt the user's music if it is playing. To do this, we check when the game starts in the Initialize () method:
Also note that the rule of good tone will be the question of whether the user wants to stop the music in the media player and turn it on in the game. Implementing this functionality is convenient, for example, through pop-up windows.
To play background music or sound effects in a game, taking into account the “With sound / Silent” mode, the playback command in the Update () method may look like this:
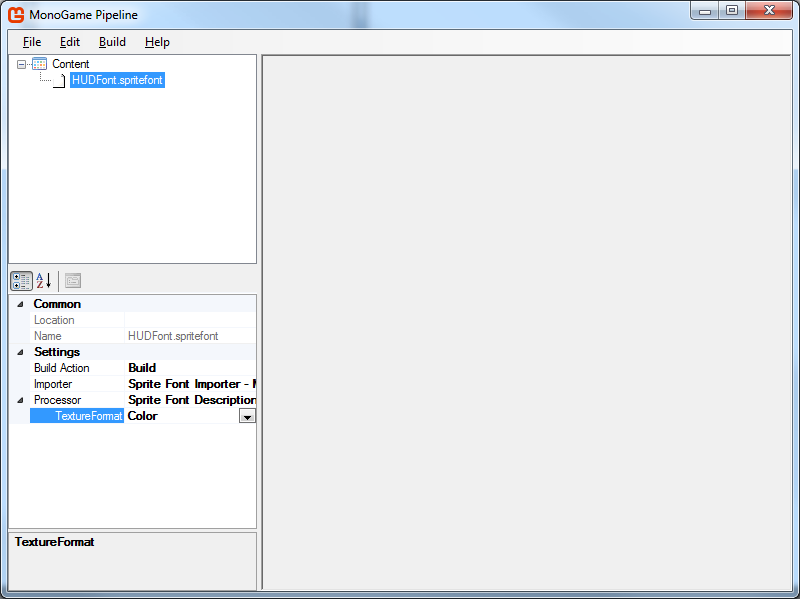
Fonts, like any other content for the game, must be downloaded via the Pipeline utility. However, in this case, not a specific font is loaded, but a new element is created to describe the font used. Previously, the font you have chosen should already be in the system folder with fonts.

Select SpriteFont Description and set the name. Click OK.
In order for fonts to not lose their display quality when scaling an image, you need to change the texture format from Compressed to Color , as shown in the figure below.
Click Build and go to the folder with the project, open the Content subfolder. There should be a generated * .spritefont file that needs to be opened in a text editor that is convenient for you (for convenience, I open it in the same Visual Studio). In the tags below you can specify any font size from those located in the system folder.
To save the results of the game is convenient to use the XML format. To access the data resources of the application used serialization . To exclude delays in the game when reading / writing data, you need to use an asynchronous approach.
To implement the above, we will write several methods in the game class:
There are a lot of ways to implement it, but for a simple game it is convenient to use enumerations. To do this, in the game class, we will declare the transfer with game states and create an instance of it.
Next, we modify the Update () and Draw ( ) methods so that at the stage of computing and drawing graphics, data from the current state of the game is processed.
Update method () :
Draw () method:
We define new methods that implement the logic of transition between game states, calculations and drawing game scenes.
Perhaps some of the points covered in this article will seem obvious, but in the process of learning I spent a considerable amount of time searching for answers to these questions. I hope that the above materials will be useful for novice developers and will help to quickly create their first masterpieces.
From myself I would like to advise the following: be sure to finish the work on the idea begun, bring the matter to the end. Determine for yourself the minimum required functionality of the game or application - this will allow you to specify the task and reduce the amount of work before the release of the first version. Improvement can be infinite, but leave the "buns" for the next release, otherwise you can get bogged down in this process and, ultimately, lose interest.
Strive to make a quality product. This applies to all elements of the game: the project architecture, code, textures, sounds and music. To do this, look for professional answers to your questions, read the relevant literature.
I would be very grateful to experienced developers for comments, suggestions for shortcomings and advice on written work.
PS What happened in the end:
I always wanted to learn how to program, and the most fascinating learning process, in my opinion, is the creation of games, because it allows you to get a visual, tangible result of your work on this thorny path. This is very important for the learning process, as it allows to warm up interest and motivates to move on.
Being a user of the Windows operating system both on a personal computer and on a phone, I decided that the most logical would be to stop choosing C #, since I wanted to use native development tools and start learning about it using the example of creating a simple phone game. Taking up the task, I set myself the goal of exploring the basic capabilities of the language, development environment and the entire ecosystem from Microsoft as a whole, with an eye to its further development in the field of programming.
Having shared their ideas and aspirations with a friend, a talented graphic designer, for whom the development of mobile games was also a novelty, they decided to start creating our “best in the world” game.
')
As a result of our work, a simple and unpretentious game for training visual memory, written without third-party libraries in C # and XAML, turned out. The player is given time to fill the location of the circles on the screen, then he needs to restore them from memory. In total, the game has 10 levels, each of which increases the number of circles. Attempts are given one or two more than the number of objects on the screen. To complete the game, the player has 5 lives.
The development and publication of the first game allowed me to figure out and get some experience on the following important points:
1) Basic knowledge of C #, XAML, and the WinRT platform as a whole.
2) Localization of the application [ link ].
3) Adding an evaluation mechanism [ link ].
4) Account creation and publishing in the Windows Store.
5) Setting up and adding ads AdDuplex, Smaato, Microsoft Advertising in the application through Microsoft advertising intermediary [ link , link , link ].
By the time of the publication of the first game, a new idea and understanding of what I want from my next project had finally been formed. I defined for myself the basic requirements for the future game:
1) Control should be carried out with one touch (one finger).
2) No levels and contain the following scenes: start screen, menu, instructions, game, pause, restart.
3) Must be infinite, aiming to set the maximum number of points.
4) Must be fun and challenging.
5) Of course beautiful.
The concept of the game was as follows: in the center of the screen is an object (let's call it “core”), to which other objects are continuously and in an arbitrary direction, and the player’s task is to protect the core. Each successful reflection of an object flying to the core gives points to the player, and failure leads to defeat, and the game begins anew.
The designer patiently and responsibly approached the embodiment of my "hotelok", creating the concept of the game in the style of sci-fi.
Having stopped on the main decisions in design of figures, then painfully selected between color scales.
I did not want to move away from native development tools - it was necessary to consolidate the knowledge gained. Therefore, further followed the analysis of existing free C # engines. One of the determining factors in choosing was the availability of a large number of training materials and examples. As a result, I chose Monogame, which is a cross-platform OpenSource implementation of the once popular Microsoft XNA 4 framework.
MonoGame provides an opportunity to develop not only for different platforms, but also on different platforms. On the official website on the download page you can find packages for various operating systems: Windows, MacOS, Linux. On Linux, as well as on MacOS, you will need Xamarin Studio . Development for Windows 8.1 will require the Windows 8.1 SDK, which is included in the full-featured free Visual Studio Community 2013, and for Windows 10, the Windows 10 SDK and the Visual Studio Community 2015, respectively.
Beginners should note that the ready-made MonoGame game template for Windows Phone 8.1 is available only in Visual Studio Community 2013, in the 2015 version you will already see the template for the UAP application.
Short about engine
In MonoGame the game cycle model is implemented:
[ link to source ]
1) In the Initialize () method, the variables and objects used, the initial state of the game, are initialized.
2) Then in the LoadContent () method, various resources are loaded into the application, which are used in the game - audio files, image files, and so on.
3) The Update () and Draw ( ) methods represent the game loop. With a certain periodicity (by default, 60 times per second), in the Update () method, game objects are polled, calculations are made, for example, the positions of characters. The Draw () method is only responsible for redrawing scenes and game objects. Both methods take a GameTime object as a parameter - it stores the time elapsed since the beginning of the game.
4) Upon exiting the game loop, control is transferred to the UnloadContent () method. In this method, the previously used resources are unloaded.
5) After that, the game ends and the application closes.
This algorithm is presented in the Game1 {} class when creating a MonoGame project:
using Microsoft.Xna.Framework; using Microsoft.Xna.Framework.Graphics; using Microsoft.Xna.Framework.Input; namespace Game1 { public class Game1 : Game { GraphicsDeviceManager graphics; SpriteBatch spriteBatch; public Game1() { graphics = new GraphicsDeviceManager(this); Content.RootDirectory = "Content"; } // protected override void Initialize() { base.Initialize(); } // protected override void LoadContent() { spriteBatch = new SpriteBatch(GraphicsDevice); } // protected override void UnloadContent() { } // , protected override void Update(GameTime gameTime) { base.Update(gameTime); } // protected override void Draw(GameTime gameTime) { GraphicsDevice.Clear(Color.CornflowerBlue); base.Draw(gameTime); } } } The global variable GraphicsDeviceManager graphics allows you to access the graphics device of your computer, smartphone, tablet, game console. Another global object - SpriteBatch spriteBatch is used to draw sprites - images that are used in the game.
The Content object provides access to game content. It should be noted that adding to the project of various textures, audio files, fonts, etc. occurs through MonoGame Pipeline - a utility that converts source files to .xnb files, with which the application is already working directly.
According to the principle of working on the Internet, there are quite a lot of materials and good lessons , therefore I will not talk about this in detail. I would like to dwell on the main tasks that any game developer has to face, put them together and give solutions using the example of the game presented in the article.
Graphics independence on screen resolution
For scaling graphics, it is convenient to use vector transformation matrices. To do this, in the game class field, create a Matrix variable to access the transformed textures and a Rectangle variable to store the values of the scaled screen edges.
private readonly Rectangle screenBounds; private readonly Matrix screenXform; In the class constructor, create a variable to store the scale value of the graphics, which can be defined as the ratio of the device screen resolution value to the height resolution of the textures. In the example, the value is 1080, since the textures were used with a resolution of 1920 × 1080 pixels. Next, set the scale value for the transformation matrix along the XYZ axes.
var screenScale = graphics.PreferredBackBufferHeight / 1080.0f; screenXform = Matrix.CreateScale(screenScale, screenScale, 1.0f); At the game cycle rendering stage (In the Draw () method), we use the scale value as a parameter for the overloaded SpriteBatch.Begin () method [ link ]:
spriteBatch.Begin(SpriteSortMode.Deferred, null, null, null, null, null, screenXform); For convenience of further work, it is now possible to set the borders and center of the screen in accordance with the current scale.
screenBounds = new Rectangle(0, 0, (int)Math.Round(graphics.PreferredBackBufferWidth / screenScale), (int)Math.Round(graphics.PreferredBackBufferHeight / screenScale)); center = screenBounds.Center.ToVector2(); Now, for correct work with the touchscreen, it is necessary to set the limits for handling clicks in the Initialize () method:
TouchPanel.DisplayWidth = screenBounds.Width; TouchPanel.DisplayHeight = screenBounds.Height; Nuances of working with sound
To get an application certification in the Windows Store, you must follow the recommendations of Microsoft [ link , link ].
As for working with sound, the application or game being launched should not interrupt the user's music if it is playing. To do this, we check when the game starts in the Initialize () method:
if (MediaPlayer.GameHasControl) { MediaPlayer.Stop(); } Also note that the rule of good tone will be the question of whether the user wants to stop the music in the media player and turn it on in the game. Implementing this functionality is convenient, for example, through pop-up windows.
To play background music or sound effects in a game, taking into account the “With sound / Silent” mode, the playback command in the Update () method may look like this:
if (!isMuted && MediaPlayer.State != MediaState.Playing && MediaPlayer.GameHasControl) { MediaPlayer.Play(backGroundMusic); } Work with fonts
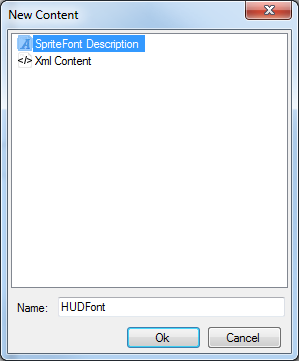
Fonts, like any other content for the game, must be downloaded via the Pipeline utility. However, in this case, not a specific font is loaded, but a new element is created to describe the font used. Previously, the font you have chosen should already be in the system folder with fonts.
Select SpriteFont Description and set the name. Click OK.
In order for fonts to not lose their display quality when scaling an image, you need to change the texture format from Compressed to Color , as shown in the figure below.
Click Build and go to the folder with the project, open the Content subfolder. There should be a generated * .spritefont file that needs to be opened in a text editor that is convenient for you (for convenience, I open it in the same Visual Studio). In the tags below you can specify any font size from those located in the system folder.
<!-- Modify this string to change the font that will be imported. --> <FontName>Arial</FontName> <!-- Size is a float value, measured in points. Modify this value to change the size of the font. --> <Size>12</Size> Preservation of records
To save the results of the game is convenient to use the XML format. To access the data resources of the application used serialization . To exclude delays in the game when reading / writing data, you need to use an asynchronous approach.
To implement the above, we will write several methods in the game class:
public async void LoadHighScore() { await readXMLAsync(); } public async void SaveHighScore() { await writeXMLAsync(); } private async Task writeXMLAsync() { var serializer = new DataContractSerializer(typeof(Int16)); using (var stream = await ApplicationData.Current.LocalFolder.OpenStreamForWriteAsync( "highscore.xml", CreationCollisionOption.ReplaceExisting)) { serializer.WriteObject(stream, highscore); } } private async Task readXMLAsync() { var serializer = new DataContractSerializer(typeof(Int16)); // bool existed = await FileExists(ApplicationData.Current.LocalFolder, "highscore.xml"); if (existed) { using (var stream = await ApplicationData.Current.LocalFolder.OpenStreamForReadAsync("highscore.xml")) { highscore = (Int16)serializer.ReadObject(stream); } } } // public async Task<bool> FileExists(StorageFolder folder, string fileName) { return (await folder.GetFilesAsync()).Any(x => x.Name == fileName); } Transition on game scenes
There are a lot of ways to implement it, but for a simple game it is convenient to use enumerations. To do this, in the game class, we will declare the transfer with game states and create an instance of it.
enum GameState { Menu, Gameplay, EndOfGame, } GameState state; Next, we modify the Update () and Draw ( ) methods so that at the stage of computing and drawing graphics, data from the current state of the game is processed.
Update method () :
void Update(GameTime deltaTime) { base.Update(deltaTime); switch (state) { case GameState.Menu: UpdateMenu(deltaTime); break; case GameState.Gameplay: UpdateGameplay(deltaTime); break; case GameState.EndOfGame: UpdateEndOfGame(deltaTime); break; } } Draw () method:
void Draw(GameTime deltaTime) { base.Draw(deltaTime); switch (state) { case GameState.Menu: DrawMenu(deltaTime); break; case GameState.Gameplay: DrawGameplay(deltaTime); break; case GameState.EndOfGame: DrawEndOfGame(deltaTime); break; } } We define new methods that implement the logic of transition between game states, calculations and drawing game scenes.
void UpdateMenu(GameTime deltaTime) { // if (pushedStartGameButton) state = GameState.GamePlay; } void UpdateGameplay(GameTime deltaTime) { // , . if (playerDied) state = GameState.EndOfGame; } void UpdateEndOfGame(GameTime deltaTime) { // , if (pushedMenuButton) state = GameState. Menu; else if (pushedRestartLevelButton) { ResetLevel(); state = GameState.Gameplay; } } void DrawMenu(GameTime deltaTime) { // , .. } void DrawGameplay(GameTime deltaTime) { // , .. void DrawEndOfGame(GameTime deltaTime) { // , .. } Conclusion
Perhaps some of the points covered in this article will seem obvious, but in the process of learning I spent a considerable amount of time searching for answers to these questions. I hope that the above materials will be useful for novice developers and will help to quickly create their first masterpieces.
From myself I would like to advise the following: be sure to finish the work on the idea begun, bring the matter to the end. Determine for yourself the minimum required functionality of the game or application - this will allow you to specify the task and reduce the amount of work before the release of the first version. Improvement can be infinite, but leave the "buns" for the next release, otherwise you can get bogged down in this process and, ultimately, lose interest.
Strive to make a quality product. This applies to all elements of the game: the project architecture, code, textures, sounds and music. To do this, look for professional answers to your questions, read the relevant literature.
I would be very grateful to experienced developers for comments, suggestions for shortcomings and advice on written work.
PS What happened in the end:
Source: https://habr.com/ru/post/307454/
All Articles