Install Sailfish OS on your smartphone (for example, Nexus 5)
In this article I will tell you how to install Sailfish OS on your smartphone and all the details of this process.
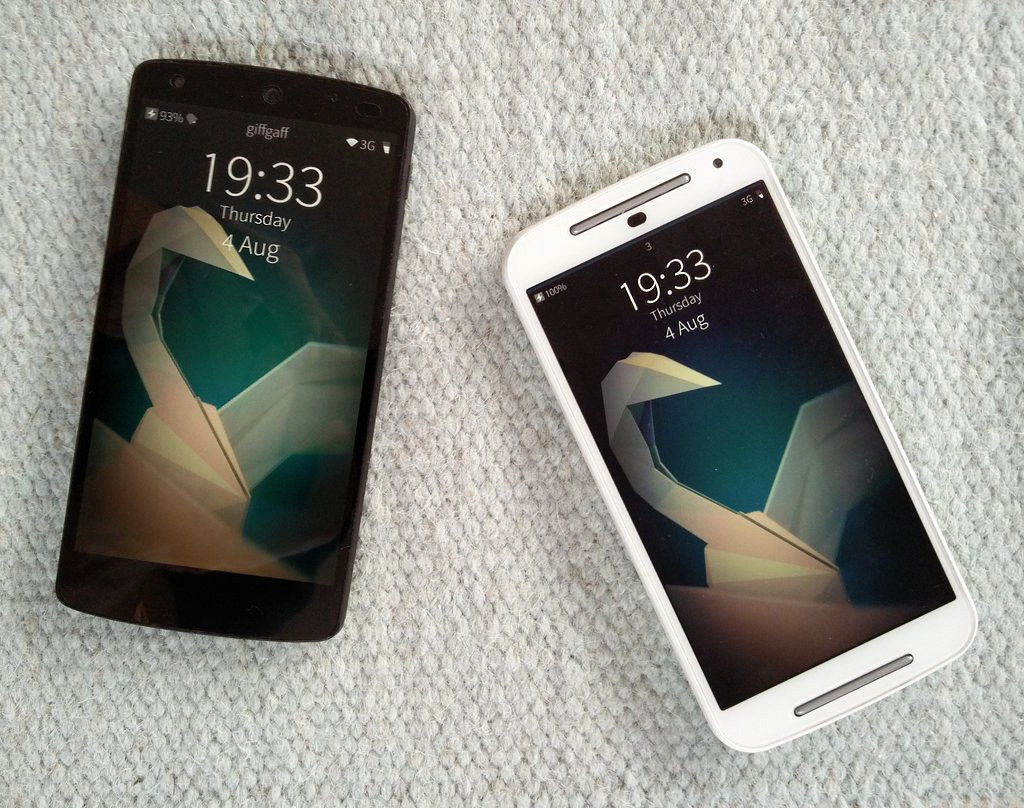
I had the very first phone from Jolla and I quite liked it. But time did not spare him: his SIM card slot broke and he turned into an offline smartphone. For a while I used Android, but I want to come back and I started looking towards unofficial firmware. The first Jolla phone is obsolete today, it has a disgusting camera, the hardware is irrelevant and the screen has a small resolution. I had a Moto G 2 on my phone, which I tried to install SFOS, but it was not quite ready (the camera did not work, Bluetooth worked partially, there was no video playback and many other shortcomings) and its Polish author somehow did not hurry to finish it. Therefore, I sat for a few weeks on eBay and found for myself a used Nexus 5 phone for experiments. Today I will try to describe to you all the pitfalls of installing SailfishOS on an Android smartphone.
In this article:
- Little about ports
- Unlock the bootloader
- We put our MultiROM loader
- We put CyanogenMod (CM) and SailfishOS (SFOS)
- Upgraded to SFOS 2 (optional)
- How to install applications?
- Top 10 programs for a beginner
Little about ports
So, unofficial firmware, ported to different devices by enthusiasts (hereinafter referred to as " port ") exist for different phone models. But how do they differ from the official? First, you must understand. that they are written by ordinary people like you and me. This means that most likely something may not work, something may be unavailable, something may break with the arrival of updates. Also, all support depends entirely on the authors of the firmware and Jolla itself has no relation to this, by and large. Secondly, the eternal problem with iron. Ports are installed on top of CyanogenMod, in order not to write drivers from scratch, but still not everything works correctly. The CM itself also consumes a lot of battery power: if the first Yolla lived with me for four days from one charge, the Nexus already draws a maximum of one and a half to two.
')
So, where to start? To get started, look at the matrix of ready ports at the link:
wiki.merproject.org/wiki/Adaptations/libhybris
There you can see for which phones their ports have already been written, what their status and which versions are available. Thanks to the activity table, I decided to take Nexus 5 for my experiments, because for it the firmware is one of the most stable. Be sure to review the list of what has already been done in the port for your smartphone, and what functionality does not work yet. Installation instructions are usually the same, but there are often some additional steps specific to the specific version of the smartphone. Here, for example, instructions for a nexus .
And if you are strong in spirit, ready to roll up your sleeves and make your own port on any smartphone model, then here are some instructions for you to start with , and there is support in the official chat. There are very friendly Yolla workers sitting there who will be happy to help with advice.
Well, if you are mentally prepared, then you can begin. Check that you have an Android SDK on your computer (we will need adb and fastboot utilities).
Unlock the bootloader
I first tried using the native bootloader for MotoG2, but it turned out to be a bad idea. There is a good time-tested MultiROM , which, moreover, allows you to install several operating systems , if you wish. In order to install it, you must first unlock the native bootloader that comes with your smartphone. We connect our (yet Android) phone to the computer, enter the Developer Mode, enable USB debugging and write in the command line:
$ adb reboot bootloader When the phone boots into fastboot mode, you need to first make sure that your computer still sees the connected phone:
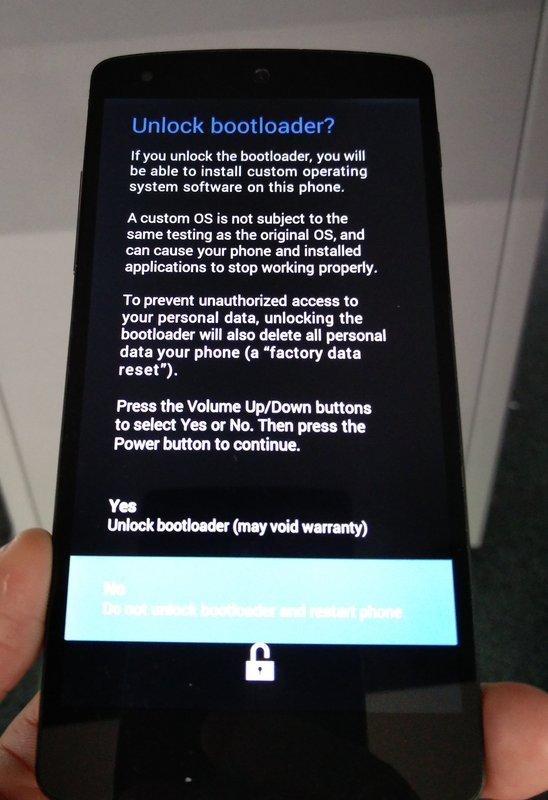
$ adb devices and, in fact, unlock the bootloader:
$ sudo fastboot oem unlock The device itself will show a warning message with which you need to agree (but remember that you will lose the warranty!).
We put our MultiROM loader
First we go to the website twrp.me and download the latest version of the bootloader for your phone (for example, for the Nexus here ). Then from the command line we write:
$ sudo fastboot flash recovery ~/Downloads/twrp-3.0.2-0-hammerhead.img target reported max download size of 1073741824 bytes sending 'recovery' (14524 KB)... OKAY [ 0.665s] writing 'recovery'... OKAY [ 1.129s] finished. total time: 1.794s We put CyanogenMod (CM) and SFOS
Before you start the installation, you need to download the images of the operating system. We download SM11 snapshot (11 is important, since the port is written for this version). For the Nexus, I took this image . And, of course, download the port itself for your phone. The link usually lies on a wiki or forum. For Nexus, this is the image . We throw both files on the phone.
$ adb push ~/Downloads/cm-11-20141008-SNAPSHOT-M11-hammerhead.zip /sdcard/ 6565 KB/s (373041464 bytes in 55.489s) $ adb push ~/Downloads/sailfishos-hammerhead-release-1.1.9.28-beta0-201510022255.zip /sdcard/ 6555 KB/s (348973612 bytes in 51.983s) Small note for Nexus5
at the time of writing the latest version of the video was broken video. The author offers to download the latest snapshot, which is more stable, but is still in testing. His instructions and links to image assemblies can be found here . But this advice may quickly become obsolete in the future. Check out the official documentation.
Now you can boot into Recovery Mode to enter the bootloader. We need to do three things here: clean the phone, install the CM, install SFOS. Turn off the phone, then with the volume keys held down, turn it on and enter the boot menu.

Choose Recovery Mode and go to the MultiROM bootloader.
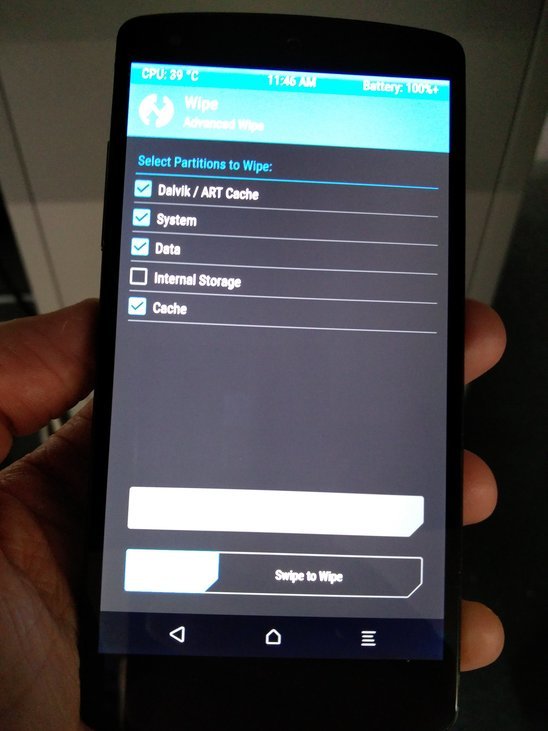
Next, go to the Wipe and erase everything except Internal Storage .
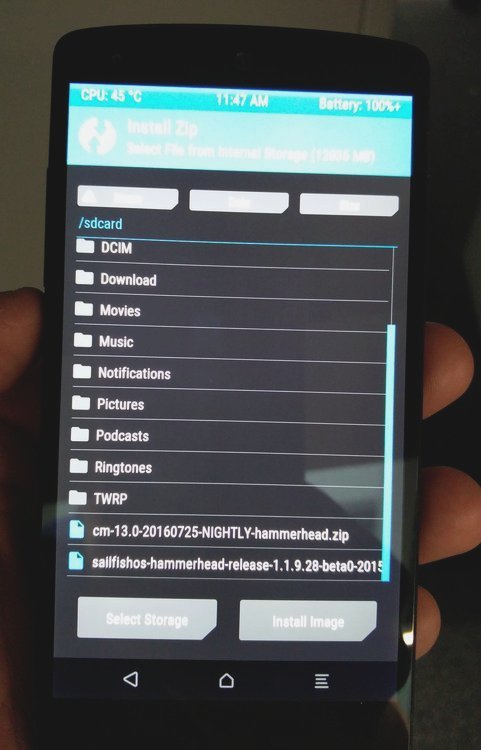
Then go to Install , find the CM and install it. ( unfortunately, in the photo I have the wrong image of CM13, but I need CM11 )
and finally, in the same way, install SailfishOS.

At the end we reboot the phone and after that it should already be loaded with a completely different smartphone. The very first system load can take quite a long time, so do not worry, this is normal. It took me about five minutes.
We update the version of an OS to 2.0
This step is only needed for the Nexus, because its port is based on the old version of SailfishOS, but for other phones this can be a useful approach. For this procedure, we need to configure updates "over the air." To do this, good people wrote a small script that we need to run.
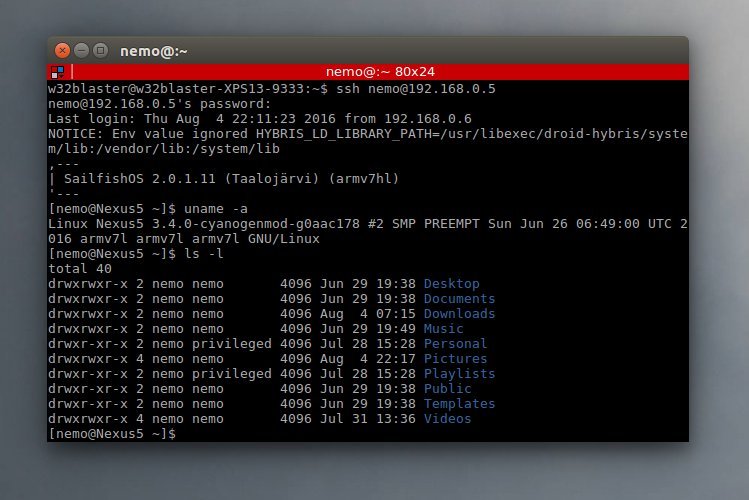
Connect to the phone via SSH
Since SailfishOS is primarily Linux, the console is available initially from us. As well as the SSH-server to which we can connect. The console can be opened on the smartphone itself, it is available for you by default, but pointing your finger at the phone screen is not entirely convenient. This option is more likely for emergency situations when there is no laptop at hand.
The second option is to connect to the phone from the computer via SSH, which is much more convenient. This is very helpful in everyday work, as we can do a lot of operations from the computer using a normal human keyboard and mouse.
So, first we need to connect to WiFi. Then open Settings> Development mode, where you can set your root password, well, and see the already ready IP address to which you can connect inside your grid:
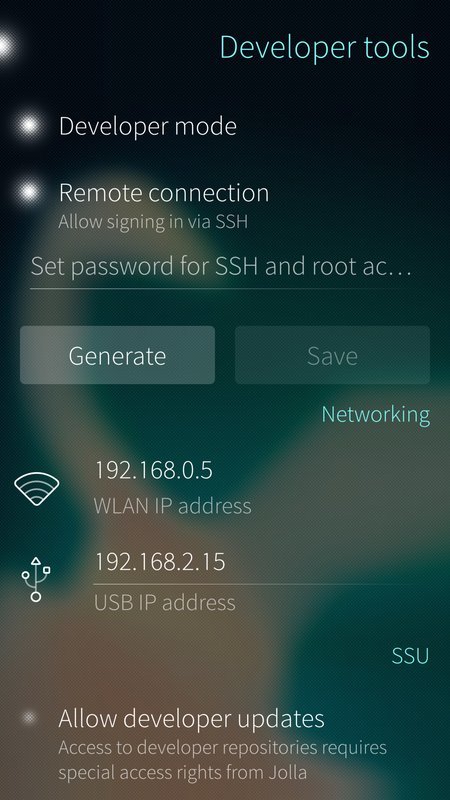
We go under the user nemo at the specified IP address.
Further, somewhere on the phone we create a shell script with such content .
ready script update.sh
RELEASE=2.0.1.11 devel-su sed -i -e 's#^adaptation=.*$#adaptation=http://repo.merproject.org/obs/nemo:/testing:/hw:/lge:/hammerhead/sailfish_latest_armv7hl/#' \ /usr/share/ssu/repos.ini ssu dr adaptation0 ssu release $RELEASE ssu dr extra ssu dr mw ssu ar mw http://repo.merproject.org/obs/home:/RealJohnGalt:/testing:/common/sailfish_latest_armv7hl/ ssu er mw ssu ar dhd http://repo.merproject.org/obs/nemo:/testing:/hw:/lge:/hammerhead/sailfish_latest_armv7hl/ ssu lr # ^ double-triple check that no -two- enabled repos point to the same URL # You may have many of OpenRepos enabled. It's recommended to disable them, even # though version --dup will do its best-effort to isolate repositories: ssu lr | grep openrepos devel-su zypper clean -a devel-su zypper ref -f version --dup # if above fails, try again version --dup sync reboot We give him the rights and run. We wait. Reboot. Enjoying the latest version of SailfishOS 2.0.
How to install applications?
Ok, now we have a naked phone in our hands and itching to put a bunch of software on it. Let's learn how to do it. We have four ways.
1. Jolla Store
Official store. There is nothing special to describe here: come in, click “install”, that's all. One thing I can add is that the Jolla Store may be missing on some ports.

2) Warehouse
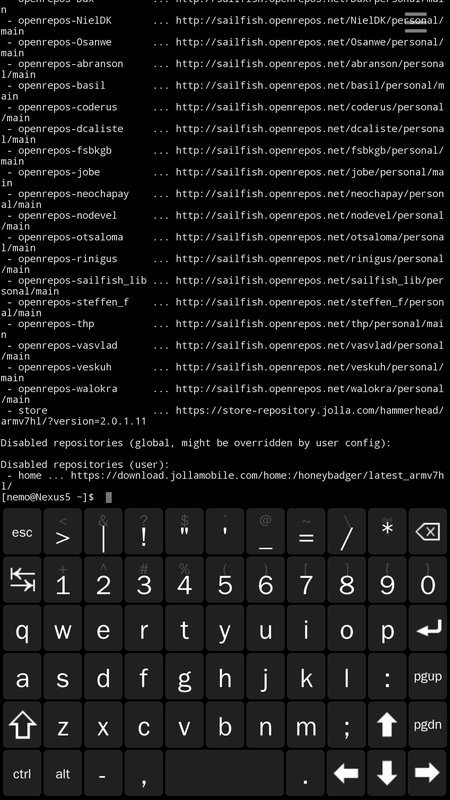
As with any Linux distribution, programs can be installed from various sources (repositories). You just need to add the desired repository and all the packages from it will be available for installation. Therefore, there is the most important analogue of the official app store - openrepos.net . He has a small phone application called Warehouse.

It looks quite simple:
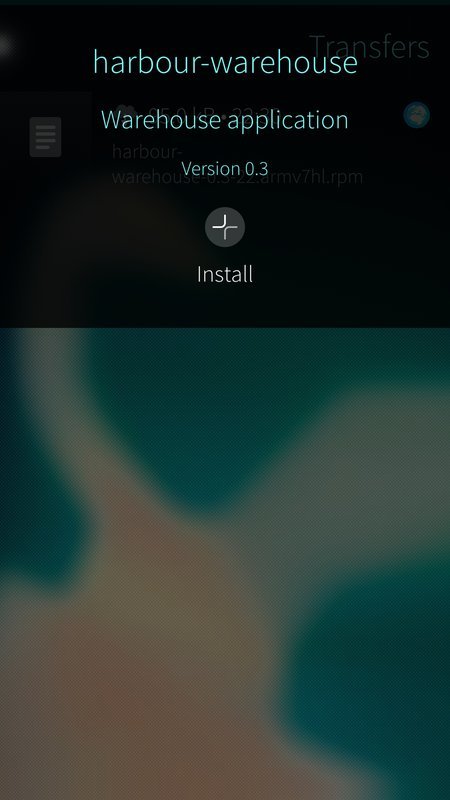
The easiest way to install it is to go to this site from the browser of the phone, download the rpm package and install it by tapping on the downloaded file (all downloads can be viewed in Settings> Transfers; on a bare system, you will most likely need to allow installation of programs from dubious sources This feature can be enabled in Settings (Untrusted Software).
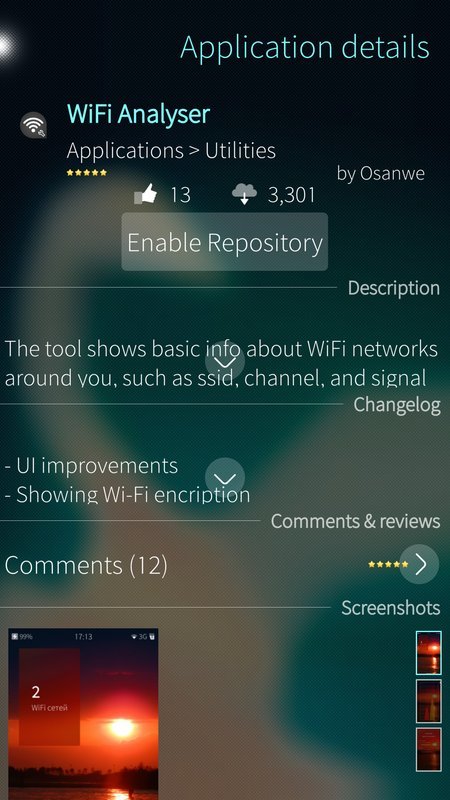
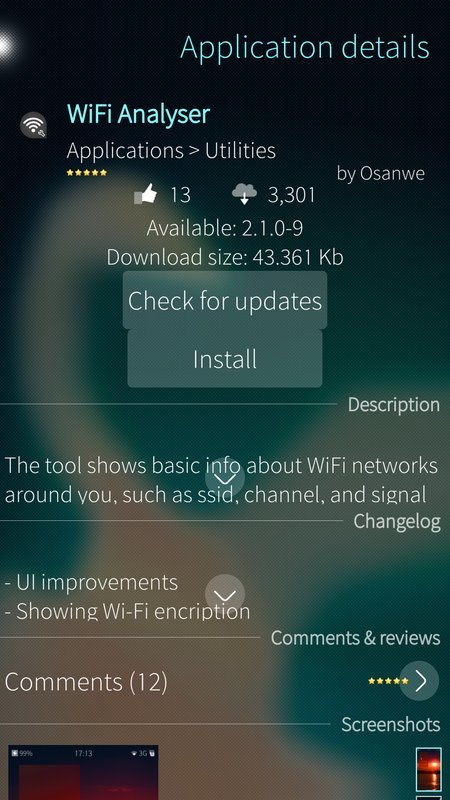
If you look at any application from this store, first you will find the “Enable repository” button, and adding the author's repository to your phone, the “Install” button will be available for you. So you can install any application from openrepos.net
3) RPM
As you noted in the previous step, the program or package can be installed either from a browser (allowing installation from unreliable sources, as described above), or directly from the console. The previous step of installing Warehouse via the console might look like this:
curl -o warehouse.rpm https://openrepos.net/sites/default/files/packages/1/harbour-warehouse-0.3-22.armv7hl.rpm
devel-su rpm -i warehouse.rpm
4) pkcon, zypper
Well, let's take a closer look at the "manual" management of your repositories. In order to manage them, the ssu command is available to you.
List of installed ssu lr repositories:
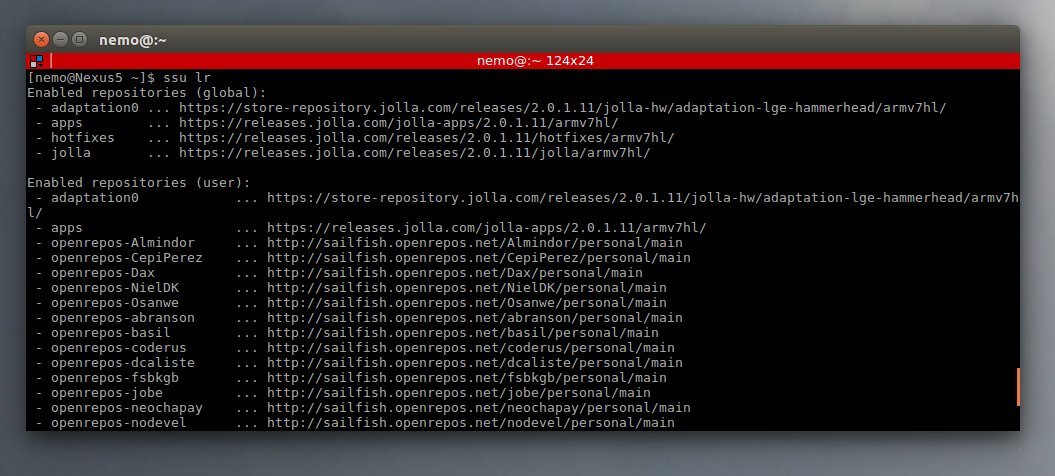
In the same way, temporarily deactivate some kind of repository:
ssu dr home Add a new repository:
ssu addrepo ... You can install programs using pkcon or zypper . For example, let's install, say, gPodder (a podcast app).
First, let's add the sailfish.openrepos.net/thp/personal-main.repo repository (found on the author's page ):
[nemo@Nexus5 ~]$ ssu addrepo openrepos-thp https://sailfish.openrepos.net/thp/personal/main [nemo@Nexus5 ~]$ devel-su pkcon refresh Password: .... Refreshing software list Then find the name of the package.
[nemo@Nexus5 ~]$ zypper search gpodder
Loading repository data...
Reading installed packages...

S | Name | Summary | Type
--+------------------------------+------------------------------+--------
| harbour-org.gpodder.sailfish | Media and podcast aggregator | package
Well, in fact, install the program itself using zypper:
[nemo@Nexus5 ~]$ devel-su zypper install harbour-org.gpodder.sailfish Password: Loading repository data... Reading installed packages... Resolving package dependencies... The following NEW packages are going to be installed: harbour-org.gpodder.sailfish libpython3_4m1_0 libsailfishapp-launcher pyotherside-qml-plugin-python3-qt5 python3-base 5 new packages to install. Overall download size: 8.6 MiB. After the operation, additional 34.0 MiB will be used. Continue? [y/n/?] (y): y .... .... As you can see, everything looks pretty familiar to anyone who is a little familiar with Linux. Let's say if you want to install a regular python this time with the pkcon command, then your command will be as follows:
[nemo@Nexus5 ~]$ devel-su pkcon install python Password: .... Installing packages [=========================================================================] The following packages have to be installed: gdbm-1.8.3-1.1.4.armv7hl GNU Database Routines python-2.7.9-1.4.1.armv7hl An interpreted, interactive, object-oriented programming language python-libs-2.7.9-1.4.1.armv7hl Runtime libraries for Python Proceed with changes? [N/y] y .... In some ports, the default is not installed word substitution in the keyboard. It will not be superfluous to add it.
[nemo@Nexus5 ~]$ devel-su pkcon install jolla-xt9 jolla-xt9-cp Top 10 programs for beginners
It is understood that this article is intended for those who do not have experience with SFOS, so I will simply list the most interesting (exclusively in my personal opinion) programs that need to be fixed first.

1) Lighthouse .
A very convenient viewer of current processes, it also shows the load on the CPU in real time, the use of memory and other phone resources. It helps when you need to nail a couple of processes, or just to see what processes you run on the background.

2) Meecast .
The program simply shows the weather. The fact is that this program (deservedly!) Was in the top of installations for a long time in the official app store Jolla. In addition to her in the top only programs from the most Yolla, who come with the phone itself. She can only show the weather, but makes it very beautiful. And, from the point of view of support, this program is a long-liver. Authors send different updates so far.

3) gPodder
App for podcasts. The program has been ported from the legendary Maemo. Imperfect, but the best that is at the moment.

4) Sailogram
Client for Telegram. Quite a great app, I use it myself every day. The majority of native functionality Telegram is supported.

5) OwnKeepass
Client for password manager KeePassX. It is very convenient to keep the password database itself somewhere in the cloud, the key to it is offline, and the password is in your head. Supports both versions of KeepassX, convenient to use.

6) FileCase
File Manager. It also supports work with cloud storages, such as Dropbox. An indispensable assistant in any phone.

7) Situations
The program passed to us from Meego. Automatic mode switch depending on some conditions (time, location, available networks), or, as the author calls it, “situations”. Let's say at night you want to activate a quiet profile (turn off the network and sound) from 24-00 to 7-00. When a Wi-Fi grid called Work is available, then you are at work and you need to activate the Work profile (connect to the grid and make the sound quieter). If the battery charge remains below 10%, then the power saving mode is activated. Well, and so on.

8) Tweetian
Legendary client for twitter, which came to us from the world of Migo and Symbian.
9) Cards
With cards in SFOS, not everything is so fabulous and beautiful, like on Android. All maps are based on Open Street Maps or HERE. Here, for example, the main map from Yolla, which is very simply called Maps, is based on HERE and is installed on all Jolla phones.

You can install it yourself with the command:
devel-su pkcon install sailfish-maps But there are other options from the community. The most famous of them is Poor Maps.

Poor maps
It is also based on Open Street Maps and can be more or less used.

10) Codereader
A simple barcode reader.
That's all. Thank you for reading to the end. And, as always, have a good swimming!
Source: https://habr.com/ru/post/307152/
All Articles