AWS Server-less API in 15 minutes
Amazon Web Services allows you to quickly prototype simple web applications, and you can write an API, say, for a simple mobile application in minutes. We will use a bunch of DynamoDB and API Gateway (without Lambda functions!) To configure GET and POST requests to the database with the ability to read, write and change data in it.

First of all, you need to register on AWS and log in to the console. We will start creating our service from the DynamoDB database, click the Create table button, enter the name of the apiData table (I will use my names in the manual, you can specify any others), the main key for which will be added to it: userID and tick the box Use default settings .

In DynamoDB, rows are added to the table using the specified key, it is possible to add any number of parameters and not necessarily a data structure for different keys. In our case, for each of the users at the specified userID, we will be able to add any data describing this user.
')
Next, we need to create a so-called role in the Identity and Access Management service . In the menu on the left, select the Roles section and click the Create new role button; specify its name - dynamoAPI , and after clicking Next Step - in the AWS Service Roles section, select Amazon API Gateway , double-click Next Step, and finally - Create Role .
We are interested in the Role ARN value specified in the arn: aws: iam :: 000000000000: role / roleName format . This value will need to be used when associating queries with the database, so write it down. Next, we need to create an access policy for this role, this is done on the Permissions tab in the Inline policies section, open it and click click here .

In the Policy Generator section, click the Select button, on the page that opens, select Amazon DynamoDB service and specify the following actions :
You may want to be able to do some other actions with the help of your API, in this case - you can study them on this help page , for basic operations, these actions will suffice for our eyes. As for the Amazon Resource Name item, here you can either specify the ARN of your table (located on the Overview tab), or specify * which will allow users with the role created to have access to all the tables in your account. Click the Add Statement and Next Step button, on the opened page - Apply Policy . This completes the role setting!
Moving on to creating an API using the API Gateway service. Click the blue Create API button, on the page that opens, specify its name - The API and click the Create API button at the bottom of the page. Now we need to create a resource that can be accessed with requests, click the Actions button and select Create Resource .

Let's call this resource user , it will contain information about users, and in order to gain access to a specific user, you will need to specify the user ID as a path parameter. In order to create such parameters in the API Gateway service, we need to create a new resource one level below the already created user, and specify the {userid} as the Resource Name and Resource Path (note that when you specify the name in this format, the Resource Path is replaced by - userid- , you need to manually specify the desired form for the path parameter).

Next, create a method for creating a record about a new user, to do this, select the resource {userid} , and click the Actions button, select Create method , specify its type - POST and click the check mark to create it. In the settings menu that opens, in the Integration type section, you must open the Show advanced spoiler and select the AWS Service Proxy . Settings:
After saving these settings, you must first go to the first square of the Method Request , in the API Key Required item, select true and click on the check mark to save the settings - this is necessary to access this method from the outside using an authorization token (configure later; do not forget to do this operation for all methods!). Go back and go to the second square of the Integration Request to configure the actual query in DynamoDB. On the page that opens, scroll to the bottom and open the Body Mapping Templates section, click the Add mapping template button, specify Content type : application / json , specify the request parameters in the input field, use the following code to create a new record:
Here we specify the name of the table in which we make changes, the first one indicates the key by which the data will be entered: userID , its value is taken from the path parameter userid . From the request body, data is taken from the parameter key and added to the column of our database of the same name for the specified user. In response - the previous value is sent to the specified key, if it existed. If a user with such a username did not exist, an empty response will come.
All that remains for us to do is to check the operability of the request. To do this, at the top of the page, click the back button and to the right of the four squares, click on the Test button with the Harry Potter icon:
In the window that opens, we will need to specify the value of Path Parameter - this is the name of the user we want to create / re-create ( remember , PutItem overwrites the entire line with the specified key), just below - specify the body of the request:
The request was successful, we received a response with an empty body without any errors!

If we go to DynamoDB , then on the Items tab we can see the newly created user:
To read user data, you must also create a GET method with Action - Query within the userid resource, set up an integration request (remember, in this case, the request to the database is still done using the POST method!) And specify the following template for body mapping :
If we want to change some parameter values for a specific user, without changing all other lines, then we can also use the POST method with an Action of the UpdateItem type and the following mapping template:
In this case, the request returns all updated user data if successful, from examples - this method can be used to store appsecret_proof when authorizing a user through Facebook in your application.
In fact, all basic API usage scenarios can be created based on these examples. All we have to do is to access the API from the outside, to do this, you need to click our favorite Actions button in the menu of our API and select the Deploy API . Specify:
Click Deploy and get the following Invoke URL : m00000000a.execute-api.us-east-1.amazonaws.com/apiRelease . To make inquiries at this address, an authorization token is required, to get it, in the menu on the left, go to the API Keys section, click the Create button, name your key and save it. Then in the Stage Association API section that appears, select the desired API and the newly created scene, then click the Add button. Return to the API via the left menu, select Actions -> Deploy API , select the already created Stage and click Deploy . Voila!
Now you can make requests to your API from the outside by adding x-api-key to the requests with your token as a value. To get data about our created user, it is enough to make a corresponding GET request to the address m00000000a.execute-api.us-east-1.amazonaws.com/apiRelease/user/newUserOne and you will receive all the information about him in response! Thus, in a matter of minutes, you can create a simple API to access the database, with which you can test your new application or any other service that does not require a complex data structure. For more complex projects, of course, you should use more suitable tools.
First of all, you need to register on AWS and log in to the console. We will start creating our service from the DynamoDB database, click the Create table button, enter the name of the apiData table (I will use my names in the manual, you can specify any others), the main key for which will be added to it: userID and tick the box Use default settings .
In DynamoDB, rows are added to the table using the specified key, it is possible to add any number of parameters and not necessarily a data structure for different keys. In our case, for each of the users at the specified userID, we will be able to add any data describing this user.
')
Next, we need to create a so-called role in the Identity and Access Management service . In the menu on the left, select the Roles section and click the Create new role button; specify its name - dynamoAPI , and after clicking Next Step - in the AWS Service Roles section, select Amazon API Gateway , double-click Next Step, and finally - Create Role .
We are interested in the Role ARN value specified in the arn: aws: iam :: 000000000000: role / roleName format . This value will need to be used when associating queries with the database, so write it down. Next, we need to create an access policy for this role, this is done on the Permissions tab in the Inline policies section, open it and click click here .
In the Policy Generator section, click the Select button, on the page that opens, select Amazon DynamoDB service and specify the following actions :
- DeleteItem
- Getitem
- Putitem
- Query
- Scan
- UpdateItem
You may want to be able to do some other actions with the help of your API, in this case - you can study them on this help page , for basic operations, these actions will suffice for our eyes. As for the Amazon Resource Name item, here you can either specify the ARN of your table (located on the Overview tab), or specify * which will allow users with the role created to have access to all the tables in your account. Click the Add Statement and Next Step button, on the opened page - Apply Policy . This completes the role setting!
Moving on to creating an API using the API Gateway service. Click the blue Create API button, on the page that opens, specify its name - The API and click the Create API button at the bottom of the page. Now we need to create a resource that can be accessed with requests, click the Actions button and select Create Resource .
Let's call this resource user , it will contain information about users, and in order to gain access to a specific user, you will need to specify the user ID as a path parameter. In order to create such parameters in the API Gateway service, we need to create a new resource one level below the already created user, and specify the {userid} as the Resource Name and Resource Path (note that when you specify the name in this format, the Resource Path is replaced by - userid- , you need to manually specify the desired form for the path parameter).
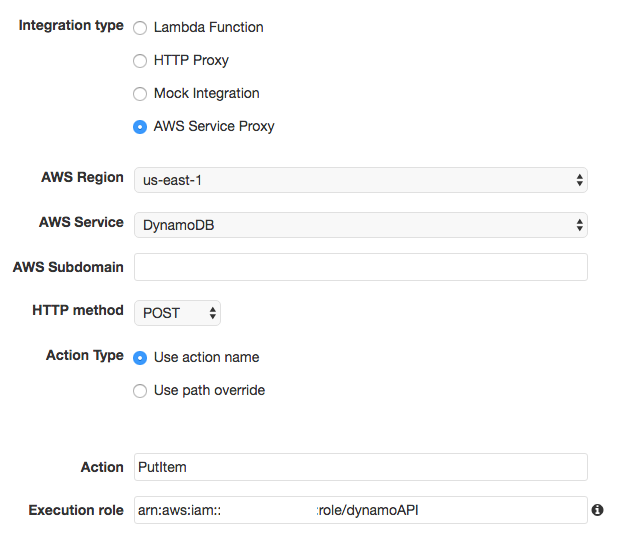
Next, create a method for creating a record about a new user, to do this, select the resource {userid} , and click the Actions button, select Create method , specify its type - POST and click the check mark to create it. In the settings menu that opens, in the Integration type section, you must open the Show advanced spoiler and select the AWS Service Proxy . Settings:
- AWS Region specify the region where your database is located (by default - us-east-1 , you can check it in the Overview section of your table)
- AWS Service : DynamoDB
- AWS Subdomain : leave blank
- HTTP method : POST (used for any calls to DynamoDB, including for receiving data)
- Action Type : Use action name
- Action : PutItem (used to create a new entry / rewrite the entire value with the specified key)
- Execution role : specify the role we created in the format arn: aws: iam :: 000000000000: role / roleName
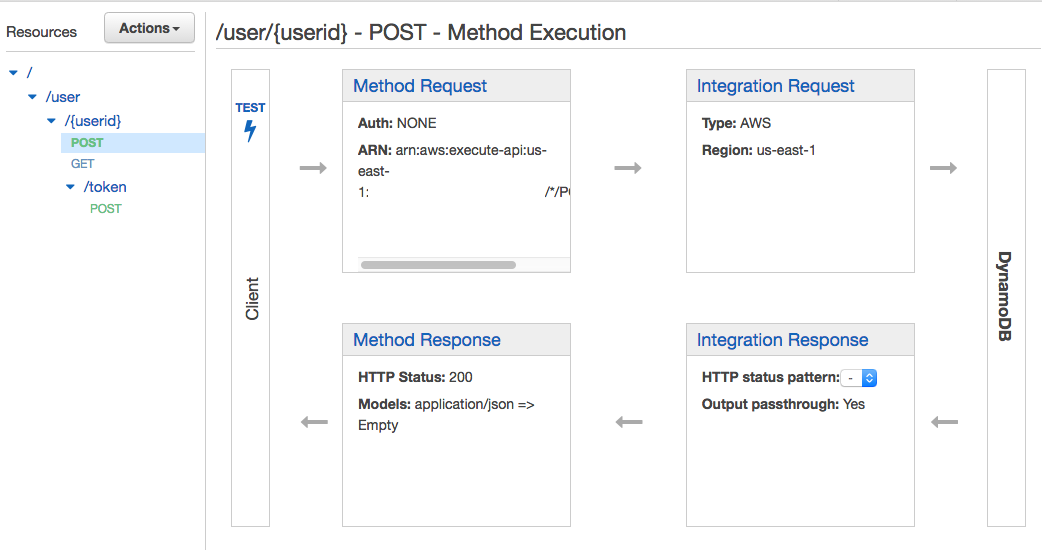
After saving these settings, you must first go to the first square of the Method Request , in the API Key Required item, select true and click on the check mark to save the settings - this is necessary to access this method from the outside using an authorization token (configure later; do not forget to do this operation for all methods!). Go back and go to the second square of the Integration Request to configure the actual query in DynamoDB. On the page that opens, scroll to the bottom and open the Body Mapping Templates section, click the Add mapping template button, specify Content type : application / json , specify the request parameters in the input field, use the following code to create a new record:
{ "TableName": "apiData", "Item": { "userID": { "S": "$input.params('userid')" }, "parameter": { "S": "$input.path('$.parameter')" } }, "ReturnValues": "ALL_OLD" } Here we specify the name of the table in which we make changes, the first one indicates the key by which the data will be entered: userID , its value is taken from the path parameter userid . From the request body, data is taken from the parameter key and added to the column of our database of the same name for the specified user. In response - the previous value is sent to the specified key, if it existed. If a user with such a username did not exist, an empty response will come.
All that remains for us to do is to check the operability of the request. To do this, at the top of the page, click the back button and to the right of the four squares, click on the Test button with the Harry Potter icon:
In the window that opens, we will need to specify the value of Path Parameter - this is the name of the user we want to create / re-create ( remember , PutItem overwrites the entire line with the specified key), just below - specify the body of the request:
{ "parameter": "112233" } The request was successful, we received a response with an empty body without any errors!
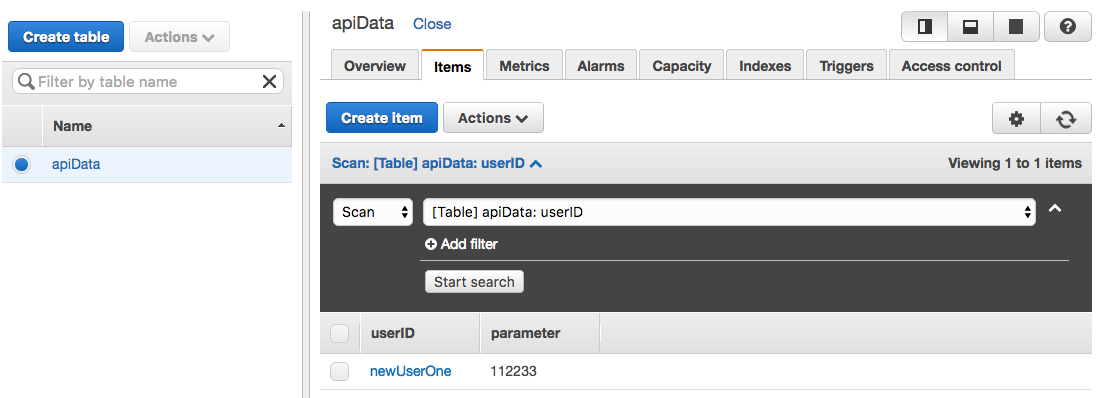
If we go to DynamoDB , then on the Items tab we can see the newly created user:
To read user data, you must also create a GET method with Action - Query within the userid resource, set up an integration request (remember, in this case, the request to the database is still done using the POST method!) And specify the following template for body mapping :
{ "TableName": "apiData", "KeyConditionExpression": "userID = :v1", "ExpressionAttributeValues": { ":v1": { "S": "$input.params('userid')" } } } If we want to change some parameter values for a specific user, without changing all other lines, then we can also use the POST method with an Action of the UpdateItem type and the following mapping template:
{ "TableName": "apiData", "Key": { "userID": { "S": "$input.params('userid')" } }, "UpdateExpression": "set token_proof = :tkn", "ExpressionAttributeValues": { ":tkn": { "S": "$input.path('$.token')" } }, "ReturnValues": "UPDATED_NEW" } In this case, the request returns all updated user data if successful, from examples - this method can be used to store appsecret_proof when authorizing a user through Facebook in your application.
In fact, all basic API usage scenarios can be created based on these examples. All we have to do is to access the API from the outside, to do this, you need to click our favorite Actions button in the menu of our API and select the Deploy API . Specify:
- Deployment stage : [New Stage]
- Stage name : apiRelease (or any other)
Click Deploy and get the following Invoke URL : m00000000a.execute-api.us-east-1.amazonaws.com/apiRelease . To make inquiries at this address, an authorization token is required, to get it, in the menu on the left, go to the API Keys section, click the Create button, name your key and save it. Then in the Stage Association API section that appears, select the desired API and the newly created scene, then click the Add button. Return to the API via the left menu, select Actions -> Deploy API , select the already created Stage and click Deploy . Voila!
Now you can make requests to your API from the outside by adding x-api-key to the requests with your token as a value. To get data about our created user, it is enough to make a corresponding GET request to the address m00000000a.execute-api.us-east-1.amazonaws.com/apiRelease/user/newUserOne and you will receive all the information about him in response! Thus, in a matter of minutes, you can create a simple API to access the database, with which you can test your new application or any other service that does not require a complex data structure. For more complex projects, of course, you should use more suitable tools.
Source: https://habr.com/ru/post/306990/
All Articles