Creating a Doodle Jump game for Android in Intel XDK in 2 hours on JavaScript from scratch
Hello, Habr.
Unusually for me to write articles after such a long time, since I am used to recording material on video, where you can freely say something. And it just so happened that I decided to write an article about the Intel XDK, but not just a review of the possibilities, but to make out the environment using the example of a very specific project. The project for me was the “clone” of the game “Doodle Jump”.
I will be developing on JavaScript using the PointJS engine (if anything, it’s in Google in a minute).
')
The very beginning to create a new empty project. Here, in principle, everything is quite simple:
2. 1. At the bottom we find the “Start a new project” button, and then in the “Templates” tab, select “Standart HTML5”, and click “Create”.

2. Now, with a tricky click, we will go to the project settings (yes, click on this blue folder):

3. Further, in general, everything is logically clear:

Let me explain some points:
App ID is a unique identifier of your application, or Company Domain
Whitelist - allowed requests that the application will be allowed to make
Developer Certificate - application certificate. If it is missing, create it using this drop-down menu:

Fill it with valid data to avoid further problems.
After completing the certificate, it will be possible to select it as an application certificate.
Crosswalk Runtime - Determines whether Cordova will be integrated into your applications (Embedded) or not (Shared)
4. Fill in the icons:
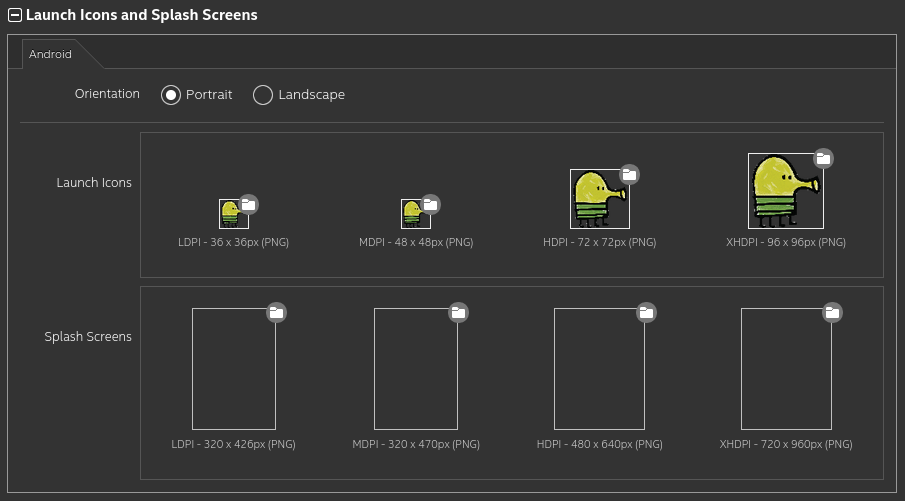
Remember that the size and format must strictly comply with the requirements of the environment.
Regarding Splash Screen, these are the loading screens of your application, which are displayed to the user while your application is heaving. As a rule, it usually takes a little less than 2 seconds, but during this time you can display, for example, the logo of somethingor insert advertising .
Since we are making the game for Android, we disable the rest of the OS and platform:

On this with the setting of the application, we are finished. We proceed to the preparation of the project itself.
I will use the PointJS game engine for creating the game, a handy thing weighing 60kb, fully cross-platform and well-optimized. Prepare the project:
1. Open the project folder in the OS (Show in OS):

Then go to the folder "www", this is our working folder. Remove everything from it and insert the engine with the index.html file:

I downloaded these files from PointJS website.
In the “Develop” tab, you and I get into (for someone familiar) the Brackets editor, and in the index.html file we see the following code:
There are already some variables added, something is defined in advance (read the comments in the code). In the column "Emulate" we set up the phone we like and its orientation with scaling, at the same time we are convinced that everything works:
With the files sorted out, the project starts, everything is fine, go to the main stages of creating the game.
Part 3. Creating the game
It is probably noticeable that we have a lot of ads of different links and variables, we will put them into a separate file (new lines are commented out)
The background in the game “Doodle Jump” is a “tetrad sheet”, that is, cells, to create such an effect, create the file grid.js with the following content:
Remember that our background is painted in gray, so if we draw white rectangles at a distance of 5px from each other, then because of these gaps between them we will have a grid.
Now, in order to draw the grid, it is enough for us to call the function drawGrid () in any game loop and the background will be filled with the grid:

Well, fill the background with a grid, it is nice, but we are making the game! Therefore, we go further!
Now, it would be good to make a menu for the game, so that the player saw his record, saw how much he scored per level and was able to start the game again if he lost (throw out to the same menu when lost). To do this, create another file and fill it:
But we remember that the index file starts the “game” cycle right away, let's fix it:
We look at the result:

When you click on "New game" we have an error, because we have not defined the game cycle "game" and there is no function "createLevel", but we do not care about it yet, we will create a game game cycle with you and we will temporarily set the game to start it, having corrected the startLoop command.
We describe the game cycle:
Now, if we start the game, we will have errors, so we will comment out the drawLevel function for now, but we will describe the drawPlayer function now. Create a new file:
First player picture:

The function of the camera offset can be viewed in the API to the engine. I’ll briefly say that we smoothly move the camera to the player’s position, while slightly shifting the camera down 500 * del pixels so that it is slightly below. At the same time, we do not move the camera left and right, its center always looks at half the width of the screen (width / 2).
If we run, we will see the following picture:
Now it's time to uncomment the “createLevel” and “drawLevel” functions, if you have commented on them. Create another file and fill it:
Block image:

That's all, no more files need to be created. The game in its minimum form is ready:

Now explanations:
del is a divisorwhich is a multiplier , which is used to multiply all values in pixels onto it. Since the screen height can be different, this factor on different screens changes, making the other objects that multiply its size onto it - dynamically scalable.
Delta-Time, also known as dt variable, is a time factor. The time in milliseconds, elapsed from the last rendered frame to the current frame, is used to compress the animation and speeds when moving, when the game starts on devices with different power.
Now about the compilation. It happens on the intel XDK server, which is good for those with weak computers.
And bad for those who know for sure that every second wants to steal his idea.
In general, there should be no difficulties, there is a “Build” tab, on which you simply choose for which OS to build the project, specify the password from the certificate, and that’s all. After compilation you will receive a link to download the finished project by mail, and you can also download directly from the program. After downloading files from the server, they are deleted.
Download project source: Download archive
To start, you can open the index.html file in Google Chrome, open the console (CTRL + SHIFT + J) and enable touch screen emulation mode, this will allow you to try playing the game without installing the intel XDK.
Download ready APK: Download APK
It must already be run either in the emulator, or installed on a real device.
For a better understanding of the development process I attach the video:
Unusually for me to write articles after such a long time, since I am used to recording material on video, where you can freely say something. And it just so happened that I decided to write an article about the Intel XDK, but not just a review of the possibilities, but to make out the environment using the example of a very specific project. The project for me was the “clone” of the game “Doodle Jump”.
Part 1. Preparation of the project
I will be developing on JavaScript using the PointJS engine (if anything, it’s in Google in a minute).
')
The very beginning to create a new empty project. Here, in principle, everything is quite simple:
2. 1. At the bottom we find the “Start a new project” button, and then in the “Templates” tab, select “Standart HTML5”, and click “Create”.
2. Now, with a tricky click, we will go to the project settings (yes, click on this blue folder):
3. Further, in general, everything is logically clear:
Let me explain some points:
App ID is a unique identifier of your application, or Company Domain
Whitelist - allowed requests that the application will be allowed to make
Developer Certificate - application certificate. If it is missing, create it using this drop-down menu:
Fill it with valid data to avoid further problems.
After completing the certificate, it will be possible to select it as an application certificate.
Crosswalk Runtime - Determines whether Cordova will be integrated into your applications (Embedded) or not (Shared)
4. Fill in the icons:
Remember that the size and format must strictly comply with the requirements of the environment.
Regarding Splash Screen, these are the loading screens of your application, which are displayed to the user while your application is heaving. As a rule, it usually takes a little less than 2 seconds, but during this time you can display, for example, the logo of something
Since we are making the game for Android, we disable the rest of the OS and platform:
On this with the setting of the application, we are finished. We proceed to the preparation of the project itself.
Part 2. File preparation
I will use the PointJS game engine for creating the game, a handy thing weighing 60kb, fully cross-platform and well-optimized. Prepare the project:
1. Open the project folder in the OS (Show in OS):
Then go to the folder "www", this is our working folder. Remove everything from it and insert the engine with the index.html file:
I downloaded these files from PointJS website.
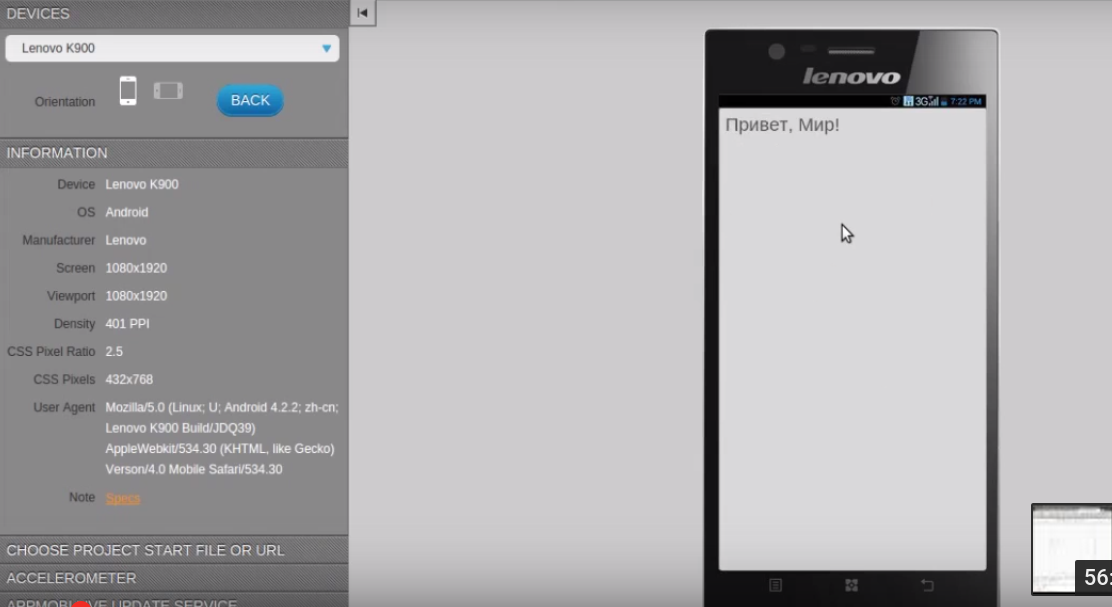
In the “Develop” tab, you and I get into (for someone familiar) the Brackets editor, and in the index.html file we see the following code:
Initial view index.html
<!DOCTYPE html> <html> <head> <meta http-equiv="Content-Type" content="text/html; charset=utf-8"/> <meta name="viewport" content="width=device-width,user-scalable=no"/> <title> PointJS</title> </head> <body> <script type="text/javascript" src="point.js"></script> <script type="text/javascript"> // var pjs = new PointJS('2d', 400, 400); // pjs.system.initFullPage(); // var vector = pjs.vector; // var log = pjs.system.log; // var game = pjs.game; // var point = vector.point; // var camera = pjs.camera; // var brush = pjs.brush; // var OOP = pjs.OOP; // var math = pjs.math; // var touch = pjs.touchControl; touch.initTouchControl(); // 'game' game.newLoop('game', function () { // game.fill('#D9D9D9'); // ", !" brush.drawText({ x : 10, y : 10, text : ', !', size : 30, color : '#515151' }); }); // 60fps game.startLoop('game'); </script> </body> </html> There are already some variables added, something is defined in advance (read the comments in the code). In the column "Emulate" we set up the phone we like and its orientation with scaling, at the same time we are convinced that everything works:
With the files sorted out, the project starts, everything is fine, go to the main stages of creating the game.
Part 3. Creating the game
It is probably noticeable that we have a lot of ads of different links and variables, we will put them into a separate file (new lines are commented out)
init.js
var pjs = new PointJS('2d', 400, 400); pjs.system.initFullPage(); var vector = pjs.vector; var log = pjs.system.log; var game = pjs.game; var point = vector.point; var size = vector.size; var camera = pjs.camera; var brush = pjs.brush; var OOP = pjs.OOP; var math = pjs.math; var touch = pjs.touchControl; touch.initTouchControl(); // var width = game.getWH().w; var height = game.getWH().h; // var del = height / 1000 / 5; // delta-time var dt; // var score = 0; // . , var levelScore = 0; // ( ) oldScore var tmpScore = localStorage.getItem('score'); var oldScore = tmpScore ? tmpScore : 0; The background in the game “Doodle Jump” is a “tetrad sheet”, that is, cells, to create such an effect, create the file grid.js with the following content:
grid.js
// ( , del) var sizeX = 200 * del, sizeY = 200 * del; // var drawGrid = function () { // , X Y var x = width / sizeX, y = height / sizeY; // OOP.forXY(x, y, function (x, y) { // - X Y, brush.drawRectS({ x : (sizeX + 2)*x, // X y : (sizeY + 2)*y, // Y fillColor : 'white', // w : sizeX, h : sizeY // }); }); }; Remember that our background is painted in gray, so if we draw white rectangles at a distance of 5px from each other, then because of these gaps between them we will have a grid.
Now, in order to draw the grid, it is enough for us to call the function drawGrid () in any game loop and the background will be filled with the grid:
Well, fill the background with a grid, it is nice, but we are making the game! Therefore, we go further!
Now, it would be good to make a menu for the game, so that the player saw his record, saw how much he scored per level and was able to start the game again if he lost (throw out to the same menu when lost). To do this, create another file and fill it:
menu.js
// , var newGame = game.newTextObject({ text : ' ', // font : 'serif', // size : 300*del, // ( del) color : '#363636' // }); // newGame.setPositionCS(point(width/2, height/2)); // , var drawMenu = function () { // , newGame.draw(); // brush.drawTextLinesS({ x : newGame.x, // " " y : newGame.y + newGame.h, // lines : [': '+Math.abs(oldScore), ' : '+Math.abs(levelScore)], // ? font : 'serif', // size : 250*del, // color : '#363636' // }); // touch, // , " " if (touch.isPeekObject(newGame)) { // - createLevel(10); // ( ) return game.setLoop('game'); // 'game' } }; But we remember that the index file starts the “game” cycle right away, let's fix it:
Overwrite the file index.html
<!DOCTYPE html> <html> <head> <meta http-equiv="Content-Type" content="text/html; charset=utf-8"/> <meta name="viewport" content="width=device-width,user-scalable=no"/> <title> PointJS</title> </head> <body> <script type="text/javascript" src="point.js"></script> <script type="text/javascript" src="init.js"></script> <script type="text/javascript" src="grid.js"></script> <script type="text/javascript" src="menu.js"></script> <script type="text/javascript"> game.newLoop('menu', function () { game.fill('#D9D9D9'); drawGrid(); // drawMenu(); // }); game.startLoop('menu'); // menu </script> </body> </html> We look at the result:
When you click on "New game" we have an error, because we have not defined the game cycle "game" and there is no function "createLevel", but we do not care about it yet, we will create a game game cycle with you and we will temporarily set the game to start it, having corrected the startLoop command.
We describe the game cycle:
game.newLoop('game', function () { // , Delta-Time dt = game.getDT(20); game.fill('#D9D9D9'); // drawGrid(); // drawLevel(); // - drawPlayer(); // - // ? brush.drawTextS({ x : 10, y : 10, // ( ) text : 'Score: '+Math.abs(score), // size : 300*del, // color : '#515151',// font : 'serif' // }); }); Now, if we start the game, we will have errors, so we will comment out the drawLevel function for now, but we will describe the drawPlayer function now. Create a new file:
pl.js
// var pl = game.newImageObject({ x : 0, y : 0, // , w : 744 * del, h : 670 * del, // . 744 670, file : 'img/pl.png' // }); var dy = 2 * del; // , var dmax = 50 * del; // var dx = 0; // , // var drawPlayer = function () { // . , Y ! if (pl.y < score) { score = Math.ceil(pl.y); } pl.draw(); // pl.move(point(0, dy*dt)); // delta-time dy += dy < dmax ? del*dt : 0; // , () // () if (touch.isDown()) { if (touch.getPositionS().x > width/2) // ( ) dx = 30*del; // ( ) else // dx = -30*del; // () // , if (dx > 0) { // pl.setFlip(0, 0); // ( "" ) if (pl.x > width) { // pl.x = -pl.w; // } } else if (dx < 0) { // pl.setFlip(1, 0); // if (pl.x+pl.w < 0) { // , , pl.x = width; // } } pl.move(point(dx*dt, 0)); // } // , , , // , , , // , if (pl.getPositionS().y > score + 5000 * del) { levelScore = score; // ( , ?) if (score < oldScore) { // , oldScore = score; // localStorage.setItem('score', score); // } return game.setLoop('menu'); // , } // , , . camera.moveTimeC(vector.pointPlus(point(width/2, pl.getPositionC().y), point(0, -500*del)), 10); }; First player picture:
The function of the camera offset can be viewed in the API to the engine. I’ll briefly say that we smoothly move the camera to the player’s position, while slightly shifting the camera down 500 * del pixels so that it is slightly below. At the same time, we do not move the camera left and right, its center always looks at half the width of the screen (width / 2).
If we run, we will see the following picture:
Now it's time to uncomment the “createLevel” and “drawLevel” functions, if you have commented on them. Create another file and fill it:
blocks.js
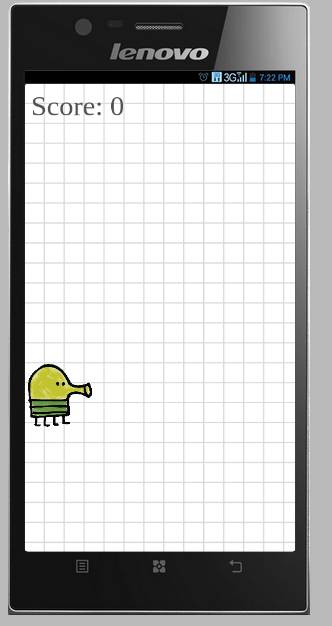
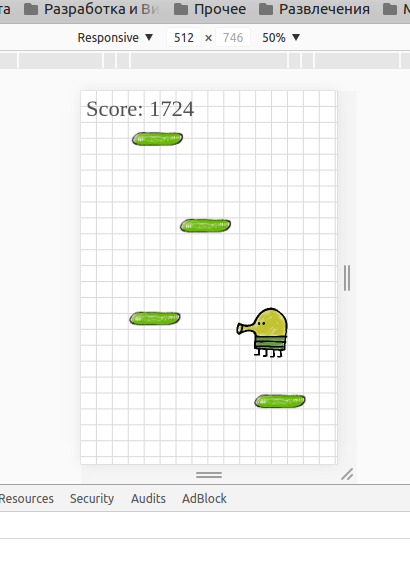
// , var blocks = []; // , dy2 = false; // createBlock ( ) var createBlock = function () { if (dy2 === false) { // , dy2 = height - 60*del*4; // } else { // , ( ) dy2 = blocks[blocks.length-1].y - 500*del - math.random(500*del, 800*del); // } blocks.push(game.newImageObject({ // w : 200 * del*4, h : 60 * del*4, // file : 'img/block.png', // x : math.random(0, width - 200*del*4), // y : dy2, // })); }; // // , var oldBlock; // , ? ? " " var createLevel = function (i) { // pl.y = 0; // , pl.x = 0; score = 0; // OOP.forInt(i, function () { // createBlock(); // }); oldBlock = blocks[blocks.length-1] // , - ( ) }; // , , var rePositionBlock = function (el) { // , var x = math.random(0, width - 200*del*4), // y = oldBlock.y - 500*del - // oldBlock, math.random(500*del, 800*del); // , el.setPosition(point(x, y)); // oldBlock = el; // , ( ) }; // var drawLevel = function () { // OOP.forArr(blocks, function (el) { // , if (camera.getPosition().y + height + 2000*del < el.y) { // rePositionBlock(el); // } el.draw(); // // , if (pl.isStaticIntersect(el.getStaticBox()) && dy > 0) { // , if (pl.y+pl.h < el.y+el.h/3) // , , , dy = -50*del; // , } }); }; Block image:
That's all, no more files need to be created. The game in its minimum form is ready:
Now explanations:
del is a divisor
Delta-Time, also known as dt variable, is a time factor. The time in milliseconds, elapsed from the last rendered frame to the current frame, is used to compress the animation and speeds when moving, when the game starts on devices with different power.
Now about the compilation. It happens on the intel XDK server, which is good for those with weak computers.
In general, there should be no difficulties, there is a “Build” tab, on which you simply choose for which OS to build the project, specify the password from the certificate, and that’s all. After compilation you will receive a link to download the finished project by mail, and you can also download directly from the program. After downloading files from the server, they are deleted.
Download project source: Download archive
To start, you can open the index.html file in Google Chrome, open the console (CTRL + SHIFT + J) and enable touch screen emulation mode, this will allow you to try playing the game without installing the intel XDK.
Download ready APK: Download APK
It must already be run either in the emulator, or installed on a real device.
For a better understanding of the development process I attach the video:
This same video article
First hour of development:
Second hour of development:
Second hour of development:
Source: https://habr.com/ru/post/306922/
All Articles