Remote control server daemon do it yourself
Hi, Habr!
Today I will talk about how to control a computer from a mobile device. No, this is not just another analogue of radmin, and not an example of how you can make fun of a friend's computer. It will be about remote control of the daemon, or rather, about creating an interface for managing the daemon written in Python.
The architecture is pretty simple:
Interested - welcome under cat.
')
Before embarking on implementation, I propose to “prepare” the project catalog. Need to:
Let's start with the server part - Django-applications. Create a new application and add a superuser:
I recommend immediately adding it to the applications used by the Django project (web \ settings.py or, instead of “web”, the name of your Djnago project):
Create a database and superuser'a:
Settings completed, proceed to the implementation of the application.
The model in architecture is the same - this is the command to which the demon must respond. Model Fields:
More information about teams and statuses - see below .
A little “upgrade” model:
1. Expand the standard manager. Add methods to get commands in the "Created" state and in the "In Processing" state.
And add it to the model:
2. Add state checking methods and methods for setting the command state:
Note: Of course, you can do without these methods. In this case, the code working with Django ORM will need to use constants and describe the logic (at least two-line, but still) command updates, which, IMHO, is not very convenient. Much more convenient to pull the necessary methods. But if this approach is contrary to the concept - I will be happy to hear the arguments in the comments.
Note: From here on, we will need the “django-ipware” application to determine the client's IP, install:
Here everything goes natively: register the model in the admin panel, describe the displayed columns in the table and fields on the form. The only caveat is that in order to save the client's IP in the object, you must override the save method:
Do not forget to apply the changes in the models to the database:
We proceed to the implementation of command processing logic.
As it was written above, we have 4 teams at our disposal:
When creating, the team is assigned the status “Created” (thanks, Cap!). During processing, the command can be “Executed” (if the state of the system satisfies all necessary conditions) or “Rejected” (otherwise). The “In Processing” state is applicable for “long-playing” teams - their execution may require a long period of time. For example, having received the “Pause” command, the code only changes the value of the flag, and the “Restart” command initiates the execution of more complex logic.
The command processing logic is as follows:
The “entry point” in the class is the .check_commands () method - it implements the logic described above. The same method will be called in the main daemon loop. In case of receiving the “Pause” command, a cycle is created in the method, the condition for exiting which is to receive the “Resume” command - thus achieving the desired effect of the pause in the operation of the daemon.
The module in which we describe the implementation of IRemoteControl, I propose to place in the application directory. So we will receive conveniently transported Django-app.
If the model of a spherical demon in vacuum can be represented as follows:
then the implementation of the control panel interface is painless:
As a result, the evil spirits are controlled, but only from the admin panel.
Place this code in a file, for example, daemon.py and go ahead - we will write a mobile client.
But for a start it would be nice to implement an interface for communication between the mobile client and the server part. Let's get started
Install the Django REST framework:
We begin by describing the return data set by the REST interface. Here we can use those mysterious methods from the model description (.status_dsp () and .code_dsp ()), which return the text name of the state and the command code, respectively:
The REST API methods in the Django application architecture are the same views, only ... you understand.
To communicate with the client, threeletters of the API-method words are enough (ehh, ideal world ...):
To minimize the code, we use the buns that come with the Django REST framework:
We describe the end-points of implemented API methods.
And connect them to the project (web \ urls.py):
Interface for communication is implemented. Go to the most delicious.
To communicate with the server, use UrlRequest ( kivy.network.urlrequest.UrlRequest ). Of all its merits, we will need the following:
For ease of implementation, we will use the Basic authentication scheme. If you wish, you can devote one of the following articles to other authentication methods on web resources using UrlRequest - write in the comments.
I hope there are enough comments in the code for understanding. If it is still not enough - inform me, I will make changes.
At this pampering with the code ends and comes on the scene
You can talk about Buildozer for a long time, because not much is said about it. There are articles on Habré ( about installing and configuring and building a release version and publishing on Google Play ), of course, there is documentation ... But there are also nuancesabout which you can write an entire article that are scattered from various sources. I will try to gather highlights here.
Well, a bit of code to help the happy owners of Debian and Ubuntu (the rest will need to be “carefully processed with a file”)
Now that Buildozer is installed, initialize it:
As a result of this command, a configuration configuration file (buildozer.spec) will be created in the directory. In it we find the keys below and assign them the appropriate values:
Activate the wunderwaffe:
and the output is .apk, which can be installed on an Android device.
Is done. With what I congratulate you!
And let's see how it all works. It’s not for nothing that we tried so long :)
We launch the Django server, using the parameter to specify the IP of your machine on the local network:
Calling evil spirits:
We start the application on the Android device and see something like this:
Note: The final version of the project, which can be found on github , was used to record the video . It differs from the code given in the article by the extension of the functional. The server part adds support for user commands and debug messages (for clarity), and the client added an authorization form, a request for confirmation of the command execution and some convenience to the interface.
What did we get as a result?
Maybe this is too loudly said, but ... Now I am tormented by the question - is it possible to implement a similar architecture using other languages and technologies (except Python), applying (at least) no more effort and writing no more code?
That's all.
All nice coding and successful builds.
"RemoteControlInterface" on github
Docks by Django
Docks by Django REST framework
Docks by Kivy
Installing Kivy
Installing Buildozer
Today I will talk about how to control a computer from a mobile device. No, this is not just another analogue of radmin, and not an example of how you can make fun of a friend's computer. It will be about remote control of the daemon, or rather, about creating an interface for managing the daemon written in Python.
The architecture is pretty simple:
- "Remote control App" - Kivy-application that implements the client part for mobile devices.
- "Remote control" - Django-application that implements the REST API and interaction with the database;
- IRemoteControl - A class that implements the logic for processing incoming commands (to be used in the daemon);
Interested - welcome under cat.
')
Before embarking on implementation, I propose to “prepare” the project catalog. Need to:
- create a separate python virtual environment
virtualenv .env - create a new Django project (for example, web)
All operations with Django will be performed relative to this directory;django-admin startproject web - Create a directory for an Android application (for example, ui_app). All operations regarding the mobile application will be performed relative to this directory.
"Remote control"
Let's start with the server part - Django-applications. Create a new application and add a superuser:
python manage.py startapp remotecontrol I recommend immediately adding it to the applications used by the Django project (web \ settings.py or, instead of “web”, the name of your Djnago project):
INSTALLED_APPS = [ ....... 'remotecontrol', ] Create a database and superuser'a:
python manage.py migrate python manage.py createsuperuser Settings completed, proceed to the implementation of the application.
Models (remotecontrol \ models.py)
The model in architecture is the same - this is the command to which the demon must respond. Model Fields:
- Command code - we will use 4 commands: “Suspend”, “Resume”, “Restart”, “Disable remote control”
- Team status - 4 states are possible: "Created", "In Processing", "Completed", "Rejected".
- IP
- Object Creation Date
More information about teams and statuses - see below .
We describe the model:
# -*- coding: utf-8 -*- from django.db import models # CODE_PAUSE = 1 # "" CODE_RESUME = 2 # "" CODE_RESTART = 3 # "" CODE_REMOTE_OFF = 4 # " " COMMANDS = ( (CODE_RESTART, 'Restart'), (CODE_PAUSE, 'Pause'), (CODE_RESUME, 'Resume'), (CODE_REMOTE_OFF, 'Disable remote control'), ) class Command(models.Model): # STATUS_CREATE = 1 # "" STATUS_PROCESS = 2 # " " STATUS_DONE = 3 # "" STATUS_DECLINE = 4 # "" STATUS_CHOICES = ( (STATUS_CREATE, 'Created'), (STATUS_PROCESS, 'In progress...'), (STATUS_DONE, 'DONE'), (STATUS_DECLINE, 'Declined'), ) # created = models.DateTimeField(auto_now_add=True) ip = models.GenericIPAddressField() code = models.IntegerField(choices=COMMANDS) status = models.IntegerField(choices=STATUS_CHOICES, default=STATUS_CREATE) A little “upgrade” model:
1. Expand the standard manager. Add methods to get commands in the "Created" state and in the "In Processing" state.
We describe our manager:
class CommandManager(models.Manager): # "", def created(self): return super(CommandManager, self).get_queryset().filter( status=Command.STATUS_CREATE).order_by('created') # " ", def processing(self): return super(CommandManager, self).get_queryset().filter( status=Command.STATUS_PROCESS).order_by('created') And add it to the model:
class Command(models.Model): ....... objects = CommandManager() 2. Add state checking methods and methods for setting the command state:
Add. methods:
class Command(models.Model): ....... # def is_created(self): return self.status == self.STATUS_CREATE def is_processing(self): return self.status == self.STATUS_PROCESS def is_done(self): return self.status == self.STATUS_DONE def is_declined(self): return self.status == self.STATUS_DECLINE # def __update_command(self, status): self.status = status self.save() def set_process(self): self.__update_command(Command.STATUS_PROCESS) def set_done(self): self.__update_command(Command.STATUS_DONE) def set_decline(self): self.__update_command(Command.STATUS_DECLINE) Note: Of course, you can do without these methods. In this case, the code working with Django ORM will need to use constants and describe the logic (at least two-line, but still) command updates, which, IMHO, is not very convenient. Much more convenient to pull the necessary methods. But if this approach is contrary to the concept - I will be happy to hear the arguments in the comments.
Full listing of models.py:
# -*- coding: utf-8 -*- from django.db import models # CODE_PAUSE = 1 # "" CODE_RESUME = 2 # "" CODE_RESTART = 3 # "" CODE_REMOTE_OFF = 4 # " " COMMANDS = ( (CODE_RESTART, 'Restart'), (CODE_PAUSE, 'Pause'), (CODE_RESUME, 'Resume'), (CODE_REMOTE_OFF, 'Disable remote control'), ) class CommandManager(models.Manager): # "", def created(self): return super(CommandManager, self).get_queryset().filter( status=Command.STATUS_CREATE).order_by('created') # " ", def processing(self): return super(CommandManager, self).get_queryset().filter( status=Command.STATUS_PROCESS).order_by('created') class Command(models.Model): # STATUS_CREATE = 1 # "" STATUS_PROCESS = 2 # " " STATUS_DONE = 3 # "" STATUS_DECLINE = 4 # "" STATUS_CHOICES = ( (STATUS_CREATE, 'Created'), (STATUS_PROCESS, 'In progress...'), (STATUS_DONE, 'DONE'), (STATUS_DECLINE, 'Declined'), ) # created = models.DateTimeField(auto_now_add=True) ip = models.GenericIPAddressField() code = models.IntegerField(choices=COMMANDS) status = models.IntegerField(choices=STATUS_CHOICES, default=STATUS_CREATE) objects = CommandManager() # def is_created(self): return self.status == self.STATUS_CREATE def is_processing(self): return self.status == self.STATUS_PROCESS def is_done(self): return self.status == self.STATUS_DONE def is_declined(self): return self.status == self.STATUS_DECLINE # def set_process(self): self.__update_command(Command.STATUS_PROCESS) def set_done(self): self.__update_command(Command.STATUS_DONE) def set_decline(self): self.__update_command(Command.STATUS_DECLINE) def __update_command(self, status): self.status = status self.save() # - STATUS_COLORS = { STATUS_CREATE: '000000', STATUS_PROCESS: 'FFBB00', STATUS_DONE: '00BB00', STATUS_DECLINE: 'FF0000', } def colored_status(self): return '<span style="color: #%s;">%s</span>' % (self.STATUS_COLORS[self.status], self.get_status_display()) colored_status.allow_tags = True colored_status.short_description = 'Status' # REST API def status_dsp(self): return self.get_status_display() def code_dsp(self): return self.get_code_display() Admin Panel (remotecontrol \ admin.py)
Note: From here on, we will need the “django-ipware” application to determine the client's IP, install:
pip install django-ipware Here everything goes natively: register the model in the admin panel, describe the displayed columns in the table and fields on the form. The only caveat is that in order to save the client's IP in the object, you must override the save method:
Listing admin.py:
# -*- coding: utf-8 -*- from django.contrib import admin from ipware.ip import get_ip from .models import Command @admin.register(Command) class CommandAdmin(admin.ModelAdmin): # list_display = ('created', 'code', 'colored_status', 'ip') # list_filter = ('code', 'status', 'ip') # \ fields = (('code', 'status'), ) # def save_model(self, request, obj, form, change): if obj.ip is None: # IP obj.ip = get_ip(request) obj.save() Do not forget to apply the changes in the models to the database:
python manage.py makemigrations remotecontrol python manage.py migrate remotecontrol As a result, we have the ability to create \ edit objects ...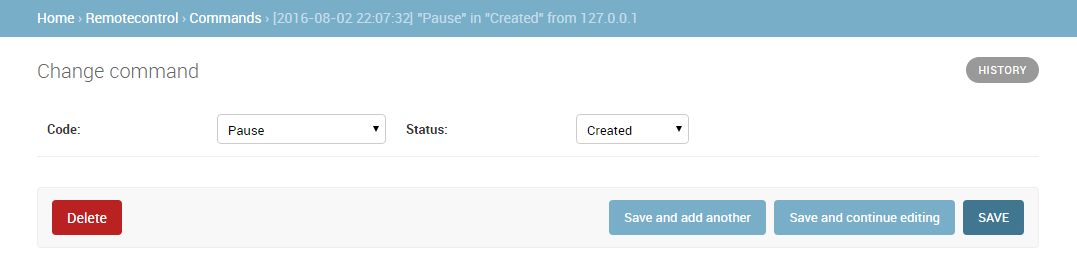
... and view the list of objects in the admin panel: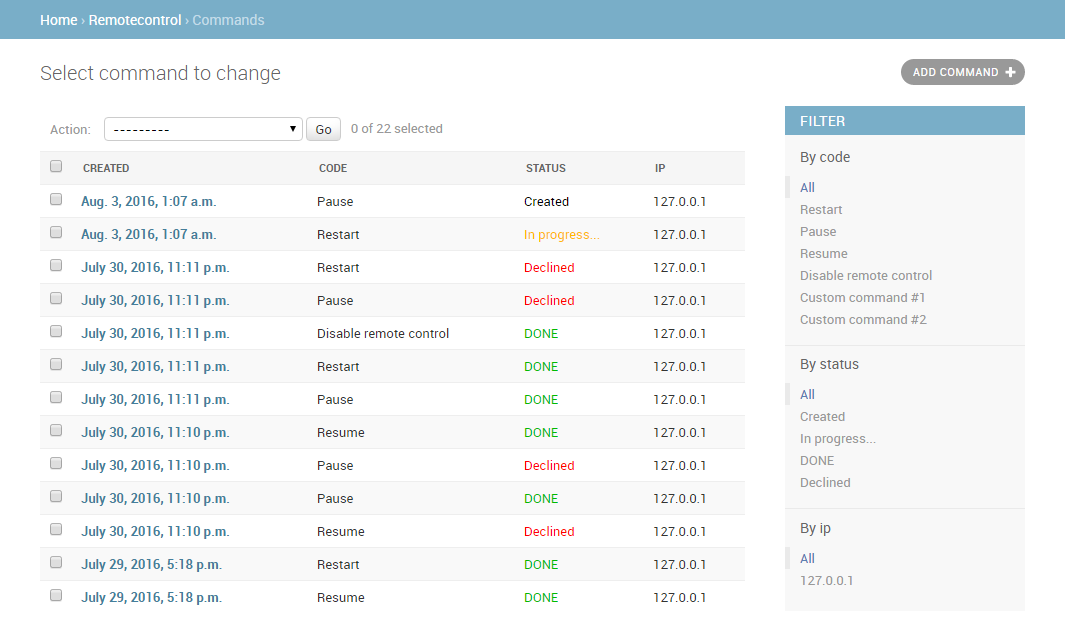
We proceed to the implementation of command processing logic.
Class IRemoteControl
As it was written above, we have 4 teams at our disposal:
- “Suspend” - pauses the main loop of the daemon and ignores all commands except “Resume”, “Restart” and “Disable Remote”;
- “Resume” - resumes the main daemon cycle;
- “Restart” - re-initializes the daemon, re-reads the configuration, etc. This command is also executed in the case of the “Pause” command action, but after restarting it resumes the main loop;
- “Disable remote control” - stops processing incoming commands (all further commands will be ignored). This command is also executed in the case of the “Suspend” command.
When creating, the team is assigned the status “Created” (thanks, Cap!). During processing, the command can be “Executed” (if the state of the system satisfies all necessary conditions) or “Rejected” (otherwise). The “In Processing” state is applicable for “long-playing” teams - their execution may require a long period of time. For example, having received the “Pause” command, the code only changes the value of the flag, and the “Restart” command initiates the execution of more complex logic.
The command processing logic is as follows:
- During one iteration, one command is processed;
- We get the most "old" team in the "In Processing" state. If there are none, we get the “oldest” in the “Created” state. If not, the iteration is completed;
- If the command is received from an invalid IP - set the status to "Rejected". Iteration is complete;
- If the control panel is disabled, we set the command to “Rejected” status. Iteration is complete;
- If the command is not valid for the current state of the daemon, set the state to “Rejected”. Iteration is complete;
- Set the status "In Processing" (if required), execute the command, set the status "Completed". Iteration is complete.
The “entry point” in the class is the .check_commands () method - it implements the logic described above. The same method will be called in the main daemon loop. In case of receiving the “Pause” command, a cycle is created in the method, the condition for exiting which is to receive the “Resume” command - thus achieving the desired effect of the pause in the operation of the daemon.
Module control.py (remotecontrol \ control.py)
The module in which we describe the implementation of IRemoteControl, I propose to place in the application directory. So we will receive conveniently transported Django-app.
Listing control.py
# -*- coding: utf-8 -*- import django django.setup() from time import sleep from remotecontrol.models import * class IRemoteControl(object): # IP. , . IP_WHITE_LIST = ['127.0.0.1'] # CODE_REMOTE_OFF REMOTE_ENABLED = True # def __get_command(self): commands = Command.objects.processing() if len(commands) == 0: commands = Command.objects.created() if len(commands) == 0: return None command = commands[0] if self.IP_WHITE_LIST and command.ip not in self.IP_WHITE_LIST: print('Wrong IP: %s' % command.ip) elif not self.REMOTE_ENABLED: print('Remote is disabled') else: return command self.__update_command(command.set_decline) # "" def __restart(self, command): if command.is_created(): self.__update_command(command.set_process) print('... Restarting ...') sleep(5) self.__update_command(command.set_done) print('... Restart complete ...') # def __update_command(self, method): try: method() except Exception as e: print('Cannot update command. Reason: %s' % e) # def check_commands(self): pause = False enter = True while enter or pause: enter = False command = self.__get_command() if command is not None: if command.code == CODE_REMOTE_OFF: self.__update_command(command.set_done) print('... !!! WARNING !!! Remote control is DISABLED ...') self.REMOTE_ENABLED = False elif command.code == CODE_RESTART: self.__restart(command) pause = False elif pause: if command.code == CODE_RESUME: self.__update_command(command.set_done) print('... Resuming ...') pause = False else: self.__update_command(command.set_decline) else: if command.code == CODE_PAUSE: self.__update_command(command.set_done) print('... Waiting for resume ...') pause = True elif pause: sleep(1) Black magic
If the model of a spherical demon in vacuum can be represented as follows:
# -*- coding: utf-8 -*- class MyDaemon(object): def magic(self): # ....... def summon(self): # while True: self.magic() MyDaemon().summon() then the implementation of the control panel interface is painless:
# -*- coding: utf-8 -*- import os os.environ.setdefault("DJANGO_SETTINGS_MODULE", "web.settings") # control DJANGO_SETTINGS_MODULE # .. django.setup() from remotecontrol.control import * class MyDaemon(IRemoteControl): def magic(self): ....... def summon(self): while True: # self.check_commands() self.magic() MyDaemon().summon() As a result, the evil spirits are controlled, but only from the admin panel.
Place this code in a file, for example, daemon.py and go ahead - we will write a mobile client.
REST API
But for a start it would be nice to implement an interface for communication between the mobile client and the server part. Let's get started
Preparatory stage
Install the Django REST framework:
pip install djangorestframework connect (web \ settings.py): INSTALLED_APPS = [ ....... 'rest_framework', ] and configure (ibid., add to the end of the file): REST_FRAMEWORK = { # superuser' 'DEFAULT_PERMISSION_CLASSES': ('rest_framework.permissions.IsAdminUser',), # API, JSON 'DEFAULT_RENDERER_CLASSES': ('rest_framework.renderers.JSONRenderer',), } Serializers (remotecontrol \ serializers.py)
We begin by describing the return data set by the REST interface. Here we can use those mysterious methods from the model description (.status_dsp () and .code_dsp ()), which return the text name of the state and the command code, respectively:
Listing serializers.py:
from rest_framework import serializers from .models import Command class CommandSerializer(serializers.ModelSerializer): class Meta: model = Command fields = ('status', 'code', 'id', 'status_dsp', 'code_dsp', 'ip') Data views (remotecontrol \ views.py)
The REST API methods in the Django application architecture are the same views, only ... you understand.
To communicate with the client, three
- commands_available - returns a list of available command codes and a list of state codes in which the command is considered processed;
- commands - used to create a new command object. The list of objects in the database is not required;
- commands / <object_id> - used to determine the state of the command object.
To minimize the code, we use the buns that come with the Django REST framework:
- @api_view - decorator for function based view, the parameter specifies the list of valid http-methods;
- generics.CreateAPIView - class for methods of creating objects, supports only POST;
- generics.RetrieveAPIView - a class for receiving detailed information about an object, supports only GET.
Listing views.py:
from rest_framework.decorators import api_view from rest_framework.response import Response from rest_framework import generics from ipware.ip import get_ip from .models import Command from .serializers import CommandSerializer @api_view(['GET']) def commands_available(request): # API- " " response = { # . CODE_REMOTE_OFF # , " " . 'commands': dict(Command.COMMAND_CHOICES), # , . 'completed': [Command.STATUS_DONE, Command.STATUS_DECLINE], } return Response(response) class CommandList(generics.CreateAPIView): # API- " " serializer_class = CommandSerializer def post(self, request, *args, **kwargs): # IP request.data[u'ip'] = u'' + get_ip(request) return super(CommandList, self).post(request, *args, **kwargs) class CommandDetail(generics.RetrieveAPIView): # API- " " queryset = Command.objects.all() serializer_class = CommandSerializer End-points (remotecontrol \ urls.py)
We describe the end-points of implemented API methods.
Listing urls.py:
from django.conf.urls import url from . import views urlpatterns = [ url(r'^commands_available/$', views.commands_available), url(r'^commands/$', views.CommandList.as_view()), url(r'^commands/(?P<pk>[0-9]+)/$', views.CommandDetail.as_view()), ] And connect them to the project (web \ urls.py):
urlpatterns = [ ....... url(r'^remotecontrol/', include('remotecontrol.urls')), ] Interface for communication is implemented. Go to the most delicious.
"Remote Control App"
To communicate with the server, use UrlRequest ( kivy.network.urlrequest.UrlRequest ). Of all its merits, we will need the following:
- asynchronous mode support;
- automatic conversion of the correct JSON received in the response in Python dict.
For ease of implementation, we will use the Basic authentication scheme. If you wish, you can devote one of the following articles to other authentication methods on web resources using UrlRequest - write in the comments.
Listing main.py
# -*- coding: utf-8 -*- import kivy kivy.require('1.9.1') from kivy.network.urlrequest import UrlRequest from kivy.properties import StringProperty, Clock from kivy.uix.button import Button from kivy.app import App from kivy.uix.boxlayout import BoxLayout try: from kivy.garden.xpopup import XError, XProgress except: from xpopup import XError, XProgress from json import dumps import base64 class RemoteControlUI(BoxLayout): """ """ # login = StringProperty(u'') password = StringProperty(u'') host = StringProperty('') def __init__(self, **kwargs): # ID self._cmd_id = None # "" self._completed = [] # . # "" # . self._wait_completion = False super(RemoteControlUI, self).__init__( orientation='vertical', spacing=2, padding=3, **kwargs) # self._pnl_commands = BoxLayout(orientation='vertical') self.add_widget(self._pnl_commands) # ============= http- ============== def _get_auth(self): # "Authorization" cred = ('%s:%s' % (self.login, self.password)) return 'Basic %s' %\ base64.b64encode(cred.encode('ascii')).decode('ascii') def _send_request(self, url, success=None, error=None, params=None): # headers = { 'User-Agent': 'Mozilla/5.0', 'Content-type': 'application/json', 'Authorization': self._get_auth() } UrlRequest( url=self.host + url, timeout=30, req_headers=headers, req_body=None if params is None else dumps(params), on_success=success, on_error=error, on_failure=error) # =========== =========== def _get_commands(self, instance=None): # API- "commands_available" self._progress_start('Trying to get command list') self._send_request( 'commands_available/', success=self._get_commands_result, error=self._get_commands_error) def _get_commands_result(self, request, response): # callback try: self._pnl_commands.clear_widgets() # for code, command in sorted( response['commands'].items(), key=lambda x: int(x[0])): btn = Button( id=code, text=command, on_release=self._btn_command_click) self._pnl_commands.add_widget(btn) self._completed = response['completed'] self._progress_complete('Command list received successfully') except Exception as e: self._get_commands_error(request, str(e)) def _get_commands_error(self, request, error): # callback self._progress_complete() XError(text=str(error)[:256], buttons=['Retry', 'Exit'], on_dismiss=self._get_commands_error_dismiss) def _get_commands_error_dismiss(self, instance): # callback if instance.button_pressed == 'Exit': App.get_running_app().stop() elif instance.button_pressed == 'Retry': self._get_commands() # ============= ============= def _btn_command_click(self, instance): # API- "commands" self._cmd_id = None self._wait_completion = True self._progress_start('Processing command "%s"' % instance.text) self._send_request( 'commands/', params={'code': instance.id}, success=self._send_command_result, error=self._send_command_error) def _send_command_result(self, request, response): # callback try: if response['status'] not in self._completed: # - ID self._cmd_id = response['id'] # , # if self._wait_completion: # Clock.schedule_once(self._get_status, 1) else: # self._progress_complete( 'Command "%s" is %s' % (response['code_dsp'], response['status_dsp'])) except Exception as e: XError(text=str(e)[:256]) def _send_command_error(self, request, error): # callback self._progress_complete() XError(text=str(error)[:256]) # ========== ========== def _get_status(self, pdt=None): # API- "commands/<id_>" if not self._cmd_id: return self._send_request( 'commands/%s/' % self._cmd_id, success=self._send_command_result, error=self._send_command_error) # ============= ============== def _progress_start(self, text): self.popup = XProgress( title='RemoteControl', text=text, buttons=['Close'], on_dismiss=self._progress_dismiss) self.popup.autoprogress() def _progress_dismiss(self, instance): self._wait_completion = False def _progress_complete(self, text=''): if self.popup is not None: self.popup.complete(text=text, show_time=0 if text is None else 1) # ========================================= def start(self): self._get_commands() class RemoteControlApp(App): """ """ remote = None def build(self): # self.remote = RemoteControlUI( login='test', password='qwerty123', host='http://localhost:8000/remotecontrol/') return self.remote def on_start(self): self.remote.start() # RemoteControlApp().run() I hope there are enough comments in the code for understanding. If it is still not enough - inform me, I will make changes.
At this pampering with the code ends and comes on the scene
Heavy artillery
You can talk about Buildozer for a long time, because not much is said about it. There are articles on Habré ( about installing and configuring and building a release version and publishing on Google Play ), of course, there is documentation ... But there are also nuances
Some practical tips for dealing with this wunderwaffe:
- To build an Android application, you still need Linux, you can do with a virtual machine. This is due to the fact that python-for-android (the package required for building) in the current version uses a more recent version of the sh package (previously pbs), which lacks Windows support;
- , — Buildozer Android-dev . ( , ndk, sdk requirements) 30-40 ;
- Buildozer , Kivy Kivy-garden ( Kivy);
- , Buildozer ( — ). Buildozer , ( ) .
- Buildozer root;
Well, a bit of code to help the happy owners of Debian and Ubuntu (the rest will need to be “carefully processed with a file”)
kivy-install.sh
# Create virtualenv virtualenv --python=python2.7 .env # Activate virtualenv source .env/bin/activate # Make sure Pip, Virtualenv and Setuptools are updated pip install --upgrade pip virtualenv setuptools # Use correct Cython version here pip install --upgrade Cython==0.20 # Install necessary system packages sudo apt-get install --upgrade build-essential mercurial git python-dev libsdl-image1.2-dev libsdl-mixer1.2-dev libsdl-ttf2.0-dev libsmpeg-dev libsdl1.2-dev libportmidi-dev libswscale-dev libavformat-dev libavcodec-dev zlib1g-dev # Install kivy pip install --upgrade kivy buildozer-install.sh
# Activate virtualenv source .env/bin/activate # Android SDK has 32bit libs sudo dpkg --add-architecture i386 # add system dependencies sudo apt-get update sudo apt-get install --upgrade ccache sudo apt-get install --upgrade libncurses5:i386 libstdc++6:i386 zlib1g:i386 sudo apt-get install --upgrade openjdk-7-jdk sudo apt-get install --upgrade unzip # Install buildozer pip install --upgrade buildozer Now that Buildozer is installed, initialize it:
buildozer init As a result of this command, a configuration configuration file (buildozer.spec) will be created in the directory. In it we find the keys below and assign them the appropriate values:
Edit for buildozer.spec
# (list) Garden requirements
garden_requirements = xpopup

# (str) Supported orientation (one of landscape, portrait or all)
orientation = portrait

# (bool) Indicate if the application should be fullscreen or not
fullscreen = 0

# (list) Permissions
android.permissions = INTERNET

# (int) Minimum API required
android.minapi = 13

# (int) Android SDK version to use
android.sdk = 21
Activate the wunderwaffe:
buildozer android debug and the output is .apk, which can be installed on an Android device.
Is done. With what I congratulate you!
Testing
And let's see how it all works. It’s not for nothing that we tried so long :)
We launch the Django server, using the parameter to specify the IP of your machine on the local network:
python manage.py 192.168.xxx.xxx:8000 Calling evil spirits:
python daemon.py We start the application on the Android device and see something like this:
Note: The final version of the project, which can be found on github , was used to record the video . It differs from the code given in the article by the extension of the functional. The server part adds support for user commands and debug messages (for clarity), and the client added an authorization form, a request for confirmation of the command execution and some convenience to the interface.
Let's sum up
What did we get as a result?
- Easily built-in class that implements the logic of reaction to remote commands;
- A server application that allows you to control an arbitrary script from a web interface and provides a REST API;
- Android application for managing the script through the REST API.
Maybe this is too loudly said, but ... Now I am tormented by the question - is it possible to implement a similar architecture using other languages and technologies (except Python), applying (at least) no more effort and writing no more code?
That's all.
All nice coding and successful builds.
useful links
"RemoteControlInterface" on github
Docks by Django
Docks by Django REST framework
Docks by Kivy
Installing Kivy
Installing Buildozer
Source: https://habr.com/ru/post/306808/
All Articles