We create stub services for integration testing on Apache Camel (using Scala DSL)

This is the third article about using Scala in testing. Today we will consider examples of using Apache Camel to create test stubs, as well as information system components.
Often there is a need to emulate the work of any part of the system for integration testing, make a stub or write a simple integration component. This can be a web service that returns the necessary answers, a test that fills the database, an application that reads a message from the queue and returns the result of processing, a generator of files and other components.
For a one-time integration check, we would use a simple Java or Scala application, an Apache JMeter script, or SoapUI. But we need a system that constantly works, responds to requests and does not require action from the tester — launched and forgotten. To solve this problem, we can create an application based on the Apache amel framework.
Consider 5 examples:
- Reading files in one encoding, writing to another;
- Request to the web service on a schedule and save the message in the data warehouse;
- Implementing a web service that returns a message depending on the GET parameter of the request;
- Reading a message from the queue and sending a message to the database;
- An example of routing by file contents.
Briefly describe the tools that are used to solve the problem. Apache camel ( http://camel.apache.org/ ) is a Java framework designed to implement the exchange of messages between individual applications, information system subsystems. Implements an approach to the development of middleware Enterprise Integration Patterns (EIP). It allows you to work with files, databases, queue managers, web services, and other components — there are more than 240 types of them on the project's component page. Camel's application describes the so-called endpoints — endpoints, and the rules for converting and routing messages between them.
The Camel component implements the end point. This is either the producer of the message (Producer) or the consumer (Consumer). Some components can implement both types of points, for example, a message can be received from a file and recorded. Some components implement only the message producer, for example, a timer, or a consumer, for example, output to a log.
During the application, the message body and its headers are manipulated. The procedure for working with Camel is as follows:
- We describe the source of the message (file, queue, database, service, timer, etc.);
- We describe the rules for converting data and formats;
- We describe the recipient (s) of the message (file, queue, database, service, output to the console, etc.) and the routing logic;
- Run the application that listens to the source, and when a message appears, converts it and routes it to the recipients.
Different languages are used to describe the rules for routing and converting messages. For ourselves, we chose Scala DSL scala-dsl-eip , because this language is well suited for simple and quick creation of component software. For Scala, we use the SBT project build system.
There is a great example of reading a message from a file and sending it to an http post request. It is a bit outdated, but may be useful.
" Http://www.lightbend.com/activator/template/camel-http
" Https://github.com/hilton/activator-camel-http#master
Preparatory work
Let's create the project in idea on the basis of SBT. An example of creating a project can be overlooked - Implementation of monitoring and integration testing of an information system using Scalatest. Part 1
In the file build.sbt we will write the settings
name := "camel-scaladsl" version := "1.0" scalaVersion := "2.11.8" val camelVersion = "2.17.1" libraryDependencies ++= Seq( // Camel "org.apache.camel" % "camel-core" % camelVersion, "org.apache.camel" % "camel-scala" % camelVersion, // Camel "org.apache.camel" % "camel-quartz" % camelVersion, "org.apache.camel" % "camel-spring-redis" % camelVersion, "org.apache.camel" % "camel-http" % camelVersion, "org.apache.camel" % "camel-jetty" % camelVersion, "org.apache.camel" % "camel-jms" % camelVersion, "org.apache.camel" % "camel-jdbc" % camelVersion, // "ch.qos.logback" % "logback-classic" % "1.1.2", "org.slf4j" % "slf4j-api" % "1.7.7", // xml "org.scala-lang.modules" % "scala-xml_2.11" % "1.0.5", // H2 "com.h2database" % "h2" % "1.4.192", "org.apache.commons" % "commons-dbcp2" % "2.1.1", // activemq "org.apache.activemq" % "activemq-client" % "5.13.3" ) Add the src / main / resources file logback.xml file in which the logging level and message format are configured.
<configuration> <appender name="STDOUT" class="ch.qos.logback.core.ConsoleAppender"> <encoder> <pattern>%d{HH:mm:ss.SSS} [%thread] %-5level %logger{36} - %msg%n</pattern> </encoder> </appender> <root level="INFO"> <appender-ref ref="STDOUT" /> </root> </configuration> Otherwise, the default level will be DEBUG - too much information is displayed.
Example 1
Reading files in one encoding, writing to another. This is a simple application that uses the http://camel.apache.org/file2.html component from the camel-core package. It consists of an object that runs the FromFileToFileApp application and the FromFileToFileRoute class, which describes routes. Class with routes can be put in a separate file.
Contents of the src / main / scala / FromFileToFileApp.scala file
import org.apache.camel.CamelContext import org.apache.camel.main.Main import org.apache.camel.scala.dsl.builder.{ScalaRouteBuilder, RouteBuilderSupport} object FromFileToFileApp extends App with RouteBuilderSupport { // Camel Main val mainApp = new Main val context = mainApp.getOrCreateCamelContext // mainApp.addRouteBuilder(new FromFileToFileRoute(context)) // mainApp.run } class FromFileToFileRoute(context: CamelContext) extends ScalaRouteBuilder(context) { // "inbox" """file:inbox?charset=utf-8""" ==> { // "outbox" to ("file:outbox?charset=Windows-1251") } } In the FromFileToFileRoute class, there is no conversion to the contents of the message, no routing. After launching the application, the folders “inbox”, “outbox” will be automatically created in the project folder. When you hit the "inbox" directory, the file is automatically read - disappears from the folder. It then appears in the "outbox" directory in a different encoding. At the same time, messages read by Camel will be stored in a separate subfolder in the "inbox" folder.
Example 2
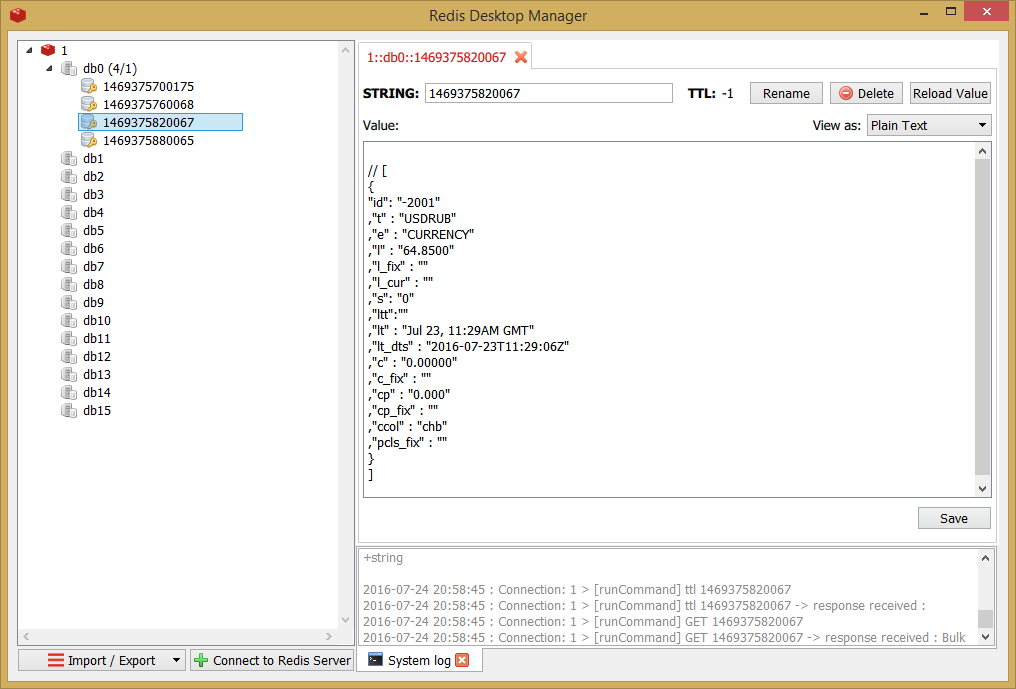
Request a web service on a schedule and save the message in the data store. In this example, the timer will collect data on the exchange rate and send it to Redis. In order to execute actions on a message (write body and headers), there is a method "process". For Redis, values are sent using the "CamelRedis.Key" / "CamelRedis.Value" header pair. We need to extract the message body that returns the HTTP GET request and make it a "CamelRedis.Value" header.
The key will generate a unique, suitable for sorting - the current time in milliseconds.
import org.apache.camel.{Exchange, CamelContext} import org.apache.camel.main.Main import org.apache.camel.scala.dsl.builder.{ScalaRouteBuilder, RouteBuilderSupport} import org.springframework.data.redis.serializer.StringRedisSerializer object FromHTTPToRedisApp extends App with RouteBuilderSupport{ val mainApp = new Main // stringSerializer Redis mainApp.bind("stringSerializer",new StringRedisSerializer) val context = mainApp.getOrCreateCamelContext mainApp.addRouteBuilder(new FromHTTPToRedisRoute(context)) mainApp.run } class FromHTTPToRedisRoute (context: CamelContext) extends ScalaRouteBuilder(context) { // , HTTP """quartz:timerName?cron=0+0/1+*+*+*+?""" ==> { // log(" ") // to("http://www.google.com/finance/info?q=CURRENCY%3aUSDRUB") // - edis, process((exchange: Exchange) => { exchange.getOut.setHeader("CamelRedis.Key",System.currentTimeMillis()) exchange.getOut.setHeader("CamelRedis.Value",exchange.getIn.getBody(classOf[String])) }) // // (Body: [Body is null]]) to("log:FromHTTPToRedisApp") // Redis // #stringSerializer - to("""spring-redis://172.16.7.58:6379?serializer=#stringSerializer""") } } To write to Redis from a remote host, permission may be needed. For example, in the Redis console on the host where it is running, execute the command
CONFIG SET protected-mode no An example of displaying records in Redis is shown in the figure.
Example 3
An implementation of a web service that returns a message depending on the GET parameter of the request. In this example, using the Jetty component, we implement a simple HTTP server that receives a GET request with a parameter and returns xml with the parameter value or with an error.
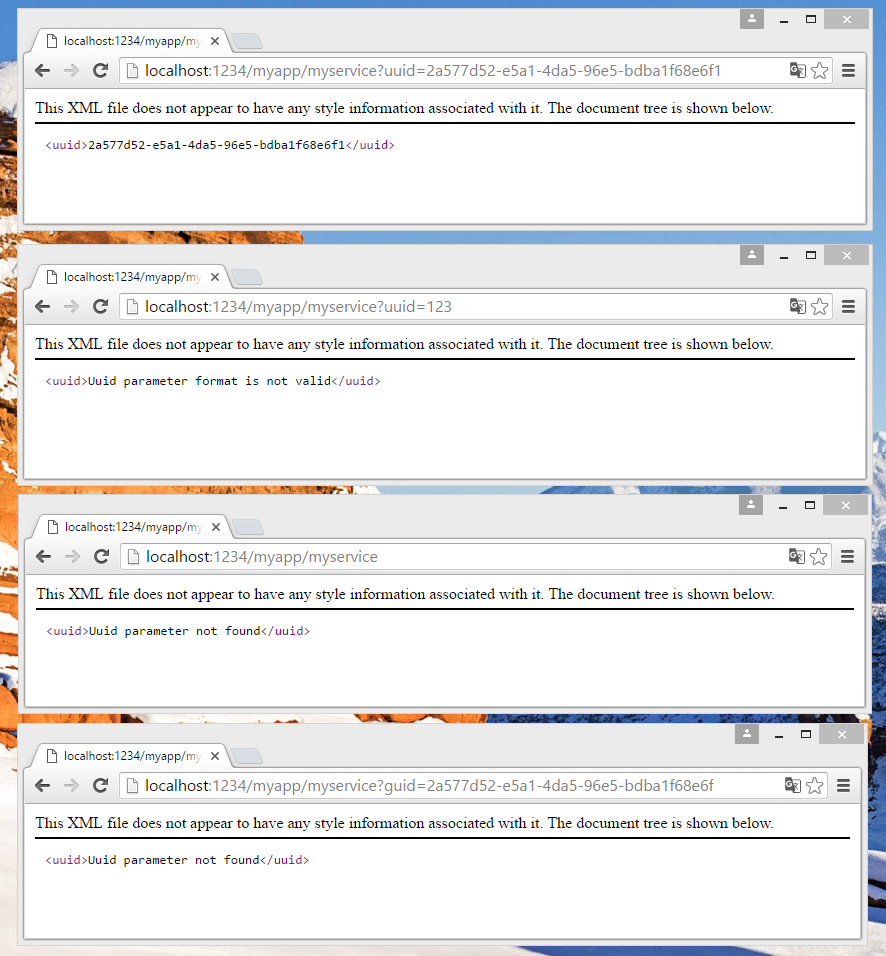
object JettyApp extends App with RouteBuilderSupport{ val mainApp = new Main val context = mainApp.getOrCreateCamelContext mainApp.addRouteBuilder(new JettyRoute(context)) mainApp.run } class JettyRoute(context: CamelContext) extends ScalaRouteBuilder(context) { // """jetty:http://0.0.0.0:1234/myapp/myservice""" ==> { delay(2 seconds) process((exchange: Exchange) => { // uuid get val uuidParam = exchange.getIn.getHeader("uuid") // val pattern = """[a-fA-F0-9]{8}-[a-fA-F0-9]{4}-[a-fA-F0-9]{4}-[a-fA-F0-9]{4}-[a-fA-F0-9]{12}""".r // // , uuid def responseText = uuidParam match { case null => "Uuid parameter not found" case pattern() => s"$uuidParam" case _ => s"Uuid parameter format is not valid" } // xml exchange.getOut().setHeader(Exchange.CONTENT_TYPE,"text/xml; charset=utf-8") // xml . exchange.getOut().setBody(<uuid>{responseText}</uuid>) // s"<uuid>$responseText</uuid>" }) } } Examples of requests for verification:
" Http: // localhost: 1234 / myapp / myservice? Uuid = 2a577d52-e5a1-4da5-96e5-bdba1f68e6f1 ;
" Http: // localhost: 1234 / myapp / myservice? Uuid = 123 ;
» Http: // localhost: 1234 / myapp / myservice ;
» Http: // localhost: 1234 / myapp / myservice? Guid = 2a577d52-e5a1-4da5-96e5-bdba1f68e6f .
Examples of service responses are presented in the figure.
Example 4
Reading a message from the queue and writing to the database. Work with queues and DB was highlighted in a separate example. Configuring these components requires a different approach. If in the previous examples the setting was made using the parameters in the endpoint string, here you need to create an object in advance, make a component on its basis and use it further.
For the database, create an instance of the org.apache.commons.dbcp2.BasicDataSource class and pass it the connection parameters. For the queue, we create an instance of the javax.jms.ConnectionFactory class, in which we also save the connection parameters. Next, a name for the end point is created for these components, and is used in the URI. The difference is that the "camel-jdbc" component is used for the database, and a new component based on "camel-jms" is created for the queues.
The table into which the record is inserted in the examples is created by the following query:
CREATE TABLE MESSAGETABLE( ID UUID NOT NULL PRIMARY KEY, DATETIME TIMESTAMP, BODY VARCHAR(65536) The following code will take messages from the queue, execute in the database a request to add a unique identifier, time and message body.
import java.text.SimpleDateFormat import java.util.{UUID, Date} import org.apache.camel.component.jms.JmsComponent import org.apache.camel.main.Main import org.apache.camel.scala.dsl.builder.{RouteBuilderSupport, ScalaRouteBuilder} import org.apache.camel.{CamelContext, Exchange} // BasicDataSource import org.apache.commons.dbcp2.BasicDataSource // - ConnectionFactory import org.apache.activemq.ActiveMQConnectionFactory object FromMQToDBApp extends App with RouteBuilderSupport { val mainApp = new Main // val ds = new BasicDataSource ds.setDriverClassName("org.h2.Driver") ds.setUrl("jdbc:h2:./h2db") // endpoint , "h2db" mainApp.bind("h2db",ds) // MQConnectionFactory val cf = new ActiveMQConnectionFactory("tcp://192.168.3.38:61616") // mainApp.bind("amq-jms", JmsComponent.jmsComponentAutoAcknowledge(cf)) val context = mainApp.getOrCreateCamelContext mainApp.addRouteBuilder(new FromMQToDBAppRoute(context)) mainApp.run } // class FromMQToDBAppRoute(context: CamelContext) extends ScalaRouteBuilder(context) { // . , - "amq-jms", // """amq-jms:queue:TESTQ""" ==> { process((exchange: Exchange) => { // uuid, / val uuid = UUID.randomUUID val time = new SimpleDateFormat("yyyy-MM-dd HH:mm:ss").format(new Date()) // val messageBody = exchange.getIn.getBody(classOf[String]) // exchange.getOut.setBody(s"INSERT INTO PUBLIC.MESSAGETABLE (ID, DATETIME, BODY) VALUES('$uuid', '$time', '$messageBody')") }) // // jdbc, DataSource to("jdbc:h2db") } } It should be remembered that when trying to write messages to a database larger than the field length (the table created by the query earlier has a field length of 65536 characters), an error will occur. It can be solved by cutting the body to the desired size, or by adding an errorHandler (deadLetterChannel ("file: error")), which will send error-causing messages to the "error" folder.
The example describes the interaction with the database H2. For other databases you need to add the appropriate library to build.sbt, determine the name of the driver class, URL. You may need other connection properties, for example, a username and password.
Example description of connection details for working with Postgresql:
Add library to build.sbt
libraryDependencies += "org.postgresql" % "postgresql" % "9.4.1207" Implementation in class:
val ds = new BasicDataSource { setDriverClassName("org.postgresql.Driver") setUrl(conf.getString("jdbc:postgresql://myhost:5432/mydb")) setUsername(conf.getString("myusername")) setPassword(conf.getString("mypassword")) } Queuing is somewhat more complicated. For some of the queue managers, libraries are not open to repository access. In this case, * .jar files are used, which are stored in the project lib folder.
For any queue manager, you need to create an appropriate connection factory object.
For example, the code that provides interaction with IBM Websphere MQ, would be:
val cf = new MQQueueConnectionFactory { setHostName("myhost") setPort(1414) setTransportType(1) setQueueManager("myqmname") setChannel("mychannel") } For Oracle Weblogic Jms even more interesting. If you create queues for how to Create a Simple JMS Queue in Weblogic Server 11g , then the component declaration will be as follows:
val env = new util.Hashtable[String, String] env.put(javax.naming.Context.INITIAL_CONTEXT_FACTORY, "weblogic.jndi.WLInitialContextFactory") env.put(javax.naming.Context.PROVIDER_URL, "t3://myhost:7001") val ic: InitialContext = new InitialContext(env) val connectionFactory = ic.lookup("jms/TestConnectionFactory").asInstanceOf[QueueConnectionFactory] // jms/TestConnectionFactory - jndi ConnectionFactory" mainApp.bind("ora-jms", JmsComponent.jmsComponentAutoAcknowledge(connectionFactory)) and the endpoint URI will be in the following format: "ora-jms: queue: ./ TestJMSModule! TestJMSQueue", where ./ stands for the current server, "TestJMSModule" JNDI module name "TestJMSQueue" - JNDI queue name
Example 5
Routing the contents of the file. In this example, consider the routing of a message depending on its content.
Suppose that there is an xml message at the input, the processing of which depends on the value of the element “To”.
<To>ActiveMQ</To> - you need to send to the queue, and <To>H2</To> - process it in some way and send it to the database, <To>someAdress</To> - process it in some other way.
A “Destination” header will be added to the message with the name of the end point to which the message should be sent.
If an error occurs while processing the message or there is no corresponding value in the routing table, then send the message to "direct: trash".
The example uses the "???" rock construct, which allows replacing a non-existent block of code for successful compilation. Instead of this block, you need to write processing logic.
import org.apache.camel.{Exchange, CamelContext} import org.apache.camel.scala.dsl.builder.ScalaRouteBuilder import scala.xml.XML class ContentOrientedRouting(context: CamelContext) extends ScalaRouteBuilder(context) { // , "direct:trash" errorHandler(deadLetterChannel("direct:trash")) // Map val destMap = Map( "ActiveMQ" -> "jms-amq:queue:inbox", "H2" -> "direct:h2db", "someAdress" -> "direct:outbox") // val addRoutingAction = (exchange: Exchange) => { // "To" XML-, val body = exchange.getIn.getBody(classOf[String]) val xmlBody = XML.loadString(body) val toValue = (xmlBody \\ "To").text // endpoint, - "direct:trash" val dest = destMap.getOrElse(toValue,"direct:trash") // exchange.getOut.setHeader("Destination", dest) } """direct:inbox1""" ==> { process(addRoutingAction) // "Destination" endpoint recipients(_.in("Destination")) } // endpoint """jms-amq:queue:inbox""" ==> {???} """direct:h2db""" ==> { process((exchange: Exchange) => {???}) to ("jdbc:h2db") } """direct:outbox""" ==> { // to("file:someFile", "log:Somelog") } """direct:trash""" ==> {???} } The examples show how you can implement a small application for our purposes. Consider additional aspects. allowing to make the development and maintenance of the application more convenient.
To configure the application, we use the Typesafe library in order not to stitch the connection parameters in the code, but to store it in the configuration file.
Add to build.sbt:
libraryDependencies += "com.typesafe" % "config" % "1.3.0" in the src / main / resources folder, create an application.conf file in which we set up the settings and call them from the code.
The application is launched using the sbt run command. In some cases it may be uncomfortable.
It is possible to create a jar file using the sbt-assembly plugin https://github.com/sbt/sbt-assembly to run with the java –jar camelapp.jar command. The .jar file will contain all the dependencies, so the size will be large, but the launch will take place immediately, without downloading the components.
To run in the background is convenient to use the nohup application.
Create a script to run in the folder that is included in the $ PATH environment variable to call by name from any directory. For example, in / usr / local / bin /. Script to run:
/ usr / local / bin / camelstart
#!/bin/bash /usr/bin/nohup java -jar /opt/camelapp.jar& To stop:
/ usr / local / bin / camelstop
#!/bin/bash pkill -f camelapp The launch of the application is done with the camelstart command, the stop is camelstop.
We can highlight some pros and cons of using Apache Camel.
Pros:
- Quick application implementation;
- A large number of finished components;
- Multithreading, parallel processing of messages out of the box;
- Ability to select the description method in the form of XML or one of DSL;
Minuses:
- Each component has its own logic of work, it takes time to understand;
- There is a threshold for entry;
In addition, since Apache Camel runs on the JVM, applications built on it are inherent in the pros and cons of this platform.
The experience of using Apache Camel in conjunction with ScalaDSL in our company has shown its effectiveness in creating plugs, integration components and sometimes load tests.
')
Source: https://habr.com/ru/post/306792/
All Articles