iOS 10: Notification Content Extension

This article will discuss the new feature in iOS 10 - Notification Content Extension. This is a type of extension that allows the user to display its own interface when interacting with a notification (remote or local). And separately we will touch on what is possible and what cannot be done in this new extension, including how much it is flexibly configured and configured.
Notification Content Extension allows you to interact with the application without formally launching it. This extension brings the greatest productivity if one or several simple actions are required from the user in response to the received notification. In the latest beta-version, the ability of users to interact with such notifications is not limited to 3D Touch devices, on older devices, the expansion screen will appear with a gesture down on the notification banner.
Let us examine in detail this new mechanism on a test project, which you can find here :
- Adding target for extension to the project.
- Design and stylization of the interface.
- Adding actions and their processing.
- Restrictions on customization of the interface.
')
Adding target for extension to the project
To create a project, we need Xcode 8 (beta version is currently available). We create a new project in a way familiar to us, then we need to create a new target for expansion through the menu File - New - Target and select the Notification Content Extension.
For the extension, you create your own storyboard and view controller, which obeys the
UNNotificationContentExtension.
protocol UNNotificationContentExtension.
UNNotificationContentExtension.
It has one mandatory method.
func didReceive(_ notification: UNNotification) which is called when a new notification is received when the extension is displayed on the screen. In this method, we can get the necessary information from the notification and display it. In this example, for simplicity, we will not implement it.
Next we will use another optional method.
func didReceive(_ response: UNNotificationResponse, completionHandler completion: (UNNotificationContentExtensionResponseOption) -> Swift.Void) to process button presses (Notification Actions) and make changes in the interface, open the main application.
Interface design and styling
Then we set up the interface as you please in the storyboard file, and configure it in the inherited
UIViewController methods.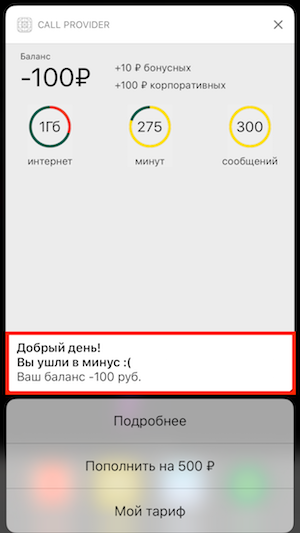
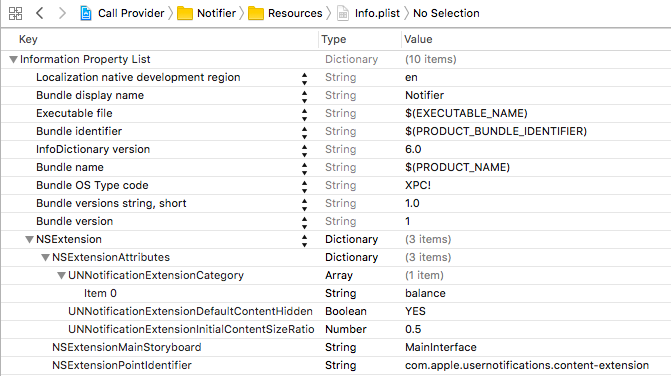
If we do not want the title, subtitle, notification text to be shown on the extension screen, we need to specify the
UNNotificationExtensionDefaultContentHidden key with the value YES in plist.When displaying a screen with an extension, you can notice a problem with its height. Unfortunately, the automatic height calculation mechanism is not available here. This can be
viewDidLoad following code, for example, in the viewDidLoad method, assuming a height of 50%, sufficient to display all the content: let size = view.bounds.size preferredContentSize = CGSize(width: size.width, height: size.width / 2) In this case, artifacts may be observed during the display - the user may notice an animation of a change in the size of the screen height.
Fortunately, this can be fixed by setting the coefficient from the maximum height in the plist (
UNNotificationExtensionInitialContentSizeRatio key).The final plist is as follows:
Add actions and process them
In order to configure user actions with a notification (Notification Actions), you need to prepare them in advance - create a category of notification and assign to it possible actions on the notification:
let showMoreAction = UNNotificationAction(identifier: "showMore", title: "", options: []) let addBalanceAction = UNNotificationAction(identifier: "addBalance", title: " 500 ₽", options: []) let myPlanAction = UNNotificationAction(identifier: "myPlan", title: " ", options: []) let balanceCategory = UNNotificationCategory(identifier: "balance", actions: [showMoreAction, addBalanceAction, myPlanAction], intentIdentifiers: [], options: []) UNUserNotificationCenter.current().setNotificationCategories([balanceCategory]) The category is needed so that the operating system by its identifier shows possible actions. The category should come in the appropriate field in the push:
{ aps : { alert : " ", category: "balance" } } In order for these actions to be applied to a local notification, you need to fill in the appropriate field of the
UNNotificationContent class: content.categoryIdentifier = "balance" Additionally, in order to display a specific extension (if there are several of them), you need to add a category identifier in plist to the array with the
UNNotificationExtensionCategory key. If the operating system does not find the category key in the available extensions, the notification is processed as standard (without displaying any extension screen).Button presses are processed as follows:
switch response.actionIdentifier { case "addBalance": addBalance() completion(.doNotDismiss) case "myPlan": openMainApplication() completion(.dismiss) case "showMore": openMainApplication() completion(.dismiss) default: completion(.dismiss) } In this method, we can perform any (including asynchronous) operations, but the time for processing the action is limited, so you should not overload the method with complex and lengthy processes.
Completion must be invoked with the
UNNotificationContentExtensionResponseOption enum UNNotificationContentExtensionResponseOption :- dismiss - after execution the notification will disappear
- doNotDismiss - after execution, the notification will not be hidden
- dismissAndForwardAction - after execution, the notification will disappear and the action will be redirected to the main application to the
func userNotificationCenter(_ center:, didReceive response:, withCompletionHandler completionHandler: )methodfunc userNotificationCenter(_ center:, didReceive response:, withCompletionHandler completionHandler: )delegate toUNUserNotificationCenterDelegate
In our test application, we refill the account asynchronously:
For other actions, we are switching to the main application in the usual extension way (after registering the application URL scheme):
if let url = URL(string: "callProvider://") { extensionContext?.open(url, completionHandler: nil) } Restrictions on customization of the interface
In conclusion, I will list the restrictions on customization of the extension (this knowledge should be shared with designers):
- Notification action button styles are not customized. You can not change the font, alignment, add icons to the buttons, etc.
- The background of the expansion screen does not support (I hope this only applies to the beta version) transparency. All attempts to set the background to transparent and get a standard blur in the background (as it works in the widget) were unsuccessful.
- The white header of the extension screen (with the application name and the “close” icon) is also completely non-configurable.
Read more about notifications in lectures from WWDC 2016: Introduction to Notifications and Advanced Notifications .
Thanks for the design: Nikita Stepanov, Denis Otroshchenko.
Source: https://habr.com/ru/post/306572/
All Articles