Eclipse + QT: installation and configuration
Long enough began to look closely to cross-platform C ++ programming. Not that it was necessary for me, but for general development. And here's what I can note: the biggest thing that causes problems on this path is a rather high threshold for entering this area precisely because of the toolkit.
If you do not consider the case of programming in Emacs, which personally seems to me while some kind of toli is an anachronism, toli is extreme, constantly comparing different IDEs with Visual Studio often had to be simply terrified. And the main problem of these systems was that, with rare exceptions, they did not work out of the box without a file.
The second problem is usability. Often below average. Early versions of KDevelop left a rather ambiguous impression.
')
Third, what I would like - an integrated interface designer. It was practically nowhere, except for NetBeans (but only for Java), and MonoDevelop (GTK #). And although these IDEs are very worthy, I wanted to find an easy way to program it in C ++ with a minimum number of rakes.
In this article I want to give a step-by-step guide, what is called "for dummies", on installing a workable configuration on the Windows platform with a good Eclipse IDE and a good QT library. The launch pad, so to speak.
UPD: With regard to programming in QT, I can recommend just a smart book on this topic:
Jasmin Blanchette, Mark Summerfield: GUI Development with QT3 (translated by Andrey Kiselev)
UDP2: More literature:
Russian translation of documentation from QAssistant
Qt4. Professional C ++ programming
Jasmin Blanchette, Mark Summerfield: Qt 4. C ++ Programming GUI
Foundations of QT Development
So let's go ...
First of all, download the programs that will be needed for further actions:

1. Automated MinGW Installer (140 kB + pumps 19 MB)
2. Qt / Windows Open Source Edition (149 MB)
3. Java Runtime Environment (JRE) 6 Update 7 (16MB)
4. Eclipse IDE for C / C ++ Developers (72 MB)
5. Qt Eclipse Integration for C ++ (6 MB)
The first thing to install is a set of GNU compilers for the Windows platform. By the link above, a web-driver is downloaded, in which the “download and install” mode is selected.

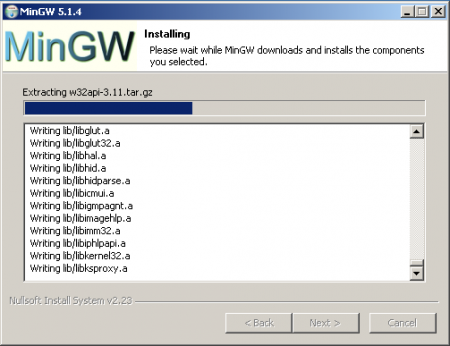
In the process, the downloaded packages will be added as tar.gz files next to the installer, after which they will be installed.
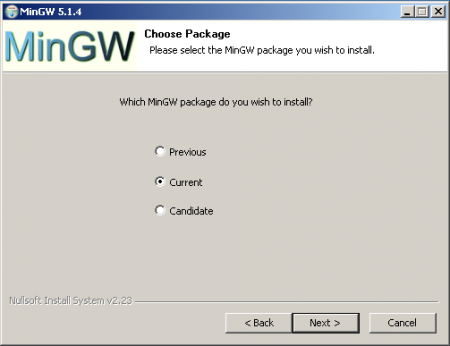
In the next step, the downloadable version of compilers is selected.
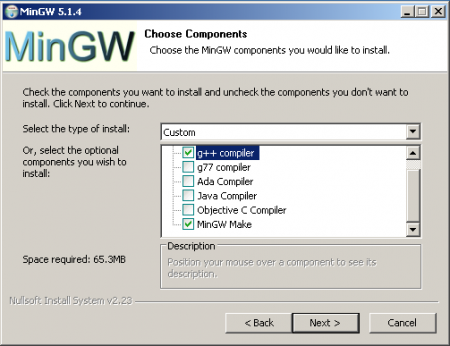
Next you need to select at least the options "g ++" and "mingw-make"
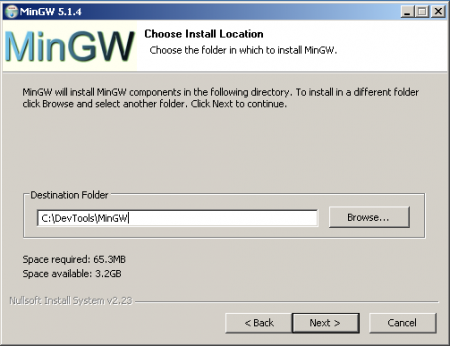
I personally selected the DevTools folder as the installation directory - I don’t like the dump in the root of the C drive: :) However, it’s better that the path doesn’t contain spaces (they often bring the main fun and dances with a tambourine)
After installing MinGW, the path to its bin directory must be entered into the PATH environment variable:

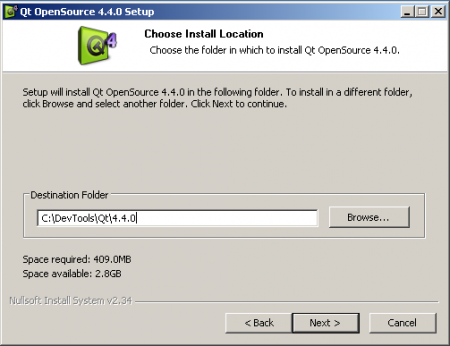
Since we are going to install the QT library and don’t want to pay, we download the free GPL version from the link above. Run, do not forget to adjust the installation path
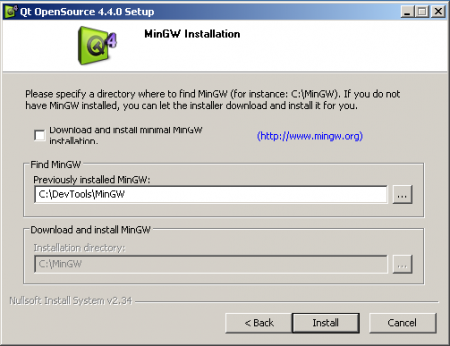
Specify where MinGW is
After clicking on the “Install” button, an error message is likely to be displayed. Clicking on “Yes” will ignore it.

The further process does not cause any particular difficulties.
Eclipse requires an installed Java machine to function. Download it from the Sun site and install it.
Now go to install Eclipse. Actually the whole installation consists in unpacking the contents of the zip archive into some folder. Let's not deviate from the chosen practice and unpack it in the folder C: \ DevTools

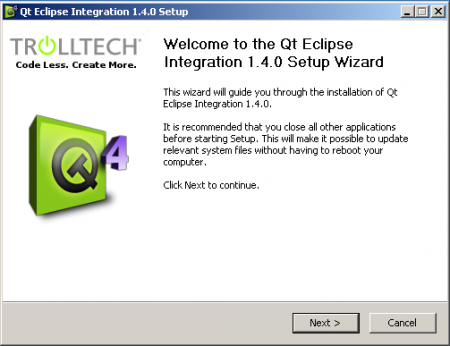
And the penultimate moment is the installation of the Eclpse and QT integration package. Run the installer
Adjust the installation path

Specify the paths to the library and IDE

With this all. Now the computer should be restarted for the PATH changes to take effect.
Run the newly installed Eclipse

When you first start you will be prompted to select the workspace

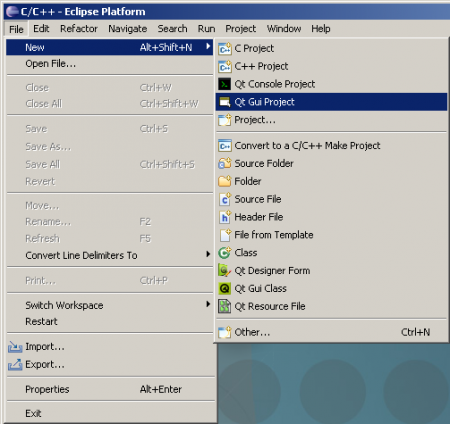
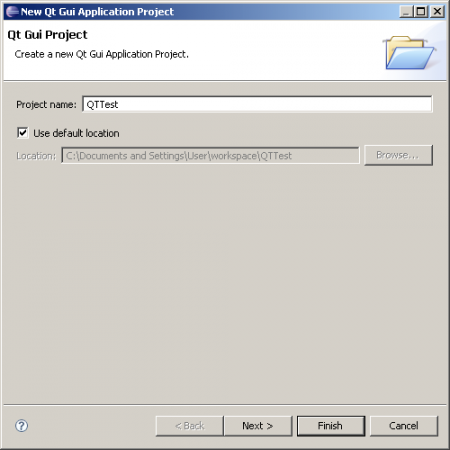
Create a new project “QT GUI Project”
Call him
Opanki! Mistake
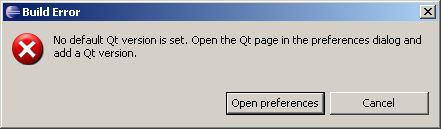
Although QT integrator asked for the path to the library, for some reason they are not installed. Need to add

Now everything is all right. Close the “Welcome” window and find yourself in a working environment.

If for some reason all the windows are missing on the screen or their arrangement deteriorates as a result of some actions, then the whole layout can be downloaded again via the menu “Window” -> “Open Perspective” -> “Other ...” -> “C / C ++
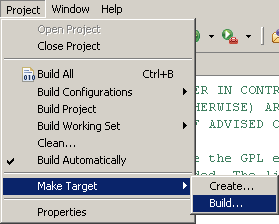
Now it's time to compile the project: “Project” -> “Make Target” -> “Build ...”
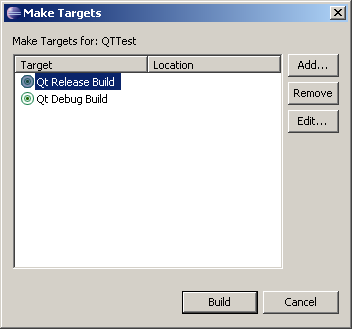
Next, select "Release" and click "Build"
Attention! Compiling “Debug” will fail! Debug libraries with QT are not supplied. They need to be compiled separately!
If everything is fine, then pressing the "play" button will now launch the compiled program.

UPD: In order for the button to launch the application lead to the compilation and launch of the Release version in the project settings “Project” - “Properties” - “C / C ++ Make Project” in the fields “Make Build Target” the word “debug” should be replaced with “release”
To be continued ...
If you do not consider the case of programming in Emacs, which personally seems to me while some kind of toli is an anachronism, toli is extreme, constantly comparing different IDEs with Visual Studio often had to be simply terrified. And the main problem of these systems was that, with rare exceptions, they did not work out of the box without a file.
The second problem is usability. Often below average. Early versions of KDevelop left a rather ambiguous impression.
')
Third, what I would like - an integrated interface designer. It was practically nowhere, except for NetBeans (but only for Java), and MonoDevelop (GTK #). And although these IDEs are very worthy, I wanted to find an easy way to program it in C ++ with a minimum number of rakes.
In this article I want to give a step-by-step guide, what is called "for dummies", on installing a workable configuration on the Windows platform with a good Eclipse IDE and a good QT library. The launch pad, so to speak.
UPD: With regard to programming in QT, I can recommend just a smart book on this topic:
Jasmin Blanchette, Mark Summerfield: GUI Development with QT3 (translated by Andrey Kiselev)
UDP2: More literature:
Russian translation of documentation from QAssistant
Qt4. Professional C ++ programming
Jasmin Blanchette, Mark Summerfield: Qt 4. C ++ Programming GUI
Foundations of QT Development
So let's go ...
Prerequisites
First of all, download the programs that will be needed for further actions:
1. Automated MinGW Installer (140 kB + pumps 19 MB)
2. Qt / Windows Open Source Edition (149 MB)
3. Java Runtime Environment (JRE) 6 Update 7 (16MB)
4. Eclipse IDE for C / C ++ Developers (72 MB)
5. Qt Eclipse Integration for C ++ (6 MB)
1. MinGW
The first thing to install is a set of GNU compilers for the Windows platform. By the link above, a web-driver is downloaded, in which the “download and install” mode is selected.
In the process, the downloaded packages will be added as tar.gz files next to the installer, after which they will be installed.
In the next step, the downloadable version of compilers is selected.
Next you need to select at least the options "g ++" and "mingw-make"
I personally selected the DevTools folder as the installation directory - I don’t like the dump in the root of the C drive: :) However, it’s better that the path doesn’t contain spaces (they often bring the main fun and dances with a tambourine)
After installing MinGW, the path to its bin directory must be entered into the PATH environment variable:
2. QT
Since we are going to install the QT library and don’t want to pay, we download the free GPL version from the link above. Run, do not forget to adjust the installation path
Specify where MinGW is
After clicking on the “Install” button, an error message is likely to be displayed. Clicking on “Yes” will ignore it.
The further process does not cause any particular difficulties.
3. Java Runtime Environment
Eclipse requires an installed Java machine to function. Download it from the Sun site and install it.
4. Eclipse
Now go to install Eclipse. Actually the whole installation consists in unpacking the contents of the zip archive into some folder. Let's not deviate from the chosen practice and unpack it in the folder C: \ DevTools
5. QT integration package for Eclipse
And the penultimate moment is the installation of the Eclpse and QT integration package. Run the installer
Adjust the installation path
Specify the paths to the library and IDE
With this all. Now the computer should be restarted for the PATH changes to take effect.
6. Compiling the simplest program
Run the newly installed Eclipse
When you first start you will be prompted to select the workspace
Create a new project “QT GUI Project”
Call him
Opanki! Mistake
Although QT integrator asked for the path to the library, for some reason they are not installed. Need to add
Now everything is all right. Close the “Welcome” window and find yourself in a working environment.
If for some reason all the windows are missing on the screen or their arrangement deteriorates as a result of some actions, then the whole layout can be downloaded again via the menu “Window” -> “Open Perspective” -> “Other ...” -> “C / C ++
Now it's time to compile the project: “Project” -> “Make Target” -> “Build ...”
Next, select "Release" and click "Build"
Attention! Compiling “Debug” will fail! Debug libraries with QT are not supplied. They need to be compiled separately!
If everything is fine, then pressing the "play" button will now launch the compiled program.
UPD: In order for the button to launch the application lead to the compilation and launch of the Release version in the project settings “Project” - “Properties” - “C / C ++ Make Project” in the fields “Make Build Target” the word “debug” should be replaced with “release”
To be continued ...
Source: https://habr.com/ru/post/30636/
All Articles