Stripe: your dream service to automate money transfers
Those who dealt with the electronic payment service Stripe know that it is perfectly tailored for developers. His documentation is written by people for people; there is a good test mode - a complete copy of the real one, and in order to switch to the live mode, you only need to replace the keys without touching the API and without receiving any surprises; admin test mode - also a complete copy of the battle. In general, Stripe is good, and I want to devote this article to the basic issues of integrating a service into an e-Commerce project, explaining the processes with concrete and abstract examples. I hope that my experience will help everyone who wants to try Stripe on their project.
However, before using Stripe, ask the question: “Where is the business that we will serve?”. For example, if the business is Russian, Stripe is useless for us: you can receive payments from any country, but the business of the owner of an account on Stripe must be legally registered in one of the available countries. Otherwise, it is impossible to create and authorize an account. A list of countries can be found here . If you want to withdraw money to other accounts, for example, to suppliers (how to do this, I will tell below), then legally suppliers must also be located in the countries with which Stripe works. The client business with which I worked is registered in America, which allowed making payments through Stripe.
You also need to be prepared that Stripe does not support the 3-D-secure xml protocol, which requires the client to enter the confirmation code received in the SMS message. Stripe is simply trying to make a payment without this option, and if the bank accepts payments without 3-D Secure, well, if not, everything will end in refusal, and you will not be able to pay from this card.
Making payment
To transfer money from the client’s card to our Stripe account, we need to do the following. Using the Stripe.js script, we will get the Stripe token on the frontend. Next we will use the token from the server side to conduct the payment itself.
We connect Stripe.js and specify the public key:
<script type="text/javascript" src="https://js.stripe.com/v2/"></script> <script type="text/javascript"> Stripe.setPublishableKey('your_public_key'); </script> We make the usual HTML form, we specify the data-stripe attributes for the script to be input. We will need the client card number, year and month of card validity and CVC. Stripe owner’s name is not required.
<form action="" method="POST" id="payment-form"> <span class="payment-errors"></span> <label>Card Number</label> <input type="text" size="20" data-stripe="number"> <label>Expiration (MM/YY)</label> <input type="text" size="2" data-stripe="exp_month"> <input type="text" size="2" data-stripe="exp_year"> <label>CVC</label> <input type="text" size="4" data-stripe="cvc"> <input type="submit" class="submit" value="Submit"> </form> Now we get the token:
$(function() { var $form = $('#payment-form'); $form.submit(function(event) { // , $form.find('.submit').prop('disabled', true); // token Stripe Stripe.card.createToken($form, stripeResponseHandler); // submit return false; }); }); function stripeResponseHandler(status, response) { // : var $form = $('#payment-form'); if (response.error) { // Problem! // : $form.find('.payment-errors').text(response.error.message); $form.find('.submit').prop('disabled', false); // submit } else { // Token // token id: var token = response.id; // token , submit : $form.append($('<input type="hidden" name="stripeToken">').val(token)); // : $form.get(0).submit(); } }; Just in case: this step is described in the official documentation .
Now we can withdraw money from the client through the server. PHP code examples.
// \Stripe\Stripe::setApiKey("your_secret_key"); // token $token = $_POST['stripeToken']; // try { $charge = \Stripe\Charge::create(array( "amount" => 1000, // "currency" => "usd", "source" => $token, "description" => "Example charge" )); } catch(\Stripe\Error\Card $e) { // } This is all you need to do to transfer money from a client card to your Stripe account.
Automatic money transfers to your suppliers
Now consider the translation in a working example. Imagine that you are writing a platform that sells rare books from small publishers around the world. You need to transfer money to your suppliers, publishers, so that they send the book to the client, and take a commission of $ 10 from each sale. You do not want to bathe with monthly reports and payments, you just want to transfer money every time a client pays. Stripe it allows.
As before, a prerequisite for setting up automatic transfers is finding a supplier in one of the countries supported by Stripe.
Stripe has a great deal of Managed Accounts . With this option, we kind of create a Stripe account for our supplier, but we take care of all account management concerns, so the publisher itself will not need to register with Stripe.
First, we will receive information about the bank account of your publisher using the script Stripe.js, which is already familiar to us. As in the case of debiting money from the client’s card, we also need a Stripe token for operations with a bank account.
Stripe.bankAccount.createToken({ country: $('.country').val(), // 2- (US) currency: $('.currency').val(), // 3- (USD) routing_number: $('.routing-number').val(), // account_number: $('.account-number').val(), // account_holder_name: $('.name').val(), // ( — ) account_holder_type: $('.account-holder-type').val() // — (individual, company) }, stripeResponseHandler); This is also described in the documentation .
Remark . Keep in mind that for each country, bank data (routing_number, account_number) are filled in differently. For example, for European countries you need to get an IBAN number. It is placed in the account_number field, and routing_number is not sent at all. Also for some countries, internal account numbers are glued together in one line and written in the fields. For example, to get the correct identification number of the bank's routing_number for Canada, you need to glue the transit number and the institution number (transit number + institution number). If transit number: 02345, and institution number: 987, then routing_number will be '02345987'. Account number varies by bank. And for Germany, only an IBAN number will be needed; it is filled in the routing_number field. For example, IBAN: DE89370400440532013000 (22 characters). How to fill these fields for other countries, you can see here .
So, now we have a token bank account where we can withdraw money to suppliers. Let's create a Managed Account. Let our publishing house is in America, is a company, not an IE, and we pay it in American dollars.
\Stripe\Stripe::setApiKey("your_secret_key"); $account = Account::create([ "country" => 'US', "managed" => true, ]); if (isset($account->id)) { try { $account->external_accounts->create( ["external_account" => $token] // token ); } catch (InvalidRequest $error) { // } } It would seem that now we have a Managed Account, and you can transfer money, but no: you need to verify your account. To do this, Stripe must be provided with certain legal information about the company. What kind of information is needed and in which countries is described here .
So, for publishing in America, we need to provide:
| Title | Description |
|---|---|
| legal_entity.address.city | The city in which the company is located |
| legal_entity.address.line1 | Company address |
| legal_entity.address.postal_code | Postcode |
| legal_entity.address.state | State |
| legal_entity.business_name | Company name |
| legal_entity.business_tax_id | Tax Identification Number |
| legal_entity.dob.day | Birthday of the owner of the company |
| legal_entity.dob.month | The month of birth of the owner of the company |
| legal_entity.dob.year | Year of birth of the owner of the company |
| legal_entity.first_name | Company owner name |
| legal_entity.last_name | Name of company owner |
| legal_entity.ssn_last_4 | The last four digits of the company's social security number |
| legal_entity.type | individual / company |
| tos_acceptance.date | Date Accepted Stripe Terms of Use |
| tos_acceptance.ip | IP address from which Stripe terms of use were accepted |
Terms of use Stripe here . The person on whose behalf the Managed Account will be created must accept them.
Stripe may also require additional information. For America, this is:
| Title | Description |
|---|---|
| legal_entity.personal_id_number | Personal identification number |
| legal_entity.verification.document | Scan of identity document |
We collect the necessary information and edit the account.
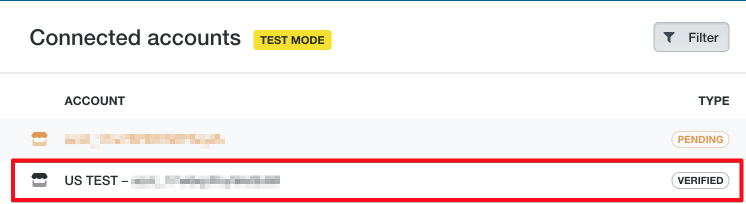
\Stripe\Stripe::setApiKey("your_secret_key"); $account = Account::retrieve($accountId); $account->legal_entity->address->city = 'New-York'; $account->legal_entity->address->state = 'New-York'; $account->legal_entity->address->postal_code = '00501'; $account->legal_entity->address->line1 = 'Some address'; $account->legal_entity->business_name = 'US TEST'; $account->legal_entity->business_tax_id = '00000001'; $account->legal_entity->dob->day = 1; $account->legal_entity->dob->month = 1; $account->legal_entity->dob->year = 1980; $account->legal_entity->first_name = 'Bob'; $account->legal_entity->last_name = 'Smith'; $account->legal_entity->type = 'company'; $account->legal_entity->ssn_last_4 = '0000'; $account->tos_acceptance->date = 1466074123; // timestamp $account->tos_acceptance->ip = 123.123.123.123; try { $account->save(); } catch (InvalidRequest $error) { // } Now the Stripe team will check everything, and we will see the Verified status in the admin panel.
https://dashboard.stripe.com/test/applications/users/overview
But this will not be enough for us. Also, the Stripe team can indicate data errors or require additional information, such as personal_id_number.
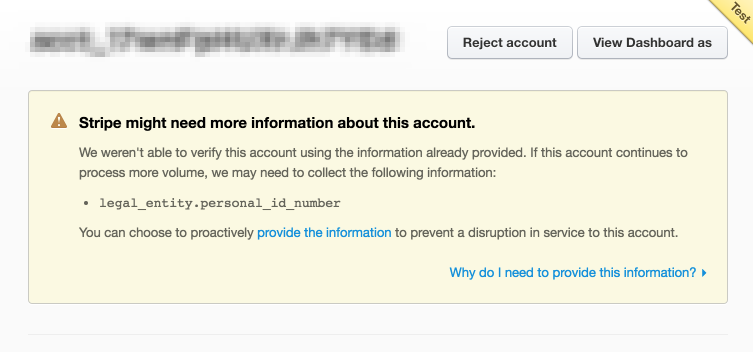
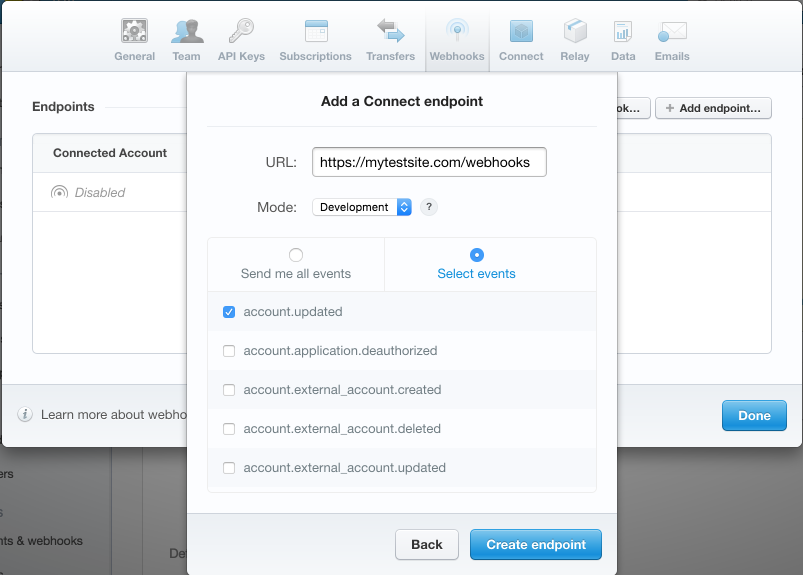
When the team checks the data, the account will be updated. This event can be configured webhook .
The required fields will be described in the account object:
$account->verification->fields_needed Stripe can also set a deadline to provide data. If there is a date, it will be in the $ account-> verification-> due_by property.
For verification verification Stripe provides a good test environment. With the help of translations from certain test cards, we can simulate different scenarios for verification of accountants. Examples of such scenarios:
- data is not filled, and we generally can not make transfers;
- Worked limit on the size of the payment. This happens if Stripe believes that the translation is too large, and the information provided is not enough for it. In this case, it disables the Managed Account;
- disable the account with the requirement to enter data to a specific date;
- loading a scan of the document confirming the identity of the account holder;
- acceptance and rejection of this scan.
How specifically to simulate these cases is described here .
Handle all situations will have in any case. And in my experience, it is better to provide Stripe with as much information as possible to avoid surprises with the disconnection of the account.
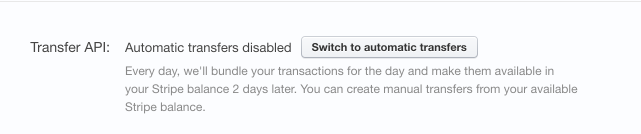
When everything is OK, and Stripe verified your Managed Account, you need to enable transfers (transfers) using the API or disable automatic transfers - this is the same thing.
https://dashboard.stripe.com/account/transfers
So, we have a verified account, transfers are included, and now we can make money transfers directly to the supplier.
Suppose we have a book. The supplier wants $ 50 for it, we want $ 10 dollars of commission for ourselves, plus we need to include the Stripe commission for translation into the price. Stripe now charges 2.9% + 30 ¢ for each transfer . We decided that we would pay the commission from our part. Then the user must pay $ 60 for the book. For our part, we will give away the $ 2.04 Stripe commission.
We get token using Stripe.js and make a payment from the server side.
$charge = Charge::create([ "amount" => 6000, // "currency" => 'USD', "source" => $token, "application_fee" => 1000, "destination" => $managedAccountId ]); The application_fee property allows you to specify how much of the transfer to leave on our account. The Stripe commission will in any case be charged only from our account, even if we make a full transfer to the supplier.
Money will not come to the bank account of the supplier immediately, they are withdrawn every seven days. Those. we transfer money to our supplier's Stripe account, and after seven days, they are transferred to the account on a linked bank account.
Additional features
In addition, Stripe allows you to save customers, add arbitrary metadata when creating a payment, to make it easier to navigate the payments made, set the description when making a payment for its more informative description, and much more. All this can be viewed in the documentation for the payments API .
I wish you the best of luck with Stripe integration! I will be glad to your comments, questions and clarifications that will help to supplement the article.
Useful links:
Countries that support Stripe
Custom HTML form to get token
Managed Accounts
Getting a token for a bank account
Required bank information by country
Required legal information for Managed Accounts by country
Stripe Terms of Use
Testing verification of an account
Webhooks
Stripe pricing
Stripe API Reference
')
Source: https://habr.com/ru/post/306338/
All Articles