A library that facilitates the development of forms on sites (v3)
Hi, Habr!
Once, a year ago, I wrote about my small library, which facilitates the development of forms on sites. Recently I released the 3rd version, which, in fact, was rewritten from scratch to become more correct and more convenient. But in my article I will not repeat the README and DEMO , but rather I will show in practice how it helps to write less code.
But before that, I would like to give some information about the new version. In it, I got rid of the malsup jquery.form dependency to send files, and I divided one large repository into several small independent repositories, while retaining, at the same time, the general all-in-one assembly:
- support for additional form events ( form-extra-events );
- HTML5 form- association-polyfill ;
- support for sending files via iframe for older browsers ( jquery-iframe-ajax );
- and, actually, the library itself ( paulzi-form ).
Additional Form Events
In the second version of the library I was faced with the problem of the need to comply with a certain order of connecting scripts. For example, previously it was impossible to include this script in front of the standard Yii2 validation script, the fact is that all the scripts that somehow have to process the submission are hung on the submit event, and in particular there is no guarantee that this event is not someone interrupts by calling
preventDefault() . Therefore, in the case of an incorrect connection order, the form was first blocked and then validated, and if there were validation errors, the form could not be resubmitted. form-extra-events solves this problem; it provides several new types of form events, one of which ensures that the form is sent and this process cannot be interrupted. In addition, events start and end of form submission are generated, which is used in all other features of the library.Prototype site
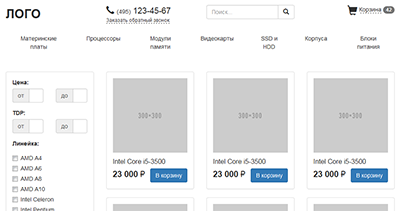
 To demonstrate the utility of the library, I sketched a prototype of a typical online store on Bootstrap:
http://paulzi.ru/paulzi-form-site/
From scripts we use only jQuery, bootstrap and paulzi-form.all.js. In this prototype, we do not use a single line of JS-code written specifically for the prototype site.
Html5 form attributes
 What can HTML5 form attributes do for you? For example, in the basket it is assumed several actions on selected items - add to favorites, send to Email, download. Of course, it would be possible to make a single action, and pass in the parameters what exactly needs to be done. But this is ugly, because it spawns the use of
 switch($action) , instead of directing it to a specific action (for example, in Yii2). And if you open a modal window, you will see that the submit button had to be made outside the form itself, however it continues to function, since the form attribute was specified to it. And most importantly, these attributes greatly help out in situations when you need to make a small form in a large form, which the HTML standard forbids.Do not send empty fields
 Now, pay attention to the filter in the catalog . If you tick "Intel Core i5" and send this form, then even if other fields are not filled, we still get a long sheet from the parameters after the transition:
?proce_from=&proce_to=&tdp_from=&tdp_from=&line[]=i5
Using the library, if you add the data-submit-empty="false" attribute to the form data-submit-empty="false" empty fields will not be sent, and the result will be a more comprehensible URL:
?line[]=i5
Block re-send
 Consider a callback order form. If you double-click the form submit button, the form will be sent to you twice, and you will receive two letters. This is wrong, so the default script blocks the ability to resubmit the form until the request is completed. An example of correct work can be seen in the form "Contact us". This behavior is regulated by setting the attribute
 data-lock="false"Dispatch Status Indication
 Sometimes, the process of submitting a form can take a long time (sending a file, processor-intensive handler, slow Internet), and if it doesn’t show that the form is being sent, the user will sooner or later think that he didn’t press the button, or something hung, and press the button again. An example of such a form is the “Write to us” form. The library provides several options, in the prototype I used the
 data-loading-text and data-loading-icon attributes, which change the text of the button and add an icon. Also, form-loading and btn-loading classes are added to the form and button, this allows you to zastilizovat state through CSS.AJAX form submission
And most importantly, it is the ability to send the form via AJAX. Indeed, in our prototype there are two forms in modal windows, it is logical when clicking on the submit button not to perform transitions between pages, but simply to close the modal window and display a message of success. And everything is very easy here - we add the
data-via="ajax" attribute, and voila, the form is sent via AJAX. And not only that, those who have ever been involved in transferring files via AJAX know that this is not so easy, because support for sending files appeared only from XMLHttpRequrest 2. For this, third-party libraries are often included, which often require writing to the server parts of special handlers, store files in a temporary folder, and then when sending the form in a separate request, take them from there. In our case, there is practically no need to think about it - everything goes as if the form was sent in the standard way. If necessary, you can easily display the percentage of data sent by hooking to the uploadprogress event.Handling AJAX Responses
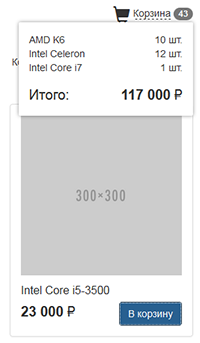
 Let's look at an example more difficult - the add to cart button on the catalog page. When you click on it, you need not just execute the query and display a message - you need to update a short list of the contents of the basket when hovering and update the counter of the amount of goods in it. This moment is also taken into account, and I tried to make the most flexible handler for AJAX-responses. Consider the answer that comes when you click on the "Add to cart" in the prototype:
 <span class="badge" data-insert-context="document" data-insert-to=".cart-block .badge" data-insert-mode="replaceWith">43</span> <div class="alert alert-success alert-dismissible" role="alert" data-insert-context="document" data-insert-to=".alert-fixed"> <button type="button" class="close" data-dismiss="alert"><span aria-hidden="true">×</span></button> ! </div> <div class="cart-block-hover" data-insert-context="document" data-insert-to=".cart-block-hover" data-insert-mode="replaceWith"> <div class="row"> <div class="col-xs-6 text-left">AMD K6</div> <div class="col-xs-6">10 .</div> </div> <div class="row"> <div class="col-xs-6 text-left">Intel Celeron</div> <div class="col-xs-6">12 .</div> </div> <div class="row"> <div class="col-xs-6 text-left">Intel Core i7</div> <div class="col-xs-6">1 .</div> </div> <div class="row cart-block-total"> <div class="col-xs-6 text-left">:</div> <div class="col-xs-6"><span class="price"><span>117 000</span> ₽</span></div> </div> </div> As you can see, the response consists of three html elements with data-insert-to , data-insert-context , data-insert-mode attributes. These attributes define how and where to insert each element, for example, for the first span.badge data-insert-context="document" data-insert-to=".cart-block .badge" data-insert-mode="replaceWith" means that this element needs to replace the element .cart-block .badge and the search zone with this selector - the whole document. All this allows you to carry out the above steps without a single line of code.
Scenarios
 Let's return to the cart page . As already discussed above, there are several buttons for it that imply different actions. For example, when you click on "arrange" it is logical to send the form with a standard mechanism, then redirect to the page with information about the order. But when you click on "Add to favorites", on the contrary, it is better not to leave the page, but simply send the form via AJAX and display a message about success or error. For this, scenarios are implemented - for any button, you can specify a
 data-via attribute that indicates how to send the form when you click on it.Settings
If you do not like something, or there are any conflicts, you can change a lot in the library through settings . For example, do you need to block re-sending all forms by default. All attribute names can also be changed.
Conclusion
As a result, by connecting a 10 kb library, you get the most important thing - you need to write less code for various small forms (or even not to write at all), and in the appendix you get some nice features, such as additional form events, iframe transport, AJAX -sending files, etc.
')
Source: https://habr.com/ru/post/306278/
All Articles