“Is this your backup so tired?” *
* And what is your backup so stale? (Odessa)

Even the most expensive systems performing periodic backups (for example, every night) have one significant limitation: everything that was done on the computer since the last backup is not protected and will be irretrievably lost if the computer goes down.
')
Suppose, for example, yesterday the first part of “Dead Souls” was written, and a backup copy was made at night. And today the second part was written, and in an emotional outburst it was destroyed even before the time came for the next backup.
To deal with such situations is called the technology of continuous backup (Continuous Data Protection, CDP). Everything that is written to disk is simultaneously sent to the backup.
Let's take a closer look at how this is done in the Arcserve RHA product (Replication and High Availability) using real examples in Windows and Linux environments.
Content
Introduction
1. Architecture
2. Software installation
2.1. Installation of control components
2.2. Installing Managed Components on Windows
2.3. Installing Managed Components on Linux
3. Data Recovery Experiments
3.1. Restore files to a specific point in time
3.2. Restore MS SQL database to a specific point in time
3.3 Restoring MySQL database to Linux at a given point in time
4. Conclusion and advertising
Suppose we have two servers.
Battle server (Master) contains constantly updated data. We follow the changes and keep a statement (journal) of changes in the form of "was -> became", for example:
The change log is constantly sent to the backup server (Replica) and applied to its files. Thus, the files of the combat and backup servers become identical.
Some details:

In order for the scheme described above to work, we will need to install on the Master and Replica machines a component called the Engine, which takes over the main job of tracking changes in files and replicating data from one machine to another.
In order to configure the operation of these two engines, we will install the Control Service on another machine (Manager). This machine is required only for configuration, receiving reports and running individual actions on managed machines. It should not be permanently on.
Finally, we will get the user interface by connecting the web browser with the management service and downloading a windows application from there.
Download Arcserve RHA ( iso or zip ) from the developer’s site (as indicated on arcserve.zendesk.com/hc/en-us/articles/205009209-RHA-R16-5-SP5-ARCSERVE-RHA-16-5-SP5 ) :
The product works for 30 days without license keys.
Let's start with the fact that we install the Control Service on the controlling machine (Manager).
It requires .NET Framework 3.5.
Now, run Setup.exe from the Arcserve RHA distribution and select “Install Components”:
On the next screen, select “Install Arcserve RHA Control Service”. (Feature: the words “Install Arcserve RHA ...” cannot be clicked, but “… Control Service” is obtained):
Then click through several screens until we get to the SSL configuration. For testing, we will not include SSL, but during work application you can add your certificate here or use a self-signed:
We will start the service on behalf of the Local System:
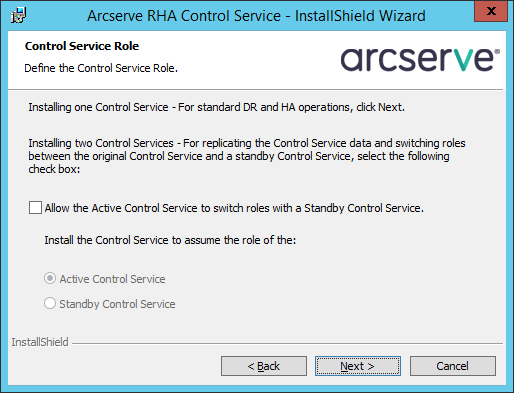
The next screen concerns the possibility of having two control machines for increased fault tolerance. For testing purposes, we limit ourselves to one:
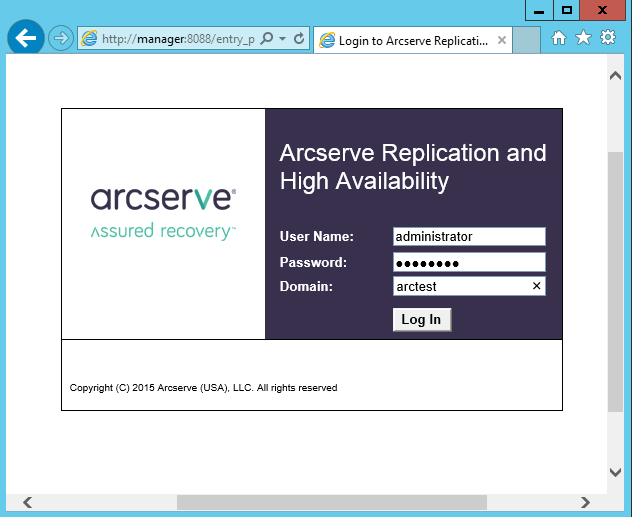
After the installation is completed, connect the Internet browser with the Manager machine on port 8088. You can login under a user who has local administrator rights on the Manager machine:
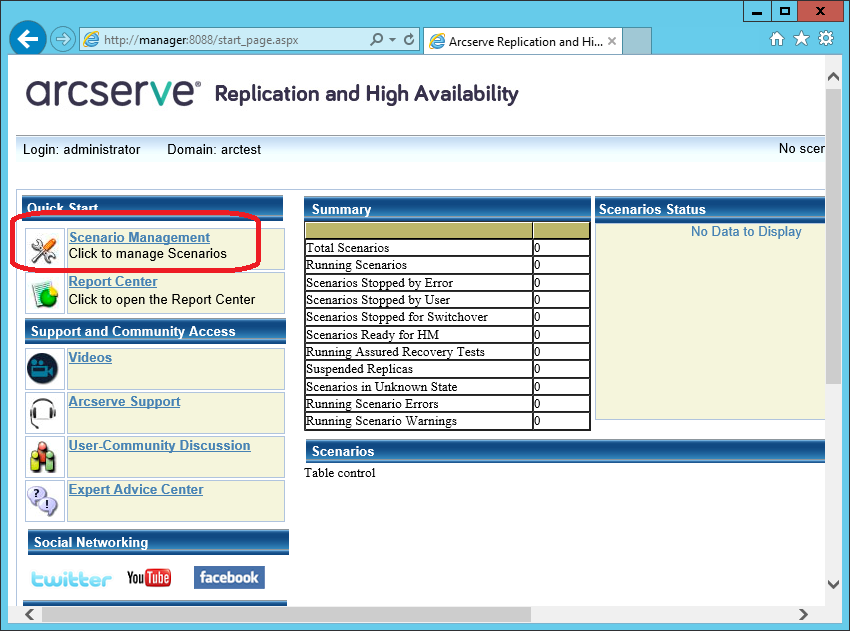
We will get access to the page on which statistics of work of various machines will be published. But for real management, we need to download from this site and run the windows-based utility “Arcserve RHA Manager”. It can be run no longer on the server, but on a workstation (for example, Windows 7 or 10). To download, click on the link “Scenario Management”:
After the security warnings, the “Arcserve RHA Manager” should start:
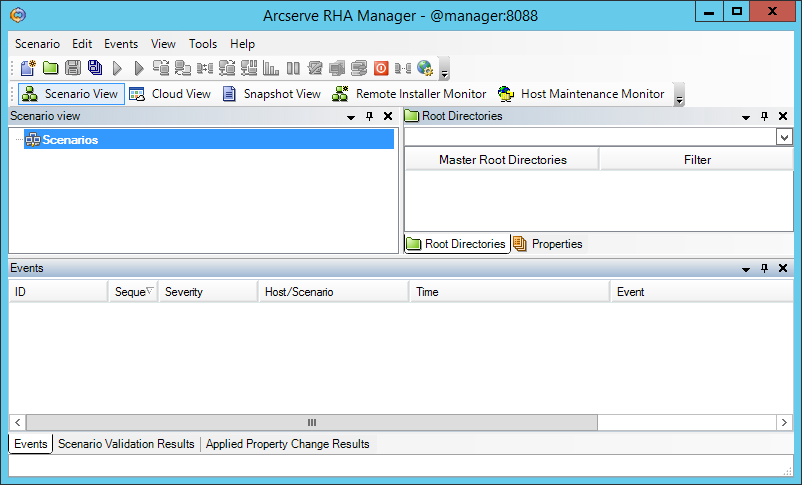
This program will continue to run only from a web page.
On the machines Master and Replica install the working components - Engine.
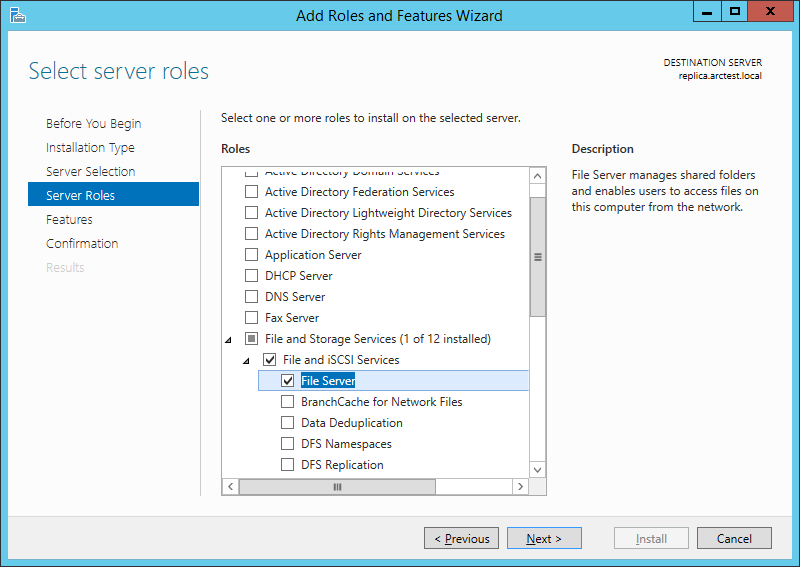
You can install them locally from the distribution kit, or you can remotely. Remote installation on the server requires that the server has the “File Server” role installed:
If the “File Server” role is installed on the master and replica machines, then on the Manager machine we can refer to “\\ master \ C $” and “\\ replica \ C $”.
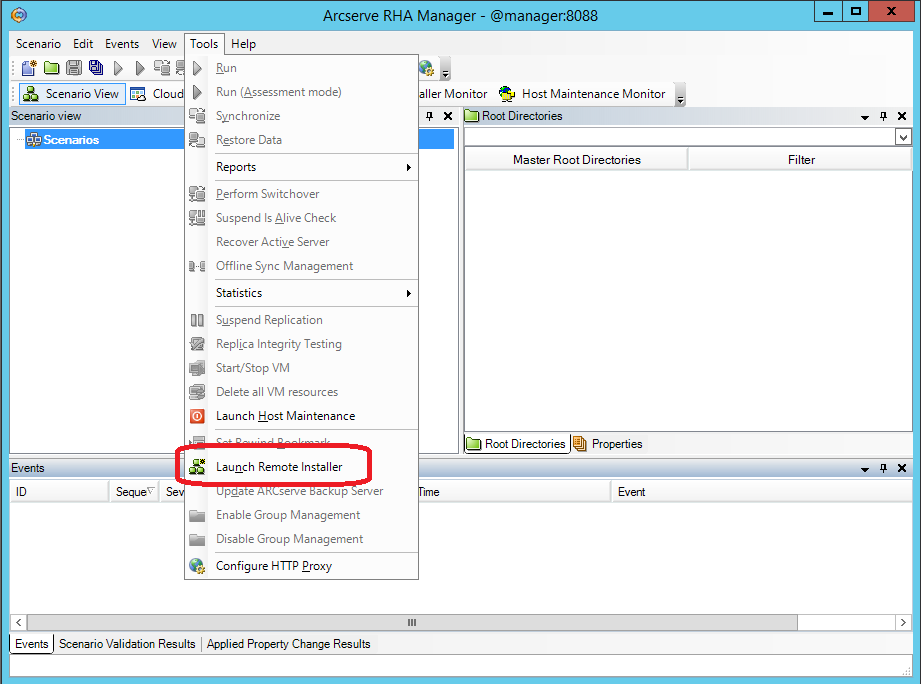
From the Arcserve RHA Manager utility, which was discussed in the previous section, we start the remote installation using the “Tools -> Launch Remote Installer” menu.
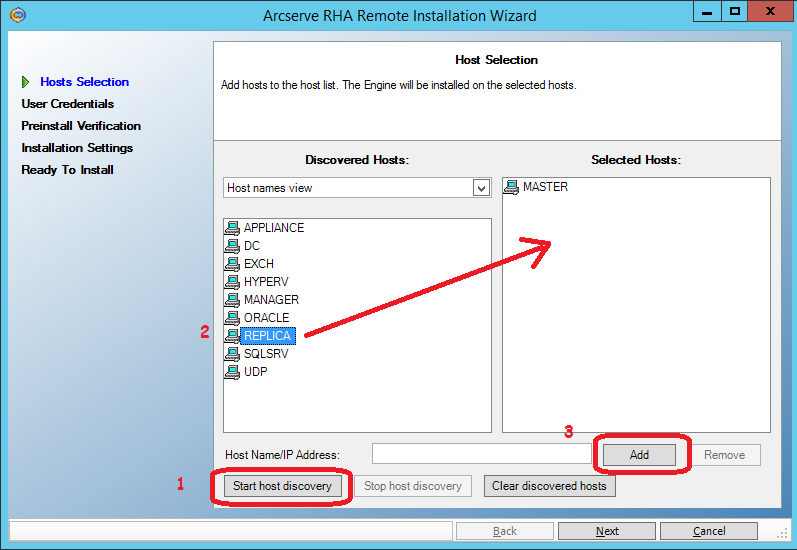
On the next screen, click the “Start host discovery” button (1) and get a list of machines from the Active Directory cache.
Select the master and replica machines and add them to the list of Engine installation candidates using the “Add” button (3)
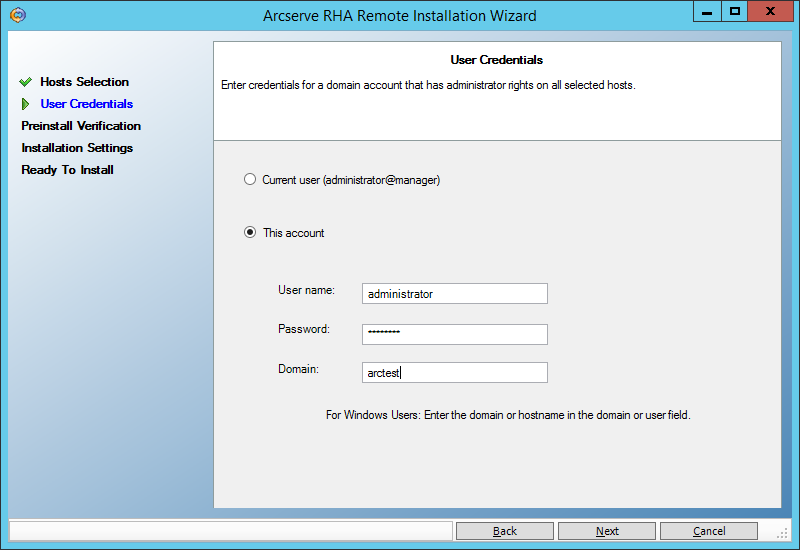
On the next screen, enter the user (domain administrator) under which the remote installation will be performed:
Next, we make sure that both servers (master and replica) allow you to perform a remote installation and are marked with checkmarks:
On the next screen, enter the user under which the engine service will run.
For the purposes of continuous backup, a user with local administrator rights (Local System) is sufficient. But if we want to use the High Availability functionality, when the backup machine will be able to pretend to be the failed primary machine, then we need to start the service under the domain administrator. The following example from section () requires exactly such powers:
Click on Next -> Install -> Yes and wait for the installation to complete:
You can install the Engine component on the server by digging into the UNIX_Linux directory on the distribution and finding the agent you need in the tarball. In particular, for installation on CentOS 6.5 I used the arcserverha_rhel6.tgz archive
If 32-bit libraries are not installed on the machine, you need to install them. For example, on CentOS 6.5, I had to run:
(after updating their 64-bit versions: “yum install glibc libstdc ++ pam”)
then run ./install.sh and agree with all the hints.
In the firewall, open port 25000 (TCP)
Create the “C: \ Ax-left-wife \” directory on the Master machine and put the files there:
Tanya.jpg
Lena.jpg
Gioconda.jpg
Create a replication script for this directory on the Replica machine. In the “Arcserve RHA Manager” menu, select Scenario -> New
The first screen of the script creation wizard is left unchanged:
On the second screen, we also do not change anything - the file replication script (File Server) should be selected there:

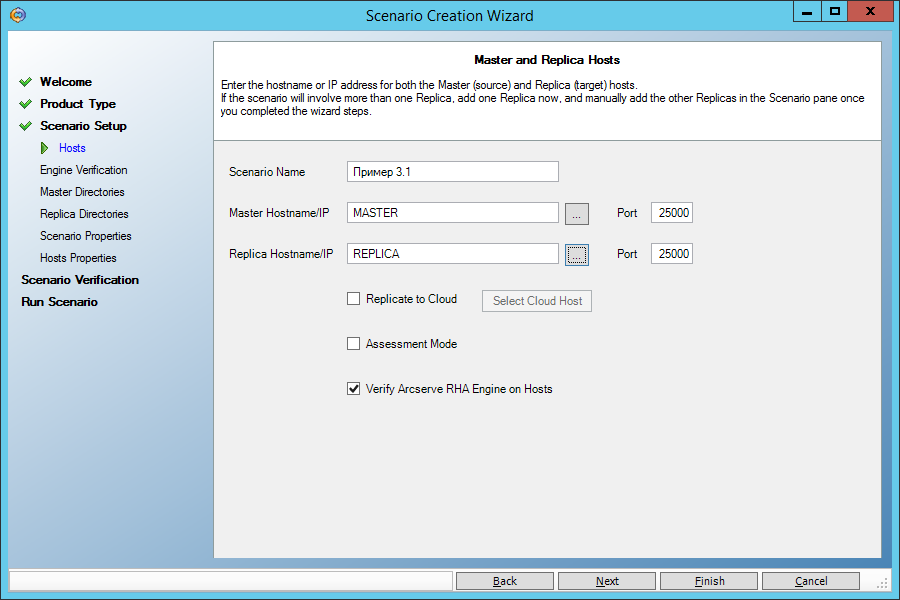
Let's select the Master server as the main machine and Replica as the backup machine:
On the next screen we see confirmation that the Engine service is installed on both machines. If we have not installed it before, we can do it remotely from here.
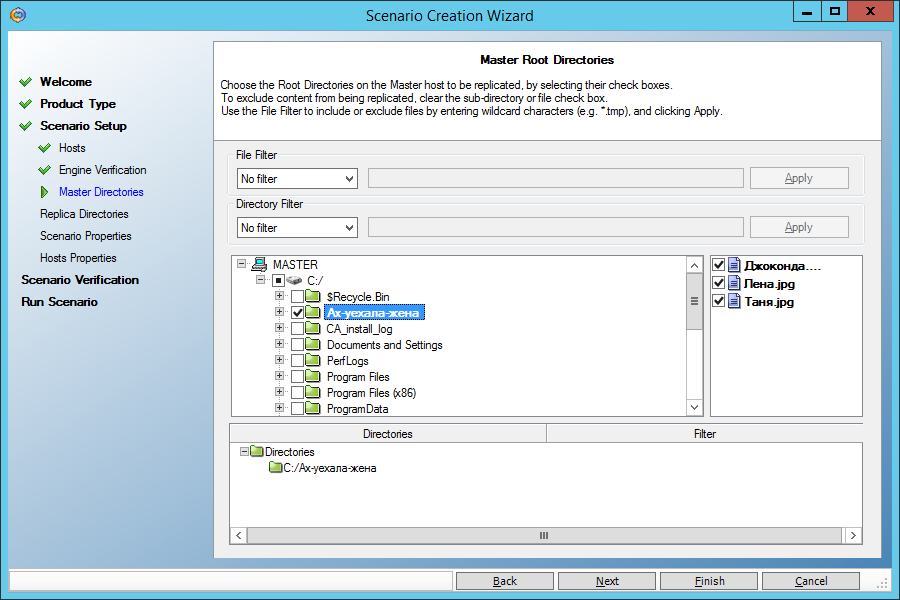
On the next screen, select the source directory “C: \ Ax-left-wife \” on the Master:
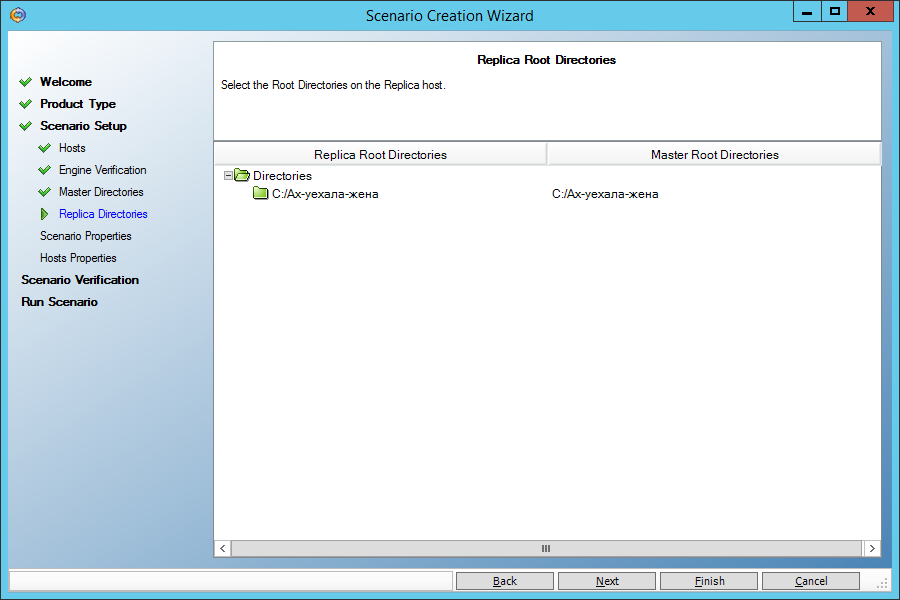
On the next screen, we will be asked to replicate this directory to a directory with the same name on the Replica machine. We agree:
On the next screen, do not change anything:
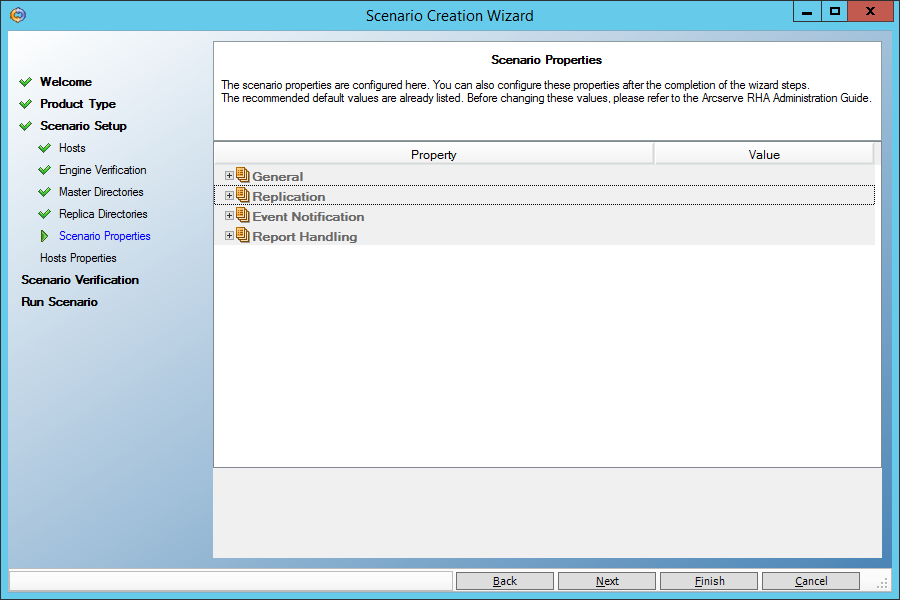
And here we need to set the “Data Rewind” parameter to “On” in order to be able to restore data to an arbitrary point in time in the past:

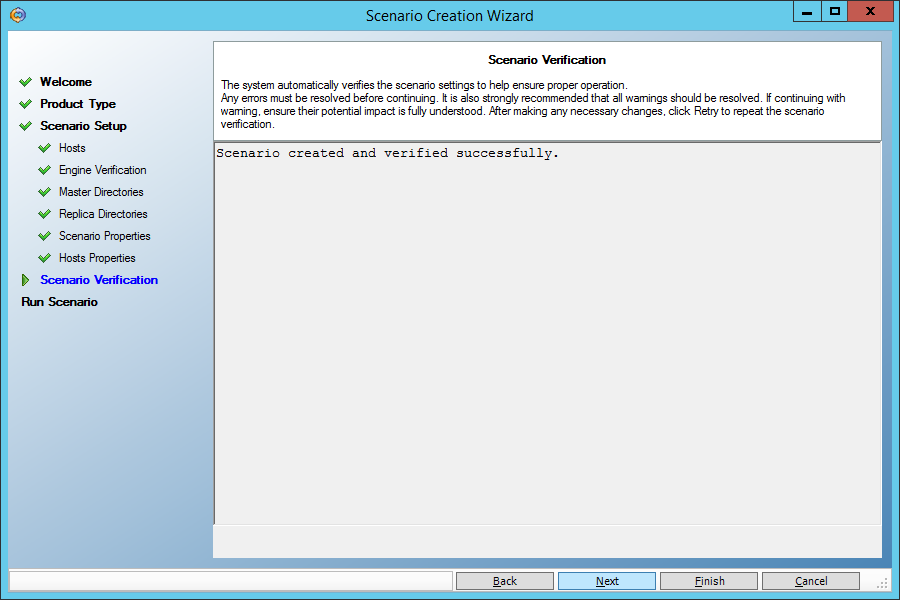
Finally, we will be told that the script contains no errors:
Run the script by clicking the “Run Now” button:

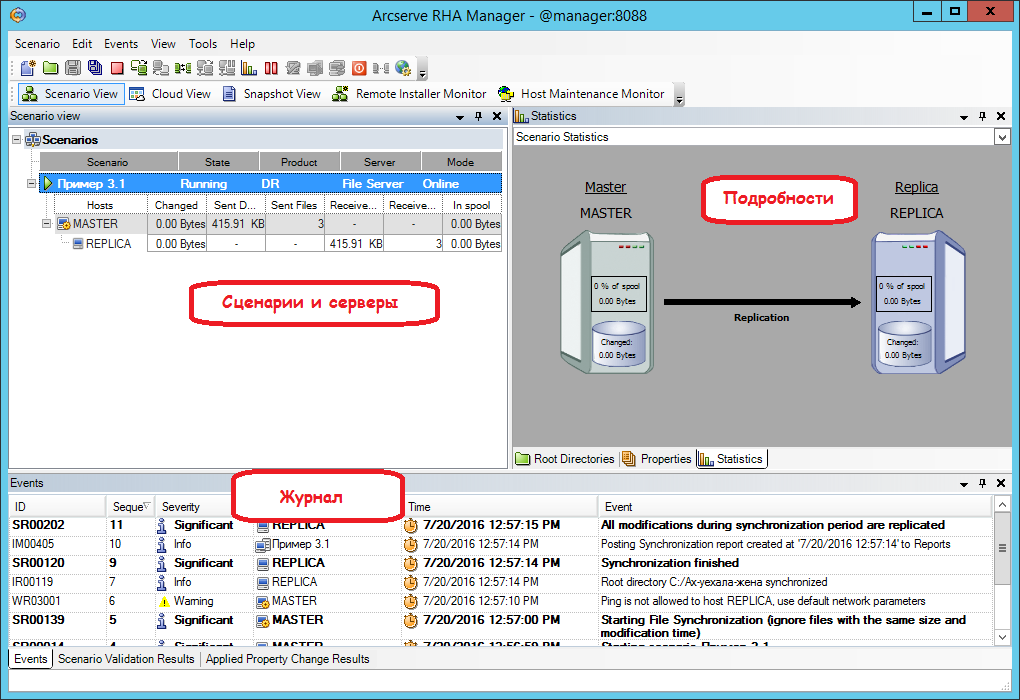
On the main screen, we’ll see how the script works. The specified directory is quickly synchronized (it will become the same on the main and backup machines), and now any change in the directory on the Master machine will lead to a similar change in its copy on the Replica machine.
Perform three steps on the Master machine:
1. Modify the Gioconda file.jpg

2. Erase the file Tanya.jpg
3. Add the file Masha.jpg
Make sure that the same thing happened with the Replica machine.
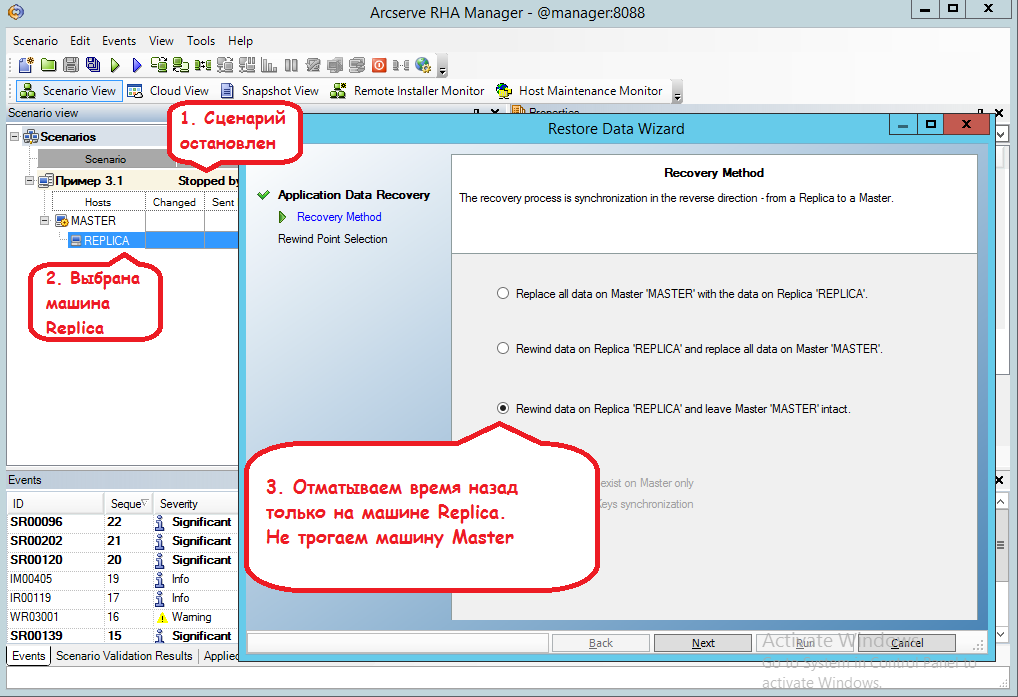
Now we would like to return to Gioconda the old look. To do this, rewind time back on the Replica machine using the Data Recovery tool.
First we need to stop the script (menu Tools -> Stop)
Then click the Replica machine and open the Tools -> Data Recovery menu:
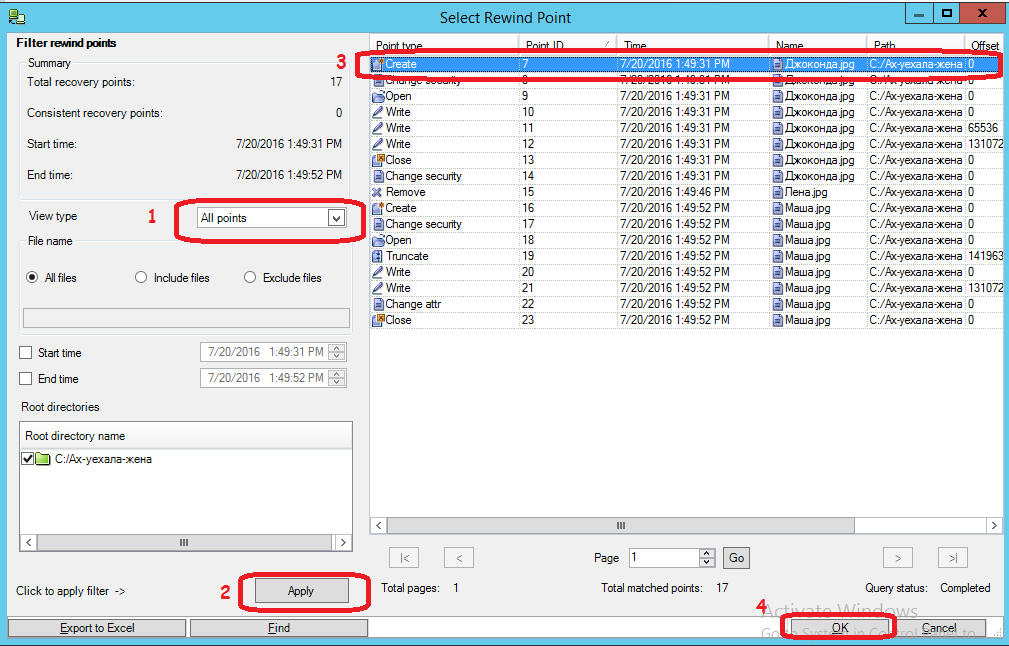
Clicking on the button “Select Recovery Point” in the next window, we get into a window where you need:
(1) Set to view all time points that can be rolled back in time.
(2) Click the Apply button.
(3) Select the very first point when Gioconda was not damaged yet
(4) Click on the “OK” button
Then click the “Run” button:
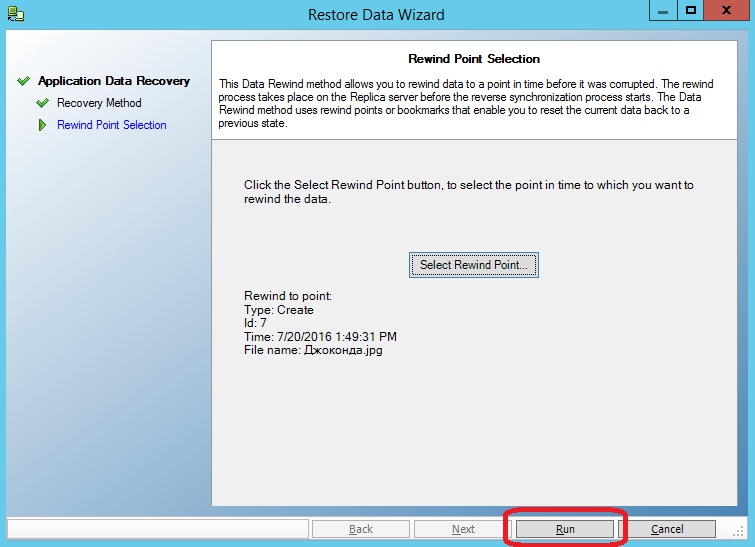
Check what happened to the files on the Replica machine.
- Dzhokonda.jpg back to its initial state
- Masha.jpg disappeared
- Lena.jpg appeared
In order not to lose Masha.jpg, we did not recover the data on both machines. Now it is enough to rewrite the “Gioconda.jpg” file to the Master machine, and we will again get the uncorrupted file into operation without affecting the rest.
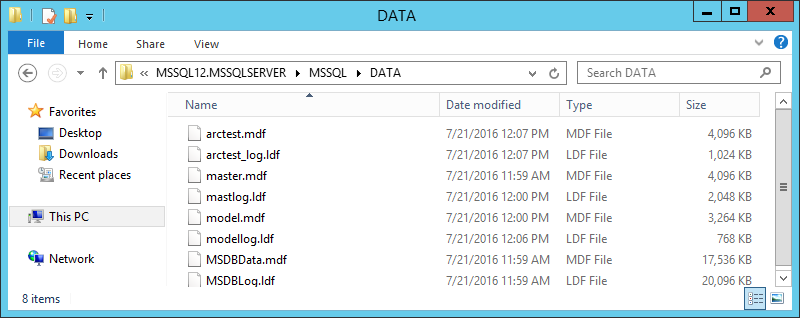
Suppose that MS SQL is installed on the Master machine. You can not install MS SQL on a Replica machine, then it will only serve as a repository of a copy of the DATA directory:
The MS SQL replication script is similar to the file replication script, but three things are added that make life easier for us:
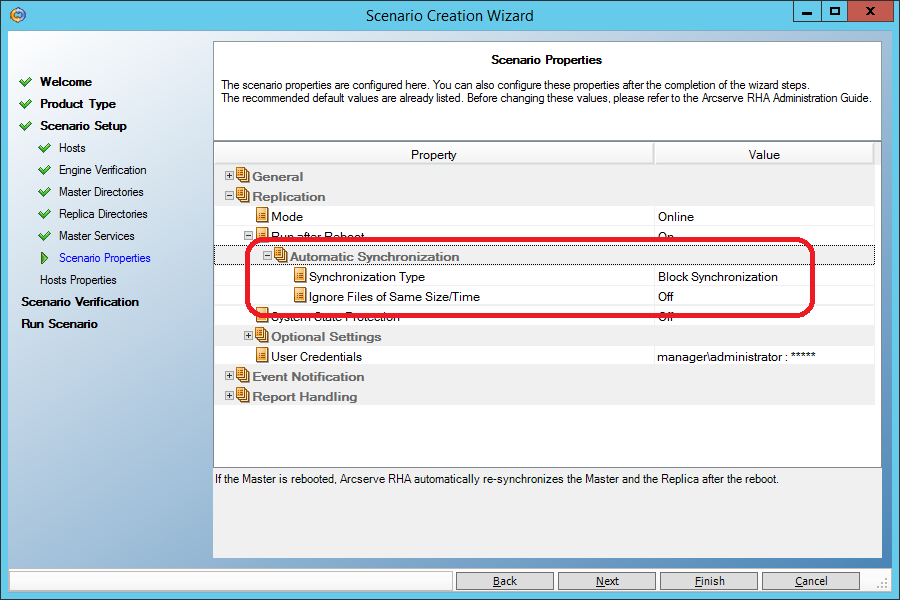
1. Select the correct method of initial synchronization - block. Before you start replication, the system must verify that the data on the two machines are identical and synchronize what is different.
For the “File Server” type scenario, a simplified initial synchronization is applied by default, in which files are considered identical if their size and modification time coincide. Such an assumption gives a good saving of initial synchronization time on file servers, but it is completely unacceptable for databases, so the script for MS SQL compares one after another all the data blocks that make up the files.
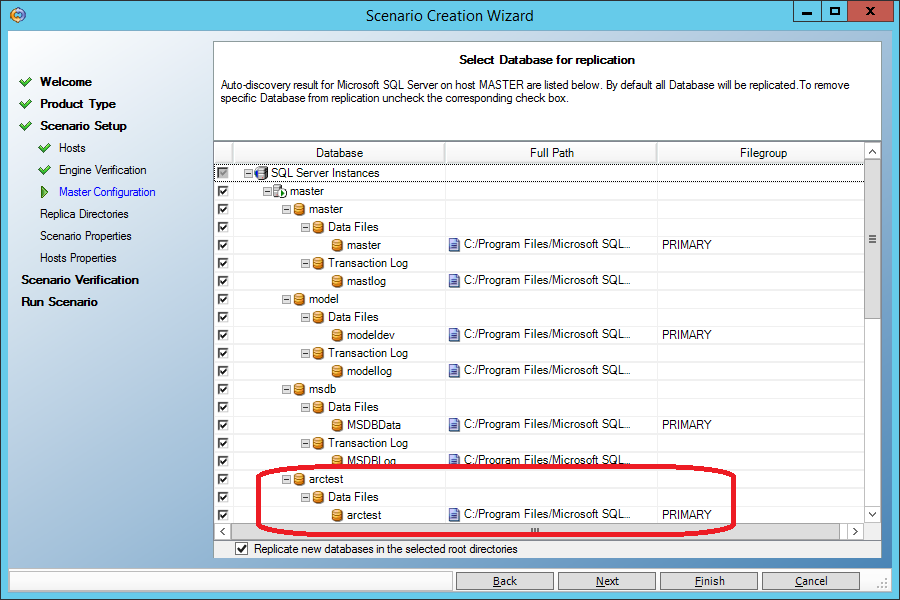
2. we do not have to explicitly indicate where the database files are located; this information will automatically pull up:
2. when restoring data to the main machine (Master), MS SQL services will be automatically extinguished and transferred to manual start mode. After recovery, everything will return to its place:

Suppose that someone forgot to write “where” in the “update” command:
(whoever did this himself will understand the depth of the fall).
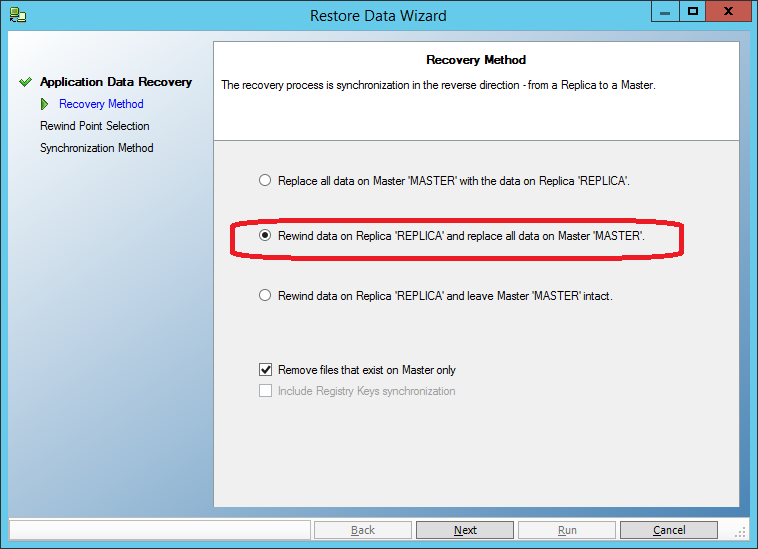
Just as in the previous case, we stop the replication script, run “Tools-> Data Recovery”, but choose recovery not only for the backup machine, but also for the main one:
It remains only to choose a point in time preceding the moment of data corruption, and carry out the restoration:

On two co-master and co-replica machines, CentOS 6.5 and MySQL are installed (in the same directories).
Strictly speaking, you can not install MySQL on the backup machine (co-replica), but we will try to go a little further and pick up the replicated data on the backup MySQL server.
On the co-master machine, the MySQL service is running, on the co-replica machine it is turned off.
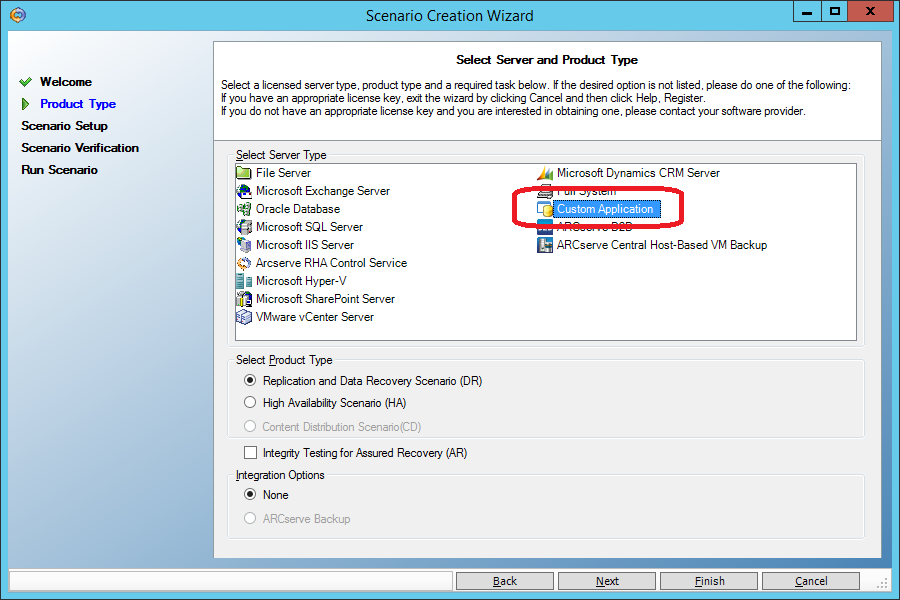
Create a new “Custom Application” script.
Unlike the “File Server” script (Section 3.1), the “Custom Application” script has a block initial sync by default. I repeat once again: for the “File Server” type scenario, a simplified initial synchronization is applied by default, in which files are considered identical if their size and modification time coincide. Such an assumption gives a good saving of initial synchronization time on file servers, but it is completely unacceptable for databases, therefore the “File Server” type script is unacceptable for MySQL replication.
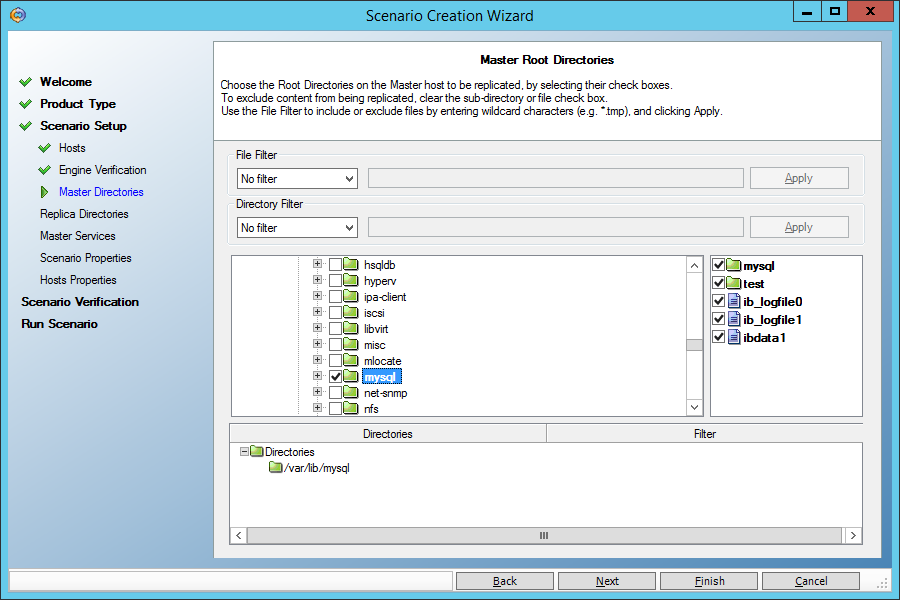
On the screen where the directories for replication are set, we set the directory with MySQL data (var / lib / mysql / in my case). Just make sure that it does not have a mysql.sock socket file. If there is, specify another place in the my.cnf configuration file .
Do not forget, as in all previous scenarios, to allow rollback to a point in time in the past during recovery:

On the co-master machine, look at the Table_1 table:
And spoil it by making the last name in all notes the same:
Now let's get everything back, using the restore function for a given point in time. As before, stop the replication script and restore the data on both machines. But first stop the mysqld service:
Choose a point in time when the base has not yet been corrupted:
After that, we will start the MySQL service on the master machine and make sure that the data is restored.
And now - a surprise! Let's start the MySQL service on the co-replica machine and get a working base on the backup machine. We came close to the enhanced functionality of the Arcserve RHA when, instead of a lost system, a backup system comes in with actual data.
Today we have raised the MySQL backup service manually. But the Arcserve RHA product is able to independently start a backup system so that it looks like it has failed. For example, run the necessary services, change the DNS records, IP address, even the NetBIOS name of the machine. This can be done in scenarios like “High Availfbility”, but this is a topic for a separate article.
In this article, we looked only at the basic capabilities of the Arcserve RHA product, aimed at recovering data at a given point in time in the past. That is, only half of the name “Replication and High Availability” was decoded. In the next article, you will see how the second part of the name is implemented - High Availability. We will see how a failed machine (physical or virtual) will be replaced by a backup machine containing an up-to-date copy of the data.
[Advertising] Currently, until the end of September 2016, you can get an Arcserve RHA product for free by purchasing an Arcserve UDP Premium Plus product at a price of Arcserve UDP Premium.
You can learn more from Arcserve partners .
Even the most expensive systems performing periodic backups (for example, every night) have one significant limitation: everything that was done on the computer since the last backup is not protected and will be irretrievably lost if the computer goes down.
')
Suppose, for example, yesterday the first part of “Dead Souls” was written, and a backup copy was made at night. And today the second part was written, and in an emotional outburst it was destroyed even before the time came for the next backup.
To deal with such situations is called the technology of continuous backup (Continuous Data Protection, CDP). Everything that is written to disk is simultaneously sent to the backup.
Let's take a closer look at how this is done in the Arcserve RHA product (Replication and High Availability) using real examples in Windows and Linux environments.
Content
Introduction
1. Architecture
2. Software installation
2.1. Installation of control components
2.2. Installing Managed Components on Windows
2.3. Installing Managed Components on Linux
3. Data Recovery Experiments
3.1. Restore files to a specific point in time
3.2. Restore MS SQL database to a specific point in time
3.3 Restoring MySQL database to Linux at a given point in time
4. Conclusion and advertising
Introduction
Suppose we have two servers.
Battle server (Master) contains constantly updated data. We follow the changes and keep a statement (journal) of changes in the form of "was -> became", for example:
| Time | The contents of the file "wash" | Change log |
|---|---|---|
| 10:30:51 | MOM'S SOAP RAMA | |
| 10:30:52 | MOM SOAP PAP | File “wash”, offset 10, “RAM” -> “PAP” |
The change log is constantly sent to the backup server (Replica) and applied to its files. Thus, the files of the combat and backup servers become identical.
Some details:
- Changes are tracked at the level of bytes, that is, when changing one byte, the log will contain information only about this byte, and not about the entire data block;
- The change log is sent over the usual IP network, that is, it is possible to spread the combat and standby servers over considerable distances, including to different cities;
- When the connection is broken, the data is accumulated in the buffer and, as soon as the connection is restored, will be transferred and applied to the backup server;
- The change history (in a given amount, for example, the last 500 megabytes) is stored on the backup machine and can be applied in reverse order, returning the contents of the files to a state at a certain point in time.
1. Architecture
In order for the scheme described above to work, we will need to install on the Master and Replica machines a component called the Engine, which takes over the main job of tracking changes in files and replicating data from one machine to another.
In order to configure the operation of these two engines, we will install the Control Service on another machine (Manager). This machine is required only for configuration, receiving reports and running individual actions on managed machines. It should not be permanently on.
Finally, we will get the user interface by connecting the web browser with the management service and downloading a windows application from there.
2. Software installation
Download Arcserve RHA ( iso or zip ) from the developer’s site (as indicated on arcserve.zendesk.com/hc/en-us/articles/205009209-RHA-R16-5-SP5-ARCSERVE-RHA-16-5-SP5 ) :
The product works for 30 days without license keys.
2.1. Installation of control components
Let's start with the fact that we install the Control Service on the controlling machine (Manager).
It requires .NET Framework 3.5.
In Windows 2012R2, the .NET Framework 3.5 installs as follows.
In Server Manager, select Manage -> Add Roles and Features. Check the “.NET Framework 3.5 Features” box.
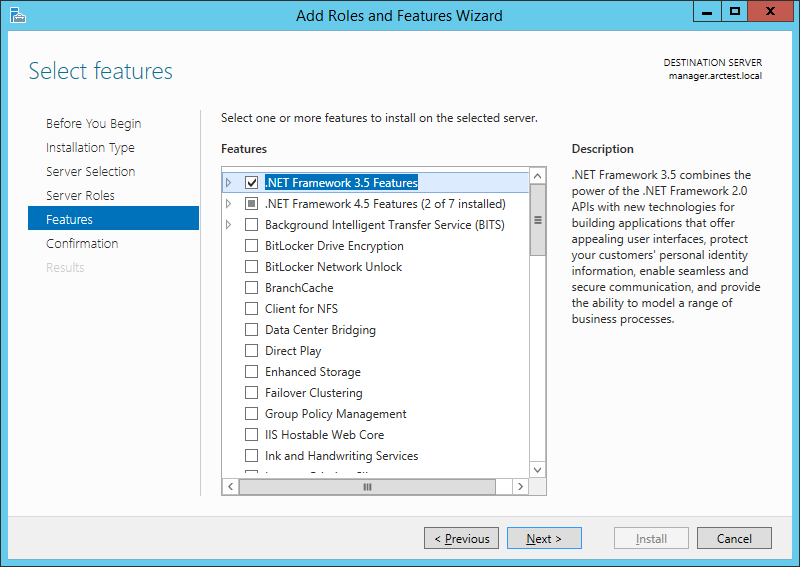
Important! You need to explicitly indicate where the component is located on the Windows distribution. To do this, on the next screen, click “Specify an alternate source path”:
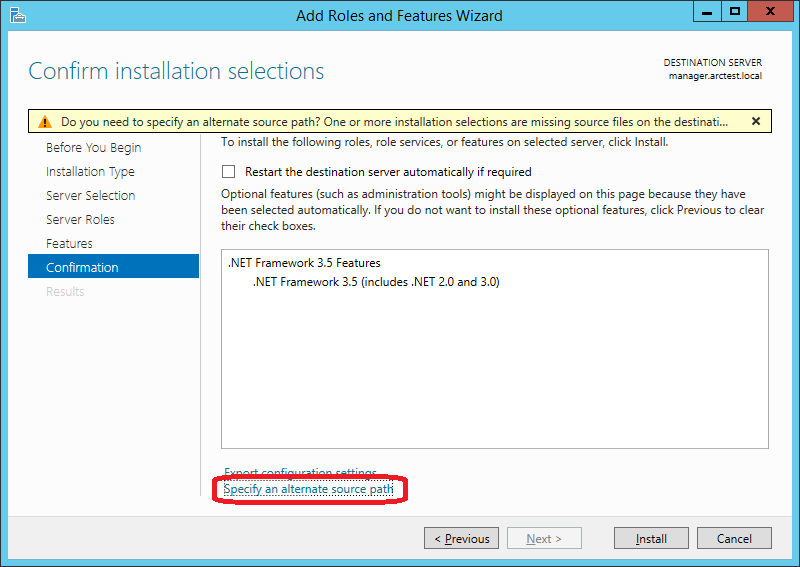
In my case, the path looks like this (D: - DVD with Windows distribution):
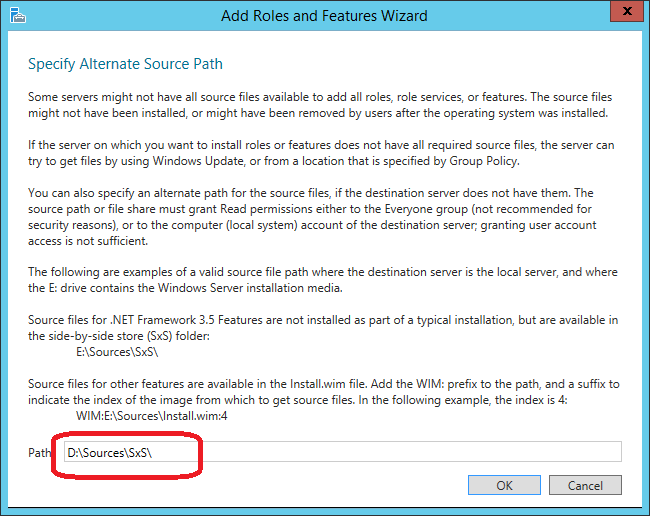
Important! You need to explicitly indicate where the component is located on the Windows distribution. To do this, on the next screen, click “Specify an alternate source path”:
In my case, the path looks like this (D: - DVD with Windows distribution):
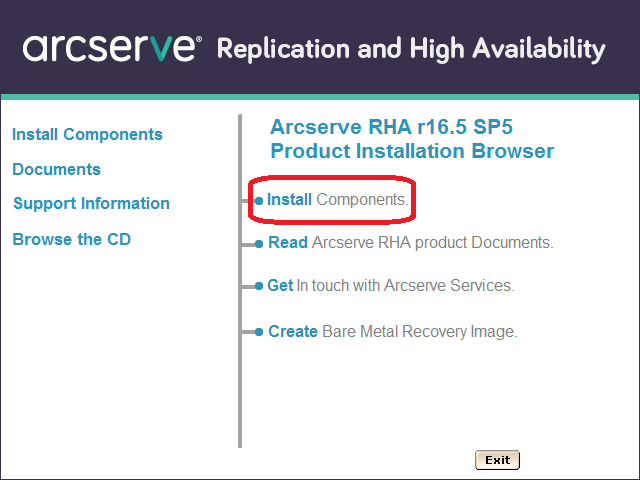
Now, run Setup.exe from the Arcserve RHA distribution and select “Install Components”:
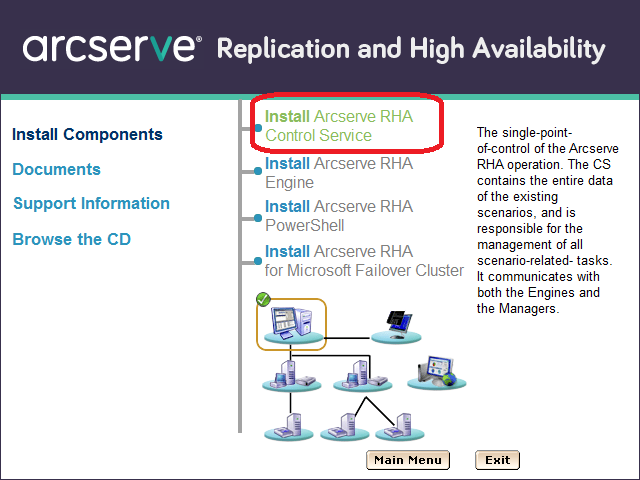
On the next screen, select “Install Arcserve RHA Control Service”. (Feature: the words “Install Arcserve RHA ...” cannot be clicked, but “… Control Service” is obtained):
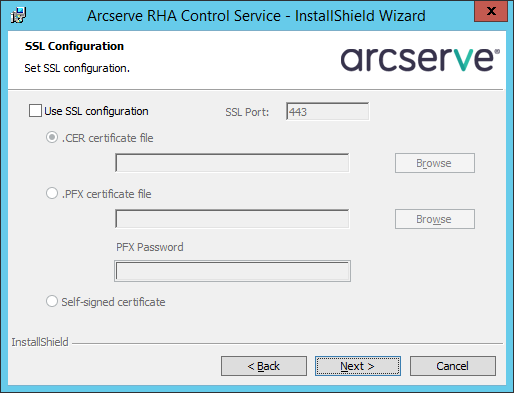
Then click through several screens until we get to the SSL configuration. For testing, we will not include SSL, but during work application you can add your certificate here or use a self-signed:
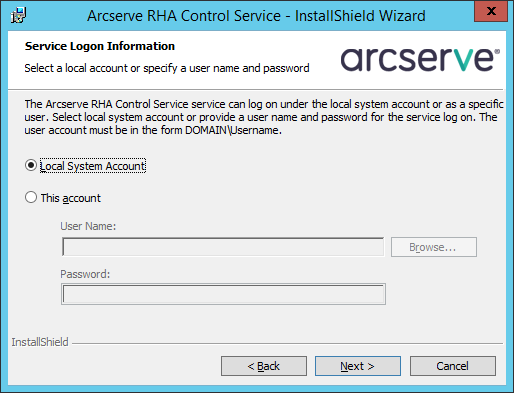
We will start the service on behalf of the Local System:
The next screen concerns the possibility of having two control machines for increased fault tolerance. For testing purposes, we limit ourselves to one:
After the installation is completed, connect the Internet browser with the Manager machine on port 8088. You can login under a user who has local administrator rights on the Manager machine:
We will get access to the page on which statistics of work of various machines will be published. But for real management, we need to download from this site and run the windows-based utility “Arcserve RHA Manager”. It can be run no longer on the server, but on a workstation (for example, Windows 7 or 10). To download, click on the link “Scenario Management”:
After the security warnings, the “Arcserve RHA Manager” should start:
This program will continue to run only from a web page.
2.2. Installing Managed Components on Windows
On the machines Master and Replica install the working components - Engine.
You can install them locally from the distribution kit, or you can remotely. Remote installation on the server requires that the server has the “File Server” role installed:
If the “File Server” role is installed on the master and replica machines, then on the Manager machine we can refer to “\\ master \ C $” and “\\ replica \ C $”.
From the Arcserve RHA Manager utility, which was discussed in the previous section, we start the remote installation using the “Tools -> Launch Remote Installer” menu.
On the next screen, click the “Start host discovery” button (1) and get a list of machines from the Active Directory cache.
Select the master and replica machines and add them to the list of Engine installation candidates using the “Add” button (3)
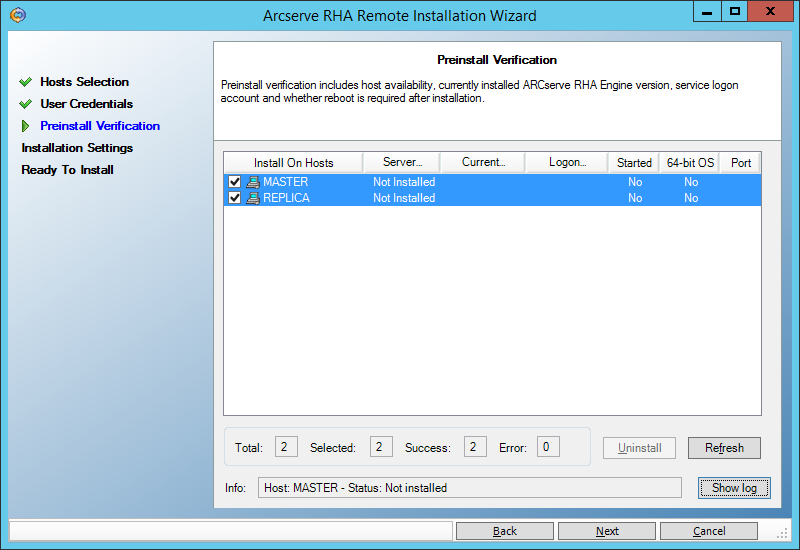
On the next screen, enter the user (domain administrator) under which the remote installation will be performed:
Next, we make sure that both servers (master and replica) allow you to perform a remote installation and are marked with checkmarks:
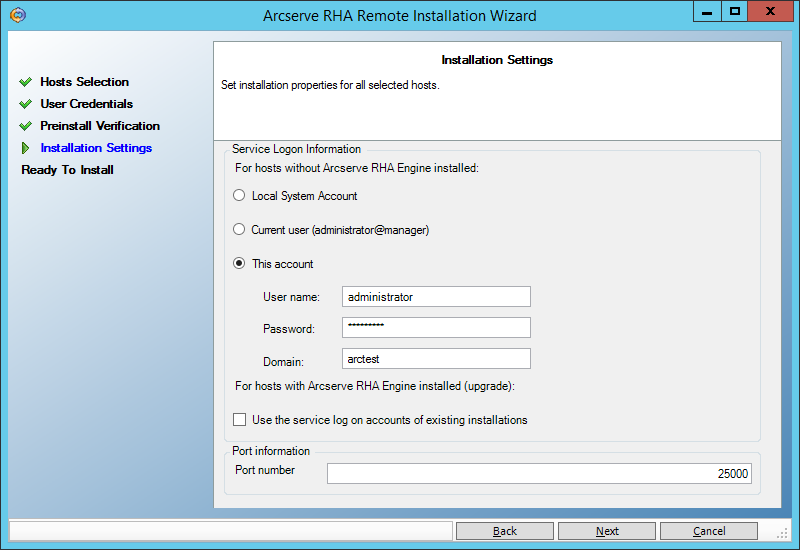
On the next screen, enter the user under which the engine service will run.
For the purposes of continuous backup, a user with local administrator rights (Local System) is sufficient. But if we want to use the High Availability functionality, when the backup machine will be able to pretend to be the failed primary machine, then we need to start the service under the domain administrator. The following example from section () requires exactly such powers:
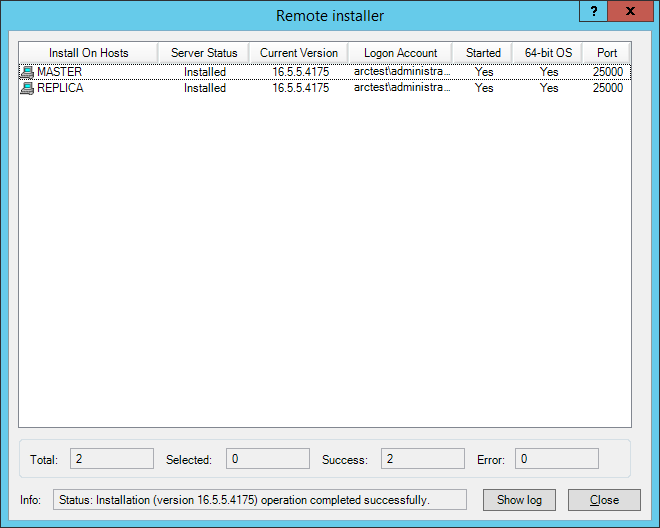
Click on Next -> Install -> Yes and wait for the installation to complete:
2.3. Installing Managed Components on Linux
You can install the Engine component on the server by digging into the UNIX_Linux directory on the distribution and finding the agent you need in the tarball. In particular, for installation on CentOS 6.5 I used the arcserverha_rhel6.tgz archive
If 32-bit libraries are not installed on the machine, you need to install them. For example, on CentOS 6.5, I had to run:
yum install glibc.i686 libstdc ++. i686 pam.i686
(after updating their 64-bit versions: “yum install glibc libstdc ++ pam”)
then run ./install.sh and agree with all the hints.
In the firewall, open port 25000 (TCP)
3. Data Recovery Experiments
3.1. Restore files to a specific point in time
Create the “C: \ Ax-left-wife \” directory on the Master machine and put the files there:
Tanya.jpg
Lena.jpg
Gioconda.jpg
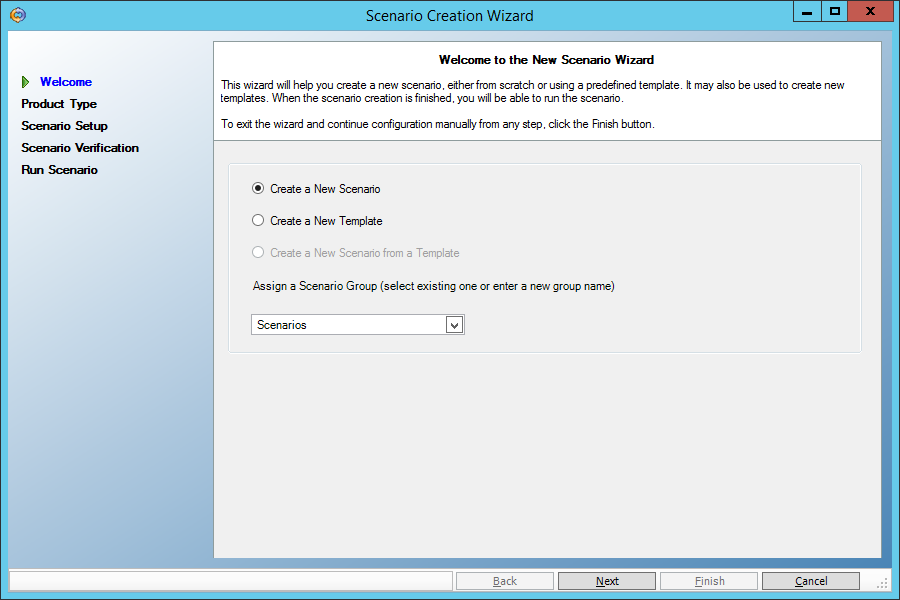
Create a replication script for this directory on the Replica machine. In the “Arcserve RHA Manager” menu, select Scenario -> New
The first screen of the script creation wizard is left unchanged:
On the second screen, we also do not change anything - the file replication script (File Server) should be selected there:
Let's select the Master server as the main machine and Replica as the backup machine:
On the next screen we see confirmation that the Engine service is installed on both machines. If we have not installed it before, we can do it remotely from here.
On the next screen, select the source directory “C: \ Ax-left-wife \” on the Master:
On the next screen, we will be asked to replicate this directory to a directory with the same name on the Replica machine. We agree:
On the next screen, do not change anything:
And here we need to set the “Data Rewind” parameter to “On” in order to be able to restore data to an arbitrary point in time in the past:
Finally, we will be told that the script contains no errors:
Run the script by clicking the “Run Now” button:
On the main screen, we’ll see how the script works. The specified directory is quickly synchronized (it will become the same on the main and backup machines), and now any change in the directory on the Master machine will lead to a similar change in its copy on the Replica machine.
Perform three steps on the Master machine:
1. Modify the Gioconda file.jpg
2. Erase the file Tanya.jpg
3. Add the file Masha.jpg
Make sure that the same thing happened with the Replica machine.
Now we would like to return to Gioconda the old look. To do this, rewind time back on the Replica machine using the Data Recovery tool.
First we need to stop the script (menu Tools -> Stop)
Then click the Replica machine and open the Tools -> Data Recovery menu:
Clicking on the button “Select Recovery Point” in the next window, we get into a window where you need:
(1) Set to view all time points that can be rolled back in time.
(2) Click the Apply button.
(3) Select the very first point when Gioconda was not damaged yet
(4) Click on the “OK” button
Then click the “Run” button:
Check what happened to the files on the Replica machine.
- Dzhokonda.jpg back to its initial state
- Masha.jpg disappeared
- Lena.jpg appeared
In order not to lose Masha.jpg, we did not recover the data on both machines. Now it is enough to rewrite the “Gioconda.jpg” file to the Master machine, and we will again get the uncorrupted file into operation without affecting the rest.
3.2. Restore MS SQL database to a specific point in time
Suppose that MS SQL is installed on the Master machine. You can not install MS SQL on a Replica machine, then it will only serve as a repository of a copy of the DATA directory:
The MS SQL replication script is similar to the file replication script, but three things are added that make life easier for us:
1. Select the correct method of initial synchronization - block. Before you start replication, the system must verify that the data on the two machines are identical and synchronize what is different.
For the “File Server” type scenario, a simplified initial synchronization is applied by default, in which files are considered identical if their size and modification time coincide. Such an assumption gives a good saving of initial synchronization time on file servers, but it is completely unacceptable for databases, so the script for MS SQL compares one after another all the data blocks that make up the files.
2. we do not have to explicitly indicate where the database files are located; this information will automatically pull up:
2. when restoring data to the main machine (Master), MS SQL services will be automatically extinguished and transferred to manual start mode. After recovery, everything will return to its place:
Suppose that someone forgot to write “where” in the “update” command:
begin transaction; update dbo.Table_1 set name=''; commit; (whoever did this himself will understand the depth of the fall).
Just as in the previous case, we stop the replication script, run “Tools-> Data Recovery”, but choose recovery not only for the backup machine, but also for the main one:
It remains only to choose a point in time preceding the moment of data corruption, and carry out the restoration:
3.3. Restore MySQL database to Linux at a given point in time
On two co-master and co-replica machines, CentOS 6.5 and MySQL are installed (in the same directories).
Strictly speaking, you can not install MySQL on the backup machine (co-replica), but we will try to go a little further and pick up the replicated data on the backup MySQL server.
On the co-master machine, the MySQL service is running, on the co-replica machine it is turned off.
Create a new “Custom Application” script.
Unlike the “File Server” script (Section 3.1), the “Custom Application” script has a block initial sync by default. I repeat once again: for the “File Server” type scenario, a simplified initial synchronization is applied by default, in which files are considered identical if their size and modification time coincide. Such an assumption gives a good saving of initial synchronization time on file servers, but it is completely unacceptable for databases, therefore the “File Server” type script is unacceptable for MySQL replication.
On the screen where the directories for replication are set, we set the directory with MySQL data (var / lib / mysql / in my case). Just make sure that it does not have a mysql.sock socket file. If there is, specify another place in the my.cnf configuration file .
Do not forget, as in all previous scenarios, to allow rollback to a point in time in the past during recovery:
On the co-master machine, look at the Table_1 table:
 mysql> select * from Table_1;
 + ---- + -------------- +
 |  id |  name |
 + ---- + -------------- +
 |  1 |  Ivanov |
 |  2 |  Petrov |
 + ---- + -------------- +
 2 rows in set (0.01 sec)
And spoil it by making the last name in all notes the same:
 mysql> update Table_1 set name = 'Sidorov';
 Query OK, 2 rows affected (0.00 sec)
 Rows matched: 2 Changed: 2 Warnings: 0
Now let's get everything back, using the restore function for a given point in time. As before, stop the replication script and restore the data on both machines. But first stop the mysqld service:
 [root @ co-master mysql] # service mysqld stop
 Stopping mysqld: [OK]
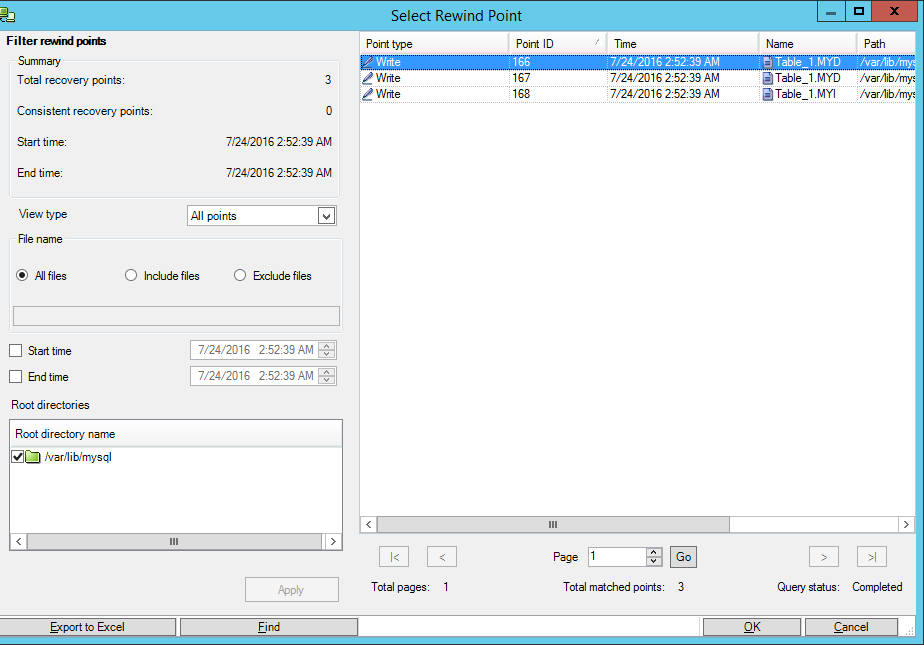
Choose a point in time when the base has not yet been corrupted:
After that, we will start the MySQL service on the master machine and make sure that the data is restored.
And now - a surprise! Let's start the MySQL service on the co-replica machine and get a working base on the backup machine. We came close to the enhanced functionality of the Arcserve RHA when, instead of a lost system, a backup system comes in with actual data.
Today we have raised the MySQL backup service manually. But the Arcserve RHA product is able to independently start a backup system so that it looks like it has failed. For example, run the necessary services, change the DNS records, IP address, even the NetBIOS name of the machine. This can be done in scenarios like “High Availfbility”, but this is a topic for a separate article.
4. Conclusion and advertising
In this article, we looked only at the basic capabilities of the Arcserve RHA product, aimed at recovering data at a given point in time in the past. That is, only half of the name “Replication and High Availability” was decoded. In the next article, you will see how the second part of the name is implemented - High Availability. We will see how a failed machine (physical or virtual) will be replaced by a backup machine containing an up-to-date copy of the data.
[Advertising] Currently, until the end of September 2016, you can get an Arcserve RHA product for free by purchasing an Arcserve UDP Premium Plus product at a price of Arcserve UDP Premium.
You can learn more from Arcserve partners .
Source: https://habr.com/ru/post/306194/
All Articles