UNetLab 1.0.0-12. Integration with Docker and Dynamic nodes connection

Hello colleagues. We continue to cover the development of UNetLab. In a previous post, I talked about the new version of UNetLab 1.0 and announced the launch of a video course. But time goes and the developers have released another significant update - UNetLab 1.0.0-12 . Key innovations to be described in this article:
1) Dynamic nodes connection
2) Docker integration
If you are interested in this topic, welcome to cat.
Dynamic nodes connection
The function that all UNetLab users have been waiting for. Finally, it became possible to dynamically connect the nodes by simply clicking the mouse (in the video tutorial below, the process itself is shown).
')
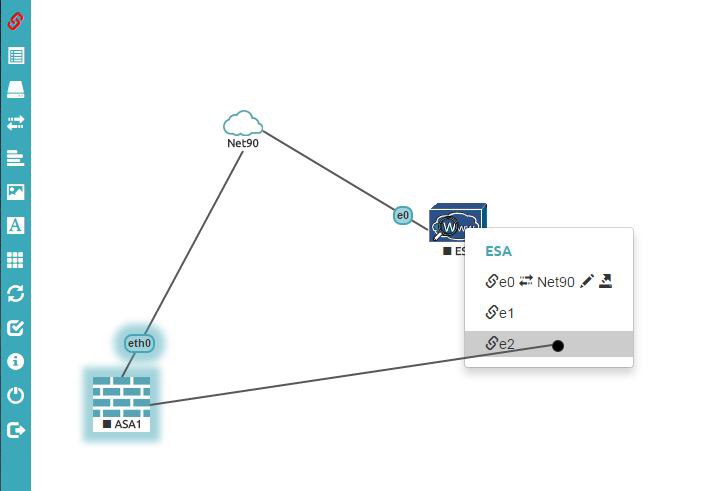
Now there is no need to create networks manually. Thus, the creation of topologies in UNetLab has become as convenient as in GNS3.
If you have not had time to upgrade, then this is done elementary:
apt-get update
apt-get install unetlab
Docker Integration
Generally speaking, the implementation of Docker in UNL is still damp and requires serious improvement, however, I cannot but touch upon this topic, since she is very important. As far as I know, even the new GNS3 version also has Docker support. This technology has a lot of potential.
But before I begin, I think it’s quite logical to first talk about Docker itself. What is it? The question is not the easiest, but I, as usual, will try to explain as simply as possible. I will describe superficially and common phrases, because This course is not about virtualization, and I myself do not consider myself an expert in this field.
So, today we can distinguish three main types of virtualization:
1) Full (hardware) virtualization </ 4>
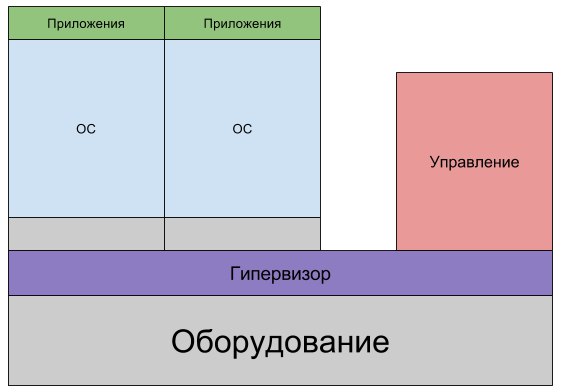
VirtualBox, VMware, KVM, QEMU, etc. use this type of virtualization. The point is to fully emulate the computer with all the hardware. In this case, the hypervisor distributes the hardware between the virtual machines. And already in these virtual machines is installed the operating system, almost like a full-fledged physical computer. Virtual machines are completely isolated from each other. Hardware virtualization must be supported by the processor. Many probably already included in the BIOS this function. This is either Intel VT (VT-x) or AMD-V.
2) Operating System Level Virtualization
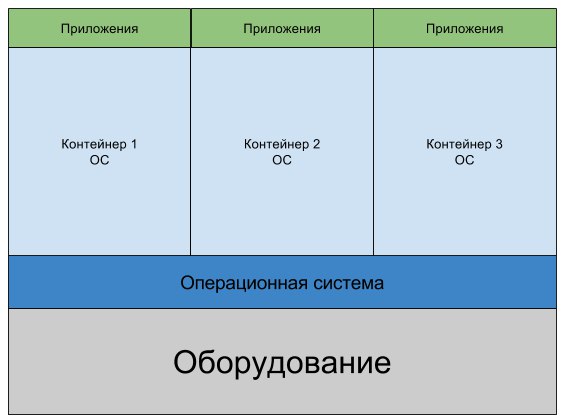
This type of virtualization is used by OpenVZ, LXC, etc. In this case, hardware emulation is no longer used. It creates a copy of most of the processes of the original operating system. These processes are isolated in a separate container (hence the name - container virtualization). At the same time, in the container we get an almost full-fledged operating system where applications can be installed. This approach gives a performance gain compared to full virtualization, because no need to emulate hardware. In general, there are many pros and cons of using one or another type of virtualization, but our lesson is not about that.
3) Application Virtualization
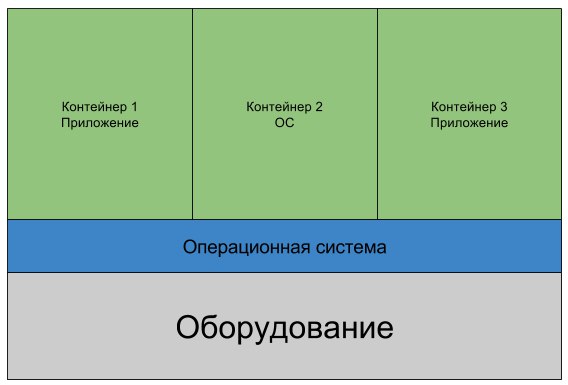
This is a higher level of abstraction, which saves system resources even more. Why virtualize an entire operating system if we for example need only a separate database? Or a separate web server? Docker solves this issue. It allows you to create a copy of not all the processes of the original operating system, but a copy of a separate application and isolate it into a container. It is very convenient when developing and testing. At the same time, docker is also able to virtualize the operating system, as OpenVZ or LXC does.
If you want to get acquainted with the docker, you can use this resource .
Briefly told what is what. I repeat that I described everything very superficially. I didn’t even touch upon things like network virtualization or storage virtualization. In general, virtualization is a very interesting and extensive topic. If you have free time, then if possible, learn in this area, because without virtualization today is nowhere!
And we, in the meantime, turn to docker. Someone may ask: “Why do we need a docker when there is both QEMU and external virtual machines in the form of VMware and the same VPCS?” I will try to answer.
If you take virtualki in the form of QEMU or VMware, then they are all good, but they consume too many resources (memory, processor, hard disk).
It would seem that there is a VPCS that does not consume anything at all. But he has very poor functionality. No telnet or ssh client, no tcpdump, no nslookup, and many other useful features. Those. at the moment we either spend a lot of resources, or have problems with lack of functionality. Docker is designed to solve our problems. Docker allows you to run a nearly full-fledged Linux-like system with fairly modest parameters, both in RAM and hard disk. At the same time, we have a huge selection of ready-made containers with various distributions or applications.
In this tutorial, we will look at working with one of the smallest containers for the docker, BusyBox . What is it, you can read here . In short, this is a very small distribution, with very small system requirements. Well, let's start.
First we need to install the docker on the unetlab server, since by default it is absent. Detailed instructions are on the official UNL website in the howto section. I see no reason to duplicate this information here.
After installation, we can go to the unetlab web interface. By the way, a special docker utility is used to connect to the containers. Make sure that you have the necessary files in the C: \ Program Files \ UNetLab folder: docker.exe, docker_wrapper and win7_64bit_docker . If not, then you need to install a new windows integration pack .
What functionality does this extremely small distribution kit give us? Actually quite rich. In busybox we have:
- Client and telnet server
- Client and tftp server
- Client and ftp server
- HTTP server
- DNS server
- NTP server
- Utilities such as:
- ifconfig
- ip route
- traceroute
- arp
- nslookup
- netstat
Now let's build a simple scheme and use the functionality available to us. Suppose that in laboratory work we needed to test services such as DHCP, HTTP, DNS, FTP, and Telnet. We can do all this with Docker! To configure, we will use the following built-in BusyBox services:
udhcpd - for DHCP server
httpd - for WEB server
dnsd - for DNS server
ftpd - for FTP server
telnetd - for telnet server
The entire configuration process can be viewed in this lesson (see from the 10th minute):
Thus, we raised the Telnet server, HTTP server, DHCP, FTP and DNS server on one container, the image of which weighs only 1 MB! Impressive, right? And we considered only one image, and their huge number with different software inside. Moreover, you can easily assemble your own image with the set of utilities you need. Our lesson is not about that, but if you are interested, be sure to explore this opportunity.
I summarize the above: it is safe to say that UNetLab continues its dynamic development and is becoming more and more functional and convenient learning tool.
Source: https://habr.com/ru/post/306134/
All Articles