Configuring Nginx with Let's Encrypt on CentOS 7
Probably, many already know that Let's Encrypt company distributes free SSL certificates at https://letsencrypt.org . How to get and configure it on your server running CentOS 7 and Nginx?
Let's get it. Let's Encrypt is a new certificate authority (CA) that allows you to easily obtain and install a TLS / SSl certificate for free, allowing us to encrypt HTTPS traffic on your web servers. This process is already automated by the letsencrypt program, but, unfortunately, only under the control of Apache web servers.
In this tutorial, I will show you how to get an SSL certificate for Nginx, CentOS 7. We also configure automatic certificate renewal, as it is given for 90 days.
')
So, what we have:
- Web server running CentOS, Nginx;
- Installed Git, Bc.
Just in case:
After git and bc are installed, go to the cloning of the letsencrypt project from GitHub.
You should now have a copy of the project in / opt / letsencrypt.
Letsencrypt provides many ways to obtain SSL certificates using various plug-ins. Unlike the Apache plugin, which is installed automatically, we will have to install the certificate manually.
We turn to the project Letsencrypt, where we cloned the files. And we start the generation of certificates using the letsencrypt-auto certonly command using the webroot plugin.
-d example.com -d www.example.com - our domains
--webroot-path = / usr / share / nginx / html directory where our project is located
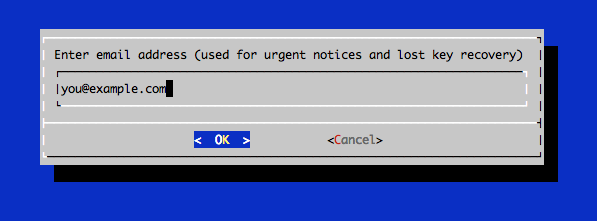
After letsencrypt initializes, we will need to keep additional data. The proposed questions may vary depending on how long ago you used letsencrypt, but we are launching for the first time.
In the command line, enter the email address that will be used for informative messages, and you will also be able to recover the keys:
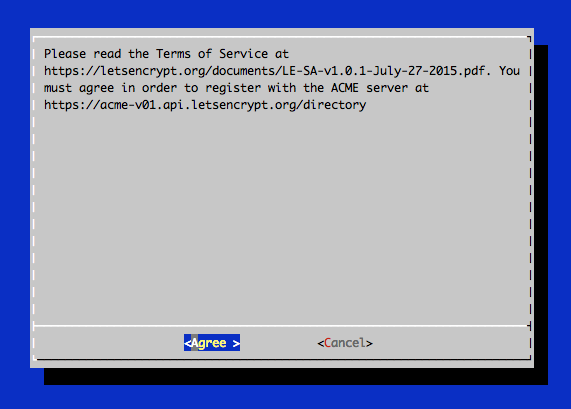
Agree to the terms of use of Letsencrypt.
If everything went well, then you should see something like this in the console:
We see where the created certificates /etc/letsencrypt/live/example.com/ and the expiration date of the certificate 2016-03-15 are stored.
Possible mistakes:
After receiving the certificate, you will have the following PEM-encoded files:
cert.pem: certificate for your domain
chain.pem: Let's Encrypt a chain of certificates
fullchain.pem: cert.pem and chain.pem
privkey.pem: Certificate with private key
In order to further enhance the level of security, we will generate a key using the Diffie-Hellman encryption algorithm. To create a 2048-bit key, use the following command:
It is necessary for us to earn Forward Secrecy. Direct secrecy means that if a third party recognizes a session key, then it can only get access to data that is protected only by that key. In order to maintain perfect forward secrecy, the key used to encrypt the transmitted data should not be used to obtain any additional keys.
The process may take several minutes, but when the key is created, it will be placed in a directory in /etc/ssl/certs/dhparam.pem.
Step 3 - Configure TLS / SSl on the Nginx web server
Configuring Nginx configuration using SSl certificates.
Reboot Nginx
Certificates are valid for 90 days, but it is recommended to renew certificates every 60 days. We automate this with cron.
To start the update process for all installed domains, run the following command:
Since we recently installed a certificate, the team will only check the expiration date and print a message informing you that the certificate does not need to be renewed. You will see something like the following in the console:
Please note that if you have created a certificate bundled with several domains, then only the base domain name will be displayed in the console, but you do not worry, all domains included in this certificate will be renewed.
Let's edit the crontab so that our certificates are updated automatically. Check for updates we will do every week. To edit the crontab as root user, run the command:
Add the following lines:
That way, the team will create a cron, which will auto-renew letsencrypt certificates at 2:30 every Monday and restart Nginx at 2:35. All update information will be logged in /var/log/le-renew.log.
Whenever new updates are available for the Let's Encrypt client, you can update the local copy by running git pull from the / opt / letsencrypt directory:
This will download all recent changes from the repository to update the Let's Encrypt client.
The finish! Your web server now uses TLS / SSL encryption, all for free. Let's encrypt HTTPS content, stand up for privacy. It will also increase the visibility of the site in the issuance of Google.
https://www.digitalocean.com/community/tutorials/how-to-secure-nginx-with-let-s-encrypt-on-centos-7
https://habrahabr.ru/post/252821/
Introduction
Let's get it. Let's Encrypt is a new certificate authority (CA) that allows you to easily obtain and install a TLS / SSl certificate for free, allowing us to encrypt HTTPS traffic on your web servers. This process is already automated by the letsencrypt program, but, unfortunately, only under the control of Apache web servers.
In this tutorial, I will show you how to get an SSL certificate for Nginx, CentOS 7. We also configure automatic certificate renewal, as it is given for 90 days.
')
Step 1 - Installing the Letsencrypt Client
So, what we have:
- Web server running CentOS, Nginx;
- Installed Git, Bc.
Just in case:
sudo yum -y install git bc After git and bc are installed, go to the cloning of the letsencrypt project from GitHub.
sudo git clone https://github.com/letsencrypt/letsencrypt /opt/letsencrypt You should now have a copy of the project in / opt / letsencrypt.
Step 2 - Getting a Certificate
Letsencrypt provides many ways to obtain SSL certificates using various plug-ins. Unlike the Apache plugin, which is installed automatically, we will have to install the certificate manually.
SSL certificate installation
We turn to the project Letsencrypt, where we cloned the files. And we start the generation of certificates using the letsencrypt-auto certonly command using the webroot plugin.
-d example.com -d www.example.com - our domains
--webroot-path = / usr / share / nginx / html directory where our project is located
cd /opt/letsencrypt ./letsencrypt-auto certonly -a webroot --webroot-path=/usr/share/nginx/html -d example.com -d www.example.com Note: run the letsencrypt-auto application without sudo
After letsencrypt initializes, we will need to keep additional data. The proposed questions may vary depending on how long ago you used letsencrypt, but we are launching for the first time.
In the command line, enter the email address that will be used for informative messages, and you will also be able to recover the keys:
Agree to the terms of use of Letsencrypt.
If everything went well, then you should see something like this in the console:
Output: IMPORTANT NOTES: - If you lose your account credentials, you can recover through e-mails sent to sammy@digitalocean.com - Congratulations! Your certificate and chain have been saved at /etc/letsencrypt/live/example.com/fullchain.pem. Your cert will expire on 2016-03-15. To obtain a new version of the certificate in the future, simply run Let's Encrypt again. - Your account credentials have been saved in your Let's Encrypt configuration directory at /etc/letsencrypt. You should make a secure backup of this folder now. This configuration directory will also contain certificates and private keys obtained by Let's Encrypt so making regular backups of this folder is ideal. - If like Let's Encrypt, please consider supporting our work by: Donating to ISRG / Let's Encrypt: https://letsencrypt.org/donate Donating to EFF: https://eff.org/donate-le We see where the created certificates /etc/letsencrypt/live/example.com/ and the expiration date of the certificate 2016-03-15 are stored.
Possible mistakes:
If you received errors like: Failed to connect to host for DVSNI challenge , configure the firewall of your server so that TCP traffic passes through ports 80 and 443.
After receiving the certificate, you will have the following PEM-encoded files:
cert.pem: certificate for your domain
chain.pem: Let's Encrypt a chain of certificates
fullchain.pem: cert.pem and chain.pem
privkey.pem: Certificate with private key
In order to further enhance the level of security, we will generate a key using the Diffie-Hellman encryption algorithm. To create a 2048-bit key, use the following command:
sudo openssl dhparam -out /etc/ssl/certs/dhparam.pem 2048 It is necessary for us to earn Forward Secrecy. Direct secrecy means that if a third party recognizes a session key, then it can only get access to data that is protected only by that key. In order to maintain perfect forward secrecy, the key used to encrypt the transmitted data should not be used to obtain any additional keys.
The process may take several minutes, but when the key is created, it will be placed in a directory in /etc/ssl/certs/dhparam.pem.
Step 3 - Configure TLS / SSl on the Nginx web server
Configuring Nginx configuration using SSl certificates.
server { # 80 , www server_name example.com www.example.com listen 80; return 301 https://www.example.com$request_uri; } server { listen 443 ssl; server_name example.com www.example.com; # ssl_certificate /etc/letsencrypt/live/example.com/fullchain.pem; ssl_certificate_key /etc/letsencrypt/live/example.com/privkey.pem; ssl_protocols TLSv1 TLSv1.1 TLSv1.2; ssl_prefer_server_ciphers on; ssl_dhparam /etc/ssl/certs/dhparam.pem; ssl_ciphers 'ECDHE-RSA-AES128-GCM-SHA256:ECDHE-ECDSA-AES128-GCM-SHA256:ECDHE-RSA-AES256-GCM-SHA384:ECDHE-ECDSA-AES256-GCM-SHA384:DHE-RSA-AES128-GCM-SHA256:DHE-DSS-AES128-GCM-SHA256:kEDH+AESGCM:ECDHE-RSA-AES128-SHA256:ECDHE-ECDSA-AES128-SHA256:ECDHE-RSA-AES128-SHA:ECDHE-ECDSA-AES128-SHA:ECDHE-RSA-AES256-SHA384:ECDHE-ECDSA-AES256-SHA384:ECDHE-RSA-AES256-SHA:ECDHE-ECDSA-AES256-SHA:DHE-RSA-AES128-SHA256:DHE-RSA-AES128-SHA:DHE-DSS-AES128-SHA256:DHE-RSA-AES256-SHA256:DHE-DSS-AES256-SHA:DHE-RSA-AES256-SHA:AES128-GCM-SHA256:AES256-GCM-SHA384:AES128-SHA256:AES256-SHA256:AES128-SHA:AES256-SHA:AES:CAMELLIA:DES-CBC3-SHA:!aNULL:!eNULL:!EXPORT:!DES:!RC4:!MD5:!PSK:!aECDH:!EDH-DSS-DES-CBC3-SHA:!EDH-RSA-DES-CBC3-SHA:!KRB5-DES-CBC3-SHA'; ssl_session_timeout 1d; ssl_session_cache shared:SSL:50m; # OCSP-, ssl_stapling on; ssl_stapling_verify on; add_header Strict-Transport-Security max-age=15768000; location ~ /.well-known { allow all; } # The rest of your server block root /usr/share/nginx/html; index index.html index.htm; location / { # First attempt to serve request as file, then # as directory, then fall back to displaying a 404. try_files $uri $uri/ =404; # Uncomment to enable naxsi on this location # include /etc/nginx/naxsi.rules } } Reboot Nginx
sudo systemctl reload nginx Step 4 - Set Up Auto Renew
Certificates are valid for 90 days, but it is recommended to renew certificates every 60 days. We automate this with cron.
To start the update process for all installed domains, run the following command:
/opt/letsencrypt/letsencrypt-auto renew Since we recently installed a certificate, the team will only check the expiration date and print a message informing you that the certificate does not need to be renewed. You will see something like the following in the console:
Checking for new version... Requesting root privileges to run letsencrypt... /root/.local/share/letsencrypt/bin/letsencrypt renew Processing /etc/letsencrypt/renewal/example.com.conf The following certs are not due for renewal yet: /etc/letsencrypt/live/example.com/fullchain.pem (skipped) No renewals were attempted. Please note that if you have created a certificate bundled with several domains, then only the base domain name will be displayed in the console, but you do not worry, all domains included in this certificate will be renewed.
Let's edit the crontab so that our certificates are updated automatically. Check for updates we will do every week. To edit the crontab as root user, run the command:
sudo crontab -e Add the following lines:
30 2 * * 1 /opt/letsencrypt/letsencrypt-auto renew >> /var/log/le-renew.log 35 2 * * 1 /usr/bin/systemctl reload nginx That way, the team will create a cron, which will auto-renew letsencrypt certificates at 2:30 every Monday and restart Nginx at 2:35. All update information will be logged in /var/log/le-renew.log.
Step 5 - Update Let's Encrypt (optional)
Whenever new updates are available for the Let's Encrypt client, you can update the local copy by running git pull from the / opt / letsencrypt directory:
cd /opt/letsencrypt sudo git pull This will download all recent changes from the repository to update the Let's Encrypt client.
The finish! Your web server now uses TLS / SSL encryption, all for free. Let's encrypt HTTPS content, stand up for privacy. It will also increase the visibility of the site in the issuance of Google.
Sources
https://www.digitalocean.com/community/tutorials/how-to-secure-nginx-with-let-s-encrypt-on-centos-7
https://habrahabr.ru/post/252821/
Source: https://habr.com/ru/post/306128/
All Articles