How to move your iron server to the clouds in 1 day

Today, there are still a huge number of large and small organizations that hold an old server, placing it directly in the office or at any site in the data center. It’s not about security and convenience, it’s just that historically there’s a stereotype that it’s a long time to transfer everything, reconfigure, and you can lose the data.
In fact, everything is done very simply and the 1st day specified in the title is not a day of hard work, it is just time to create an image of the current disk and copy it to the clouds. Network speeds are different for everyone, as is the amount of information being transferred - on average, they learn that it takes 1 day to go to the cloud server .
So, what is the essence of the transfer:
- With the help of specialized software, a full disk image of your current server (or even a home computer) is taken - as a result, you get a regular file with everything that you have
- we send this file to the hosting provider for hosting (if the provider, as we support it)
- you connect to the server at a new network address and work as before, forgetting about your physical equipment and its maintenance
')
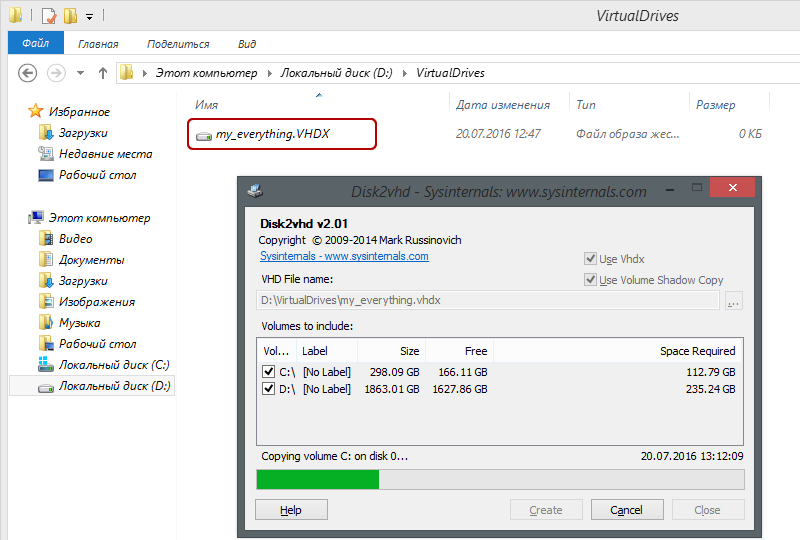
Step 1. Create a disk image file from your current server
The simplest, most popular and convenient (and not yet unimportantly free!) Tool for this is Disk2vhd . You can download it directly from the Microsoft website:
https://technet.microsoft.com/en-us/sysinternals/ee656415
The program does not require installation, it is just an archive that needs to be unpacked and run disk2vhd.exe :

Make sure that the one selected at the top “Use Vhdx” is the format of the output disk image of the server. VHDX is a modern format in Windows and Hyper-V that supports disks up to 64TB, VHD is outdated and allows you to create disks up to only 2TB.
Below, in the address bar, you can specify an arbitrary path for saving the disk image file and then choose which disks to include in this image.
Depending on the amount of data and the speed (performance) of the disks on your server, the process of creating an image file can take up to several hours.
Step 2. Send the server disk image to the hosting provider
Create an account on ultravds.com , choosing the required server configuration in terms of performance parameters and disk system size depending on the amount of data transferred.
After creating your account and VDS server, just write a support request to arrange reception of your file.
In response to your request, we will prepare FTP access for you to the isolated temporary storage for downloading the disk image of your server especially for you.
On our side, for transferring data to the cloud, a channel is allocated at a speed of 1 Gbit / s , which allows you to download an image of 1TB in just 2 and a half hours, of course, if you have the same fast Internet channel on your side.
At the end of the download, just write a second request for support, and we will deploy the provided disk image in the virtual server you created earlier.

Source: https://habr.com/ru/post/306050/
All Articles