Introduction to Veeam Agent for Linux
As you may already know, in the near future our new product will be released - the Veeam Agent for Linux. And now everyone can evaluate this decision in the course of the announced beta testing program. To access the beta version, you need to register here , and you will receive a download link by email. Please note that the beta testing period will end on September 1, 2016 - then you can install the release version already.
So what does beta do? For the answer, welcome under cat.
Veeam Agent for Linux is our new free backup solution for Linux machines. Its main characteristics are:
')
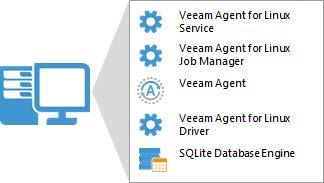
The solution includes the following components:
Veeam Agent for Linux is able to perform backups at the image level, working inside the guest OS, and you can do backups at the volume and file level. To create incremental backups, we have developed a special driver that keeps track of changed blocks (its module is dynamically loaded into the kernel).
Readers will probably be pleased that this module is supplied as source code . Since there are a great many versions of the kernel, we decided not to try to write and compile a binary version of the module for each of them - in the end, it could well turn out that something was not supported on some version, and the corresponding part of users could not use the solution. Therefore, we decided to follow the traditional way for the Linux community - to supply the source code and compile the module during the installation of the product, specifically for the version of the kernel with which it will work. The user will not have to compile anything manually - all the necessary operations will be performed by the package manager of your distribution: check for the necessary dependencies, list the missing ones so that you can fix everything, and automatically install and install our module during the installation.
The solution requires the Dynamic Kernel Module Support (DKMS) package, which is required to compile the kernel module, and the LVM2 package, which is required to support LVM volume operations. If they are not on the machine, then install them - for example, DKMS on CentOS can be supplied from the additional EPEL repository.
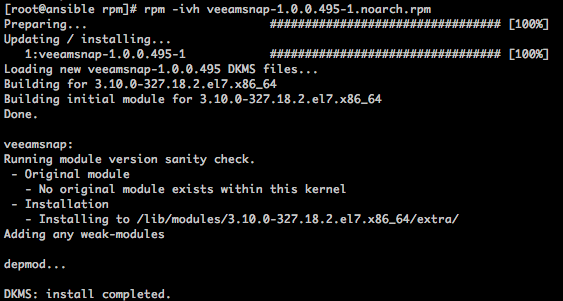
After the installation of the first component has passed, you can proceed to the installation of the Veeam Agent for Linux itself (you will need root rights for the installation):

The Veeam Agent for Linux is installed as a service, which you can then work with using the veeamconfig command. To view a list of its options, after the veeamconfig command , enter --help . Well, and then you can go directly to work - and there already almost everything is clear and without prompts, but we still briefly consider the backup process first.
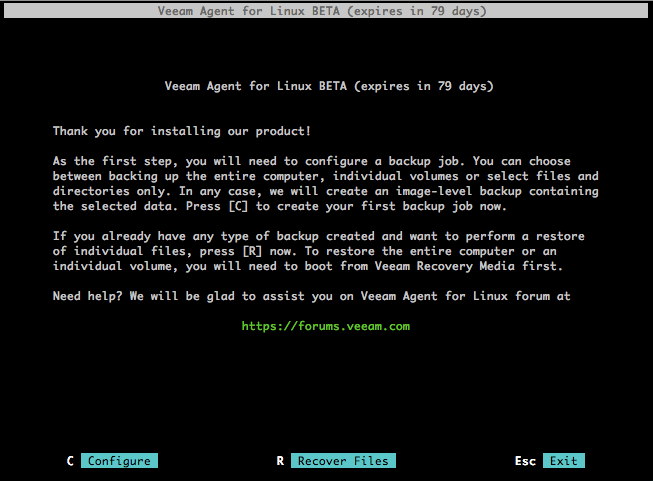
Since there are both advanced and novice users among Linux users, we offer a simple graphical user interface in addition to the command line. To launch it, use the command line - enter the veeam command in it. A GUI will appear on the screen with a welcome message and menu buttons:
To create a new backup task, click C (Configure) . We pass on the steps of the master:
After all the settings have been made, the wizard will prompt you to start the task right away. If you again want to go through the settings and, perhaps, change something, you can either return to the previous step by pressing Prev , or, if you have already clicked Finish and returned to the main menu, press C. To start a job from the main menu, press S. If you want to start the task at some point on demand, then the following command is at your service:
During the execution of the task by pressing Enter you can see what goes and what is written to the log:
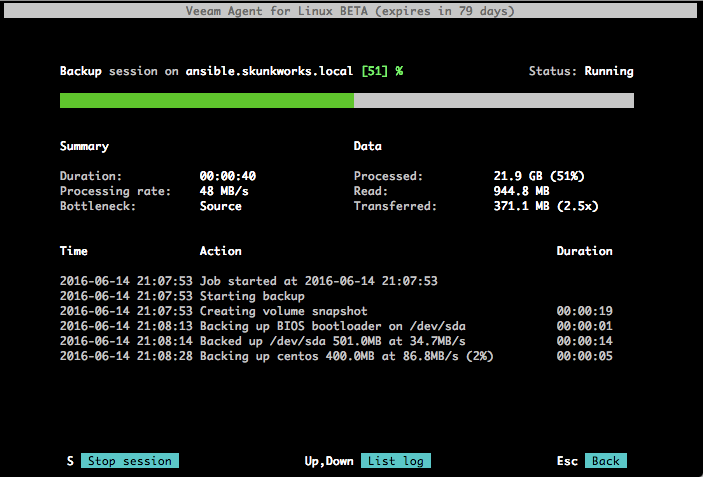
Our task successfully completed and the corresponding information appeared on the screen in the Status field:

The repository on the NFS server now contains backup files (.VBK and .VBM), named according to the job name and creation time:

Having a backup, you can see how Veeam Agent for Linux can restore a Linux server at the file level, volume, or even “on bare metal” - but more on that in the next post.
Register for beta testing
Comments and suggestions can be left on our forum.
UPD: Please note - the link from September 1 issued beta # 2. Read more about it here . In the topic there is an instruction and password for downloading (it is the same as it was for beta # 1). From the newly added, in particular, packages for Fedora 23, Fedora 24 have appeared, the CLI command set has expanded, support for pre / post job scripts has appeared.
With information about found issues, we are waiting for you on the forum - in new topics or in personal messages (responsible for PTide).
So what does beta do? For the answer, welcome under cat.
Veeam Agent for Linux is our new free backup solution for Linux machines. Its main characteristics are:
- It can be used for both virtual and physical machines.
- Works with machines of the Debian and RedHat families. Available in RPM and DEB packages.
- Linux kernel versions are supported, starting from 2.6.32 (i.e., even if you have a very old installation, it will be supported provided that you have the official kernel for this distribution).
- Works with 32-bit and 64-bit architecture.
')
The solution includes the following components:
- Veeam Agent for Linux Service is a component responsible for working with all tasks and necessary resources. It is registered as a normal service, automatically starts at the start of the OS and runs in the background.
- Veeam Agent for Linux Job Manager is the process that is launched by the above service for each session of the backup task and is responsible for its work.
- Veeam Agent is, in fact, a workhorse that performs data transfer operations: during backup it copies them to the repository, and during recovery - vice versa, and also performs deduplication, compression, etc.
- Veeam Agent for Linux Driver is a Linux kernel module that is responsible for creating snapshots of volumes on your machine.
- SQLite database engine - used to store configuration; if you do not have it, it will be installed during the installation of the product.
Veeam Agent for Linux is able to perform backups at the image level, working inside the guest OS, and you can do backups at the volume and file level. To create incremental backups, we have developed a special driver that keeps track of changed blocks (its module is dynamically loaded into the kernel).
Readers will probably be pleased that this module is supplied as source code . Since there are a great many versions of the kernel, we decided not to try to write and compile a binary version of the module for each of them - in the end, it could well turn out that something was not supported on some version, and the corresponding part of users could not use the solution. Therefore, we decided to follow the traditional way for the Linux community - to supply the source code and compile the module during the installation of the product, specifically for the version of the kernel with which it will work. The user will not have to compile anything manually - all the necessary operations will be performed by the package manager of your distribution: check for the necessary dependencies, list the missing ones so that you can fix everything, and automatically install and install our module during the installation.
Perform the installation
The solution requires the Dynamic Kernel Module Support (DKMS) package, which is required to compile the kernel module, and the LVM2 package, which is required to support LVM volume operations. If they are not on the machine, then install them - for example, DKMS on CentOS can be supplied from the additional EPEL repository.
After the installation of the first component has passed, you can proceed to the installation of the Veeam Agent for Linux itself (you will need root rights for the installation):
The Veeam Agent for Linux is installed as a service, which you can then work with using the veeamconfig command. To view a list of its options, after the veeamconfig command , enter --help . Well, and then you can go directly to work - and there already almost everything is clear and without prompts, but we still briefly consider the backup process first.
Getting Started for Backup
Since there are both advanced and novice users among Linux users, we offer a simple graphical user interface in addition to the command line. To launch it, use the command line - enter the veeam command in it. A GUI will appear on the screen with a welcome message and menu buttons:
To create a new backup task, click C (Configure) . We pass on the steps of the master:
- Enter the name you want to give the task.
- On the Backup mode step, we choose whether we want to backup the entire machine ( Entire machine ), a volume ( Volume level backup ) or individual files and folders ( File level backup ):
- Then we specify the type of repository ( Destination Location ) where backups will be saved. If we do not have a repository yet, then the master will ask to create it. The following repositories are supported:
- devices with direct connection (USB, eSATA, FC, etc.)
- network file systems NFS, SMB (CIFS)
- local storage (not recommended)
In this example, the NFS shared folder is selected as the repository: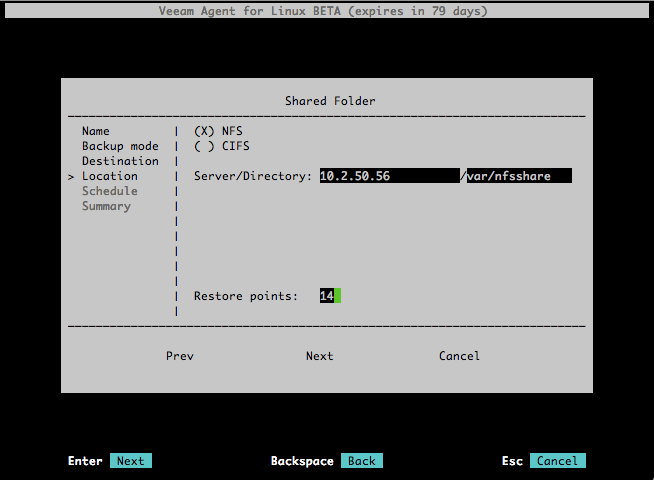
- Here you can also specify how many restore points ( Restore points ) should be stored in the repository - the default is 14.
- Then you can configure the schedule ( Schedule ) for our task, specifying how often it will run.
After all the settings have been made, the wizard will prompt you to start the task right away. If you again want to go through the settings and, perhaps, change something, you can either return to the previous step by pressing Prev , or, if you have already clicked Finish and returned to the main menu, press C. To start a job from the main menu, press S. If you want to start the task at some point on demand, then the following command is at your service:
veeamconfig job start --name "BackupJob1"
During the execution of the task by pressing Enter you can see what goes and what is written to the log:
Our task successfully completed and the corresponding information appeared on the screen in the Status field:
The repository on the NFS server now contains backup files (.VBK and .VBM), named according to the job name and creation time:
Having a backup, you can see how Veeam Agent for Linux can restore a Linux server at the file level, volume, or even “on bare metal” - but more on that in the next post.
useful links
Register for beta testing
Comments and suggestions can be left on our forum.
UPD: Please note - the link from September 1 issued beta # 2. Read more about it here . In the topic there is an instruction and password for downloading (it is the same as it was for beta # 1). From the newly added, in particular, packages for Fedora 23, Fedora 24 have appeared, the CLI command set has expanded, support for pre / post job scripts has appeared.
With information about found issues, we are waiting for you on the forum - in new topics or in personal messages (responsible for PTide).
Source: https://habr.com/ru/post/306032/
All Articles