How to start using Swing GUI-wizard IntelliJ IDEA. detailed instructions
I have not written for a long time desktop applications in Java in general and using Swing in particular. However, there was a need for a bit of GUI. I chose IntelliJ IDEA Community edition, 2016.1 version as a tool.
I began to sculpt and, naturally, the first thing that I ran into - although since the days of Borland Java Builder 2006, a lot of water has flowed, screen interfaces have not become easier to create, rather the opposite. And one of the reasons for choosing IDEA was just the presence of the Swing designer out of the box, but how to use it on the move is absolutely incomprehensible - the form is generated, the class is created, the control variables from the designer are created ... but only: when creating our class, the form on the screen is not appears
Fumbled the Internet, information about zero. People say, they say, "create and - go ahead!". Hmm ...
According to the results of small ordeals on this topic, I decided to publish the instructions, since taking into account my past experience it was much easier to search than a newcomer, who generally sculpts a form on Swing for the first time.
')
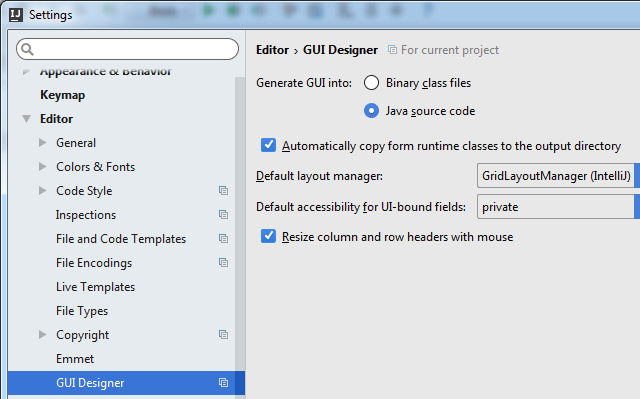
First, to understand the process it is better to start with. what to go to the IDEA menu “File -> Settings” - there is “Editor -> GUI Designer” and check the box Generate GUI Into: in Java source code. (this will help the process a little at the first stage - then it will be possible to remove it back).
Next, open the source tree of your project and right-click on any folder or java source file and select “New -> Dialog” - enter the class name for the form.

As a result, we really had a JDialog class derived from us (which can be created and used) and a form for it.
We start our project for execution and ... oh,horror is a miracle! When compiling IDEA, some additional code is added to the end of our file.
It is easy to guess that all of our Swing forms are configured in the $$$ setupUI $$$ auto-generated method.
Remember the setting we set up at the very beginning - “GUI Into: -> Java source code”. If you do not install it, then this method will simply appear directly in the _class_ file, bypassing the java file (decompile it, if in doubt, I did it). Accordingly, you can return the “GUI Into:” setting to its original form, so that this code (which is not recommended to edit anyway) does not put off eyes.
Now that we understand how it works, let's move on to creating other forms - not necessarily dialogs.
Again, right-click on the folder or file of the source code, select "New -> GUI Form" - enter the class name for the form.
The class and the form to it is generated. We throw a few controls on the form. In the GUI designer, we look at the name of the root element (usually panel1, if IDEA did not set a name, but it happens, set it forcibly - I called it rootPanel for clarity).

Go to the source code of our class.
So:
1. Add inheritance "extends JFrame" for our class;
2. Add a class constructor with strings:
Everything. The form is ready for use. See the rest of the Swing instructions for the rest.
PS As an option, you can not inherit our class from JFrame, but create a constructor of the form:
This option also works - perhaps someone will come in handy.
I began to sculpt and, naturally, the first thing that I ran into - although since the days of Borland Java Builder 2006, a lot of water has flowed, screen interfaces have not become easier to create, rather the opposite. And one of the reasons for choosing IDEA was just the presence of the Swing designer out of the box, but how to use it on the move is absolutely incomprehensible - the form is generated, the class is created, the control variables from the designer are created ... but only: when creating our class, the form on the screen is not appears
Fumbled the Internet, information about zero. People say, they say, "create and - go ahead!". Hmm ...
According to the results of small ordeals on this topic, I decided to publish the instructions, since taking into account my past experience it was much easier to search than a newcomer, who generally sculpts a form on Swing for the first time.
')
Creating Swing GUI Forms with JetBrains IntelliJ IDEA 2016.1
First, to understand the process it is better to start with. what to go to the IDEA menu “File -> Settings” - there is “Editor -> GUI Designer” and check the box Generate GUI Into: in Java source code. (this will help the process a little at the first stage - then it will be possible to remove it back).
Next, open the source tree of your project and right-click on any folder or java source file and select “New -> Dialog” - enter the class name for the form.
As a result, we really had a JDialog class derived from us (which can be created and used) and a form for it.
We start our project for execution and ... oh,
{ // GUI initializer generated by IntelliJ IDEA GUI Designer // >>> IMPORTANT!! <<< // DO NOT EDIT OR ADD ANY CODE HERE! $$$setupUI$$$(); } /** * Method generated by IntelliJ IDEA GUI Designer * >>> IMPORTANT!! <<< * DO NOT edit this method OR call it in your code! * * @noinspection ALL */ private void $$$setupUI$$$() { contentPane = new JPanel(); contentPane.setLayout(new com.intellij.uiDesigner.core.GridLayoutManager(2, 1, new Insets(10, 10, 10, 10), -1, -1)); .................... } /** * @noinspection ALL */ public JComponent $$$getRootComponent$$$() { return contentPane; } It is easy to guess that all of our Swing forms are configured in the $$$ setupUI $$$ auto-generated method.
Remember the setting we set up at the very beginning - “GUI Into: -> Java source code”. If you do not install it, then this method will simply appear directly in the _class_ file, bypassing the java file (decompile it, if in doubt, I did it). Accordingly, you can return the “GUI Into:” setting to its original form, so that this code (which is not recommended to edit anyway) does not put off eyes.
Now that we understand how it works, let's move on to creating other forms - not necessarily dialogs.
Again, right-click on the folder or file of the source code, select "New -> GUI Form" - enter the class name for the form.
The class and the form to it is generated. We throw a few controls on the form. In the GUI designer, we look at the name of the root element (usually panel1, if IDEA did not set a name, but it happens, set it forcibly - I called it rootPanel for clarity).
Go to the source code of our class.
So:
1. Add inheritance "extends JFrame" for our class;
2. Add a class constructor with strings:
setContentPane(panel1); setVisible(true); The final class code
public class GUIFrame extends JFrame{ private JButton button1; private JPanel rootPanel; public GUIFrame() { setContentPane(rootPanel); setVisible(true); setDefaultCloseOperation(WindowConstants.EXIT_ON_CLOSE); } public static void main(String[] args) { new GUIFrame(); } } Everything. The form is ready for use. See the rest of the Swing instructions for the rest.
PS As an option, you can not inherit our class from JFrame, but create a constructor of the form:
JFrame frame = new JFrame(); frame.setContentPane(panel1); frame.setVisible(true); This option also works - perhaps someone will come in handy.
Source: https://habr.com/ru/post/305974/
All Articles