Creating your own graph processing application in Giraph

Be my friend by oosDesign
Large Internet companies often face such challenges as big data processing and analysis of social network graphs. The frameworks help in solving them, but first it is necessary to analyze possible options and select the appropriate one. In the Mail.Ru Technosphere laboratory, we study these issues with real examples from Mail.Ru Group projects (myTarget, Mail.Ru Search, Antispam). Tasks can be both purely practical and with a research component. Based on one of these tasks, this article appeared.
During the assembly and launch of their first project on Giraph, the employees of the Data.Rub.Technosphere laboratory of data analysis faced a number of problems, and therefore the idea was born to write a short tutorial on how to build and run your first Giraph project.
')
In this article we will explain how to create your own applications under the Giraph framework, which is an add-on for the popular Hadoop data processing system.
0. What is Giraph?
Giraph is a framework for iterative processing of large graphs, which runs on top of the very popular Hadoop distributed data processing system. Just as Google’s article on the MapReduce and GFS concept (Google File System) served as the impetus for the emergence of Hadoop and HDFS, Giraph appeared as an open source version of Google’s Pregel, which was published in 2010. Giraph is used by large corporations such as Facebook to handle graphs.
What is the feature of Giraph? Its main "trick" - the so-called vertex-centric-model. As written in Practical Graph Analytics with Apache Giraph :
This model requires the developer to be in the skin of the vertex, which can exchange messages with other vertices between iterations. During development, you do not have to think about the problems of parallelization and scaling - this is what Giraph does.
The processing of the graph in Giraph is as follows: the process is divided into iterations, which are called supersteps. At each super-step, the vertex executes the necessary program and, if necessary, can send messages to other vertices. At the next iteration, the vertex receives messages, runs the program, sends messages, etc. After completing all the super-steps, you will get the resulting graph.
Giraph supports a large number of possibilities for interacting with the graph, including creating / deleting vertices, creating / deleting edges, the ability to override the format in which the graph is specified or selected from existing ones, managing loading from disk and unloading parts of the graph to disk while working with it and much more. Details can be found in the book Practical Graph Analytics with Apache Giraph.
1. Required software
First you need Hadoop itself. If you do not have access to a cluster with Hadoop, you can deploy its single-node version. It is not very demanding of resources, it will work quietly on a laptop. For this, for example, you can use the Hadoop distribution called Cloudera. Cloudera installation manual you can find here . Cloudera 5.5 (Hadoop 2.6.0) was used in the development and testing of this article.
Giraph is implemented in Java. When building projects, Maven build manager is used. Giraph source code can be downloaded from the official site . Instructions for compiling Giraph itself and the examples that come with it are here and in the Quick Start Guide .
Any IDE, such as Eclipse or IntelliJ IDEA, can work with Maven in projects, which is very convenient when developing. We used IntelliJ IDEA in our experiments.
2. Compiling Giraph
Let's first compile the contents of the source Giraph and try to run something. As stated in the instructions , in the folder with the Giraph project we execute the command:
mvn -Phadoop_2 -fae -DskipTests clean install And we wait some time while everything is going to ... In the daddy of giraph-examples / target, the collected jar-files will appear, we will need giraph-examples-1.2.0-SNAPSHOT-for-hadoop-2.5.1-jar-with-dependencies. jar.
Let's run, for example, SimpleShortestPathsComputation . First we need a file with input data. Take an example from the Quick Start Guide :
[0,0,[[1,1],[3,3]]] [1,0,[[0,1],[2,2],[3,1]]] [2,0,[[1,2],[4,4]]] [3,0,[[0,3],[1,1],[4,4]]] [4,0,[[3,4],[2,4]]] Save this in the tiny_graph.txt file and put it in HDFS in our local folder:
hdfs dfs -put ./tiny_graph.txt ./ With this command, the file will fall into your local directory. You can check this by displaying the contents of the file:
hdfs dfs -text tiny_graph.txt Ok, everything is cool, and now let's start:
hadoop jar \ giraph-examples-1.2.0-SNAPSHOT-for-hadoop-2.5.1-jar-with-dependencies.jar \ org.apache.giraph.GiraphRunner \ org.apache.giraph.examples.SimpleShortestPathsComputation \ -vif org.apache.giraph.io.formats.JsonLongDoubleFloatDoubleVertexInputFormat \ -vip tiny_graph.txt \ -vof org.apache.giraph.io.formats.IdWithValueTextOutputFormat \ -op shortestpaths \ -w 1 Let's see what is written here:
hadoop jar giraph-examples-1.2.0-SNAPSHOT-for-hadoop-2.5.1-jar-with-dependencies.jar— this part of the command tells Hadup to run the jar file;org.apache.giraph.GiraphRunneris the name of the rener. It uses the default. Rahner can be overridden. So that, for example, at the start, it deletes old data or performs some other preparatory actions. You can read more about this in the book Practical Graph Analytics with Apache Giraph;org.apache.giraph.examples.SimpleShortestPathsComputation- the class containing the compute method to be executed;-vifspecifies the class that will read the input file with vertices. This class is selected depending on the format of the input file and may be different, if necessary, it can even be overridden (see Practical Graph Analytics with Apache Giraph). Description of standard classes can be found here ;-vip- the path to the input file that contains the vertex descriptions;-vof- in what format the result of the work will be saved. If desired, redefined; for descriptions of standard classes, see here ;-op- where to save;-wis the number of workers (processes that handle a vertex graph).
More details about the launch options can be found by typing in the console:
hadoop jar \ giraph-examples-1.2.0-SNAPSHOT-for-hadoop-2.5.1-jar-with-dependencies.jar \ org.apache.giraph.GiraphRunner \ org.apache.giraph.examples.SimpleShortestPathsComputation -h After launch, we can read the result in shortestpaths by executing
hdfs dfs -text shortestpaths/* 3. Creating your own project
And now let's write an application that will count the degree of vertices in an undirected graph. I am creating a new Maven project. How to do this is written, for example, here . At the root of the project is pom.xml, fill it in the following way:
<?xml version="1.0" encoding="UTF-8"?> <project xmlns="http://maven.apache.org/POM/4.0.0" xmlns:xsi="http://www.w3.org/2001/XMLSchema-instance" xsi:schemaLocation="http://maven.apache.org/POM/4.0.0 http://maven.apache.org/xsd/maven-4.0.0.xsd"> <modelVersion>4.0.0</modelVersion> <groupId>ru.simple.giraph.project.org</groupId> <artifactId>simple-giraph-project</artifactId> <version>1.0-SNAPSHOT</version> <repositories> <repository> <id>cloudera</id> <url> https://repository.cloudera.com/artifactory/cloudera-repos/ </url> </repository> </repositories> <properties> <org.apache.hadoop.version>2.6.0-cdh5.5.1</org.apache.hadoop.version> </properties> <build> <plugins> <plugin> <artifactId>maven-assembly-plugin</artifactId> <version>2.4</version> <configuration> <finalName>simple-giraph-project</finalName> <descriptor> ${project.basedir}/src/main/assembly/single-jar.xml </descriptor> </configuration> <executions> <execution> <goals> <goal>single</goal> </goals> <phase>package</phase> </execution> </executions> </plugin> </plugins> </build> <dependencies> <dependency> <groupId>org.apache.hadoop</groupId> <artifactId>hadoop-client</artifactId> <version>${org.apache.hadoop.version}</version> </dependency> <dependency> <groupId>org.apache.hadoop</groupId> <artifactId>hadoop-common</artifactId> <version>${org.apache.hadoop.version}</version> </dependency> <dependency> <groupId>org.apache.giraph</groupId> <artifactId>giraph-core</artifactId> <version>1.1.0-hadoop2</version> </dependency> <dependency> <groupId>com.google.guava</groupId> <artifactId>guava</artifactId> <version>19.0</version> </dependency> </dependencies> </project> You can read about how to create pom-files and work with Maven in the official guide here . After that in src, I create a new file ComputationDegree.java. This will be our class that will count the degrees of the vertices:
/** * This is a simple implementation of vertex degree computation. */ package ru.simple.giraph.project.org; import com.google.common.collect.Iterables; import org.apache.giraph.graph.BasicComputation; import org.apache.giraph.graph.Vertex; import org.apache.hadoop.io.IntWritable; import org.apache.hadoop.io.NullWritable; import org.apache.hadoop.io.Text; import java.io.IOException; public class ComputeDegree extends BasicComputation<IntWritable, IntWritable, NullWritable, Text> { public void compute(Vertex<IntWritable, IntWritable, NullWritable> vertex, Iterable<Text> iterable) throws IOException { if (getSuperstep() == 0){ sendMessageToAllEdges(vertex, new Text()); } else if (getSuperstep() == 1){ Integer degree = Iterables.size(vertex.getEdges()); vertex.setValue(new IntWritable(degree)); }else{ vertex.voteToHalt(); } } } It works like this:
- At the first step, each vertex sends messages to its neighbors.
- Each vertex counts the number of incoming messages and stores them in the vertex value.
- All vertices vote to stop computing.
At the output, we have a graph that, in the value of a vertex, stores the degree of the vertex. Compile with the command:
mvn package -fae -DskipTests clean install Usually after compilation, the target folder is created, in which the giraph-test-fatjar.jar file is located. This file we will run. Take some very simple graph, like this:
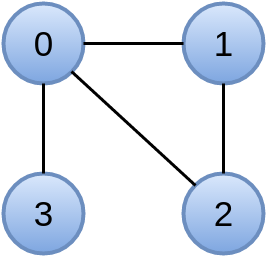
We will use org.apache.giraph.io.formats.IntIntNullTextVertexInputFormat as the input data format, so the file describing our graph will look like this:
0 0 1 2 3 1 0 0 2 2 0 0 1 3 0 0 Save it to the file example_graph.txt, put on HDFS and run our program:
hadoop jar ./target/giraph-test-fatjar.jar org.apache.giraph.GiraphRunner \ ru.giraph.test.org.ComputeDegree \ -vif org.apache.giraph.io.formats.IntIntNullTextVertexInputFormat \ -vip example_graph.txt \ -vof org.apache.giraph.io.formats.IdWithValueTextOutputFormat \ -op degrees \ -w 1 See the result:
hdfs dfs -text degrees/* And we see something like this:
0 3 2 2 1 2 3 1 So, in this article we learned how to compile Giraph and wrote our little application. And the whole project can be downloaded here .
In the next article we will talk about working with Giraph using the example of the Restricted Boltzmann Machine learning algorithm. We will try to speed up the algorithm as much as possible in order to understand the subtleties of setting up the Giraph and to assess how comfortable / productive / stable this system is.
Source: https://habr.com/ru/post/305924/
All Articles