API Yandex.Panoram: how to make your virtual walk or just bring a person from the subway
We have been asked for a very long time to create an API that allows embedding Yandex Panoramas on our sites, and we were finally able to do it. Even more: our API allows you to create your own panoramas.
In this post I will tell you what you need to know to do such virtual walks. Why it was not so easy to make an API for them, as we resolved various problems arising in the way and explain in detail what you can do with the help of our API (more than it might seem at first glance).
Engine
Panorama service launched on Yandex.Maps back in September 2009. At first, there were only a few panoramas of the sights and they worked, as you might guess, in Flash. Since then much water has flowed under the bridge, several million panoramas have begun, mobile platforms have begun to grow rapidly, and Flash has not made its way there. Therefore, around 2013, we decided that we needed a new technology. And the basis for this technology was HTML5.
The API we started with is Canvas2D. Now it may seem strange, but in 2013 this choice was quite reasonable. WebGL was standardized only two years earlier, didn’t really get to mobiles (in iOS, for example, WebGL worked only in the iAd which had almost died), and it didn’t work very well on desktops. A reader may object to me that everything had to be done on CSS 3D, as it was then popular. But using CSS 3D, you can draw only a cubic panorama, while all Yandex panoramas are spherical (stored in an equidistant projection).
This was the most important technical difficulty in the development. The fact is that correctly and accurately projecting a spherical panorama on the screen is not easy due to the nonlinearity of this transformation. A naive implementation of such a projection would require a whole heap of trigonometric calculations for each pixel of the screen - after all, you need to find the corresponding point in the panoramic image and determine its color. In addition, Canvas 2D does not provide an effective way to manipulate each image pixel separately.
One of the oldest tricks in computer graphics, linear interpolation, comes to the rescue in this difficult situation. We will not accurately calculate the coordinates of the corresponding point in the panoramic image for each pixel of the screen. We will do this only for some pixels, which we will choose in advance - and for the rest we will find the coordinates, interpolating between those already calculated. The only question is how to select these pixels.
As already noted, recording pixel-by-pixel color in Canvas2D is inconvenient, but it is convenient to work with images and their two-dimensional transformations. In addition, such transformations actually implement interpolation for us. It was their decision to use as the basis of the panorama rendering algorithm. And since a two-dimensional linear transformation is uniquely defined by two triplets of points, one on the screen and the other on a panoramic image, the choice of a set of points for which we will consider the projection exactly turns out by itself: we divide the panoramic sphere into triangles. The final rendering algorithm is as follows:
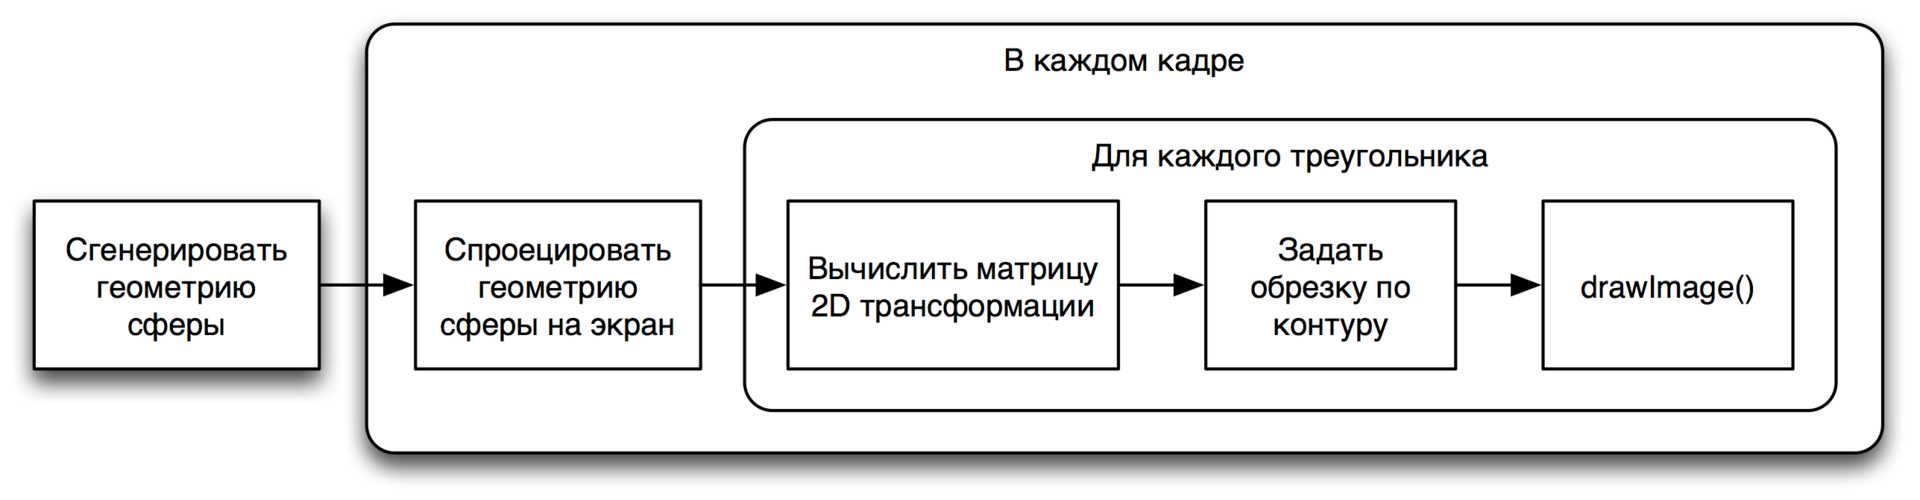
Having written all this and running it, I saw something well described by the word “slideshow”. The frame rate was completely unacceptable. After profiling, I found that the save() and restore() Canvas 2D context functions consume most of the time. Where did they come from? Of the features of working with trimming in Canvas2D. Unfortunately, to be able to reset the current cropping and set a new one, you must save the context state before setting (this is just save() ), and after all the necessary drawing, restore the saved state (and this is restore() ). And since these operations work with the entire state
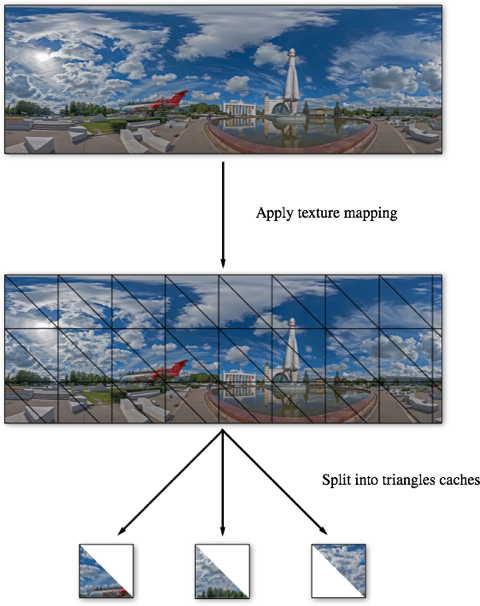
context, they are not cheap. In addition, we do the same trimming every time (after initialization, the division of the sphere into triangles and their imposition on the panoramic image does not change). It makes sense to cache it!
No sooner said than done. After generating the triangulated sphere, we “cut out” each triangle from the panoramic image and save it in a separate cache canvas. The rest of this cache remains transparent. After this optimization, it was possible to get 30-60 frames per second even on mobile devices. From this experience, the following lesson can be learned: when designing rendering on Canvas 2D, all you can do is cache and pre-render. And if something is suddenly impossible - do it so that it is possible, and also prerender.
Any caching (like many things in this life) has a downside: memory consumption inevitably increases. This is exactly what happened with the rendering of the panorama. Increased appetites have created many problems. The most noticeable are the crashes of browsers even on desktop platforms, and also a rather slow start. In the end, tired of fighting these problems, we abandoned the reprojection of the panoramic image on Canvas 2D and went the other way. But he is not interesting at all :)
However, even before we started looking from the side of WebGL. We were pushed to this by various reasons, the main one of which, perhaps, was iOS 8, which WebGL earned in Safari.
The main problem in the development of WebGL-rendering version was the size of the panoramas. Panoramic image is not completely climbed into any texture. We solved this problem again, guided by the principle “follow the old principles as the world principles”, and divided the panoramic sphere into sectors. Each sector has its own texture. At the same time, to save memory and GPU resources, invisible sectors are completely removed. When they should appear on the screen again, the data for them is reloaded again (usually from the browser cache).
Embedding panoramas
Embedding panoramas using the Maps API begins with the connection of the necessary modules. This can be done in two ways: either by specifying them in the load parameter when the API is connected, or by using a modular system (we will soon add the panorama modules to the default module set).
<!-- API. --> <script src="https://api-maps.yandex.ru/2.1/?lang=ru_RU&load=panorama.locate,panorama.Player"></script> <script> // . ymaps.modules.require([ 'panorama.createPlayer', 'panorama.isSupported' ]) .done(function () { // ... }); </script> Before you start working with panoramas, you must make sure that the user's browser is supported by the engine. This can be done using the function ymaps.panorama.isSupported :
if (!ymaps.panorama.isSupported()) { // , // , etc. } else { // . } To open a panorama, we first need to get its description from the server. This is done using the ymaps.panorama.locate function:
ymaps.panorama.locate( [0, 0] // ).done(function (panoramas) { // ... }); The result that will be resolved by the promis returned by a call to ymaps.panorama.locate will be an array of panoramas located in a certain neighborhood of the passed point. If there is no such panorama, the array will be empty. If several such panoramas are found, they will be sorted by distance from the transmitted point. The first one will be closest.
You can also request aerial panoramas:
ymaps.panorama.locate( [0, 0], // { layer: 'yandex#airPanorama' } ).done(function (panoramas) { // ... }); Having received the description of the panorama, we can create a player that displays it on the page:
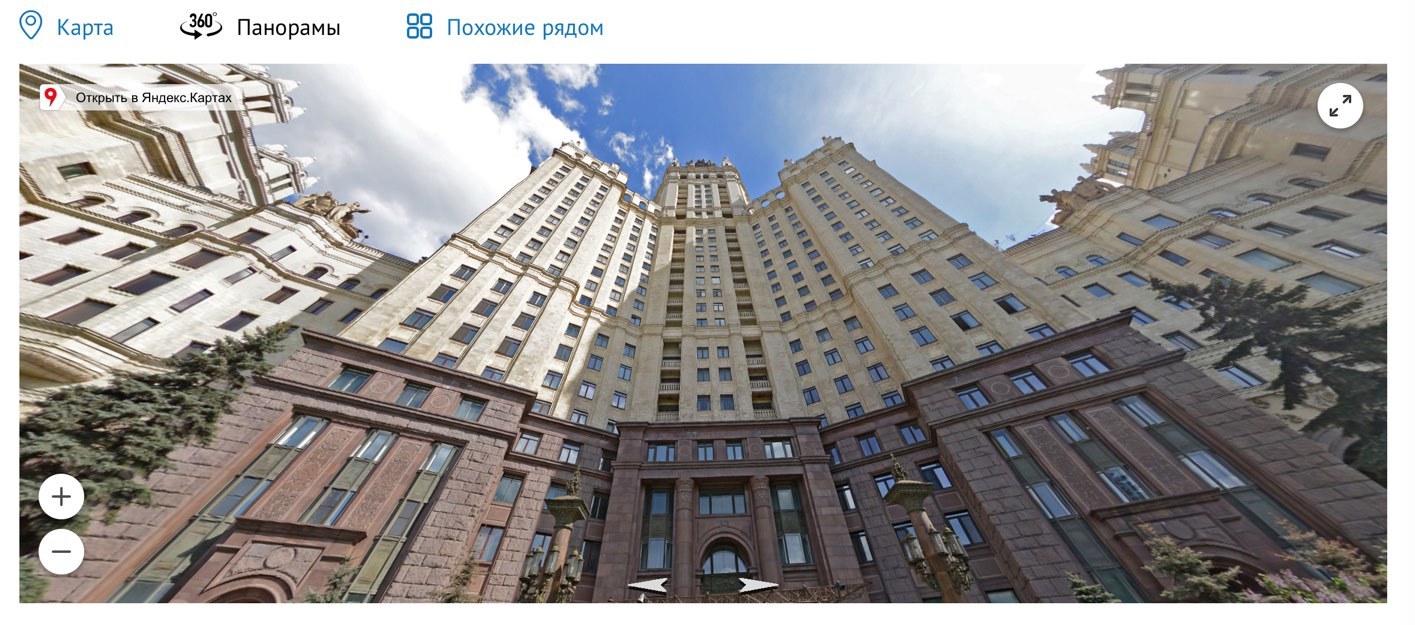
var player = new ymaps.panorama.Player( 'player', // ID , panorama // , ); And we will see on the page:
The fastest and easiest way to open a panorama is the function ymaps.panorama.createPlayer :
ymaps.panorama.createPlayer( 'player', // ID DOM-, [0, 0] // , ).done(function (player) { // ... }); In this case, you can specify one or more options by the third parameter:
ymaps.panorama.createPlayer( 'player', [0, 0], { // , layer: 'yandex#airPanorama', // direction: [120, 10], // span: [90, 90], // controls: ['zoomControl', 'closeControl'] } ).done(function (player) { // ... }); After creation, the player provides a compact API for managing the display of panoramas and subscriptions to user events. But, as it seems to me, this is not the most interesting feature of the API panoramas.
Your panoramas
Perhaps the most interesting opportunity that the API provides is to create your own panoramas and embed them on the site.
Any panorama begins with shooting and preparing a panoramic image. For shooting, you can use a special device, an ordinary camera or even a smartphone. The main thing is that the result of shooting and glueing should be a spherical panorama in an equidistant projection. For example, a standard camera application on Android can shoot and glue panoramas in the desired projection. That we used them for shooting panoramas of our cozy openspace.
After we have shot the panoramic image, it is necessary to prepare it for display in the player. For this we need to cut it into tiles. In addition, we can prepare images of several different sizes for different levels of mastabilization. The player will select the most appropriate level for the current size of the DOM element in which the player is open and the angular dimensions of the visible panorama area. And if the smallest level is less than 2048 pixels across the width of the image, it will be used to create the “progressive jeep-effect”. The player will load the tiles of this level with the highest priority and will show them where there are no better quality tiles (for example, if they have not yet been loaded or have been pushed out of memory and have not yet rebooted).
To cut images into tiles, you can use any software (if you have a certain perseverance - even Paint). The size of the tiles should be a power of two (those of you who worked with WebGL, I think, guess where your legs grow from this restriction). I used ImageMagick:
# , # ( , , ). $ convert src.jpg -resize 7168x3584 hq.jpg # 512 512 . $ convert hq.jpg -crop 512x512 \ -set filename:tile "%[fx:page.x/512]-%[fx:page.y/512]" \ "hq/%[filename:tile].jpg" # « # ». , # . $ convert hq.jpg -resize 512x256 lq/0-0.jpg Let's finally write some code for our panorama. An API is a system of interconnected interfaces. These interfaces describe the panorama object and all associated with it.
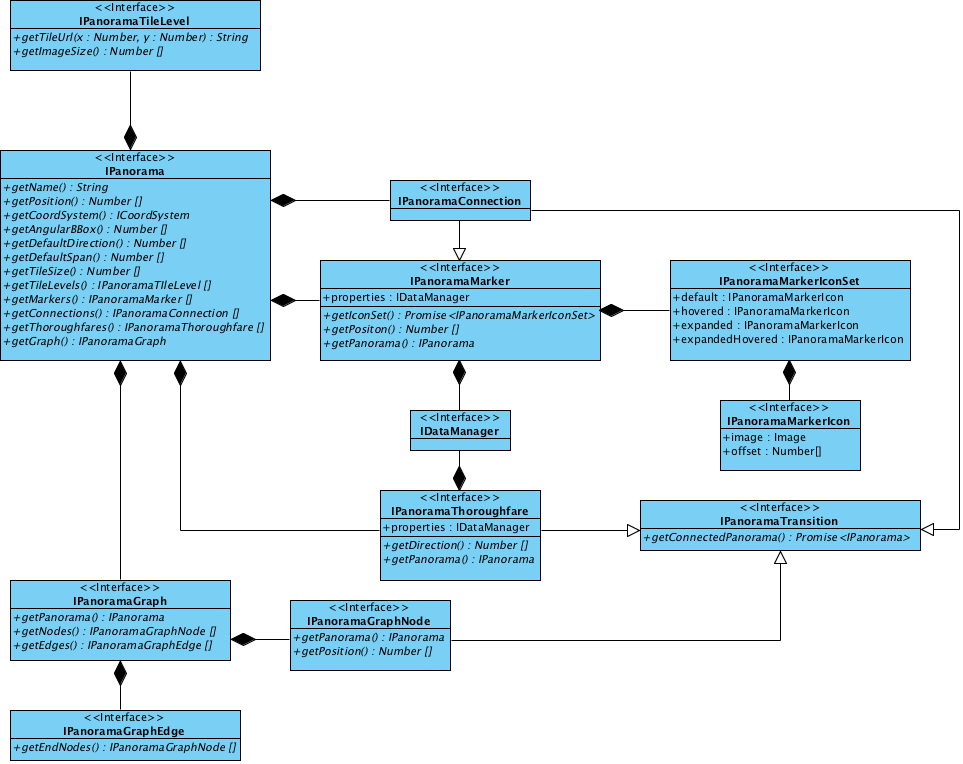
Let's now analyze this image by entities.
The panorama object must implement the IPanorama interface. To write your panorama class was easier, made the abstract class ymaps.panorama.Base . It provides reasonable default implementations for some IPanorama methods, as well as the validate method, which checks whether the panorama satisfies the restrictions imposed by the player (for example, if the specified tile size is a power of two). Let's take it and use it.
function Panorama () { Panorama.superclass.constructor.call(this); // ... // , . this.validate(); } ymaps.util.defineClass(Panorama, ymaps.panorama.Base, { // , . }); We begin by describing the player to the panorama geometry. To do this, you need to implement the getAngularBBox method, which returns, according to the documentation, an array of four numbers. What is the meaning of these numbers? To answer this question, let us recall that our panorama is spherical, that is, superimposed on a sphere. To describe the position of the panoramic image on the sphere, it is necessary to select some "reference" points. Usually for a rectangle (and a panoramic image, not being on a sphere, it is just like any other image in a computer) that the coordinates of its two opposite corners are chosen. In our case, this approach continues to work on the sphere, because the vertical sides of the image become meridians when they are superimposed, and the horizontal sides become parallels. This means that each side of the rectangle has its own angular coordinate, common to all points of this side. It is these coordinates of the sides that make up the array returned by the getAngularBBox method, defining a kind of spherical rectangle bounding the panorama (hence the name of the method).
The player imposes an important limitation on the geometry of the panorama (and therefore on the panoramic image itself): the panoramic image must be closed on the sphere horizontally, forming a full circle. For the values returned by the getAngularBBox method, this means that the difference between the right and left corner of the panorama should be 2π. As for the vertical borders, they can be any.
The panorama that we shot with a smartphone is not only complete horizontally, but also vertically, that is, from pole to pole. Therefore, the boundaries of the panorama on the sphere will be the intervals [π/2, -π/2] vertically (from the upper pole to the lower) and [0, 2π] horizontally (here, for simplicity, we assume that the direction to the joint of the panorama coincided with the direction to north, which of course is not true). It turns out this code:
getAngularBBox: function () { return [ 0.5 * Math.PI, 2 * Math.PI, -0.5 * Math.PI, 0 ]; } You also need to implement methods that return the position of the panorama and the coordinate system in which it is set. This data will be used by the player for correct positioning in the scene of objects related to the panorama (about them below).
getPosition: function () { // , ... return [0, 0]; }, getCoordSystem: function () { // ... , // - . return ymaps.coordSystem.cartesian; }, Now we will describe the panoramic images themselves - how they are cut into tiles and where these tiles lie. To do this, we need to implement the getTileSize and getTileLevels . With the first one everything is obvious: it returns the size of the tiles.
getTileSize: function () { return [512, 512]; } getTileLevels returns an array of objects describing the zoom levels of the panoramic image. We have them, I remind you, there were two: high (relatively) and low quality. Each such description object must implement the IPanoramaTileLevel interface, which consists of two methods: getImageSize and getTileUrl . For simplicity, we will not start a separate class for this, just return the objects with the necessary methods.
getTileLevels: function () { return [ { getTileUrl: function (x, y) { return '/hq/' + x + '-' + y + '.jpg'; }, getImageSize: function () { return [7168, 3584]; } }, { getTileUrl: function (x, y) { return '/lq/' + x + '-' + y + '.jpg'; }, getImageSize: function () { return [512, 256]; } } ]; } This completes the minimum description of the panorama, and the player will be able to display it:
var player = new ymaps.panorama.Player('player', new Panorama()); By the way, such a minimal description of the panorama can be made faster and simpler with the help function ymaps.panorama.Base.createPanorama :
var player = new ymaps.panorama.Player( 'player', ymaps.panorama.Base.createPanorama({ angularBBox: [ 0.5 * Math.PI, 2 * Math.PI, -0.5 * Math.PI, 0 ], position: [0, 0], coordSystem: ymaps.coordSystem.cartesian, name: ' -', tileSize: [512, 512], tileLevels: [ { getTileUrl: function (x, y) { return '/hq/' + x + '-' + y + '.jpg'; }, getImageSize: function () { return [7168, 3584]; } }, { getTileUrl: function (x, y) { return '/lq/' + x + '-' + y + '.jpg'; }, getImageSize: function () { return [512, 256]; } } ] }) ); In addition to the panorama itself, the player can display three types of objects: markers, transitions and links.
Markers allow you to mark objects in a panorama (for example, markers with house numbers in Yandex panoramas). The token object must implement the IPanoramaMarker interface. This interface contains only three methods: getIconSet , getPosition and getPanorama . The purpose of the last two is quite understandable from their names. The first I see necessary to clarify. The fact is that the marker is an interactive element. It changes state by responding to user events. These states and how they change by events in the UI can be written with the following diagram:

For example, a marker denoting a house. Here is its default state, the state when the cursor is pointing, and the expanded state:

It is the icons of these states that the getIconSet method returns to the player. The icon can be either loaded from the server (this is exactly what this method is made asynchronous for), and procedurally generated (using the canvas). In our example, we assume that in the panorama one marker and its icons are already loaded:
getMarkers: function () { // , // , . var panorama = this; return [{ properties: new ymaps.data.Manager(), getPosition: function () { return [10, 10]; }, getPanorama: function () { return panorama; }, getIconSet: function () { return ymaps.vow.resolve({ 'default': { image: defaultMarkerIcon, offset: [0, 0] }, hovered: { image: hoveredMarkerIcon, offset: [0, 0] } // , , // `default`. }); } }]; } Transitions are the same arrows, on click on which the player moves to the next panorama. Objects that describe transitions must implement the IPanoramaThorougfare interface:
getThoroughfares: function () { // :) var panorama = this; return [{ properties: new ymaps.data.Manager(), getDirection: function () { // , // , . return [Math.PI, 0]; }, getPanorama: function () { return panorama; }, getConnectedPanorama: function () { // . // , // , ymaps.panorama.locate. return ymaps.panorama.locate(/* ... */) .then(function (panoramas) { if (panoramas.lengths == 0) { return ymaps.vow.reject(); } return panoramas[0]; }); } }]; } Connections are a kind of hybrid of markers and transitions: they look like the first, and behave like the last. In the code, they are implemented in the same way as markers, but with the addition of the getConnectedPanorama method (see IPanoramaConnection ).
Instead of conclusion
The Panoramas API is currently running in beta status. Embed, test on your websites and applications, tell us about it in a club , a group on VKontakte , Facebook or through support . Here is CIAN already :)
')
Source: https://habr.com/ru/post/305846/
All Articles