How to connect to the server via RDP from Windows, Mac OS, iPhone, iPad, Android, Ubuntu or Debian (Linux OS)
All servers created by Windows servers on UltraVDS by default are immediately available for connection using the standard RDP (Remote Desktop Protocol) protocol - the usual “Remote Desktop Connection” in Russian-language editions of Windows.
This article will describe how to connect to the newly created virtual server on UltraVDS from various devices (operating systems). If you need any other connection method (RAdmin, TeamViewer, etc.) after successfully connecting via RDP, you can configure it in the same way as any other software.
The article is quite long due to the fact that it describes in detail the steps how to connect from each of the most popular systems, so the hot links for navigation were taken up:


When using the standard Windows operating system, you need to open the following path to connect to the server:
')
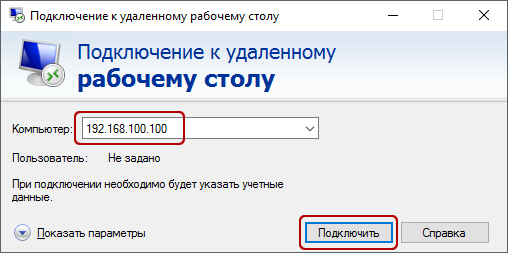
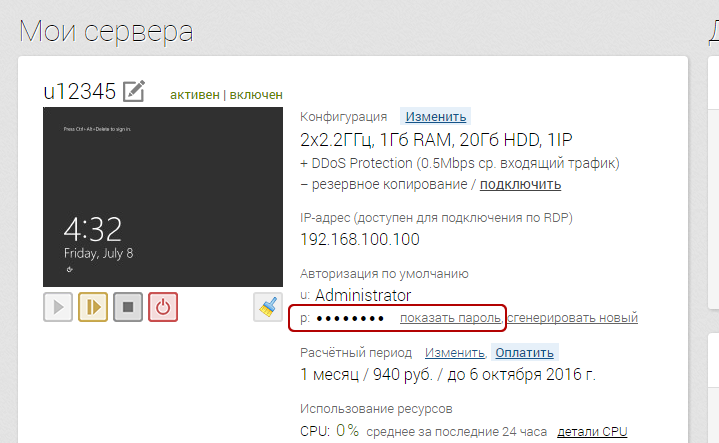
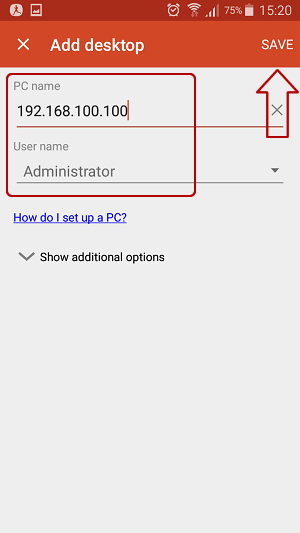
In the window that opens, you must specify the IP address of the VDS server created for you. If you ordered a server with multiple IP addresses, you can use any of them to connect.
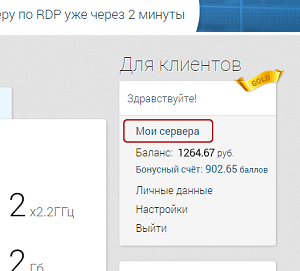
The IP address of your server is listed near your server in your account in the "My Servers" section.

After entering the server’s IP address, click the Connect button and you will see a window with authorization fields. Here you need to go under the new user:

When creating each new server, the system automatically generates a random Administrator password. This password is also displayed in your account near your server:
In some editions of Windows there is a strangeness: if the password from the server is copied and pasted in the authorization field before connecting, nothing will happen when trying to connect, and the RDP client will again show the authorization window as if the credentials were entered incorrectly. In this case, you must enter the password manually (capital letters are large, small - small, in the English keyboard layout).
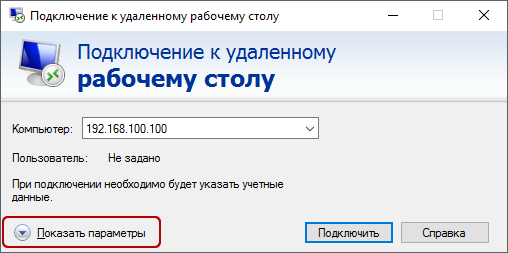
Connecting to a remote desktop is a very convenient thing, with its help you can transfer files from computer to server and back by simply copying and pasting them, the same with the text in the clipboard. You can also transfer any USB devices and network printers / scanners to the server from your computer. To do this, the first time you connect to the server, select "Show options" in the lower left corner.
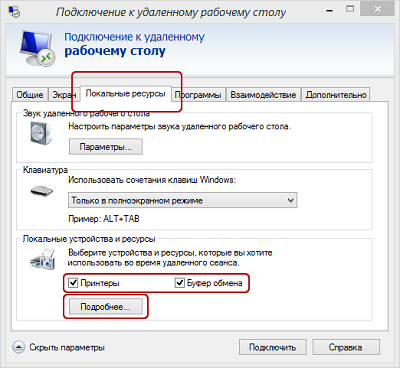
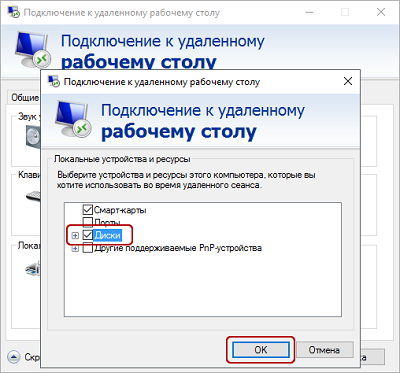
In the window that opens, go to the “Local Resources” tab and select the required parameters:
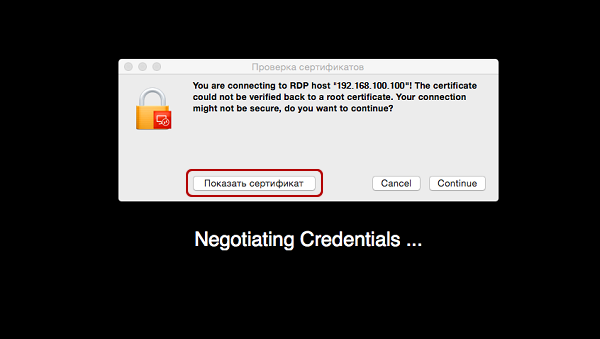
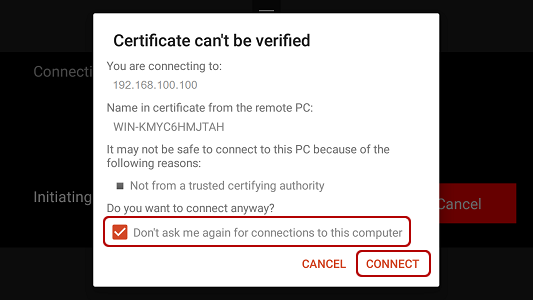
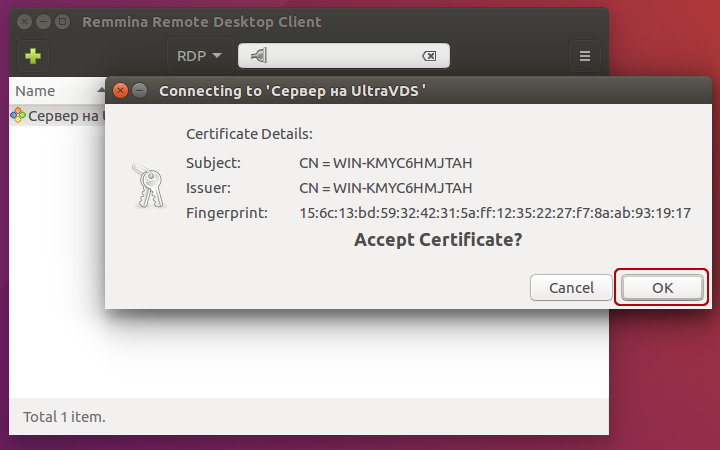
When you connect to the server, you can see information about the untrusted security certificate . The reason for this is that the server encrypts the transmitted data with an SSL certificate, which it itself generated automatically. This notice is not an indication of a security issue, but only warns you that the connection is encrypted using a certificate that was not issued by an authorized center.
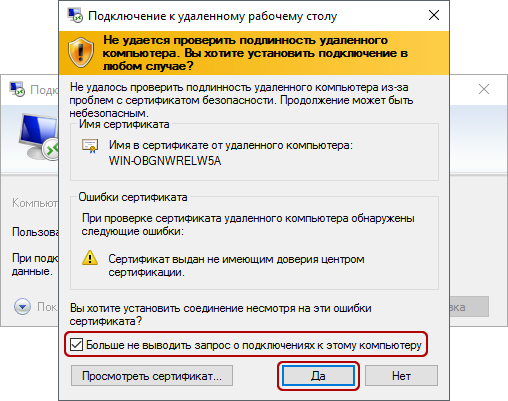
Check the box here “Do not ask for connections to this computer again” and click “Yes”.
For Mac OS, Microsoft releases the official RDP client, which works stably when connected to any version of Windows.
You can download it from iTunes here: https://itunes.apple.com/gb/app/id715768417
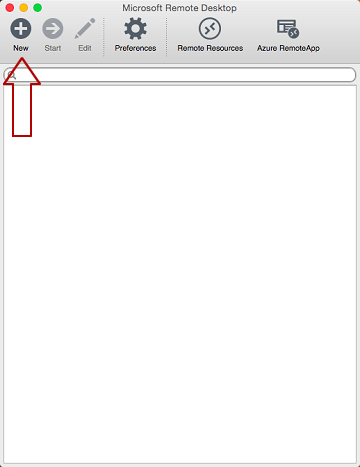
The program interface is simple and intuitive. Before you begin, you must configure the connection settings. To do this, create a new one:
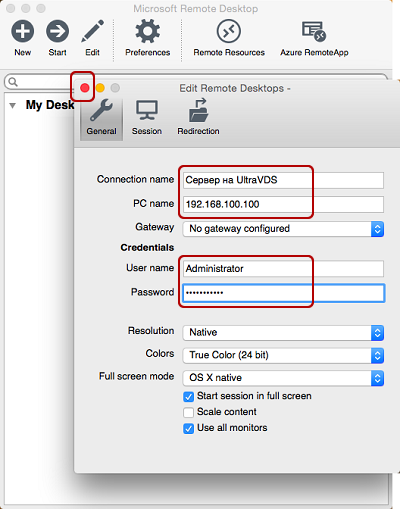
In the connection settings window, we specify an arbitrary name, for example, “Server on UltraVDS”, IP address of the created server and data for authorization (the Administrator login and password assigned to the server in automatic mode) - these data are displayed in your personal account .
After exiting the settings window, everything will be saved automatically and in the list of connections you will see the newly created one:
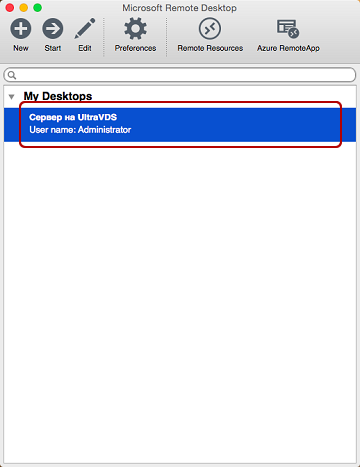
Double click on it and you will connect to your server.
When you connect to the server, you can see information about the untrusted security certificate. Why such a notification occurs and what it means is described above .

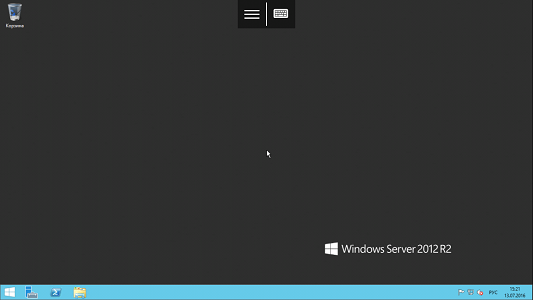
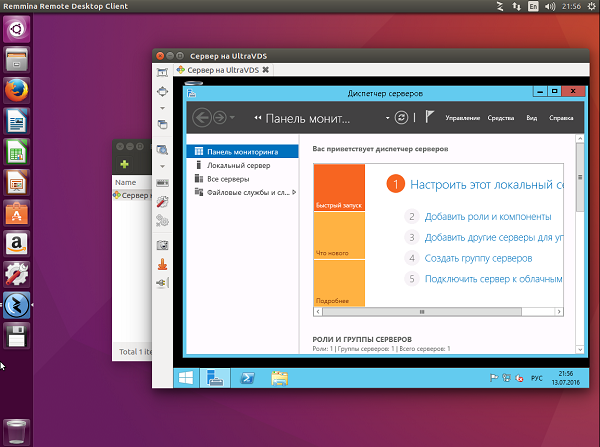
By adding your server’s self-signed certificate to trusted or simply accepting it once, you will see your virtual server’s Windows desktop.
Before connecting to the server, you need to download the Microsoft Remote Desktop application from the Apple Store (this is the official Microsoft RDP client):
https://itunes.apple.com/ru/app/id714464092
Run the application after installation and click on add a new connection:
In the window for creating a new connection, you need to specify the IP address of your virtual server and the data for authorization, which are displayed in your personal account ( for details, see where they are listed above ).
When you connect to the server, you can see information about the untrusted security certificate. The reason for this is described above .
Select “No more asking for this PC” and click “Accept”.
If the authorization data and server IP address were entered without error, you will successfully connect to your server.
First of all, you need to download and install the Microsoft Remote Desktop from Google Play (this is the official Microsoft RDP client):
https://play.google.com/store/apps/details?id=com.microsoft.rdc.android&hl=en
Run the application after installation and click on add a new connection.
In the window for creating a new connection, you need to specify the IP address of the created VDS server and the data for authorization ( where they will be described just above ).

When you connect to the server, you can see information about the untrusted security certificate. The reason for this is described above .
Select the tick "Don't ask me again for connections to this computer" and click "Connect".
If the authorization data and server IP address were entered without error, you will successfully connect to your server.
RDP is a proprietary protocol of Microsoft, which, in turn, does not release RDP clients for Linux operating systems.
However, there are still different working versions from various manufacturers.
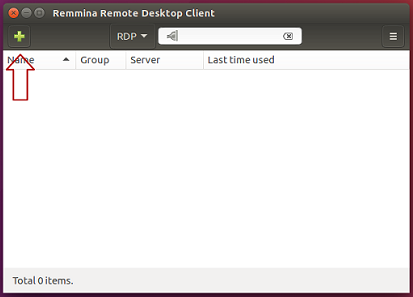
We recommend using the Remmina client.
For Ubuntu users, there is a special repository with various application packages, including Remmina and RDP.
Installation is done in 3 simple commands, which are entered one by one in the Terminal:
To install the Remmina package
Install updates
Install the RDP plugin
If you have already installed or launched an existing version of Remmina, then you need to restart it. You can do this by reloading the computer, or by executing the following command in the same terminal:
Open the search menu and find there a freshly installed Remmina package.

Click on adding a new connection and fill in the fields with data for connecting and authorizing to your server ( where the data for connecting to your server is described above ):

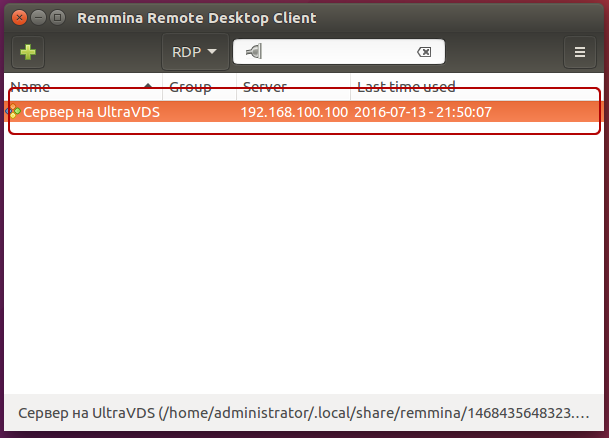
After saving, your server will always be available in the list of connections for quick access. To connect to it, double-click on the line of your server.
When you first connect to the server, you can see information about the untrusted security certificate. The reason for this is described above . Just click "OK" and you will see the desktop of your server.
RDP (Remote Desktop Connection) is a proprietary protocol of Microsoft, and they, in turn, do not release RDP clients for Linux operating systems.
But still there are different working versions from one or another development company.
We recommend using Remmina RDP client.
To install the Remmina application and the RDP plug-in for it, you need to open the package installation manager:
Here in the search bar, enter “Remmina” and select all the results for installation:

The installation takes literally 3-4 seconds, after which you can immediately use the application.
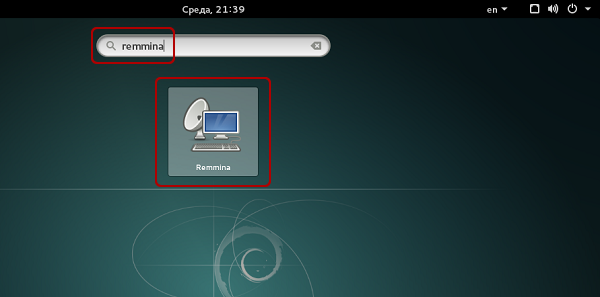
Find it in the main menu and run:
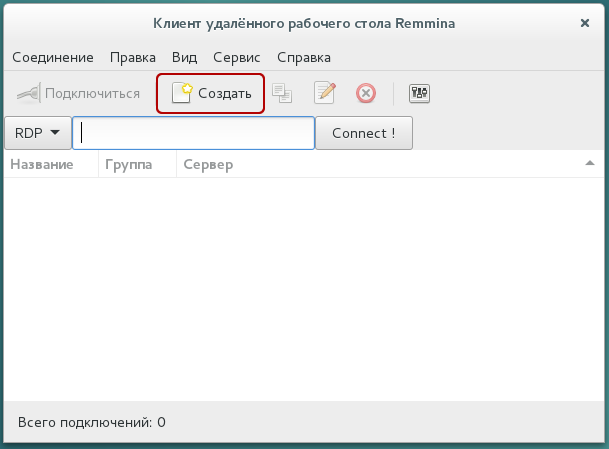
Before you start, you need to create a new connection for convenience in the future:
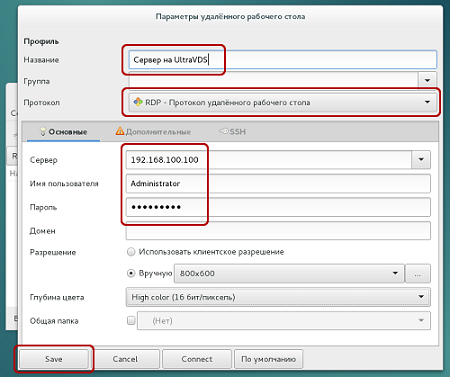
In the window that opens, you must set the correct RDP connection parameters and data for authorization ( indicated in the UltraVDS personal account ):
After saving, your server will always be available in the list of connections for quick access. To connect to it, just double click on the line of your server.
When you first connect to the server, you can see information about the untrusted security certificate. The reason for this is described just above . Just click "OK" or "Accept" and you will see the desktop of your server.
By default, on all servers created on UltraVDS, only RDP connections are allowed from computers (clients) that are authenticated at the network level. Some Linux RDP clients may not support this authentication. In this case, before connecting to the server via RDP, you need to cancel this requirement on the VDS server itself.
UltraVDS implements the possibility of emergency access to the server in case you can’t connect to it, which is what we will use to turn off the requirement of mandatory authentication. To open the emergency mode, go to your My Account page on the “My Servers” page and click on the screenshot of the required server

In the window that opens, you must activate the ability to authorize the user. This is done by pressing the Ctr + Alt + Del key combination, but since such a combination cannot be transmitted via the web, a special button was placed on the top pane of the window:
Next, enter the administrator password and press Enter:

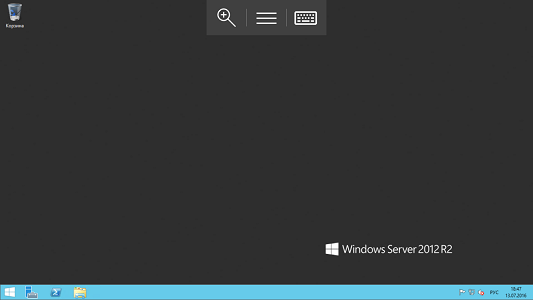
You will see the standard Windows desktop. Here, click the "Start" button (Start), find "My PC" (This PC) and click on it with the right mouse button:

Select “Properties” in the menu to open the system information window.
In the menu on the left, you need to find the button for controlling remote desktop settings (Remote settings).
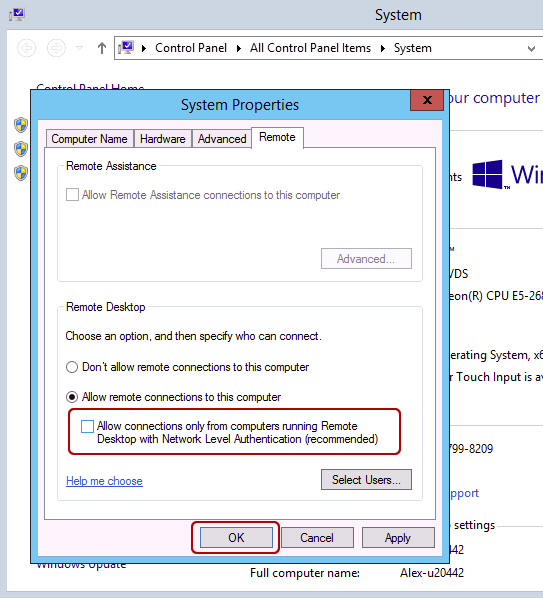
The last step is to uncheck the “Allow connections only from ...” option and click “OK”.
This article will describe how to connect to the newly created virtual server on UltraVDS from various devices (operating systems). If you need any other connection method (RAdmin, TeamViewer, etc.) after successfully connecting via RDP, you can configure it in the same way as any other software.
The article is quite long due to the fact that it describes in detail the steps how to connect from each of the most popular systems, so the hot links for navigation were taken up:
Connecting to a virtual server from a desktop version of Windows (XP, 7, 8, 8.1, 10)
When using the standard Windows operating system, you need to open the following path to connect to the server:
-> -> -> ')
In the window that opens, you must specify the IP address of the VDS server created for you. If you ordered a server with multiple IP addresses, you can use any of them to connect.
The IP address of your server is listed near your server in your account in the "My Servers" section.
After entering the server’s IP address, click the Connect button and you will see a window with authorization fields. Here you need to go under the new user:
When creating each new server, the system automatically generates a random Administrator password. This password is also displayed in your account near your server:
In some editions of Windows there is a strangeness: if the password from the server is copied and pasted in the authorization field before connecting, nothing will happen when trying to connect, and the RDP client will again show the authorization window as if the credentials were entered incorrectly. In this case, you must enter the password manually (capital letters are large, small - small, in the English keyboard layout).
Connecting to a remote desktop is a very convenient thing, with its help you can transfer files from computer to server and back by simply copying and pasting them, the same with the text in the clipboard. You can also transfer any USB devices and network printers / scanners to the server from your computer. To do this, the first time you connect to the server, select "Show options" in the lower left corner.
In the window that opens, go to the “Local Resources” tab and select the required parameters:
When you connect to the server, you can see information about the untrusted security certificate . The reason for this is that the server encrypts the transmitted data with an SSL certificate, which it itself generated automatically. This notice is not an indication of a security issue, but only warns you that the connection is encrypted using a certificate that was not issued by an authorized center.
Check the box here “Do not ask for connections to this computer again” and click “Yes”.
Connecting to VDS server with Mac OS
For Mac OS, Microsoft releases the official RDP client, which works stably when connected to any version of Windows.
You can download it from iTunes here: https://itunes.apple.com/gb/app/id715768417
The program interface is simple and intuitive. Before you begin, you must configure the connection settings. To do this, create a new one:
In the connection settings window, we specify an arbitrary name, for example, “Server on UltraVDS”, IP address of the created server and data for authorization (the Administrator login and password assigned to the server in automatic mode) - these data are displayed in your personal account .
After exiting the settings window, everything will be saved automatically and in the list of connections you will see the newly created one:
Double click on it and you will connect to your server.
When you connect to the server, you can see information about the untrusted security certificate. Why such a notification occurs and what it means is described above .
By adding your server’s self-signed certificate to trusted or simply accepting it once, you will see your virtual server’s Windows desktop.
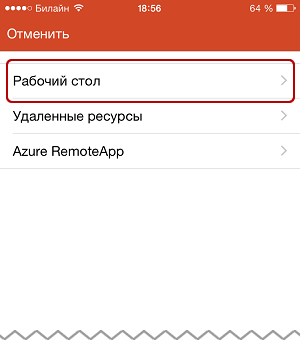
Connecting to a VPS server from a smartphone or tablet on iOS (from iPhone or iPad)
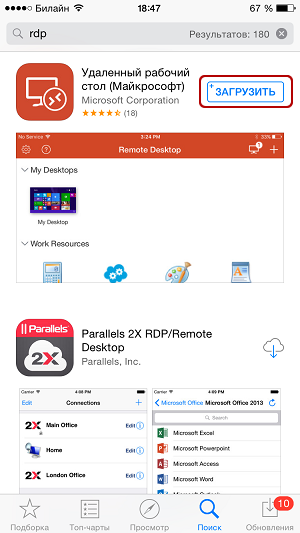
Before connecting to the server, you need to download the Microsoft Remote Desktop application from the Apple Store (this is the official Microsoft RDP client):
https://itunes.apple.com/ru/app/id714464092
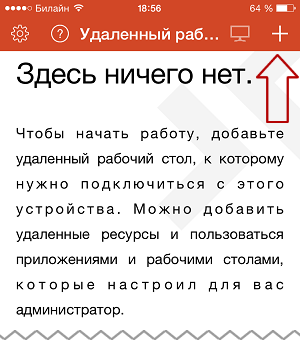
Run the application after installation and click on add a new connection:
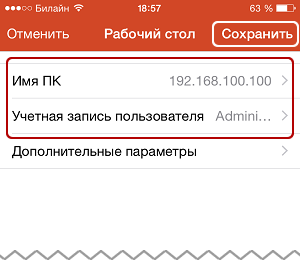
In the window for creating a new connection, you need to specify the IP address of your virtual server and the data for authorization, which are displayed in your personal account ( for details, see where they are listed above ).
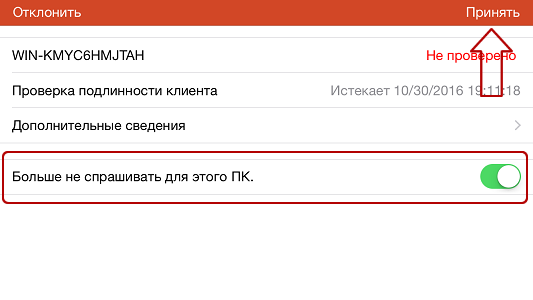
When you connect to the server, you can see information about the untrusted security certificate. The reason for this is described above .
Select “No more asking for this PC” and click “Accept”.
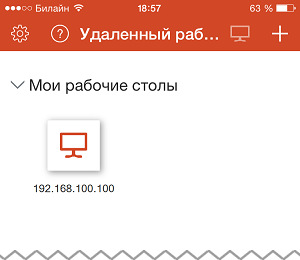
If the authorization data and server IP address were entered without error, you will successfully connect to your server.
Connecting to a virtual server from a smartphone or tablet on Android
First of all, you need to download and install the Microsoft Remote Desktop from Google Play (this is the official Microsoft RDP client):
https://play.google.com/store/apps/details?id=com.microsoft.rdc.android&hl=en
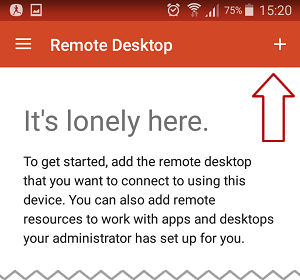
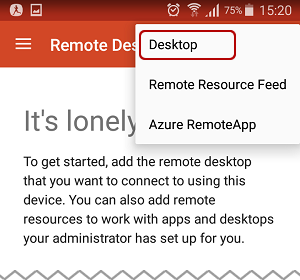
Run the application after installation and click on add a new connection.
In the window for creating a new connection, you need to specify the IP address of the created VDS server and the data for authorization ( where they will be described just above ).
When you connect to the server, you can see information about the untrusted security certificate. The reason for this is described above .
Select the tick "Don't ask me again for connections to this computer" and click "Connect".
If the authorization data and server IP address were entered without error, you will successfully connect to your server.
Connecting to a server via RDP from Ubuntu
RDP is a proprietary protocol of Microsoft, which, in turn, does not release RDP clients for Linux operating systems.
However, there are still different working versions from various manufacturers.
We recommend using the Remmina client.
For Ubuntu users, there is a special repository with various application packages, including Remmina and RDP.
Installation is done in 3 simple commands, which are entered one by one in the Terminal:
To install the Remmina package
sudo apt-add-repository ppa:remmina-ppa-team/remmina-next Install updates
sudo apt-get update Install the RDP plugin
sudo apt-get install remmina remmina-plugin-rdp libfreerdp-plugins-standard If you have already installed or launched an existing version of Remmina, then you need to restart it. You can do this by reloading the computer, or by executing the following command in the same terminal:
sudo killall remmina If the process was not started, an error message will appear: the process was not found, which also suits us.Open the search menu and find there a freshly installed Remmina package.
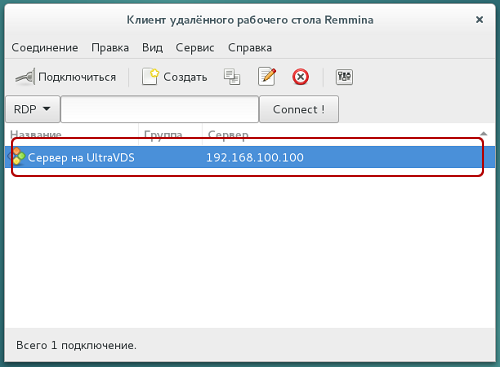
Click on adding a new connection and fill in the fields with data for connecting and authorizing to your server ( where the data for connecting to your server is described above ):
After saving, your server will always be available in the list of connections for quick access. To connect to it, double-click on the line of your server.
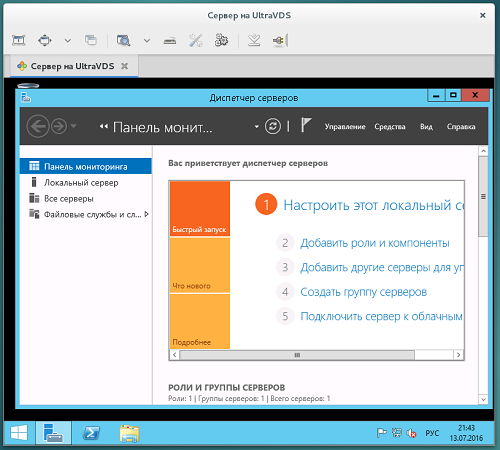
When you first connect to the server, you can see information about the untrusted security certificate. The reason for this is described above . Just click "OK" and you will see the desktop of your server.
Remote Desktop Connection (RDP) from Debian
RDP (Remote Desktop Connection) is a proprietary protocol of Microsoft, and they, in turn, do not release RDP clients for Linux operating systems.
But still there are different working versions from one or another development company.
We recommend using Remmina RDP client.
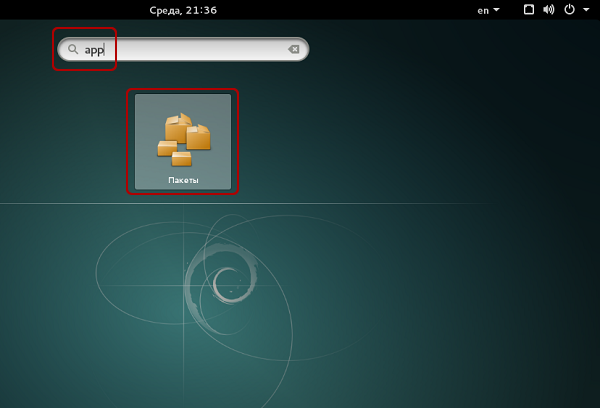
To install the Remmina application and the RDP plug-in for it, you need to open the package installation manager:
Here in the search bar, enter “Remmina” and select all the results for installation:
The installation takes literally 3-4 seconds, after which you can immediately use the application.
Find it in the main menu and run:
Before you start, you need to create a new connection for convenience in the future:
In the window that opens, you must set the correct RDP connection parameters and data for authorization ( indicated in the UltraVDS personal account ):
After saving, your server will always be available in the list of connections for quick access. To connect to it, just double click on the line of your server.
When you first connect to the server, you can see information about the untrusted security certificate. The reason for this is described just above . Just click "OK" or "Accept" and you will see the desktop of your server.
What should I do if I get an error when I try to connect with the Linux OS?
By default, on all servers created on UltraVDS, only RDP connections are allowed from computers (clients) that are authenticated at the network level. Some Linux RDP clients may not support this authentication. In this case, before connecting to the server via RDP, you need to cancel this requirement on the VDS server itself.
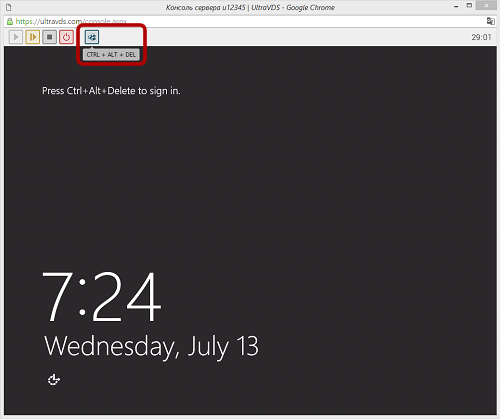
UltraVDS implements the possibility of emergency access to the server in case you can’t connect to it, which is what we will use to turn off the requirement of mandatory authentication. To open the emergency mode, go to your My Account page on the “My Servers” page and click on the screenshot of the required server
In the window that opens, you must activate the ability to authorize the user. This is done by pressing the Ctr + Alt + Del key combination, but since such a combination cannot be transmitted via the web, a special button was placed on the top pane of the window:
Next, enter the administrator password and press Enter:
You will see the standard Windows desktop. Here, click the "Start" button (Start), find "My PC" (This PC) and click on it with the right mouse button:
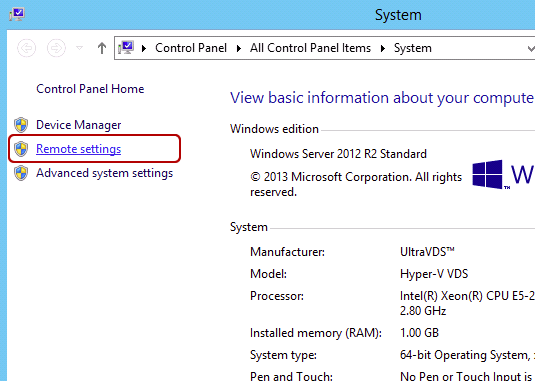
Select “Properties” in the menu to open the system information window.
In the menu on the left, you need to find the button for controlling remote desktop settings (Remote settings).
The last step is to uncheck the “Allow connections only from ...” option and click “OK”.
Source: https://habr.com/ru/post/305672/
All Articles