Styling file inputs
Hey. Today I want to tell you about how you can change the appearance of the file input.
The fact is that changing the appearance of the input is usually not difficult, but this type of input is different from the others. First of all, it is connected with security, and secondly with the fact that each browser displays this element in its own way, and it is almost impossible to influence.
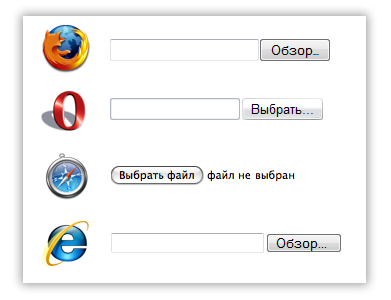
First of all, let's take a look at how file inputs are displayed without applying any styles in different browsers.
')
As you can see, in all browsers except safari there is a text field, and to the right of it is a button. I'll tell you about the differences. In Opera and IE, we can write the file address manually (I doubt that anyone has ever used this feature). Firefox, despite the fact that it has a text field, does not allow us to enter the file address there. Instead, a file selection window appears as if you click on the “Browse” button.
Let's now select a file in these fields.

As a result, everywhere, except for safari, we see the beginning of the address, which carries almost no semantic meaning. I doubt that someone did not know about it, but only the guys from the epl noticed this nonsense and made it possible to immediately see not only the name of the selected file, but also the icon. We are going to implement the same file-in-file functionality for all browsers.
But first, let's get acquainted with the problems.
1. By means of JS, we cannot simulate a click on such an input. Here is what the DOM specification
click
Simulate a mouse-click. For INPUT elements of the following values: “button”, “checkbox”, “radio”, “reset”, or “submit”.
No Parameters
No return value
No exceptions
That is, using the click method, we can simulate a click on almost all types of inputs, but not on the file input. This was done to secure the client’s computer: otherwise, the site owner could easily receive any files from the client’s computer. Although on the other hand, only the file selection window is called up by clicking. Anyway, in the firefox developer center this fact is designated as a bug.
There is a solution, and we did not invent a bicycle, we tuned it. All those who stylize the input act in the same way: an input is created with zero transparency and is placed on top of the button or image, which is the file select button.
The main difficulty in the next problem.
2. We cannot freely influence the size of the “review” buttons to adjust the input to the size of the overlapped picture. In firefox, we generally can not change the appearance of the file-input with css (except for height). That is, the task is to determine the optimal size of the overlapped image so that the minimum number of pixels is non-clickable and the empty areas do not respond to a click.
Let's look at clickable areas and their sizes in different browsers.
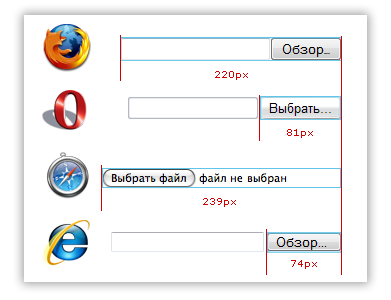
Everything inside the blue stroke is a clickable area. I note that we can increase the height of the buttons, but not the width.
The problems are clear. Get down to business.
To begin, draw a button to select a file. That's what I got.
In normal condition:
when hovering:
Now for different types of files we will prepare icons and merge them into one file.
For serious projects it is better, of course, to draw your own icons. Pavel Markovnin’s blog has good, and most importantly free icons for documents, others can search through our selection of icons .
So, we will impose an inputa pattern:
HTML:
< div class = "blocker" > <! - block that overlaps the input field to the left of the button ->
< input type = "file" id = "File1" class = "customFile" />
< div id = "BrowseButton" title = "Select File" class = "fakeButton" >
< div id = "FileName" > <! - here we will insert the file name and icon ->
CSS:
< style type = "text / css" >
# File1 {
position: absolute;
}
.customFile {
width: 219px;
margin-left: -140px;
cursor: default;
height: 21px;
z-index: 2;
filter: alpha (opacity: 0);
opacity: 0;
}
.fakeButton {
position: absolute;
z-index: 1;
width: 85px;
height: 21px;
background: url (images / button.jpg) no-repeat left top;
float: left;
}
.blocker {
position: absolute;
z-index: 3;
width: 150px;
height: 21px;
background: url (images / transparent.gif);
margin-left: -155px;
}
#FileName {
position: absolute;
height: 15px;
margin-left: 90px;
font-family: Verdana;
font-size: 8pt;
color: Gray;
margin-top: 2px;
padding-top: 1px;
padding-left: 19px;
}
#activeBrowseButton {
background: url (images / button_active.jpg) no-repeat left top;
display: none;
}
</ style >
The result looks like this:

Circled in red - blocker, file-input shown with half transparency.
Now, when choosing a file (onchange event), we need to cut the file name from the value of our file input, determine the file type by extension and shift the background so that the desired icon is displayed. Please note that in different operating systems, the file path can be via forward slash (for Mac OS, for example), or through a reverse (Windows), so cutting out the file name everywhere requires two regular expressions.
function HandleChanges () {
file = fileInput.value;
reWin = /.* (.*)/;
var fileTitle = file.replace (reWin, "$ 1" ); // rip out the file name for windows
reUnix = /.*/(.*)/;
fileTitle = fileTitle.replace (reUnix, "$ 1" ); // rip out the file name for unix-systems
fileName.innerHTML = fileTitle;
var RegExExt = /. *. (. *) /;
var ext = fileTitle.replace (RegExExt, "$ 1" ); // and its extension
var pos;
if (ext) {
switch (ext.toLowerCase ()) {
case 'doc' : pos = '0' ; break ;
case 'bmp' : pos = '16' ; break ;
case 'jpg' : pos = '32' ; break ;
case 'jpeg' : pos = '32' ; break ;
case 'png' : pos = '48' ; break ;
case 'gif' : pos = '64' ; break ;
case 'psd' : pos = '80' ; break ;
case 'mp3' : pos = '96' ; break ;
case 'wav' : pos = '96' ; break ;
case 'ogg' : pos = '96' ; break ;
case 'avi' : pos = '112' ; break ;
case 'wmv' : pos = '112' ; break ;
case 'flv' : pos = '112' ; break ;
case 'pdf' : pos = '128' ; break ;
case 'exe' : pos = '144' ; break ;
case 'txt' : pos = '160' ; break ;
default : pos = '176' ; break ;
};
fileName.style.display = 'block' ;
fileName.style.background = 'url (images / icons.png) no-repeat 0 -' + pos + 'px' ;
};
};
function MakeActive () {
activeButton.style.display = 'block' ;
};
function UnMakeActive () {
activeButton.style.display = 'none' ;
};
The last two functions, MakeActive and UnMakeActive, add a hover effect to our button. The active and inactive states of the button are split into two files so that you can easily implement animation for the appearance of the button.
Great, but there are a few problems left. First: in the markup, a large number of divs, which spoil the semantics.
Second: when js is disabled, the user will not see which file he has selected. In the case of js disabled, let's output the usual file-input, and load all the necessary markup when the page loads. Let's start:
On the page we will have only two elements:
< div id = "wrapper" >
< input id = "File1" type = "file" />
</ div >
If the user has javascript disabled, he will see the usual file input. Otherwise, the following will happen:
window.onload = WindowOnLoad;
var fileInput = document .getElementById ( 'File1' );
var fileName = document .createElement ( 'div' );
fileName.style.display = 'none' ;
fileName.style.background = 'url (images / icons.png)' ;
var activeButton = document .createElement ( 'div' );
var bb = document .createElement ( 'div' );
var bl = document .createElement ( 'div' );
function WindowOnLoad () {
var wrap = document .getElementById ( 'wrapper' );
fileName.setAttribute ( 'id' , 'FileName' );
activeButton.setAttribute ( 'id' , 'activeBrowseButton' );
fileInput.value = '' ;
fileInput.onchange = HandleChanges;
fileInput.onmouseover = MakeActive;
fileInput.onmouseout = UnMakeActive;
fileInput.className = 'customFile' ;
bl.className = 'blocker' ;
bb.className = 'fakeButton' ;
activeButton.className = 'fakeButton' ;
wrap.appendChild (bb);
wrap.appendChild (bl);
wrap.appendChild (activeButton);
wrap.appendChild (fileName);
};
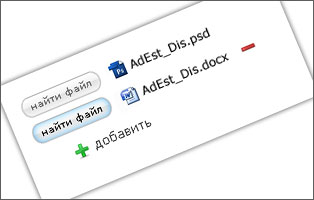
Now let's see how it looks .
In this post, we looked at the problems and techniques of creating stylized file-inputs. In the next Friday snippet will be an improved script that allows you to add multiple file-input paths.
If readers wish, in addition to the script we will make a specialized control for asp.net-programmers, allowing you to easily add such stylized inputs to the page.
Archive with lesson scripts
Original article on temporary.
* Source code was highlighted with Source Code Highlighter
Source: https://habr.com/ru/post/30560/
All Articles