iOS 10: new in creating animations

Not so long ago, an updated interface for working with interactive animations in iOS 10 was announced at WWDC 2016: now developers have a flexible tool for creating, managing and modifying. This article will discuss what changes have occurred and what the new API is.
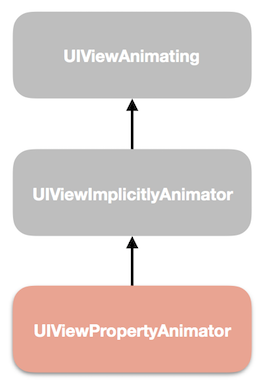
The central class of the new API is UIViewPropertyAnimator, which provides its functionality based on the two protocols UIViewAnimating and UIViewImplicitlyAnimating, which will be discussed below.
UIViewPropertyAnimator
With this class you can:
')
- create interactive animations (they can be stopped, paused, interrupted, handled by the user's touch);
- modify already running;
- rewind the current animation at any time;
- play in the reverse order;
- tune the timing functions.
Timing functions
The timing functions (or easing functions) are understood as functions of the animation speed, which affect the rate of change of a particular property being animated. Four types are currently supported: easeInOut, easeIn, easeOut, linear.
Usage example:
// let parameters = UICubicTimingParameters(animationCurve: .easeIn) // let animator = UIViewPropertyAnimator(duration: 5.0, timingParameters: parameters) // ( UIView.animate(withDuration:, animations:)) animator.addAnimations { view.center = CGPoint(x: 150, y: 200) view.transform = CGAffineTransform(rotationAngle: CGFloat(M_PI_2)) view.backgroundColor = UIColor.red() } // Completion block animator.addCompletion { _ in view.backgroundColor = UIColor.orange() } // animator.startAnimation() It may seem that such an implementation is more verbose compared to the old API, but now there is an animator who can reuse / modify / save and enjoy the other benefits of having a solid object.
Apple also provides new protocols:
Uiviewanimating
This protocol is responsible for the basic actions that we can perform with the animator: start, pause, stop, rewind, get the current state and position of the animation. More information is available in the documentation . Let us dwell on a couple of methods and properties in more detail:
Rewind animation (scrubbing)
var fractionComplete: CGFloat { get set } animator.fractionComplete = fraction Using this property, you can move forward / backward through the animation step by step, getting its state at a selected moment in time. With this feature, the user can interact with the interface as with something alive and interactive.
Example
The robot icon rotates and zooms horizontally to the right. Initially the animation is paused. UIPanGestureRecognizer has been added to the icon (sets a fraction for animation when called) and UITapGestureRecognizer (the animation is played during tapes).
First, drag the icon to the right and manually flush the animation (UIPanGestureRecognizer). Then we tap on the icon and look at the animation that plays itself (UITapGestureRecognizer).

First, drag the icon to the right and manually flush the animation (UIPanGestureRecognizer). Then we tap on the icon and look at the animation that plays itself (UITapGestureRecognizer).
End animation
func finishAnimation(at: UIViewAnimatingPosition) The at input parameter indicates at which position the animation will complete.
Variants of enum UIViewAnimatingPosition values:
- start;
- end;
- current (current position - any point of the animation loop).
The position parameter can be very useful when you need to finish the animation in non-standard state. For example, in the middle of a loop or in the last frame.
(Temporary) stop animation
func stopAnimation(_ withoutFinishing: Bool) The withoutFinishing parameter allows you to either stop the animation completely (as when using finishAnimation), or to transfer to the stopped state, from which the animation can be continued from the current location.
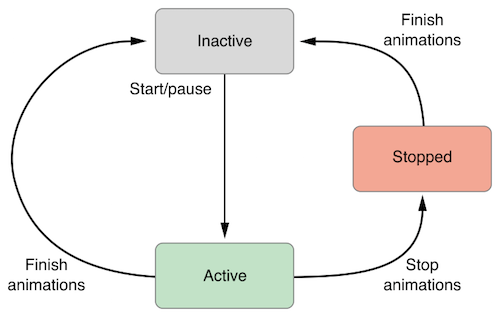
Animation state
- inactive
The initial state is that each new created animator starts with it. After the completion of the animation (finishAnimation), it returns to the same state. - active
The animator enters this state after the startAnimation () or pauseAnimation () calls. - stopped
The state of the animator after calling stopAnimation, where withoutFinishing == false.
Visual image of state change:
And a few more interesting properties of UIViewAnimating:
// var isInterruptible: Bool // ( false) var isManualHitTestingEnabled: Bool With a default value, the object being animated will receive all user touches. If you set isManualHitTestingEnabled = true, then all the tachi will receive not an object in its current state (presentation layer), but its model layer, that is, in the final state, as if the animation has already ended.
Example
For this animation isManualHitTestingEnabled = true is set. UITapGestureRecognizer is added to the icon (when taped, the label text below will change to Received touch). As you can see, the icon in motion does not receive the user's touch, but if you tap on the intended end of the animation (the rightmost part of the field), the selector will work, as if the icon is located there.
UIViewImplicitlyAnimating
This protocol is inherited from the previous one (UIViewAnimating) and provides an important part of the functionality: adding animations through the block and creating the completion block.
One of the new features is the continuation of the animation after a pause or stop, and with the change of the timing function.
let newParameters = UICubicTimingParameters(animationCurve: .easeOut) animator.continueAnimation(withTimingParameters: newParameters, durationFactor: 2.0) This can be useful if you need to change the animation tempo after user interaction (stop or pause the animation).
UITimingCurveProvider
Used when creating a UIViewPropertyAnimator object for setting the timing function via UISpringTimingParameters or UICubicTimingParameters.
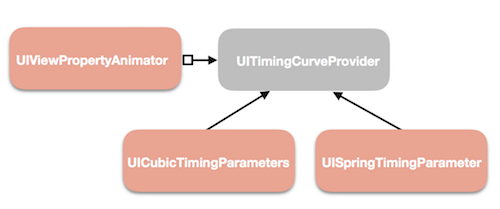
UICubicTimingParameters
Now UIKIt gives us only four good old speed functions (easeInOut, easeIn, easeOut, linear).
But in the new API, there was room for designers' imagination - the ability to create their timing functions from two control points:
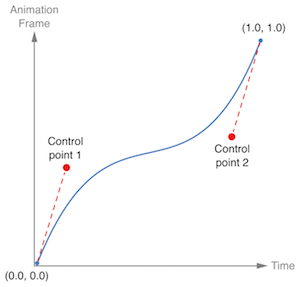
let controlPoint1 = CGPoint(x: 0.2, y: 0.1) let controlPoint2 = CGPoint(x: 0.8, y: 0.8) let parameters = UICubicTimingParameters(controlPoint1: controlPoint1, controlPoint2: controlPoint2) animator = UIViewPropertyAnimator(duration: 0.5, timingParameters: parameters) UISpringTimingParameters
UISpringTimingParameters allow you to get elastic behavior.
The interesting point here is that the velocity is now a vector, not a scalar. Previously, the speed was directed along the line in contrast to the new API, where the calculation goes along two axes, which means that the animation looks more natural.
And Apple discovered the use of the spring equation, that is, you can now set any coefficients and settings for UISpringTimingParameters, but you have to consider that in this case the duration is ignored and calculated according to the parameters:
// Spring equation init(mass: CGFloat, stiffness: CGFloat, damping: CGFloat, initialVelocity velocity: CGVector) Conclusion
After watching the lecture and a few code examples, the general impression remains that a variety and possibilities for experiments with timing functions and animation modifications were added, and the API became more verbose, but flexible. Hopefully, developers will now become even easier and more pleasant to add interactivity to their applications!
You can learn more about the examples in the lecture Advances in UIKit Animations and Transitions .
Source: https://habr.com/ru/post/305596/
All Articles