In the footsteps of Google I / O 2016 - the new Firebase: integration with Android
Hi, Habr! We continue the series of articles on technology presented at our annual Google I / O event. Today our guest is Alexander Denisov, and he will tell about his acquaintance with the basic capabilities of the updated Firebase.

 Hi, I am Alexander Denisov, working at Netcracker as Senior Software Developer and heading the GDG of Nizhny Novgorod. I have been following the technologies that Google is developing for a long time, and this time I just could not get past Firebase. There are many changes, they are conceptual in themselves, and, finally, they turn Firebase itself into one big service for building a mobile backend.
I was very impressed with the presentation, so I decided to personally try to work with new features and share with you how to take the first steps into this amazing world of convenient and fast development for Android.
The joint history of Google and Firebase began back in 2014, when the entire Firebase team just went to Google and continued to work on their product, gaining access to the cloud capabilities of the Google Cloud Platform and other Google technologies. At that time, Firebase was, in fact, a set of REST services for managing the cloud-based NoSQL database for storing and synchronizing data between several clients, and the associated authentication and hosting services. It looked like this:
')
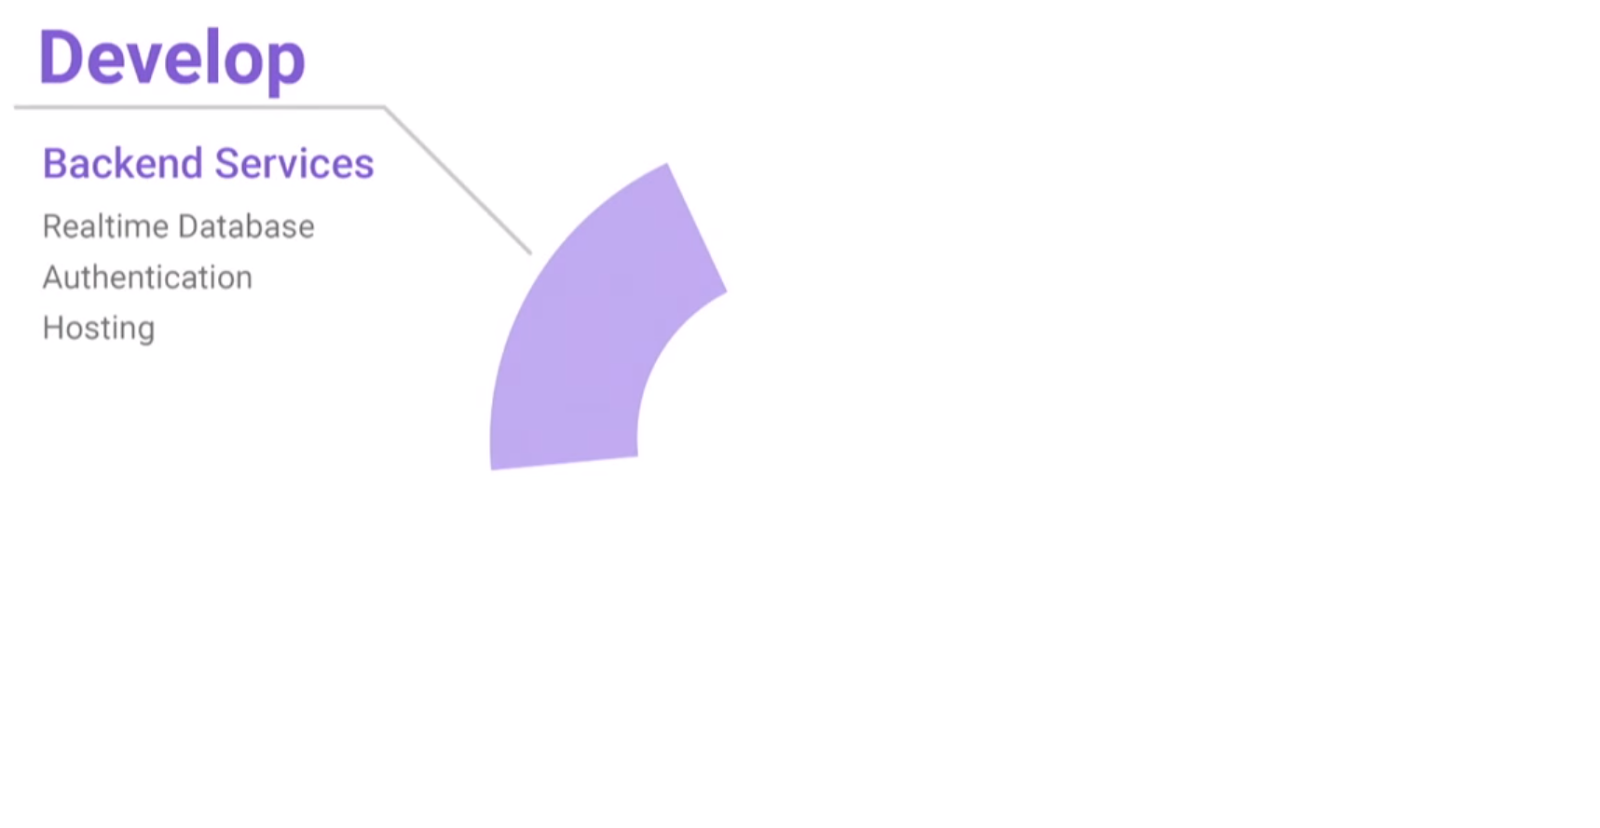
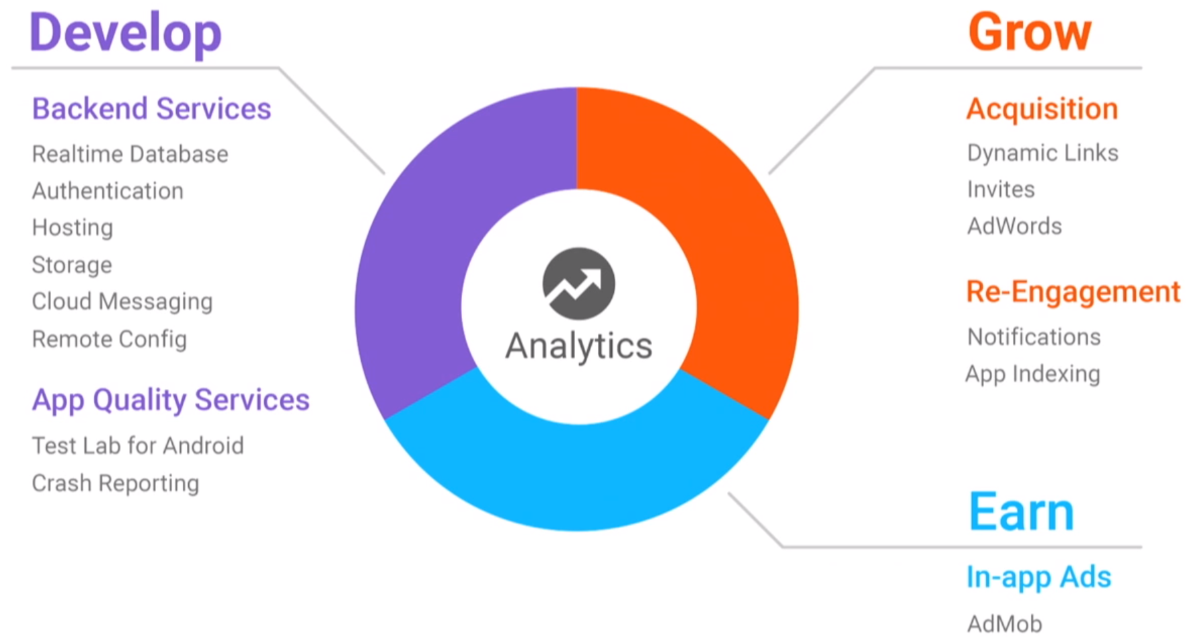
In 2016, the anniversary, the tenth Google I / O, and the new features of Firebase are presented there. He grew up, matured and grown up to a set of 15 products intended not only for development, but also to facilitate the promotion and monetization of applications. These products can be used both individually and in any combination - depending on your needs.
In a good way, each of these products should be dedicated to a separate article, with a lot of example and codes. But it takes time, so for now we just try to create a small application based on Firebase, get acquainted with some (most interesting, in my opinion) possibilities, and just try to experience the “taste” of the technology ... As an example, I will create a simple chat, message and information about the interlocutors who will be stored in the cloud. You will not believe how easy it was to develop such things.
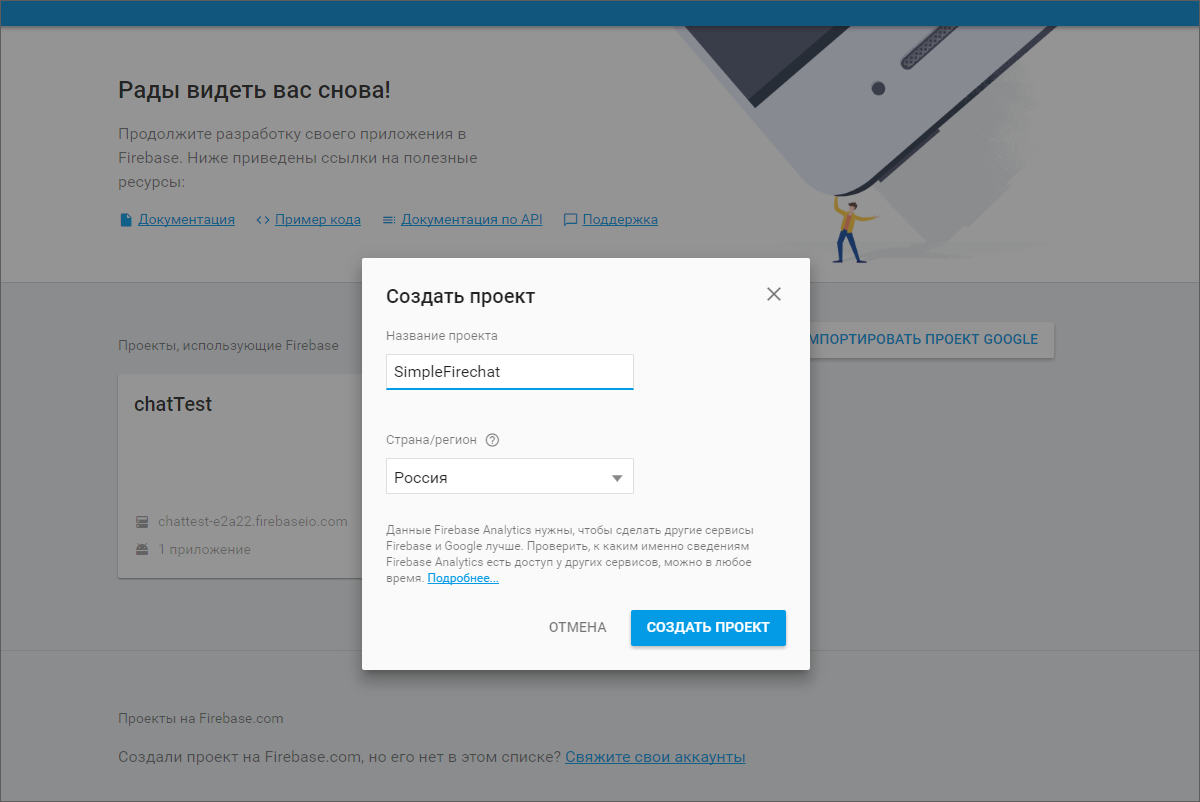
Let's create a simple project (let's call it com.google.simplefirebasechat) with empty markup. A start, now you need to connect it with Firebase. To do this, go to the main tool for managing Firebase - the console and click "Create a new project":
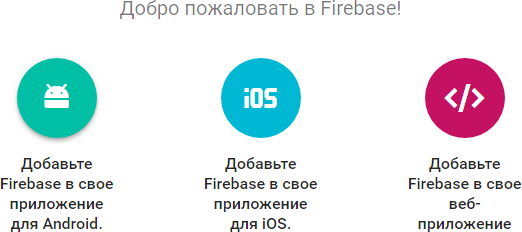
Since we are going to work with an Android application, we need to select it from the options offered.
The system will offer us to specify the name of our application and the security key of the SHA1 format
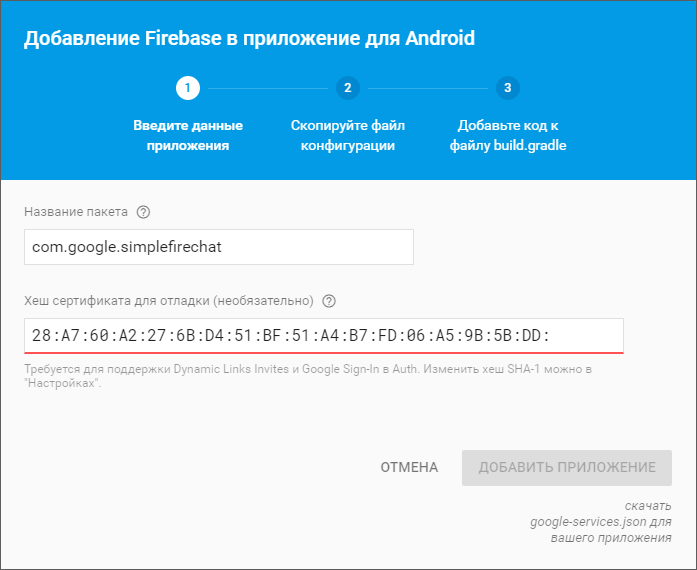
Note: If you forgot your key, open the Windows console (Win + R, CMD, Enter) and extract it from debug.keystore. To do this, enter the following commands:
And log in with the password from your debug repository, (the default is "android" )
After you provide all the necessary data, the browser will automatically download the generated Firebase configuration json with the metadata necessary for the work. The resulting file should be put in the app directory of our application. Now you need to add a dependency on the corresponding library to the build.gradle of the project level.
You should also add the following line to the end of build.gradle in the app directory
which connects to the Google Services project a plugin necessary for processing configuration JSONa and connecting the main libraries com.google.gms: google-services.
Voila! Firebase is associated with an application that you can try to build!
The next step is to check that everything is in order, and we really connected. To do this, we will add a couple of records to the database, and then read them in the application.
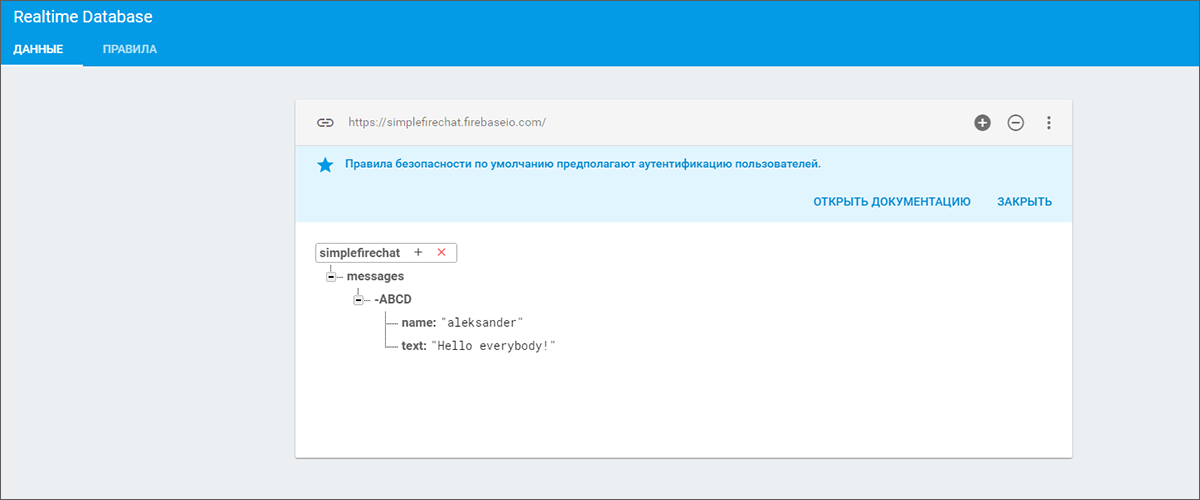
Open the Firebase console, look for the Database tab, and create a simple JSON in it to store messages. The console interface easily allows you to do this.
Now we will read the entered data, requesting them from our application ... To get access to them and be able to display them in our interface, we will add several corresponding dependencies to build.gradle
We will also add a new class for the chat message and markup to display it. With the necessary preparations completed, now let's do the display of content obtained from the database.
To do this, we need to create a main activity and place interface elements on it that will help us test the operation of Firebase. Add a field to enter a message, the Send button, the ProgressBar button at the time of loading data and RecyclerView to display data from the database, and add a couple of lines of code to the class itself.
So, what we have:
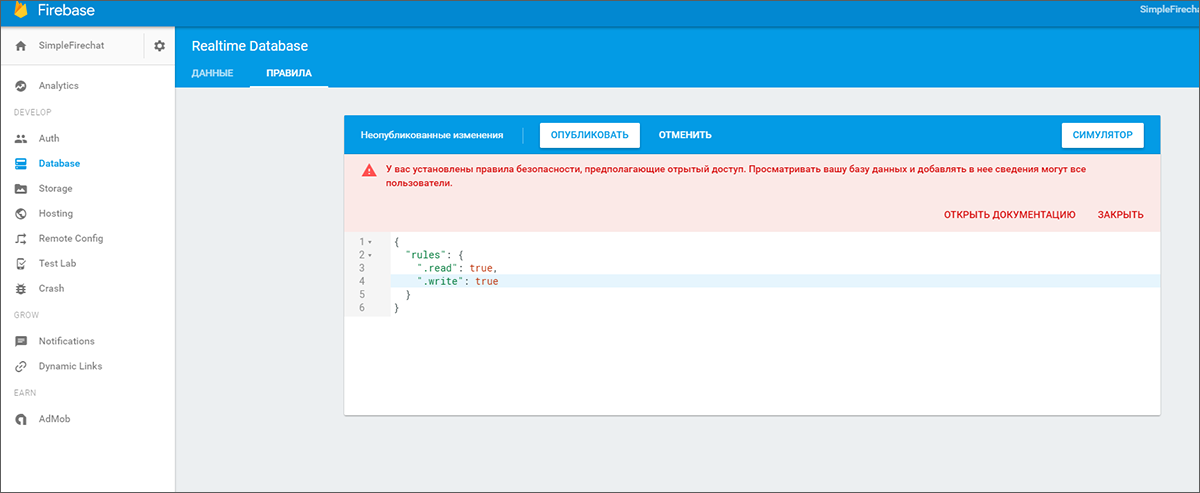
At this stage, we did not add authorization tools to the application, so we’ll just provide the right for unauthorized reading from the database in the Firebase console. To do this, go to the "Rules" tab and change the settings in this way:
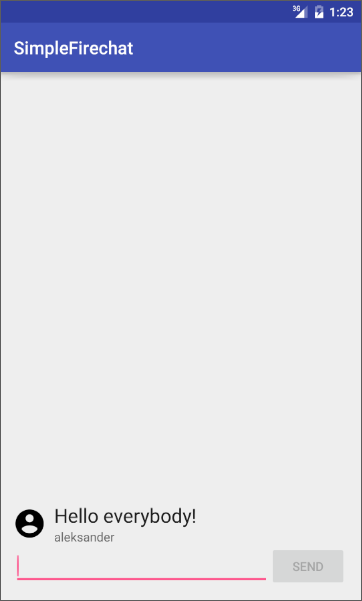
Well, it is time to check out what happened. We start our application and this is what we see: the record from the database appeared as a previously sent message.
Now we can check one more thing. Try adding some more messages to the database. If everything is done correctly, these messages will be displayed in real time in our chat. Unfortunately, we cannot answer them from the application, so we end up having fun and proceed to refine the functionality of the application.
Everything is simple here. Add the Send button handler to MainActivity:
And it's all! You can run the application again and mess around. Write the text, click on the Send button, it is displayed in the chat, and the corresponding entry instantly appears in the database, which we can see through the Firebase console. It remains to add the last necessary feature - user authorization.
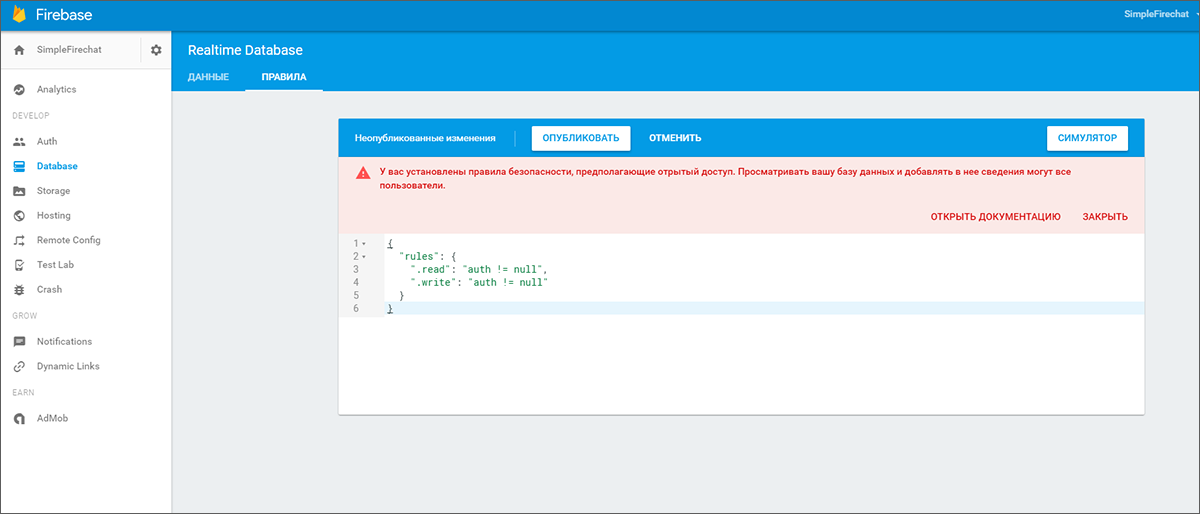
First of all, we take access to the database from unauthorized users. We included it only for tests. Go to the console, in the "Rules" section and set everything up as it was:
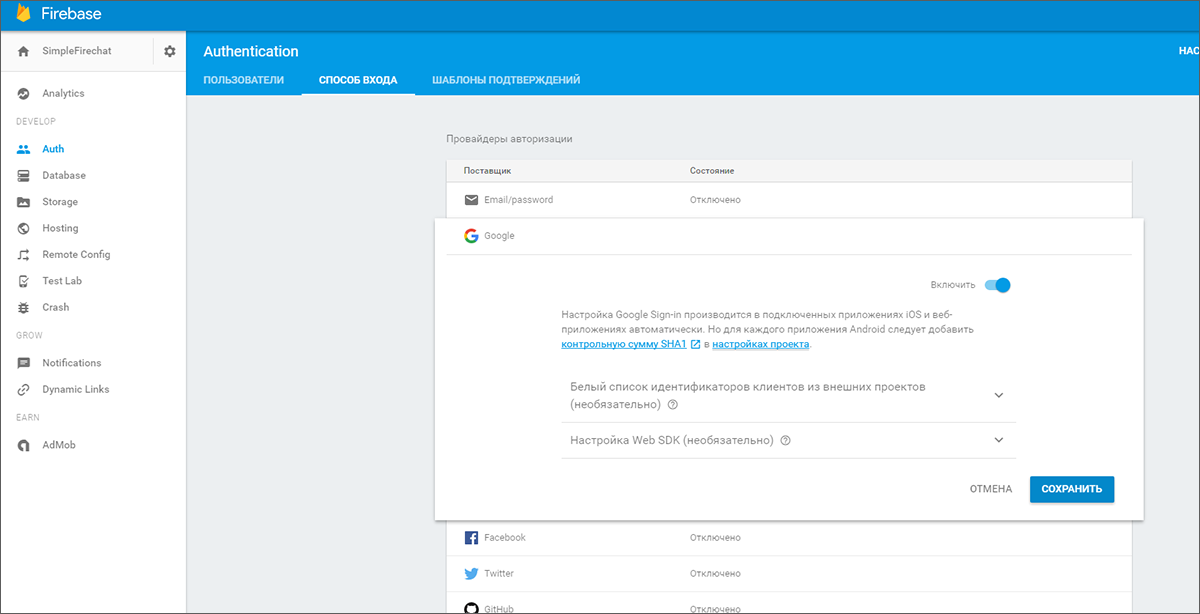
After that, go to the Auth tab and select the authorization method - in this case, through Google:
Update build.gradle again by adding dependencies on authorization libraries.
We also need an additional Activity to enter the chat, with the appropriate markup ( AuthorizationActivity.class and activiti_auth.xm l). Just do not forget to register it in the manifest. It would also be nice to have a menu so that we have where to add the option to exit from your account ( main_menu.xml ). Well, as a finishing touch, we will a little fix MainActivity.
First, we need to inherit the Activity from the GoogleApiClient.OnConnectionFailedListener interface, and to implement this interface itself:
Second, add entities to work with authorization:
this interface:
And their initialization in onCreate:
Third, add a call from the menu so that the user can log out:
Now you can run and test the application with authorization via Google account.

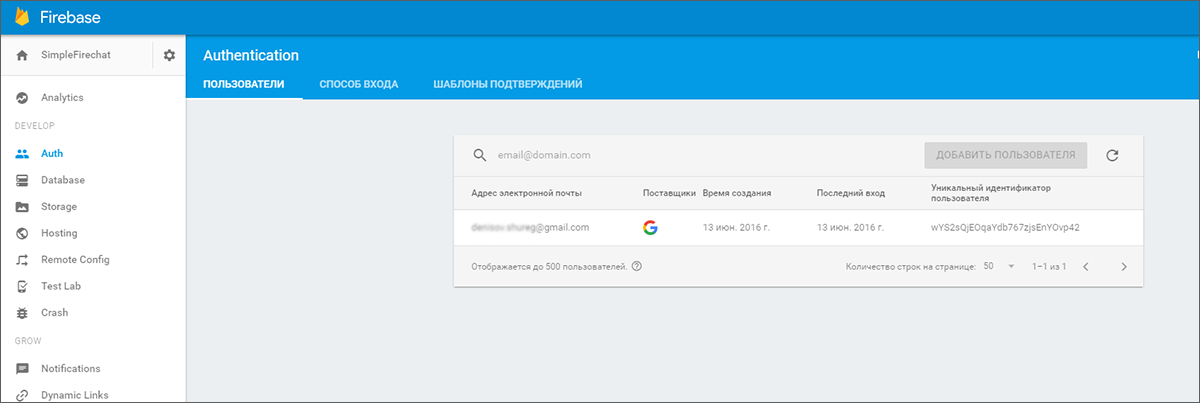
And in the Firebase console, in the Auth tab, you can see the users who have been authorized in our application:
So, we have a simple application, the backend of which is completely made on Firebase. These features were available before, now we just got acquainted with the tools of Firebase, now let's move on to more interesting things.
Firebase Notifications allows you to send notifications to user devices directly from the Firebase console. Moreover, you can choose to send to all users, to a specific group (integration into the Firebase Audience tool also works here) or to users of specific devices in general. But to work with these notifications, you need to teach the application to accept them, and for this you need to configure the appropriate service.
First, add the appropriate ... (build, command, whatever) to build.gradle
Next, create a SimpleFirechatMessagingService service that we will use to manage incoming FCM messages (Firebase Clouds Messages). It is enough for us to override the onMessageReceived method (RemoteMessage remoteMessage) in order to somehow handle the incoming notification.
We also need to create the SimpleFirechatInstanceIdService service to manage FCM logic. It is usually used to notify the application that a new token has been generated, as well as to receive this token. Just override the onTokenRefresh () method
All that is left for us is to register the services in the manifest, after which everything should work.
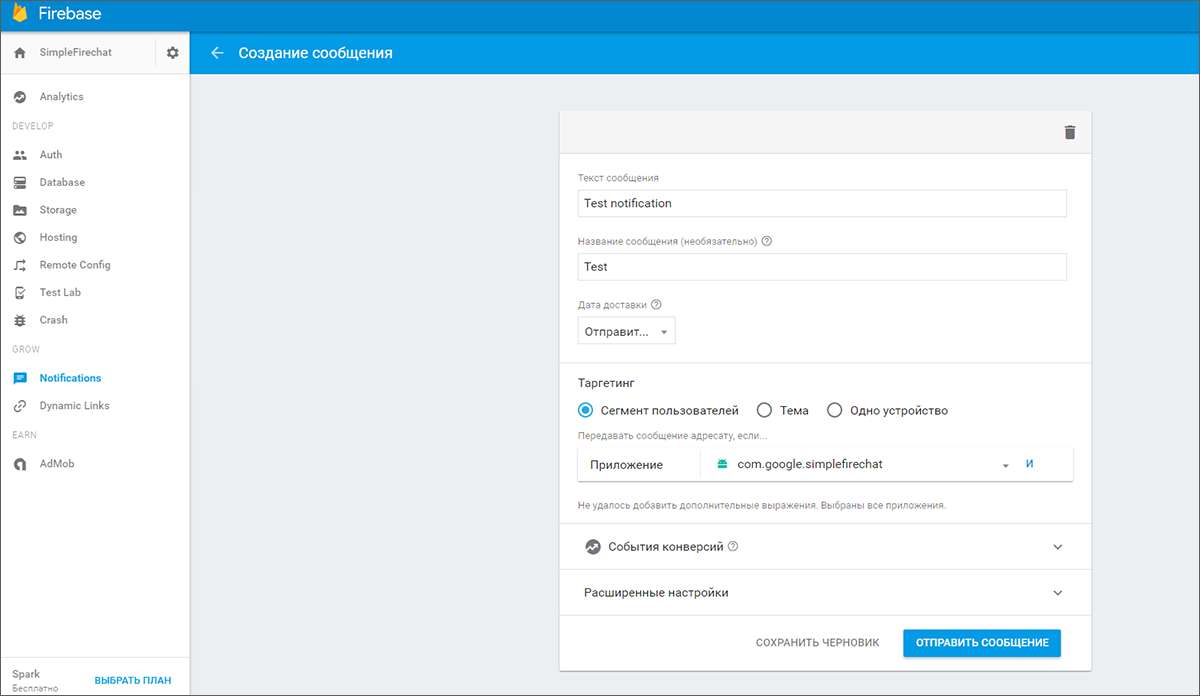
Run the application, then go to the Firebase console, in the Notifications tab, and send a long-awaited message. The result will instantly be displayed on the smartphone display or in the emulator:
You can get acquainted with the results of sending notifications in the corresponding section of the Firebase console.
Firebase Remote Config allows you to set a number of parameters in applications that you can update remotely from the server. Thus, you can take your app's capabilities (design, for example, or translation) without updating the whole .apk and not waiting for it to be uploaded to the app store, and then also updated by the user on the device. As an example, let's try to change the message on the message sending button using this feature.
To get started, go to the Remote Config tab and create a variable button_name
Now you need to configure the application.
As in previous times, we start again by adding the corresponding dependency to build.gradle
... and add the fetchconfig method, in which we will retrieve the configuration from the server and apply it to the button name.
We will call this method in onCreate and in the menu item created for this. To do this, add the following lines to main_menu.xml:
OnCreate:
... and in onOptionsItemSelected:
The test algorithm is similar to the past. Run the application, look at the text button, go to the Firebase console, change its value to the variable button_name., And call reconfig from the menu.
So just in half an hour we created a chat with authorization, cloud notifications and remote configuration based on the capabilities of Firebase.
PS: download the project and dig yourself into it yourself can be here .
I think there is enough practice for today, time to take stock.
To store messages, we used Realtime Database - services for managing the cloud-based NoSQL database. They allow you to save and synchronize data with all connected devices in a matter of milliseconds. In the updated version, the data is stored in memory or on the disk of the device so that the application remains operational when the connection to the network is lost, and, of course, the data is synchronized after the connection is restored.
For authorization, we used the Authentication service — a service for authenticating and managing users. Supports authentication via a couple of e-mail and password, social networks (Facebook, Twitter, GitHub, Google+) and can be integrated with other existing authorization systems
To test notifications, we used Notifications , a service that provides a new UI, accessible via the built-in console and based on Firebase Cloud Messaging. He came to replace Google Cloud Messaging technology and send notifications to users without writing a single line of code. Integration with Firebase Analytics allows you to send notifications to pre-configured user groups
Its technology is closely related to the project Cloud Messaging - a service that combines Firebase with the most popular messaging service - Google Cloud Messaging. Cloud Messaging is cross-platform and works on iOS, Android and web applications.
And finally, for remote configuration, we used Remote Config , a service that allows you to modify and update parts of applications without resorting to a full package upgrade and passing relatively long checks in application stores. For security and ease of operation, you will need to think in advance that you want to update remotely and set the appropriate parameters in the video key - value. Well, then you can make changes to the work and appearance of the application by replacing the values of these parameters on the server side. For example, you can update the design of the application for the holiday, and then return everything "as it was." And no lengthy reviews. Like many other elements of Firebase, Notifications are integrated into Firebase Analytics. That is, you can select groups of different users (formed automatically by dozens and hundreds of parameters) and send updates to them ...
In conclusion, I want to say that Firebase has evolved from a data storage service into a universal platform for mobile developers, with a convenient, user-friendly interface and the most simplified integration into applications (as you have seen, you can add it to your application in fact with a couple of clicks). I think that it would be a big mistake not to pay attention to the output of such a useful and interesting tool. Try it. He is really very, very cool ...
For today you have enough. But we will definitely return to this topic and consider the remaining features of the new Firebase: data storage tools, application testing, monetization and advertising services, as well as nice handy buns such as invites or reliable links. And, of course, the coolest thing ever - the most powerful analytics and grouping of users, which is closely integrated into all other possibilities.
Thank you all for your attention! The post turned out to be very big, we are all human, so if you find a typo or mistake - write in the LAN, we will promptly fix it. And leave questions in the comments. :)
Hi, I am Alexander Denisov, working at Netcracker as Senior Software Developer and heading the GDG of Nizhny Novgorod. I have been following the technologies that Google is developing for a long time, and this time I just could not get past Firebase. There are many changes, they are conceptual in themselves, and, finally, they turn Firebase itself into one big service for building a mobile backend.I was very impressed with the presentation, so I decided to personally try to work with new features and share with you how to take the first steps into this amazing world of convenient and fast development for Android.
Prehistory
The joint history of Google and Firebase began back in 2014, when the entire Firebase team just went to Google and continued to work on their product, gaining access to the cloud capabilities of the Google Cloud Platform and other Google technologies. At that time, Firebase was, in fact, a set of REST services for managing the cloud-based NoSQL database for storing and synchronizing data between several clients, and the associated authentication and hosting services. It looked like this:
')
In 2016, the anniversary, the tenth Google I / O, and the new features of Firebase are presented there. He grew up, matured and grown up to a set of 15 products intended not only for development, but also to facilitate the promotion and monetization of applications. These products can be used both individually and in any combination - depending on your needs.
In a good way, each of these products should be dedicated to a separate article, with a lot of example and codes. But it takes time, so for now we just try to create a small application based on Firebase, get acquainted with some (most interesting, in my opinion) possibilities, and just try to experience the “taste” of the technology ... As an example, I will create a simple chat, message and information about the interlocutors who will be stored in the cloud. You will not believe how easy it was to develop such things.
1. Firebase - first steps
Preparatory work, registration and authorization
Let's create a simple project (let's call it com.google.simplefirebasechat) with empty markup. A start, now you need to connect it with Firebase. To do this, go to the main tool for managing Firebase - the console and click "Create a new project":
Since we are going to work with an Android application, we need to select it from the options offered.
The system will offer us to specify the name of our application and the security key of the SHA1 format
Note: If you forgot your key, open the Windows console (Win + R, CMD, Enter) and extract it from debug.keystore. To do this, enter the following commands:
keytool -exportcert -alias androiddebugkey -keystore %USERPROFILE%/.android/debug.keystore -list -v And log in with the password from your debug repository, (the default is "android" )
After you provide all the necessary data, the browser will automatically download the generated Firebase configuration json with the metadata necessary for the work. The resulting file should be put in the app directory of our application. Now you need to add a dependency on the corresponding library to the build.gradle of the project level.
classpath 'com.google.gms:google-services:3.0.0' You should also add the following line to the end of build.gradle in the app directory
apply plugin: 'com.google.gms.google-services' which connects to the Google Services project a plugin necessary for processing configuration JSONa and connecting the main libraries com.google.gms: google-services.
Voila! Firebase is associated with an application that you can try to build!
We check the performance of Firebase
The next step is to check that everything is in order, and we really connected. To do this, we will add a couple of records to the database, and then read them in the application.
Open the Firebase console, look for the Database tab, and create a simple JSON in it to store messages. The console interface easily allows you to do this.
Now we will read the entered data, requesting them from our application ... To get access to them and be able to display them in our interface, we will add several corresponding dependencies to build.gradle
compile 'com.google.firebase:firebase-database:9.0.0' compile 'com.firebaseui:firebase-ui-database:0.4.0' compile 'de.hdodenhof:circleimageview:1.3.0' compile 'com.github.bumptech.glide:glide:3.6.1' We will also add a new class for the chat message and markup to display it. With the necessary preparations completed, now let's do the display of content obtained from the database.
To do this, we need to create a main activity and place interface elements on it that will help us test the operation of Firebase. Add a field to enter a message, the Send button, the ProgressBar button at the time of loading data and RecyclerView to display data from the database, and add a couple of lines of code to the class itself.
So, what we have:
package com.google.simplefirechat; import android.content.SharedPreferences; import android.preference.PreferenceManager; import android.support.v4.content.ContextCompat; import android.support.v7.app.AppCompatActivity; import android.os.Bundle; import android.support.v7.widget.LinearLayoutManager; import android.support.v7.widget.RecyclerView; import android.text.Editable; import android.text.InputFilter; import android.text.TextWatcher; import android.view.View; import android.widget.Button; import android.widget.EditText; import android.widget.ProgressBar; import android.widget.TextView; import com.google.android.gms.common.api.GoogleApiClient; import com.google.firebase.database.DatabaseReference; import com.firebase.ui.database.FirebaseRecyclerAdapter; import com.google.firebase.database.FirebaseDatabase; import de.hdodenhof.circleimageview.CircleImageView; import com.bumptech.glide.Glide; public class MainActivity extends AppCompatActivity { private DatabaseReference mSimpleFirechatDatabaseReference; private FirebaseRecyclerAdapter<ChatMessage, FirechatMsgViewHolder> mFirebaseAdapter; private RecyclerView mMessageRecyclerView; private LinearLayoutManager mLinearLayoutManager; private ProgressBar mProgressBar; public static class FirechatMsgViewHolder extends RecyclerView.ViewHolder { public TextView msgTextView; public TextView userTextView; public CircleImageView userImageView; public FirechatMsgViewHolder(View v) { super(v); msgTextView = (TextView) itemView.findViewById(R.id.msgTextView); userTextView = (TextView) itemView.findViewById(R.id.userTextView); userImageView = (CircleImageView) itemView.findViewById(R.id.userImageView); } } @Override protected void onCreate(Bundle savedInstanceState) { super.onCreate(savedInstanceState); setContentView(R.layout.activity_main); mProgressBar = (ProgressBar) findViewById(R.id.progressBar); mMessageRecyclerView = (RecyclerView) findViewById(R.id.messageRecyclerView); mLinearLayoutManager = new LinearLayoutManager(this); mLinearLayoutManager.setStackFromEnd(true); mMessageRecyclerView.setLayoutManager(mLinearLayoutManager); mSimpleFirechatDatabaseReference = FirebaseDatabase.getInstance().getReference(); mFirebaseAdapter = new FirebaseRecyclerAdapter<ChatMessage, FirechatMsgViewHolder>( ChatMessage.class, R.layout.chat_message, FirechatMsgViewHolder.class, mSimpleFirechatDatabaseReference.child("messages")) { @Override protected void populateViewHolder(FirechatMsgViewHolder viewHolder, ChatMessage friendlyMessage, int position) { mProgressBar.setVisibility(ProgressBar.INVISIBLE); viewHolder.msgTextView.setText(friendlyMessage.getText()); viewHolder.userTextView.setText(friendlyMessage.getName()); if (friendlyMessage.getPhotoUrl() == null) { viewHolder.userImageView .setImageDrawable(ContextCompat .getDrawable(MainActivity.this, R.drawable.ic_account_circle_black_36dp)); } else { Glide.with(MainActivity.this) .load(friendlyMessage.getPhotoUrl()) .into(viewHolder.userImageView); } } }; mFirebaseAdapter.registerAdapterDataObserver(new RecyclerView.AdapterDataObserver() { @Override public void onItemRangeInserted(int positionStart, int itemCount) { super.onItemRangeInserted(positionStart, itemCount); int chatMessageCount = mFirebaseAdapter.getItemCount(); int lastVisiblePosition = mLinearLayoutManager.findLastCompletelyVisibleItemPosition(); if (lastVisiblePosition == -1 || (positionStart >= (chatMessageCount - 1) && lastVisiblePosition == (positionStart - 1))) { mMessageRecyclerView.scrollToPosition(positionStart); } } }); mMessageRecyclerView.setLayoutManager(mLinearLayoutManager); mMessageRecyclerView.setAdapter(mFirebaseAdapter); } } At this stage, we did not add authorization tools to the application, so we’ll just provide the right for unauthorized reading from the database in the Firebase console. To do this, go to the "Rules" tab and change the settings in this way:
Well, it is time to check out what happened. We start our application and this is what we see: the record from the database appeared as a previously sent message.
Now we can check one more thing. Try adding some more messages to the database. If everything is done correctly, these messages will be displayed in real time in our chat. Unfortunately, we cannot answer them from the application, so we end up having fun and proceed to refine the functionality of the application.
2. Writing to Firebase
Everything is simple here. Add the Send button handler to MainActivity:
mSendButton = (Button) findViewById(R.id.sendButton); mSendButton.setOnClickListener(new View.OnClickListener() { @Override public void onClick(View view) { ChatMessage friendlyMessage = new ChatMessage(mMsgEditText.getText().toString(), mUsername, mPhotoUrl); mSimpleFirechatDatabaseReference.child("messages") .push().setValue(friendlyMessage); mMsgEditText.setText(""); } }); And it's all! You can run the application again and mess around. Write the text, click on the Send button, it is displayed in the chat, and the corresponding entry instantly appears in the database, which we can see through the Firebase console. It remains to add the last necessary feature - user authorization.
3. Authorization in Firebase
First of all, we take access to the database from unauthorized users. We included it only for tests. Go to the console, in the "Rules" section and set everything up as it was:
After that, go to the Auth tab and select the authorization method - in this case, through Google:
Update build.gradle again by adding dependencies on authorization libraries.
compile 'com.google.firebase:firebase-auth:9.0.0' compile 'com.google.android.gms:play-services-auth:9.0.0' We also need an additional Activity to enter the chat, with the appropriate markup ( AuthorizationActivity.class and activiti_auth.xm l). Just do not forget to register it in the manifest. It would also be nice to have a menu so that we have where to add the option to exit from your account ( main_menu.xml ). Well, as a finishing touch, we will a little fix MainActivity.
We connect authorization
First, we need to inherit the Activity from the GoogleApiClient.OnConnectionFailedListener interface, and to implement this interface itself:
@Override public void onConnectionFailed(@NonNull ConnectionResult connectionResult) { Toast.makeText(this, "Google Play Services error.", Toast.LENGTH_SHORT).show(); } Second, add entities to work with authorization:
this interface:
private GoogleApiClient mGoogleApiClient; private FirebaseAuth mFirebaseAuth; private FirebaseUser mFirechatUser; And their initialization in onCreate:
mGoogleApiClient = new GoogleApiClient.Builder(this) .enableAutoManage(this /* FragmentActivity */, this /* OnConnectionFailedListener */) .addApi(Auth.GOOGLE_SIGN_IN_API) .build(); mFirebaseAuth = FirebaseAuth.getInstance(); mFirechatUser = mFirebaseAuth.getCurrentUser(); if (mFirechatUser == null) { startActivity(new Intent(this, AuthorizationActivity.class)); finish(); return; } else { mUsername = mFirechatUser.getDisplayName(); if (mFirechatUser.getPhotoUrl() != null) { mPhotoUrl = mFirechatUser.getPhotoUrl().toString(); } } Third, add a call from the menu so that the user can log out:
@Override public boolean onOptionsItemSelected(MenuItem item) { switch (item.getItemId()) { case R.id.sign_out_menu: mFirebaseAuth.signOut(); Auth.GoogleSignInApi.signOut(mGoogleApiClient); mUsername = DEFAULT_NAME; startActivity(new Intent(this, AuthorizationActivity.class)); return true; default: return super.onOptionsItemSelected(item); } } Now you can run and test the application with authorization via Google account.
Messages should have the following form: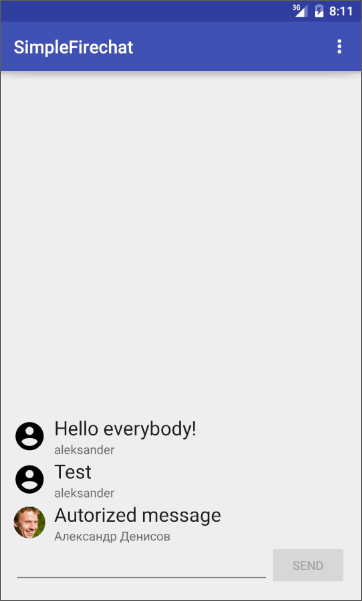
And in the Firebase console, in the Auth tab, you can see the users who have been authorized in our application:
So, we have a simple application, the backend of which is completely made on Firebase. These features were available before, now we just got acquainted with the tools of Firebase, now let's move on to more interesting things.
4. Notifications using Firebase Notifications
Firebase Notifications allows you to send notifications to user devices directly from the Firebase console. Moreover, you can choose to send to all users, to a specific group (integration into the Firebase Audience tool also works here) or to users of specific devices in general. But to work with these notifications, you need to teach the application to accept them, and for this you need to configure the appropriate service.
We connect Firebase Notifications
First, add the appropriate ... (build, command, whatever) to build.gradle
compile 'com.google.firebase:firebase-messaging:9.0.0' Next, create a SimpleFirechatMessagingService service that we will use to manage incoming FCM messages (Firebase Clouds Messages). It is enough for us to override the onMessageReceived method (RemoteMessage remoteMessage) in order to somehow handle the incoming notification.
We also need to create the SimpleFirechatInstanceIdService service to manage FCM logic. It is usually used to notify the application that a new token has been generated, as well as to receive this token. Just override the onTokenRefresh () method
All that is left for us is to register the services in the manifest, after which everything should work.
<service android:name=".SimpleFirechatMessagingService" android:exported="false"> <intent-filter> <action android:name="com.google.firebase.MESSAGING_EVENT" /> </intent-filter> </service> <service android:name=".SimpleFirechatInstanceIdService" android:exported="false"> <intent-filter> <action android:name="com.google.firebase.INSTANCE_ID_EVENT" /> </intent-filter> </service> We test notifications
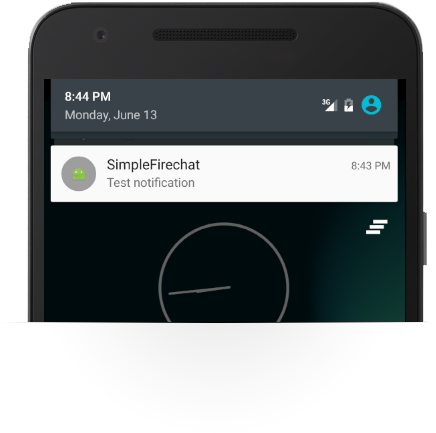
Run the application, then go to the Firebase console, in the Notifications tab, and send a long-awaited message. The result will instantly be displayed on the smartphone display or in the emulator:
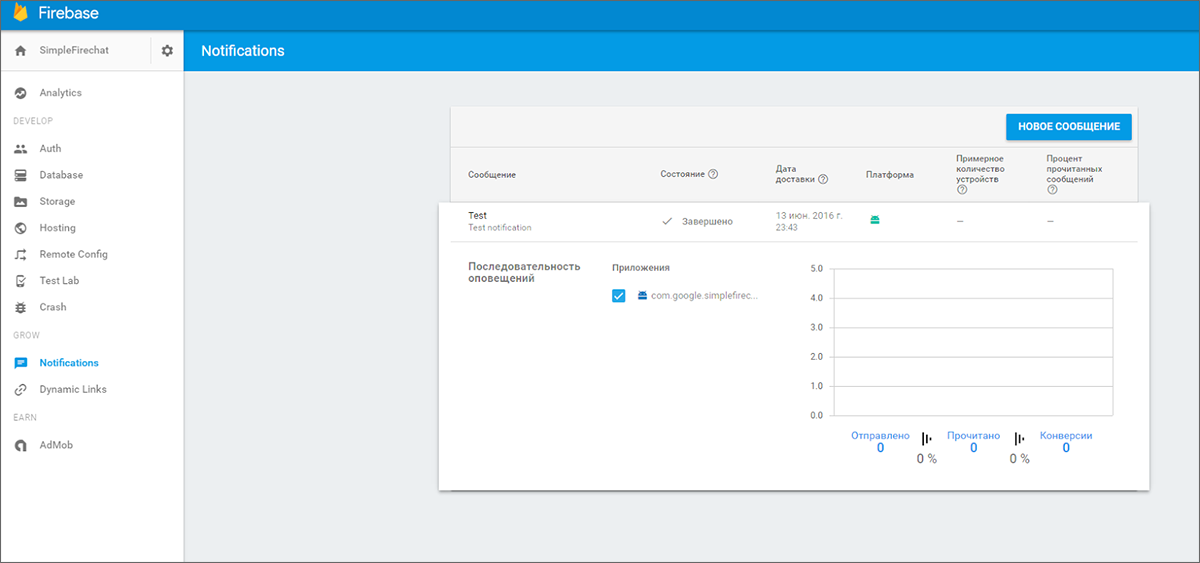
You can get acquainted with the results of sending notifications in the corresponding section of the Firebase console.
5. Firebase Remote Config - change application on the fly
Firebase Remote Config allows you to set a number of parameters in applications that you can update remotely from the server. Thus, you can take your app's capabilities (design, for example, or translation) without updating the whole .apk and not waiting for it to be uploaded to the app store, and then also updated by the user on the device. As an example, let's try to change the message on the message sending button using this feature.
Add functionality
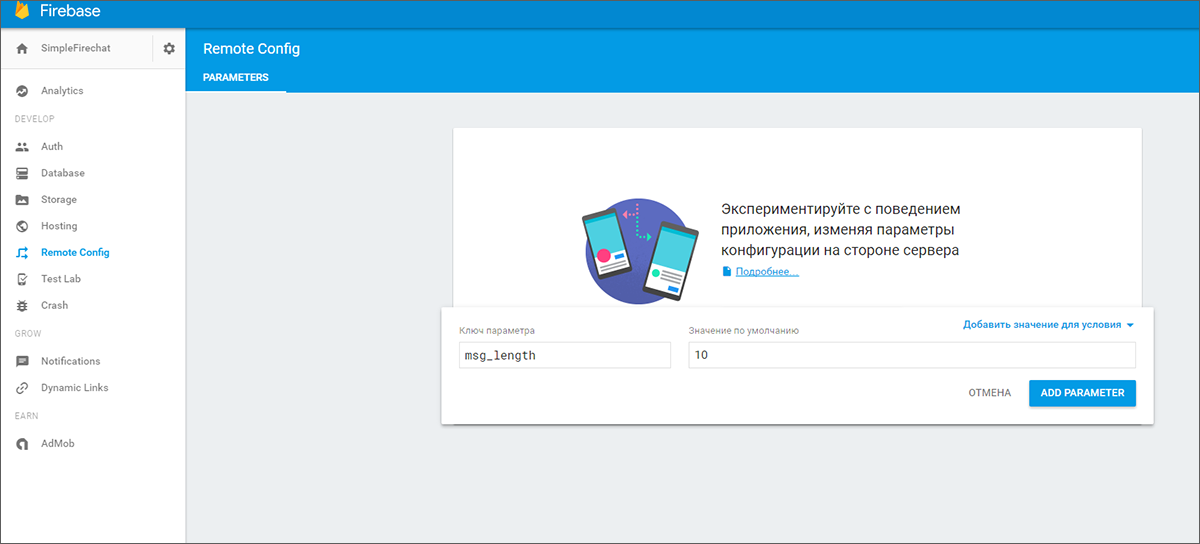
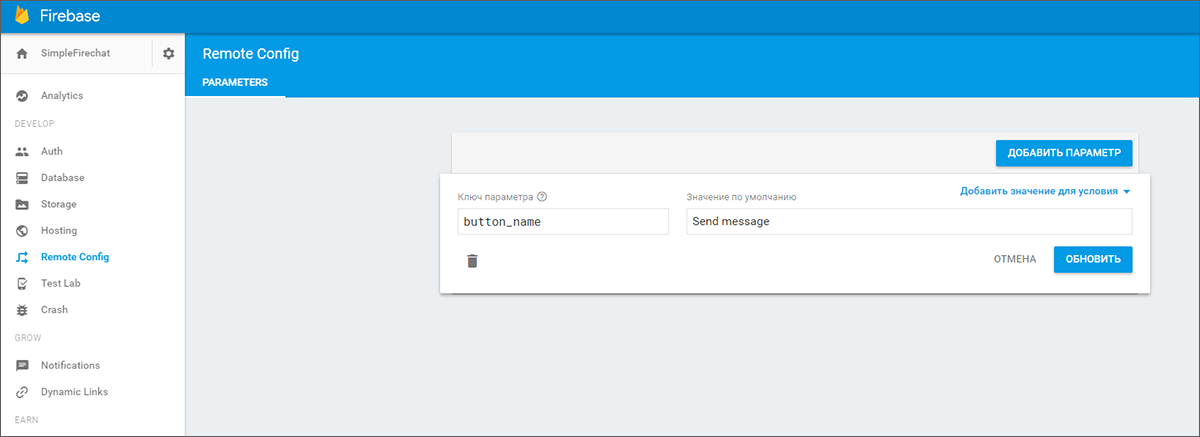
To get started, go to the Remote Config tab and create a variable button_name
Now you need to configure the application.
As in previous times, we start again by adding the corresponding dependency to build.gradle
compile 'com.google.firebase:firebase-messaging:9.0.0' ... and add the fetchconfig method, in which we will retrieve the configuration from the server and apply it to the button name.
public void fetchConfig() { long cacheExpiration = 3600; // 1 hour in seconds // If developer mode is enabled reduce cacheExpiration to 0 so that // each fetch goes to the server. This should not be used in release // builds. if (mFirebaseRemoteConfig.getInfo().getConfigSettings() .isDeveloperModeEnabled()) { cacheExpiration = 0; } mFirebaseRemoteConfig.fetch(cacheExpiration) .addOnSuccessListener(new OnSuccessListener<Void>() { @Override public void onSuccess(Void aVoid) { // Make the fetched config available via // FirebaseRemoteConfig get<type> calls. mFirebaseRemoteConfig.activateFetched(); mSendButton.setText(mFirebaseRemoteConfig.getString("button_name")); } }) .addOnFailureListener(new OnFailureListener() { @Override public void onFailure(@NonNull Exception e) { mSendButton.setText(mFirebaseRemoteConfig.getString("button_name")); } }); } We will call this method in onCreate and in the menu item created for this. To do this, add the following lines to main_menu.xml:
<item android:id="@+id/reconfig" android:title="Reconfig" app:showAsAction="never"/> OnCreate:
mFirebaseRemoteConfig = FirebaseRemoteConfig.getInstance(); FirebaseRemoteConfigSettings firebaseRemoteConfigSettings = new FirebaseRemoteConfigSettings.Builder() .setDeveloperModeEnabled(true) .build(); Map<String, Object> defaultConfigMap = new HashMap<>(); defaultConfigMap.put("button_name", "Send"); ... and in onOptionsItemSelected:
case R.id.reconfig: fetchConfig(); return true; Check the result
The test algorithm is similar to the past. Run the application, look at the text button, go to the Firebase console, change its value to the variable button_name., And call reconfig from the menu.
So just in half an hour we created a chat with authorization, cloud notifications and remote configuration based on the capabilities of Firebase.
PS: download the project and dig yourself into it yourself can be here .
I think there is enough practice for today, time to take stock.
What we got as a result
To store messages, we used Realtime Database - services for managing the cloud-based NoSQL database. They allow you to save and synchronize data with all connected devices in a matter of milliseconds. In the updated version, the data is stored in memory or on the disk of the device so that the application remains operational when the connection to the network is lost, and, of course, the data is synchronized after the connection is restored.
For authorization, we used the Authentication service — a service for authenticating and managing users. Supports authentication via a couple of e-mail and password, social networks (Facebook, Twitter, GitHub, Google+) and can be integrated with other existing authorization systems
To test notifications, we used Notifications , a service that provides a new UI, accessible via the built-in console and based on Firebase Cloud Messaging. He came to replace Google Cloud Messaging technology and send notifications to users without writing a single line of code. Integration with Firebase Analytics allows you to send notifications to pre-configured user groups
Its technology is closely related to the project Cloud Messaging - a service that combines Firebase with the most popular messaging service - Google Cloud Messaging. Cloud Messaging is cross-platform and works on iOS, Android and web applications.
And finally, for remote configuration, we used Remote Config , a service that allows you to modify and update parts of applications without resorting to a full package upgrade and passing relatively long checks in application stores. For security and ease of operation, you will need to think in advance that you want to update remotely and set the appropriate parameters in the video key - value. Well, then you can make changes to the work and appearance of the application by replacing the values of these parameters on the server side. For example, you can update the design of the application for the holiday, and then return everything "as it was." And no lengthy reviews. Like many other elements of Firebase, Notifications are integrated into Firebase Analytics. That is, you can select groups of different users (formed automatically by dozens and hundreds of parameters) and send updates to them ...
In conclusion, I want to say that Firebase has evolved from a data storage service into a universal platform for mobile developers, with a convenient, user-friendly interface and the most simplified integration into applications (as you have seen, you can add it to your application in fact with a couple of clicks). I think that it would be a big mistake not to pay attention to the output of such a useful and interesting tool. Try it. He is really very, very cool ...
For today you have enough. But we will definitely return to this topic and consider the remaining features of the new Firebase: data storage tools, application testing, monetization and advertising services, as well as nice handy buns such as invites or reliable links. And, of course, the coolest thing ever - the most powerful analytics and grouping of users, which is closely integrated into all other possibilities.
Thank you all for your attention! The post turned out to be very big, we are all human, so if you find a typo or mistake - write in the LAN, we will promptly fix it. And leave questions in the comments. :)
Source: https://habr.com/ru/post/305308/
All Articles