Introduction to JavaFx and working with the layout in the examples
Good day. In this article I will cover the basics of working with the classes of the javafx.scene.layout. * Package (BorderPane, AnchorPane, StackPane, GridPane, FlowPane, TilePane, HBox, VBox) and their features in step-by-step examples and illustrations. Also, in short, let's go over the JavaFx class hierarchy.
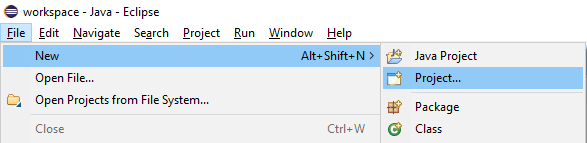
After installing Eclipse and the e (fx) lipse plug-in, create a new project:
')
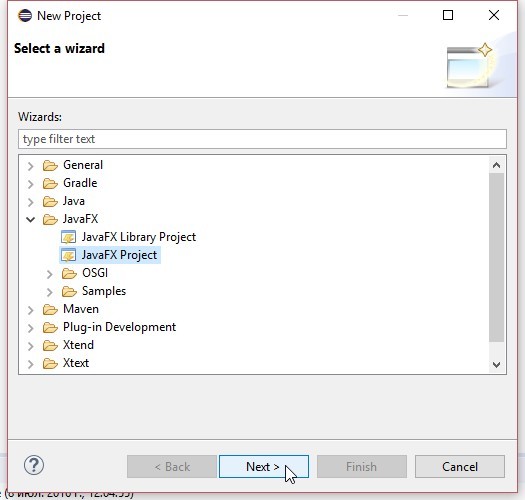
Choose a JavaFx project:
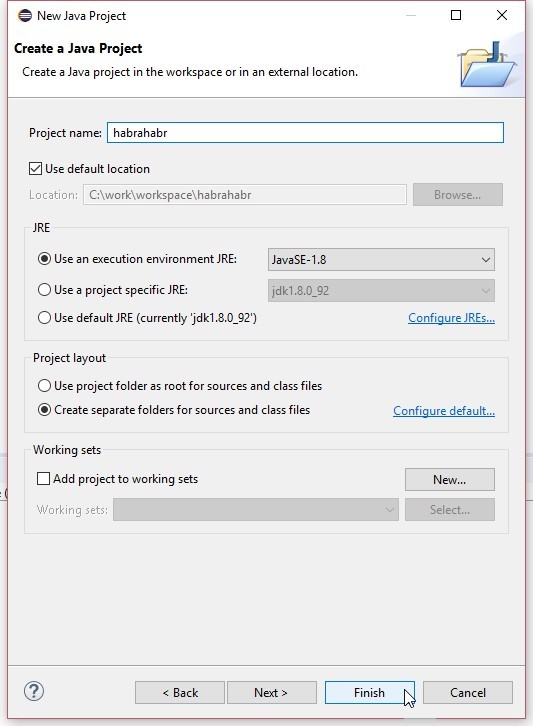
Customize the project:
By default, Eclipse will create this:
The root node is added to the scene, it must be a class inherited from Parent (the node that can have children) the root node is added to the scene (a special container for the entire content of the node graph), and this in turn for the stage that is shown.
Let's look at the JavaFx class hierarchy:
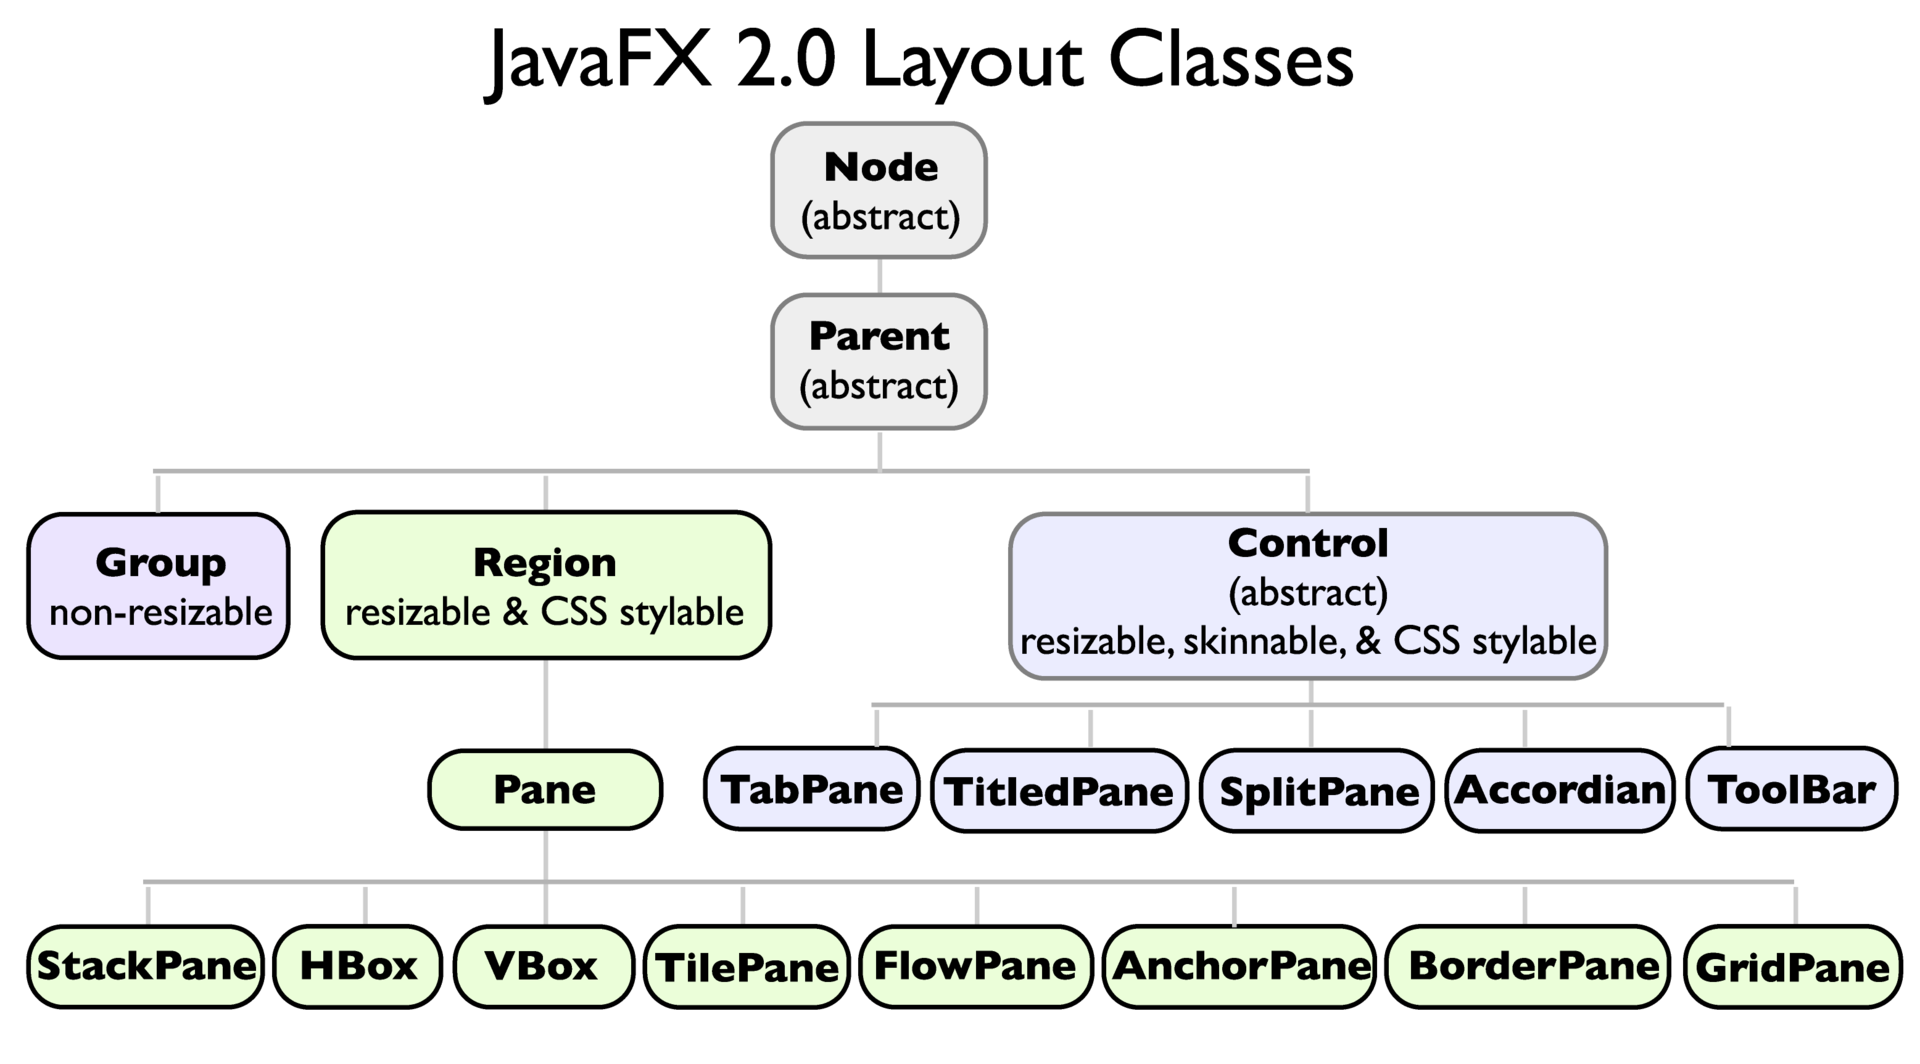
The most basic abstract class is Node - a node in the scene column, the heirs are provided with fields for adjusting the sizes: (minWidth - the minimum width, minHeight - the minimum height, prefWidth - the preferred width, prefHeight - the preferred height, maxWidth - the maximum width, maxHeight - the maximum height) .
Coordinates of the node: getLayoutX () and getLayoutY ()
relocate (double x, double y) - changes the coordinates of the node, if you need to adjust the position of each coordinate separately, use setLayoutX (double value) and setLayoutY (double value)
It is important to understand that the set coordinates and dimensions (pref, that is, prefer is preferable) when linking, depending on the hierarchy of the node graph and their settings, can differ from those expected. I will give examples a little later.
Node can not contain child elements and this is logical, for this there is a Parent direct heir to Node, to which you can add and remove child nodes. By the way, speaking, there are classes that represent nodes, but do not contain child nodes: Camera, Canvas, ImageView, LightBase, MediaView, Parent, Shape, Shape3D, SubScene, SwingNode.
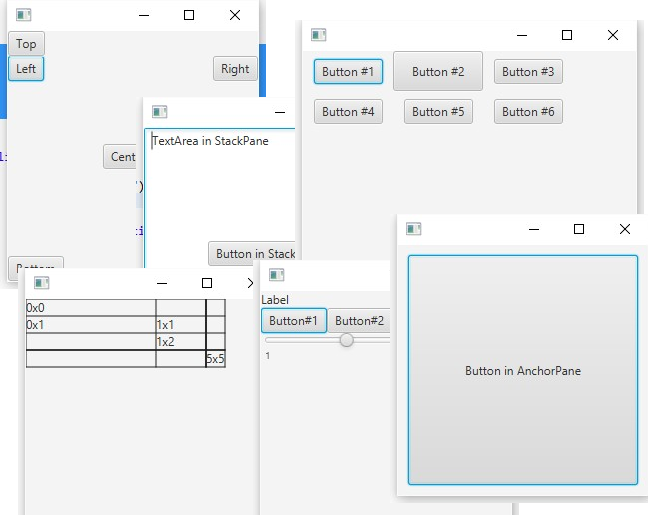
Today we are interested in a subgroup of Region class heirs (the base class of all container containers), in particular, let's talk about the main descendants of the Pane class about the panels that are most often required in everyday development.
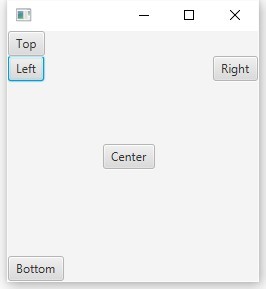
This is a special panel that has its child nodes of the top (setTop (Node)), bottom (setBottom (Note)), left (setLeft (Node)), right (setRight (Node)) and center (setCenter (Node)) positions, add A few buttons in all these positions on the BotderPane:
The top and bottom sections have priority, so they narrow down all the others in height:
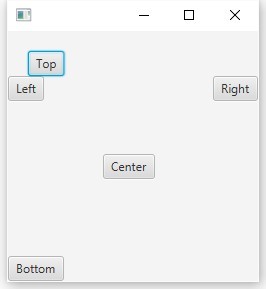
When trying to set coordinates for example at the top button:
The button does not change its position, why is this happening? When arranging children in the layoutChildren method of the BorderPane class, the position of each node is redefined with all settings taken into account. There are several solutions to correct, for example, to place (wrap) a button into an additional suitable container, for example, the base one for all panels.
Because Pane does not redefine the position of its children, we get the desired offset:
You can not wrap the button, but simply set an external indent for it using the static setMargin method (Node child, Insets value) :
Insets - auxiliary class for setting indents, the constructor is overloaded, it can take one argument for all sides, and for each side individually, while we set up one indent for all sides, this is what we got:

Remove indents from the bottom and to the right and get the desired offset of the button:
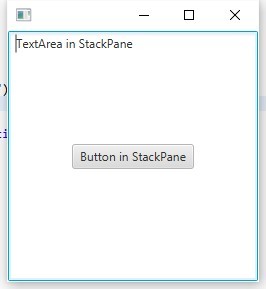
Now let's consider the situation in which the panel imposes on children not only a position, but also tries to stretch them across the entire width and height, filling the entire content area, replace BorderPane and add there first TextArea and Button.
By the way, you can use the method to add several nodes in the desired order:
What we see is the text field stretched across our panel, and the button was centered:
Centering can be adjusted using setAlignment (Pos)
Indent with setPadding (Insets)
You can customize the centering and padding of each node using static methods:
Result:
The anchor panel allows the edges of the child nodes to be attached with offsets to the edges of the panel, consider an example:
Add a button and tie it to the right:
Add a binding to the bottom edge:
Now in the left and upper:
We get that the edges of the button are now rigidly attached to the edges of the panel, if you start to pull the window, the button will also drag.
Consider a very useful grid panel, adding children to this panel should be done through the add method (Node child, int columnIndex, int rowIndex) in which the first parameter is added to the node, the second column number, the third row number, here is a simple example:
We see that nodes can be added to any cell, empty columns and rows are created automatically:

To work with columns, there is a special class ColumnConstraints , for this you need to create columns, set them up and add them to the GridPane, for example, if we want to set the widths of the first column to 130, and the second one to 20%:
We get:
These are the most basic features, you will need to write a separate article to cover all the subtleties of the GridPane configuration.
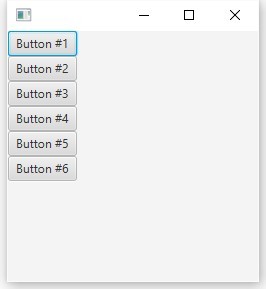
Let's immediately for example, from it it will immediately become clear, add six buttons in FlowPane:
Let's see the result, the button is displayed one by one (by default, FlowPane has a horizontal output Orientation.HORIZONTAL)
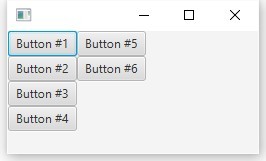
Now, when the window is reduced in width, we see that the child nodes are starting to be transferred:
And accordingly, if you set the vertical orientation
When reducing the height of the window we get the transfer:
Vertical and horizontal indents between elements can be configured using:
TilePane
The work of this panel is similar to the work of FlowPane, the difference is that the child nodes are placed in the grid of the cell of the same size, we give the previous example, but this time let one button be larger than the others:

As we see all the nodes are now in the "tile" of the same size, stretched over the largest node.
These are the usual horizontal and vertical lists, combine them to achieve the desired result:
These are all inheritors of the Pane class, thank you for your attention.
After installing Eclipse and the e (fx) lipse plug-in, create a new project:
')
Choose a JavaFx project:
Customize the project:
By default, Eclipse will create this:
package application; import javafx.application.Application; import javafx.stage.Stage; import javafx.scene.Scene; import javafx.scene.layout.BorderPane; public class Main extends Application { @Override public void start(Stage primaryStage) { try { BorderPane root = new BorderPane(); Scene scene = new Scene(root,400,400); scene.getStylesheets().add(getClass().getResource("application.css").toExternalForm()); primaryStage.setScene(scene); primaryStage.show(); } catch(Exception e) { e.printStackTrace(); } } public static void main(String[] args) { launch(args); } } The root node is added to the scene, it must be a class inherited from Parent (the node that can have children) the root node is added to the scene (a special container for the entire content of the node graph), and this in turn for the stage that is shown.
Let's look at the JavaFx class hierarchy:
The most basic abstract class is Node - a node in the scene column, the heirs are provided with fields for adjusting the sizes: (minWidth - the minimum width, minHeight - the minimum height, prefWidth - the preferred width, prefHeight - the preferred height, maxWidth - the maximum width, maxHeight - the maximum height) .
Coordinates of the node: getLayoutX () and getLayoutY ()
relocate (double x, double y) - changes the coordinates of the node, if you need to adjust the position of each coordinate separately, use setLayoutX (double value) and setLayoutY (double value)
It is important to understand that the set coordinates and dimensions (pref, that is, prefer is preferable) when linking, depending on the hierarchy of the node graph and their settings, can differ from those expected. I will give examples a little later.
Node can not contain child elements and this is logical, for this there is a Parent direct heir to Node, to which you can add and remove child nodes. By the way, speaking, there are classes that represent nodes, but do not contain child nodes: Camera, Canvas, ImageView, LightBase, MediaView, Parent, Shape, Shape3D, SubScene, SwingNode.
Today we are interested in a subgroup of Region class heirs (the base class of all container containers), in particular, let's talk about the main descendants of the Pane class about the panels that are most often required in everyday development.
BorderPane
This is a special panel that has its child nodes of the top (setTop (Node)), bottom (setBottom (Note)), left (setLeft (Node)), right (setRight (Node)) and center (setCenter (Node)) positions, add A few buttons in all these positions on the BotderPane:
BorderPane root = new BorderPane(); root.setLeft(new Button("Left")); root.setTop(new Button("Top")); root.setRight(new Button("Right")); root.setBottom(new Button("Bottom")); root.setCenter(new Button("Center")); The top and bottom sections have priority, so they narrow down all the others in height:
When trying to set coordinates for example at the top button:
BorderPane root = new BorderPane(); root.setLeft(new Button("Left")); Button topButton = new Button("Top"); topButton.setLayoutX(20.0); topButton.setLayoutY(20.0); root.setTop(topButton); root.setRight(new Button("Right")); root.setBottom(new Button("Bottom")); root.setCenter(new Button("Center")); The button does not change its position, why is this happening? When arranging children in the layoutChildren method of the BorderPane class, the position of each node is redefined with all settings taken into account. There are several solutions to correct, for example, to place (wrap) a button into an additional suitable container, for example, the base one for all panels.
Pane
BorderPane root = new BorderPane(); root.setLeft(new Button("Left")); // Pane pane = new Pane(); Button topButton = new Button("Top"); topButton.setLayoutX(20.0); topButton.setLayoutY(20.0); pane.getChildren().add(topButton); root.setTop(pane); // root.setRight(new Button("Right")); root.setBottom(new Button("Bottom")); root.setCenter(new Button("Center")); Because Pane does not redefine the position of its children, we get the desired offset:
You can not wrap the button, but simply set an external indent for it using the static setMargin method (Node child, Insets value) :
BorderPane.setMargin(topButton, new Insets(20.0)); Insets - auxiliary class for setting indents, the constructor is overloaded, it can take one argument for all sides, and for each side individually, while we set up one indent for all sides, this is what we got:
Remove indents from the bottom and to the right and get the desired offset of the button:
BorderPane.setMargin(topButton, new Insets(20.0, 0.0, 0.0, 20.0)); Stackpane
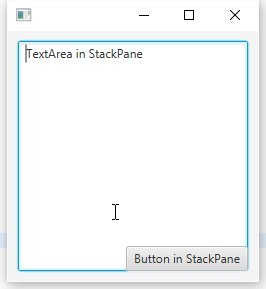
Now let's consider the situation in which the panel imposes on children not only a position, but also tries to stretch them across the entire width and height, filling the entire content area, replace BorderPane and add there first TextArea and Button.
StackPane root = new StackPane(); root.getChildren().add(new TextArea("TextArea in StackPane")); root.getChildren().add(new Button("Button in StackPane")); Scene scene = new Scene(root,250,250); By the way, you can use the method to add several nodes in the desired order:
root.getChildren().addAll(Node1, Node2, ....); What we see is the text field stretched across our panel, and the button was centered:
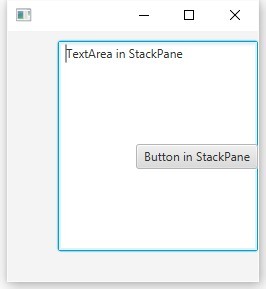
Centering can be adjusted using setAlignment (Pos)
root.setAlignment(Pos.BOTTOM_RIGHT); Indent with setPadding (Insets)
root.setPadding(new Insets(10.0)); You can customize the centering and padding of each node using static methods:
StackPane root = new StackPane(); TextArea textArea = new TextArea("TextArea in StackPane"); StackPane.setMargin(textArea, new Insets(10.0, 0.0, 30.0, 50.0)); Button button = new Button("Button in StackPane"); StackPane.setAlignment(button, Pos.CENTER_RIGHT); root.getChildren().addAll(textArea, button); Result:
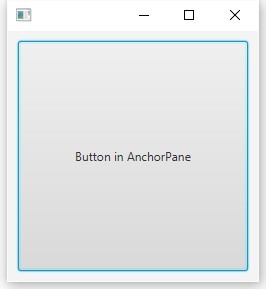
Anchorpane
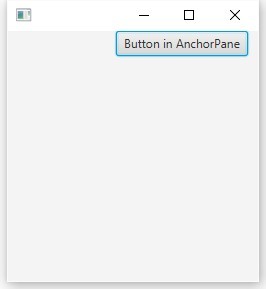
The anchor panel allows the edges of the child nodes to be attached with offsets to the edges of the panel, consider an example:
Add a button and tie it to the right:
AnchorPane root = new AnchorPane();
Button button = new Button("Button in AnchorPane");
root.getChildren().add(button);
AnchorPane.setRightAnchor(button, 10.0);
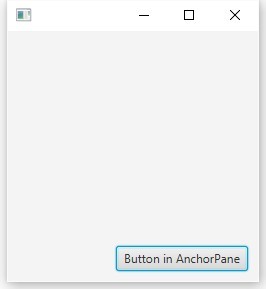
Add a binding to the bottom edge:
AnchorPane.setBottomAnchor(button, 10.0); Now in the left and upper:
AnchorPane.setRightAnchor(button, 10.0); AnchorPane.setTopAnchor(button, 10.0); We get that the edges of the button are now rigidly attached to the edges of the panel, if you start to pull the window, the button will also drag.
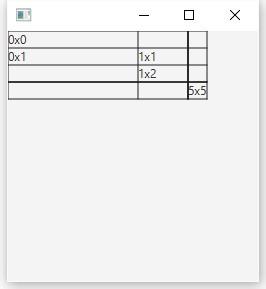
Gridpane
Consider a very useful grid panel, adding children to this panel should be done through the add method (Node child, int columnIndex, int rowIndex) in which the first parameter is added to the node, the second column number, the third row number, here is a simple example:
GridPane root = new GridPane(); // root.setGridLinesVisible(true); root.add(new Label("0x0"), 0, 0); root.add(new Label("0x1"), 0, 1); root.add(new Label("1x1"), 1, 1); root.add(new Label("1x2"), 1, 2); root.add(new Label("5x5"), 5, 5); We see that nodes can be added to any cell, empty columns and rows are created automatically:
To work with columns, there is a special class ColumnConstraints , for this you need to create columns, set them up and add them to the GridPane, for example, if we want to set the widths of the first column to 130, and the second one to 20%:
GridPane root = new GridPane(); root.setGridLinesVisible(true); root.add(new Label("0x0"), 0, 0); root.add(new Label("0x1"), 0, 1); root.add(new Label("1x1"), 1, 1); root.add(new Label("1x2"), 1, 2); root.add(new Label("5x5"), 5, 5); // ColumnConstraints columnConstraints = new ColumnConstraints(); columnConstraints.setPrefWidth(130.0); ColumnConstraints columnConstraints1 = new ColumnConstraints(); columnConstraints1.setPercentWidth(20); root.getColumnConstraints().addAll(columnConstraints, columnConstraints1); // We get:
These are the most basic features, you will need to write a separate article to cover all the subtleties of the GridPane configuration.
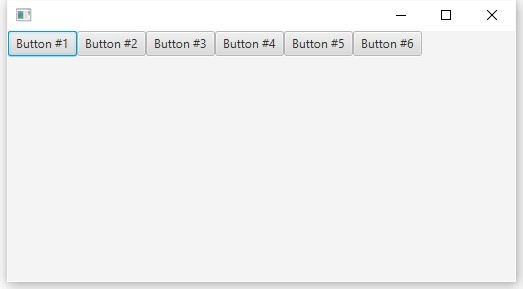
Flowpane
Let's immediately for example, from it it will immediately become clear, add six buttons in FlowPane:
FlowPane root = new FlowPane(); root.getChildren().add(new Button("Button #1")); root.getChildren().add(new Button("Button #2")); root.getChildren().add(new Button("Button #3")); root.getChildren().add(new Button("Button #4")); root.getChildren().add(new Button("Button #5")); root.getChildren().add(new Button("Button #6")); Let's see the result, the button is displayed one by one (by default, FlowPane has a horizontal output Orientation.HORIZONTAL)
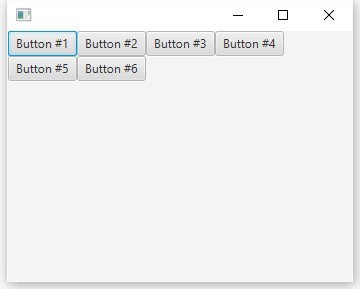
Now, when the window is reduced in width, we see that the child nodes are starting to be transferred:
And accordingly, if you set the vertical orientation
root.setOrientation(Orientation.VERTICAL); When reducing the height of the window we get the transfer:
Vertical and horizontal indents between elements can be configured using:
root.setVgap(8); root.setHgap(4); TilePane
The work of this panel is similar to the work of FlowPane, the difference is that the child nodes are placed in the grid of the cell of the same size, we give the previous example, but this time let one button be larger than the others:
As we see all the nodes are now in the "tile" of the same size, stretched over the largest node.
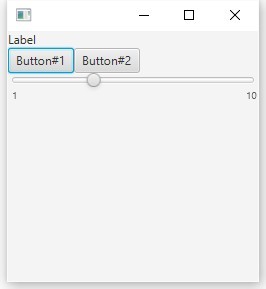
HBox and VBox
These are the usual horizontal and vertical lists, combine them to achieve the desired result:
VBox root = new VBox(); HBox hBox = new HBox(); hBox.getChildren().addAll(new Button("Button#1"), new Button("Button#2")); Slider slider = new Slider(1.0, 10.0, 4.0); slider.setShowTickLabels(true); root.getChildren().add(new Label("Label")); root.getChildren().addAll(hBox, slider); These are all inheritors of the Pane class, thank you for your attention.
Source: https://habr.com/ru/post/305282/
All Articles