How to start developing a large, atypical project. Practical guide
Choosing a backend platform
To create a high-quality and productive Web application, it is necessary to pay due attention to the choice of development platform. This should be addressed immediately after you have familiarized yourself with the tasks that this application should perform.
In this case, an important factor in the terms of reference was the allegedly high load on the service. There are many good tools on the market with which you can solve the problem. We use some of them in development, but this time the choice fell on Yii2.
If we take a closer look at this framework, we can single out a number of advantages:
- High performance;
- Convenience in working with databases;
- Caching of pages and separate fragments;
- Interception and error handling;
- Authentication and authorization;
- Using database migration makes team work easier.
By installing the advanced template, we already get some of the features we need, such as user registration forms and logging into the site with forgotten password recovery functionality. Another significant advantage of this template is that the application is divided into frontend (user part) and backend (administrator part).
When designing the structure of the application, it was decided to split the logical parts into modules. Although some modules are dependent on each other, modular programming allows you to conveniently extend and maintain the code.
The choice of platform for the frontend
Since our application assumes the presence of many interactive controls that will interact with each other and with the server, we decided that jQuery, which comes in a box with the advanced pattern, needs to be enhanced by adding AngularJS to the frontend (because Angular was created for this) . It allows you to enter a template without breaking the structure of the HTML document itself.
Thus, we can make a layout, then add template attributes, but the coder can continue working with the document as if it were static HTML. That is, it is very easy to change the design during the development process, without relying on a specific layout and class attributes, or id html elements. This is a big plus, especially if you want to share the work on the user interface. This feature helped us to distribute tasks in teamwork. One person imposes, the second introduces banding and binds the view model to the backend.
The advantages of using AngularJS include:
- Quite low entry threshold;
- Ease of building complex dependency chains;
- Parallel teamwork;
- The ability to maximize the use of HTML attributes, minimizing javascript code;
- Good support from the company and the community;
- Ease of working with REST.
Implementation of the modular structure
We hope that you are familiar with Yii2 and have already written at least a few applications on this framework. Further we will pay attention only to those solutions that we applied in our project.
We used the advanced pattern, a number of advantages of which were described above. But already at this stage, when installing yii2-app-advanced through the composer, many users encounter the following error when trying to open a website in a browser:
D: \ OpenServer \ domains \ yii2-app-advanced / vendor \ bower / jquery / dist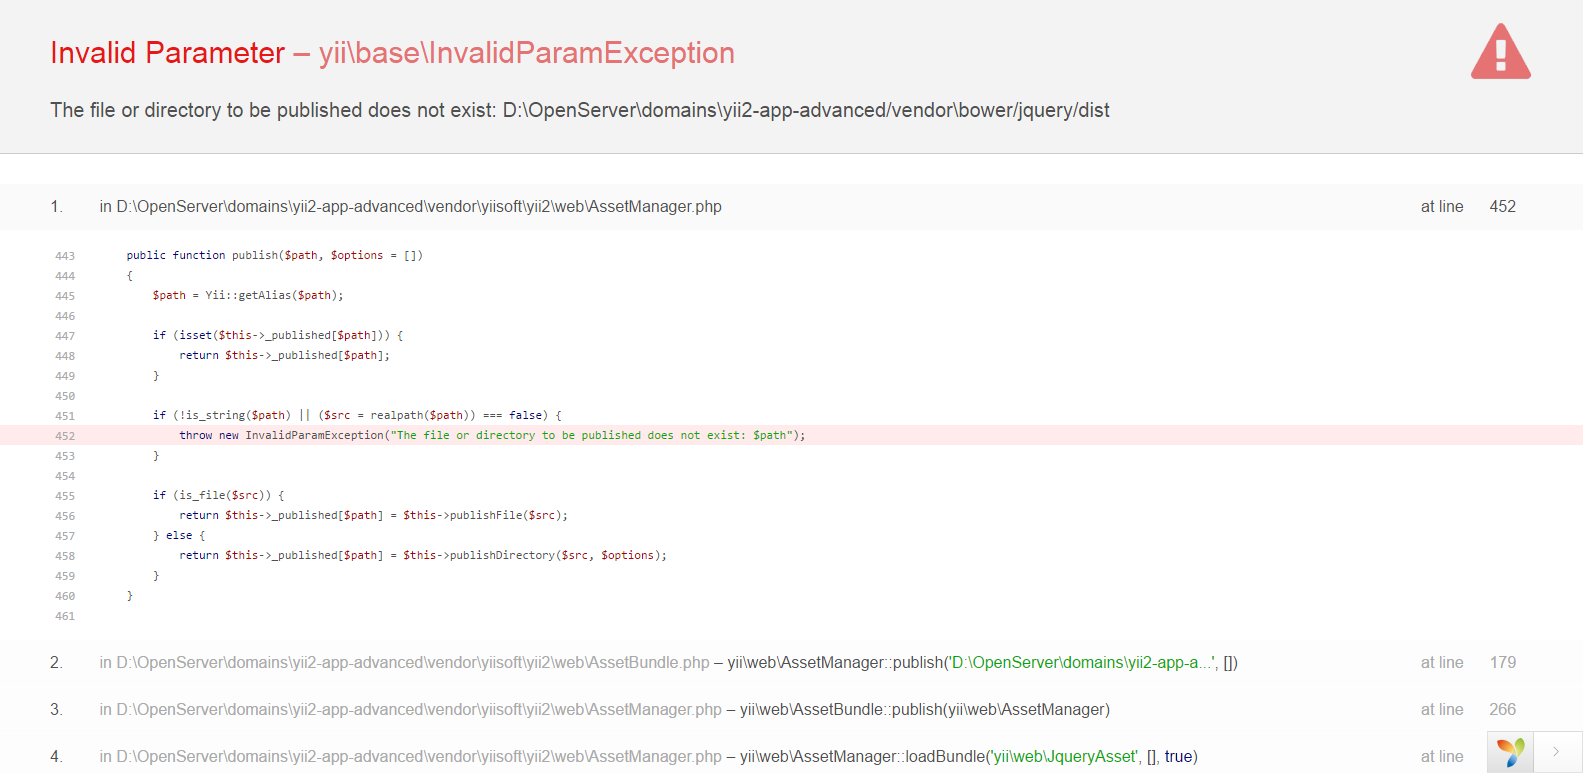
You need to install the composer asset plugin and solve the problem with the following commands:
cd /path/to/your/project composer global require "fxp/composer-asset-plugin:~1.1" composer update Also check if there are such lines in your composer.json file:
{ "extra": { "asset-installer-paths": { "npm-asset-library": "vendor/npm", "bower-asset-library": "vendor/bower" } } } Since we have organized the modular structure of the application, first of all we will add alias for our module folder to the \ common \ config \ bootstrap.php file
<?php Yii::setAlias('@common', dirname(__DIR__)); Yii::setAlias('@frontend', dirname(dirname(__DIR__)) . '/frontend'); Yii::setAlias('@backend', dirname(dirname(__DIR__)) . '/backend'); Yii::setAlias('@console', dirname(dirname(__DIR__)) . '/console'); Yii::setAlias('@modules', dirname(dirname(__DIR__)) . '/modules'); Now all the modules that we will write will be located in the / modules folder.
It is time to create the first module in this project. Let's start with the module that will be responsible for displaying the main pages of the site, such as “Homepage”, contact page, 404 page, “About us” page. To do this, we can use the Gii generator, which can write code for us.
We pass in your browser on the link and get to the main page of the generator.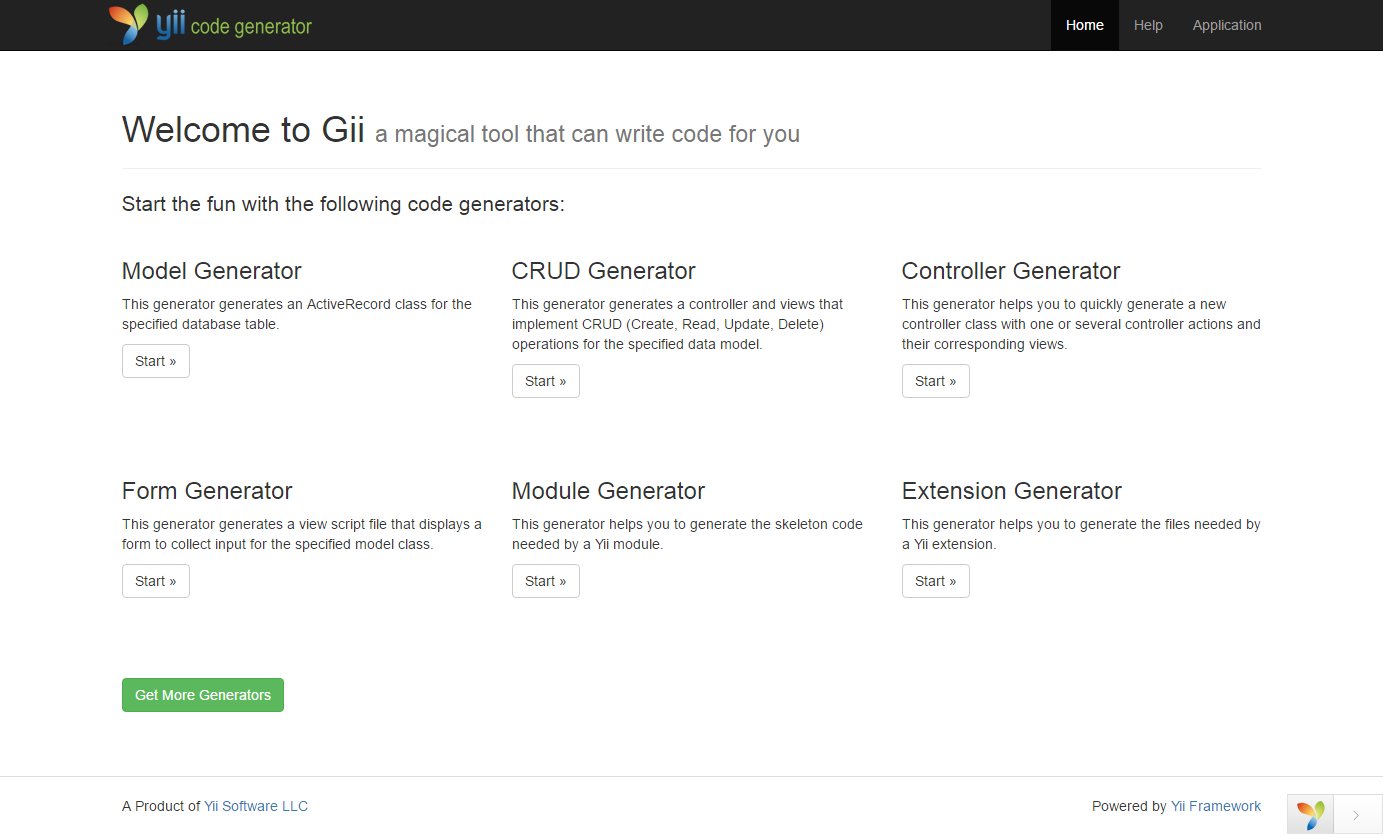
At this stage, you most likely have already created a database and made the appropriate settings for connecting to it in the configuration file \ environments \ dev \ common \ config \ main-local.php
… 'components' => [ 'db' => [ 'class' => 'yii\db\Connection', 'dsn' => 'mysql:host=localhost;dbname=your-db-name', 'username' => 'db-user-name', 'password' => 'db-user-password', 'charset' => 'utf8', ], … Press the Start button in the 'Module Generator' block and get into the module generation view.
Fill two inputa as follows:
Module Class: modules\site\Module Module ID: site Click the 'Preview' button, then 'Generate' and see how the files of the first module are created. It remains only to connect it in the configuration file as suggested by the Gii generator.
Add the following lines to the file \ common \ config \ main.php
...... 'modules' => [ 'site' => [ 'class' => 'modules\site\Module', ], ], ...... And correct the frontend \ frontend \ config \ main.php configuration file by adding the line:
...... 'defaultRoute' => 'site/site/index', ...... It determines that our home page is located in the 'site / site / index' route, that is, in our Site module.
In the same file, we delete the line
'controllerNamespace' => 'frontend\controllers' This needs to be done, because now each module will define its own namespaces for the controllers. Talk about this further.
Since we want our modules to be as independent as possible from each other, and they can be used from project to project (some modules can be connected to the project and others disconnected), we will support the frontend functionality and the content management functionality of the module in the module in the module . Therefore, we will store the controllers, models and views of each of these parts in separate directories. The directory structure of the module will be as follows:
… site -- controllers -- -- backend -- -- frontend -- models -- -- backend -- -- frontend -- views -- -- backend -- -- frontend … Accordingly, the controller and view that we already have in the module must be transferred to the appropriate frontend folders and do not forget to change the namespace in the controller to namespace modules \ site \ controllers \ frontend;
We will rewrite the code of the module file so that it is clear which controller to contact when working on the frontend, and which one when working in the admin panel. Thus, at the frontend, it will access the controller in the / modules / site / controllers / frontend folder, and when working in the admin panel, use the controller in the / modules / site / controllers / backend folder.
<?php namespace modules\site; /** * site module definition class */ class Module extends \yii\base\Module { /** * @inheritdoc */ public $controllerNamespace = 'modules\site\controllers\frontend'; /** * @var boolean -. */ public $isBackend; /** * @inheritdoc */ public function init() { parent::init(); // , frontend backend if ($this->isBackend === true) { $this->controllerNamespace = 'modules\site\controllers\backend'; $this->setViewPath('@modules/site/views/backend'); } else { $this->setViewPath('@modules/site/views/frontend'); } } } And in order to configure access to the site module on the backend, you need to designate it in the backend configuration file \ backend \ config \ main.php as follows:
... 'modules' => [ 'site' => [ 'isBackend' => true, ] ], ... and replace the string
'controllerNamespace' => 'backend\controllers', on
'defaultRoute' => 'site/site/index', Now you can create controllers in the / modules / site / controllers / backend folder for backend. I will transfer the SiteController.php controller from the / backend / controllers folder to / modules / site / controllers / backend and replace the namespace in it, respectively.
After the manipulations on refactoring existing controllers, models and views and transferring them to our module site, it began to be transformed and take the following form:
In this article I tried to explain all the advantages of the technologies we chose for an interesting large project, suggested a method for implementing a modular application on the Yii2 framework. This is the first post of a series of articles in which I want to share with you all the ways that we used to solve various atypical tasks in the development of this project.
In the next article, I will describe setting up routing and creating a URL using urlManager for each module separately. And also lay out the process of creating your own rules for specific URLs by writing a class that extends UrlRuleInterface.
Thanks for attention!
Material prepared: greebn9k (Sergey Gribnyak), pavel-berezhnoy (Pavel Berezhnoy), silmarilion (Andrey Khakharev)
')
Source: https://habr.com/ru/post/304908/
All Articles