JavaFX visual creation of a simple application and native packaging in Eclipse
Today I will tell you how to create a simple JavaFX application step by step from scratch, which is required for this, show you how to make a Windows Installer (msi) for your application.

First we need a development environment, we will use Eclipse, at the moment the latest version is called Neon (released on June 22, 2016) and can be downloaded here .
Next, download the installer, choose the version for Java developers, the default path will be C: \ Users \% USERNAME% \ eclipse, the file will be located there in the java-neon \ eclipse directory.
')
After launching Eclipse, you will immediately be prompted to choose a working directory, you can leave the default directory, just make sure that the path to it does not contain Russian letters, in particular because of% USERNAME%, otherwise you may experience problems with these paths later. If you nevertheless chose this directory as a workspace, it doesn't matter, you can change it in the following: File -> Switch Workspace -> Other ...
Now for the development of JavaFX applications and the subsequent assembly we need a plug-in for Eclipse, detailed installation instructions can be found here: www.eclipse.org/efxclipse/install.html
Important! Before you start creating an application, you need to change the standard JRE without a compiler to a JDK. Let's connect the previously downloaded JDK and make it default: go to the Window-> Preferences settings:

Choose a standard virtual machine:

Specifies the path to the directory on your computer where the pre-downloaded JDK version is located:
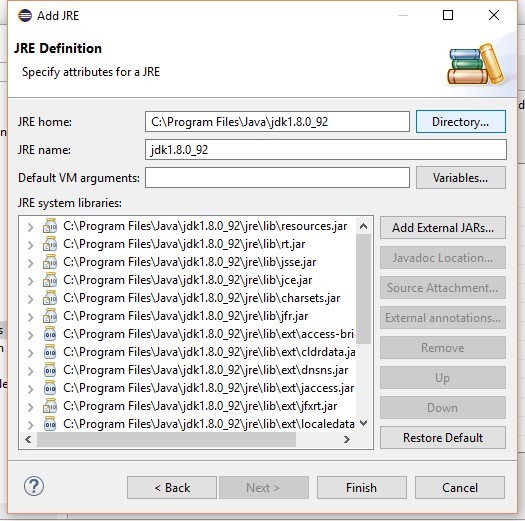
After clicking on Finish, install the JDK as default:
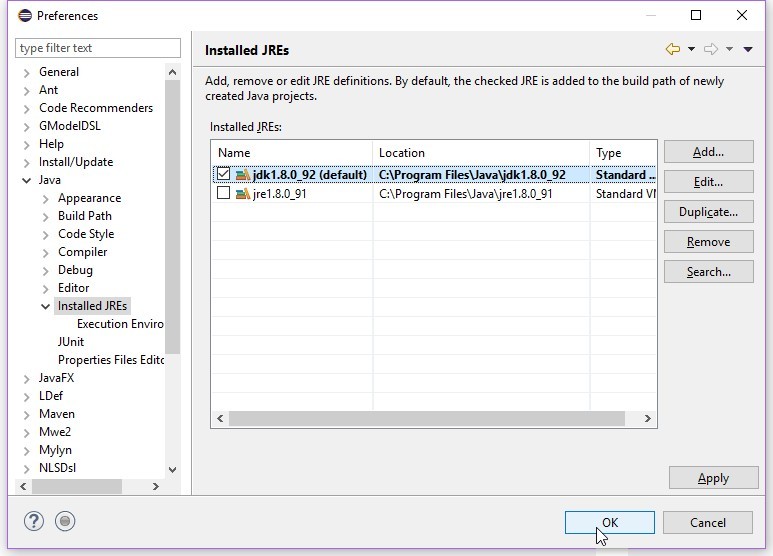
We also specify it as default for JavaSE-1.8:

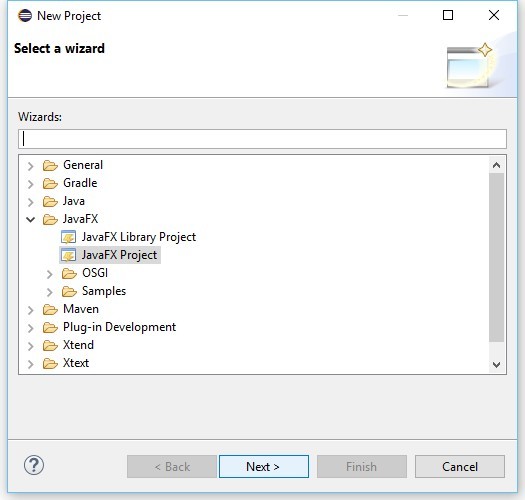
Now let's get to the most interesting, create a new JavaFX project File-> New-> Project ...
We are setting up the project, I think everything is obvious here:

Let's write our small application (in the directory with Main.java should be: the favicon-16x16.png icon and the click.wav sound):
Run:

Great, now we need to package this application for the end user, in the root directory is the intended file build.fxbuild, which generates the xml file, which is used in turn by the Ant builder, we will configure this file:

If you click Generate ant build.xml only in the right part, the root folder creates a configuration build for Ant build \ build.xml before you run it, you need to download the Wix Toolset from the resource: wix.sf.net (if an exe is generated, then Inno Setup is required for it from the jrsoftware.org resource . Otherwise, Ant will generate everything except for the .msi we need in the console when building it and write about it. After you install Wix, you need to set the path to the bin directory in the environment variables and reboot the computer.
Run Ant build:

After the build, the msi installer will appear, which can be launched (the application is defaulted to C: \ Program Files \ HabrApp):

This article is a reminder about the native assembly of the installation file using Eclipse, it does not understand the intricacies of JavaFx. Thank you all for your attention.
First we need a development environment, we will use Eclipse, at the moment the latest version is called Neon (released on June 22, 2016) and can be downloaded here .
Next, download the installer, choose the version for Java developers, the default path will be C: \ Users \% USERNAME% \ eclipse, the file will be located there in the java-neon \ eclipse directory.
')
After launching Eclipse, you will immediately be prompted to choose a working directory, you can leave the default directory, just make sure that the path to it does not contain Russian letters, in particular because of% USERNAME%, otherwise you may experience problems with these paths later. If you nevertheless chose this directory as a workspace, it doesn't matter, you can change it in the following: File -> Switch Workspace -> Other ...
Now for the development of JavaFX applications and the subsequent assembly we need a plug-in for Eclipse, detailed installation instructions can be found here: www.eclipse.org/efxclipse/install.html
Important! Before you start creating an application, you need to change the standard JRE without a compiler to a JDK. Let's connect the previously downloaded JDK and make it default: go to the Window-> Preferences settings:
Choose a standard virtual machine:
Specifies the path to the directory on your computer where the pre-downloaded JDK version is located:
After clicking on Finish, install the JDK as default:
We also specify it as default for JavaSE-1.8:
Now let's get to the most interesting, create a new JavaFX project File-> New-> Project ...
We are setting up the project, I think everything is obvious here:
Let's write our small application (in the directory with Main.java should be: the favicon-16x16.png icon and the click.wav sound):
package application; import java.net.URL; import javafx.application.Application; import javafx.geometry.Insets; import javafx.stage.Stage; import javafx.stage.StageStyle; import javafx.scene.Cursor; import javafx.scene.Scene; import javafx.scene.control.Alert; import javafx.scene.control.Button; import javafx.scene.control.Tooltip; import javafx.scene.image.Image; import javafx.scene.control.Alert.AlertType; import javafx.scene.layout.AnchorPane; import javafx.scene.media.AudioClip; public class Main extends Application { @Override public void start(Stage primaryStage) { try { AnchorPane root = new AnchorPane(); root.setPadding(new Insets(5.0)); Button button = createButton(); AnchorPane.setBottomAnchor(button, 0.0); AnchorPane.setTopAnchor(button, 0.0); AnchorPane.setBottomAnchor(button, 0.0); AnchorPane.setRightAnchor(button, 0.0); AnchorPane.setLeftAnchor(button, 0.0); root.getChildren().add(button); Scene scene = new Scene(root, 300, 300); primaryStage.setTitle(""); primaryStage.getIcons().add(new Image(getResource("favicon-16x16.png").toExternalForm())); primaryStage.setScene(scene); primaryStage.show(); } catch(Exception e) { e.printStackTrace(); } } private Button createButton() { Button result = new Button(""); result.setTooltip(new Tooltip(" , !")); result.setCursor(Cursor.HAND); result.setOnMouseClicked(mouseEvent -> { new AudioClip(getResource("click.wav").toString()).play(); showDialog(); }); return result; } private URL getResource(String name) { return getClass().getResource(name); } private void showDialog() { Alert dialog = new Alert(AlertType.INFORMATION); dialog.initStyle(StageStyle.UTILITY); dialog.setTitle(""); dialog.setHeaderText(" !"); dialog.showAndWait(); } public static void main(String[] args) { launch(args); } } Run:
Great, now we need to package this application for the end user, in the root directory is the intended file build.fxbuild, which generates the xml file, which is used in turn by the Ant builder, we will configure this file:
If you click Generate ant build.xml only in the right part, the root folder creates a configuration build for Ant build \ build.xml before you run it, you need to download the Wix Toolset from the resource: wix.sf.net (if an exe is generated, then Inno Setup is required for it from the jrsoftware.org resource . Otherwise, Ant will generate everything except for the .msi we need in the console when building it and write about it. After you install Wix, you need to set the path to the bin directory in the environment variables and reboot the computer.
Run Ant build:
After the build, the msi installer will appear, which can be launched (the application is defaulted to C: \ Program Files \ HabrApp):
This article is a reminder about the native assembly of the installation file using Eclipse, it does not understand the intricacies of JavaFx. Thank you all for your attention.
Source: https://habr.com/ru/post/304856/
All Articles